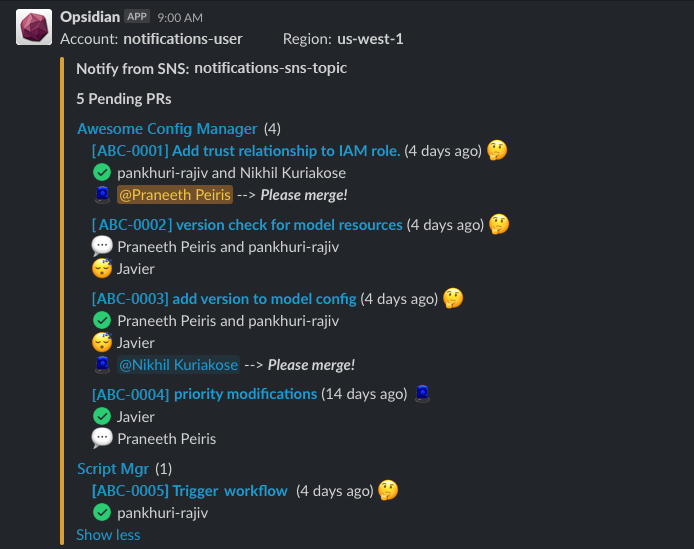
Send GitHub Pull Requests notifications to Slack, Email or anywhere.
This repository contains an independently runnable code which will retrieve open Pull Requests from a given set of GitHub repositories, and then sends a notification to the configured target such as Slack or Email.
This script is NOT a read-made solution. So you need to change several things before using this script.
The example config file is placed inside configs as config.sample.json and you should update the configs to match your requirements.
{
  "organization": "my-org",
  "global_min_approvals": 2,
  "pr_duration_warnings": {
    "show_warnings": true,
    "warnings": [
      [2, "low"],
      [5, "medium"],
      [10, "high"],
      [14, "critical"]
    ]
  },
  "show_open_since": true,
  "show_open_pr_count": true,
  "max_names_limit": 2,
  "ignore_repos_with_zero_prs": true,
  "repositories": [
    {
      "repo": "my-repo",
      "min_approvals": 2
    },
    {
      "repo": "my-other-repo",
      "min_approvals": 2
    }
  ]
}-
organization(string)
Unique name (login name) of the organization you want to work with. i.e. https://github.com/organization/ -
global_min_approvals(int)
How many minimum number of approvals required for a PR to be able to merge. When a repository section doesn't havemin_approvalsdefined, this value is used. This parameter is only used to notify the owner of the PR. -
pr_duration_warnings-
show_warnings(boolean)
Whether to show warning emojis when the PR is getting old. -
warnings
List of pairs representing the stages of the PR warning according to the number of days since it was open.i.e.
[2, "low"]--> Any PR open for 2 days or less will be marked aslow.
If it's more than 2 days, it will be caught by[5, "medium"]and will be marked asmediumif it's open for 5 days or less.
You have the flexibility of adding more warning levels (with number of days), but make sure the label (second element) is unique.
-
-
show_open_since(boolean)
Shows the number of days since the PR was open.
i.e.Some random PR (4 days ago) -
show_open_pr_count(boolean)
Whether to show the number of open PRs per repository (after the repository name).
i.e.my awesome repo (3) -
max_names_limit(int)
How many GitHub usernames should be shown before getting truncated.
i.e. Ifmax_names_limitis set to 2:
-Developer X, Developer Y and 3 others(for five names)
-Developer X and Developer Y(for only two names) -
ignore_repos_with_zero_prs(boolean)
If enabled, repositories with zero open PRs will not be added in the repo. -
repositories(list)repo- Name of the repositorymin_approvals- Minimum number of approvals needs before notifying the owner. This overridesglobal_min_approvals.
For now, we can put the config file either in an S3 bucket or deploy along with the code.
You can use Config.load_from_s3(bucket_name, key) or Config.load_from_local(file_name) functions to load the configs respectively.
If you're using the local file, pass the config file path asCONFIG_FILE parameter.
If you're using a config file from an S3 bucket, you can pass BUCKET_NAME and CONFIG_FILE_S3_PATH parameters.
Feel free to add your own ways of reading configs (i.e. a NoSQL table) and make a PR.
Advice: Use the local file only for testing to avoid having to re-deploy the code when you changed the config.
You need to generate a Personal Access Token from the Developer Settings in GitHub, and set GITHUB_TOKEN environment varibale, to enable this script to read the repositories. Make sure your account (and the token) has permission to read from the given organization and the desired repositories.
Note: Make sure you ONLY give read-only access to the generated token to avoid any accidental changes to the repositories (if you're to change the code).
Currently it supports two main types of message formats.
- Slack (for both SNS based and Incoming WebHook based)
- HTML
formatters.slack.RepoFormatter and formatters.slack.PRFormatter classes will generate the message in the Slack message format.
formatters.html.RepoFormatter and formatters.html.PRFormatter classes will generate the message in basic HTML.
TODO: Add CSS to the HTML elements.
If you need to add more formatting options, you can create sub-classes of formatters.BaseRepoFormatter and/or formatters.BasePRFormatter and re-implement any protected methods you wish.
from formatters import NameFormatter
from formatters.html import RepoFormatter, PRFormatter
...
name_formatter = NameFormatter(config)
pull_formatter = PRFormatter(config, name_formatter)
repo_formatter = RepoFormatter(config, pull_formatter)You have the capability of pushing the generated message to several targets. Here are the currently available targets.
- Amazon SNS (for both Slack and HTML)
- HTTP Endpoint
- Slack Incoming WebHook (sub-class of HTTP Endpoint)
You may add any targets as you wish, by simply implementing a send(title, message) method or any function you'd like.
For the moment, there is only a scheduled AWS Lambda function defined in cloudformation/daily_report.yaml.
You can however use this code in any environment such as Amazon EC2/ECS, GCP Functions, or even on your pc.
However, no CloudFormation templates are available (yet) for other environments and feel free to create a PR if you like.
The code is (almost) platform-independent, yet you need to main.handler function parameters accordingly.
If you want to use this as a scheduled Lambda function, you can check the Deployment section.
Note: When you deploy, make sure the environment (Lambda, ECS etc.) has relavant permission to read the configs and write to the provided target.
cd path_to_project

python3 -m venv .venv
source .venv/bin/activate
pip install -r requirements.txt
You can test the code on your local machine by passing the relevant parameters at the runtime.
PYTHONPATH=./src/ CONFIG_FILE=configs/config.json python src/main.py
These parameters will change depending on the sub-components you're using.
You can easily deploy this code as a AWS Lambda function with the given cloudformation file.
However, you need to change some parameters in the Makefile.
BASE_STACK_NAME- CloudFormation Stack prefixBUCKET- Bucket where the Lambda package will be uploaded and the config file is stored.TEAM- Team name to be added as tags (no important)
Then, you can deploy the stack using the below command.
make release TARGET=daily_report
You can pass ENV parameter as well.
make release TARGET=daily_report ENV=production
If you think of adding more features, you're more than welcome to create a PR and improve this code.
