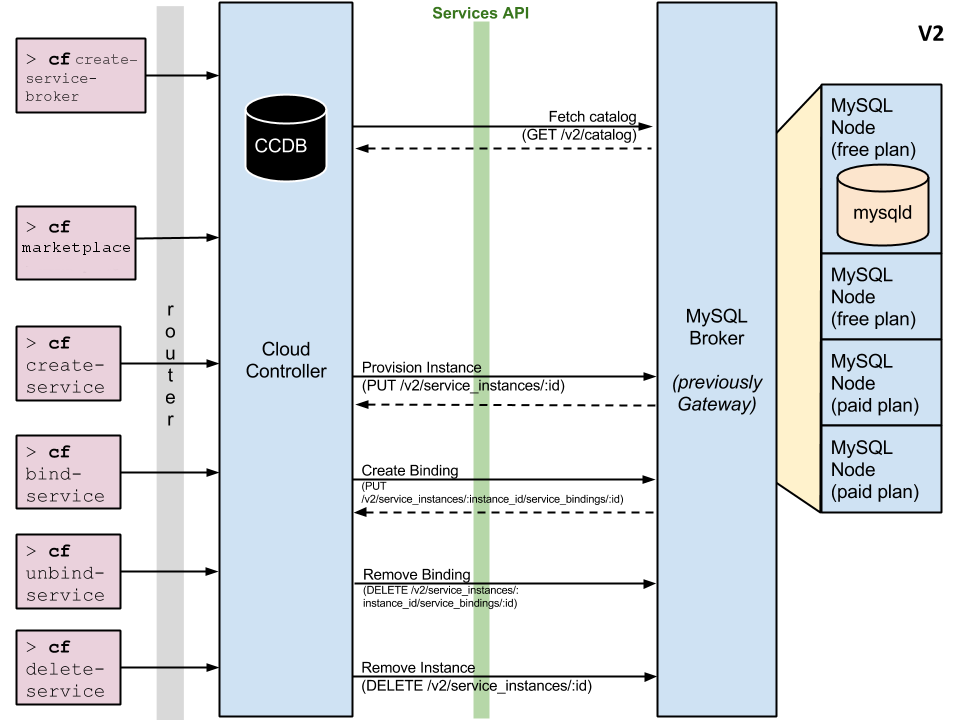
This is a Node.js version of MySQL Service Broker for Cloud Foundry which can be deployed as a Node.js application to Cloud Foundry or anywhere the node.js framework works.
The specification complies with the Service Broker API v2. Some other official documents of Cloud Foundry - Managing Service Brokers & Access Control - were also be referenced.
Appreciate the original Java example which can be found here.
- Already a lot of Service Broker examples in Java and Ruby - some people might be looking for something different. Hope this one can be used as a template for beginners like myself.
- MySQL Community Edition can be easily found and installed on Windows, Mac OS X or Linux and monitored with a good GUI admin tool called MySQL Workbench - easy for local environment test.
- Trust Microservices in Node.js fits this kind of task better.
- I am a database engineer without too much javascript experience and happen to notice that Node.js is so powerful and make applications and services easy to compose.
###Cloud Foundry Service Broker API v2
The broker can be deployed to any place where both sides - Cloud Foundry and MySQL Server - can be reached.
Starting with a local MySQL server. Go to http://dev.mysql.com/downloads/mysql/ and download and install the proper release for your OS.
I also prefer to use MySQL Workbench for GUI management but it is optional.
Clone this repository.
git clone https://github.com/komushi/cf-mysql-node-broker
cd cf-mysql-node-broker
Open cf-mysql-node-broker/server/app.js and uncomment the following lines. Hope they match your default settings.
// process.env['host'] = "localhost";
// process.env['port'] = "3306";
// process.env['user'] = "root";
// process.env['password'] = "";
Remeber to install node.js and npm first. Then, install the dependencies:
npm install
Then, run the Application:
npm start
You should be able access your app at with test/test as credentials. I just decided to use the basic authentication to make the code simple.
http://localhost:9000/v2/
Let's test the Microservices now.
curl -i -X GET http://test:test@localhost:9000/v2/catalog
HTTP/1.1 200 OK X-Powered-By: Express access-control-allow-origin: * access-control-allow-methods: GET,PUT,POST,DELETE,OPTIONS access-control-allow-headers: Content-Type, Authorization, Content-Length, X-Requested-With content-type: application/json content-length: 85107 Date: Fri, 20 Feb 2015 09:40:55 GMT Connection: keep-alive
{"services":[{"name":"mac-mysql","id":"3101b971-1044-4816-a7ac-9ded2e028079","description":"MySQL service for application development and testing","bindable":true,"tags":["mysql","relational"],"max_db_per_node":250,"metadata":{"displayName":"MySQL On Mac".....
curl -i -X PUT http://test:test@localhost:9000/v2/service_instances/myinstance
HTTP/1.1 200 OK X-Powered-By: Express access-control-allow-origin: * access-control-allow-methods: GET,PUT,POST,DELETE,OPTIONS access-control-allow-headers: Content-Type, Authorization, Content-Length, X-Requested-With content-type: application/json content-length: 2 Date: Fri, 20 Feb 2015 09:47:14 GMT Connection: keep-alive
{}
Check your MySQL server, now you should have a MySQL schema called myinstance.
curl -i http://test:test@localhost:9000/v2/service_instances/myinstance/service_bindings/mybindingid -d '{
"plan_id": "plan-guid-here",
"service_id": "service-guid-here",
"app_guid": "app-guid-here"
}' -X PUT
HTTP/1.1 200 OK X-Powered-By: Express access-control-allow-origin: * access-control-allow-methods: GET,PUT,POST,DELETE,OPTIONS access-control-allow-headers: Content-Type, Authorization, Content-Length, X-Requested-With content-type: application/json content-length: 210 Date: Fri, 20 Feb 2015 09:49:55 GMT Connection: keep-alive
{"credentials":{"uri":"mysql://0fd7c4b7475c3cbd:d235440f6be97030@localhost:3306/myinstance","username":"0fd7c4b7475c3cbd","password":"d235440f6be97030","host":"localhost","port":"3306","database":"myinstance"}}
Check your MySQL server, now you should have a user which has privileges of the schema myinstance. Remember the user name is generated by the binding id named mybindingid.
curl -i 'http://test:test@localhost:9000/v2/service_instances/myinstance/service_bindings/mybindingid?service_id=service-id-here&plan_id=plan-id-here' -X DELETE
HTTP/1.1 200 OK X-Powered-By: Express access-control-allow-origin: * access-control-allow-methods: GET,PUT,POST,DELETE,OPTIONS access-control-allow-headers: Content-Type, Authorization, Content-Length, X-Requested-With content-type: application/json content-length: 2 Date: Fri, 20 Feb 2015 09:55:49 GMT Connection: keep-alive
{}
Check your MySQL server, the user is gone.
curl -i -X DELETE http://test:test@localhost:9000/v2/service_instances/myinstance
HTTP/1.1 200 OK X-Powered-By: Express access-control-allow-origin: * access-control-allow-methods: GET,PUT,POST,DELETE,OPTIONS access-control-allow-headers: Content-Type, Authorization, Content-Length, X-Requested-With content-type: application/json content-length: 2 Date: Fri, 20 Feb 2015 09:58:57 GMT Connection: keep-alive
{}
This time the schema myinstance is also gone.
If you are confident enough about this example you can skip the local test and deploy it to a web server which supports Node.js.
Clone this repository,
git clone https://github.com/komushi/cf-mysql-node-broker
cd cf-mysql-node-broker
Remember to install cf cli first. Then, push the application:
cf push
You can access your app at test/test as credentials.
http://cf-mysql-node-broker.<your-cf-app-domain>/v2
Create Service Broker with admin access.
cf create-service-broker mysqlbroker test test http://cf-mysql-node-broker.<your-cf-app-domain>
Make the service available to all the organizations.
cf enable-service-access mac-mysql
Set MySQL credentials as environment variables to the broker application.
cf set-env cf-mysql-node-broker host yourmysqlhost
cf set-env cf-mysql-node-broker port yourmysqlport
cf set-env cf-mysql-node-broker user 3306
cf set-env cf-mysql-node-broker password rootpassword
Restart the broker application to enable those environment variables.
cf restart cf-mysql-node-broker
You are now able to create MySQL schema and bind users to your applications.
