Plug-in based, Real-time Ultrasound
PRETUS is a lightweight software that creates, at run-time, a real-time imaging pipeline.
PRETUS is a plug-in based, lightweight software for real time image analysis, data collection, and operator guidance, developed within the iFIND project.
PRETUS functionality is brought in through plug-ins that are connected in sequence in the user-defined pipeline.
Configuration information as well as data is passed from a plug-in to the next embedded in an object of the the ifind::Image class.
This class, together with convenience readers and writers make up the Common tools.
- Lead development: Alberto Gomez
- Support: pretus@googlegroups.com.
If you use PRETUS please cite our SoftwareX article: Alberto Gomez, Veronika A. Zimmer, Gavin Wheeler, Nicolas Toussaint, Shujie Deng, Robert Wright, Emily Skelton, Jackie Matthew, Bernhard Kainz, Jo Hajnal, Julia Schnabel. "PRETUS: A plug-in based platform for real-time ultrasound imaging research", in SoftwareX, vol 17, 2022
@misc{gomez2021pretus,
      title={PRETUS: A plug-in based platform for real-time ultrasound imaging research},
      journal = {SoftwareX},
      volume = {17},
      pages = {100959},
      author={Alberto Gomez and Veronika A. Zimmer and Gavin Wheeler and Nicolas Toussaint and Shujie Deng and Robert Wright and Emily Skelton and Jackie Matthew and Bernhard Kainz and Jo Hajnal and Julia Schnabel},
      year={2022},
      issn = {2352-7110},
      doi = {https://doi.org/10.1016/j.softx.2021.100959},
      url = {https://www.sciencedirect.com/science/article/pii/S2352711021001849}
}
- Alberto Gomez
- Nicolas Toussaint
- Gavin Wheeler
- Veronika Zimmer
- Miguel Xochicale (documentation and testing)
After build and install (see build instructions below), PRETUS can be launched with a convenience bash script:
./launch_pretus -h
The -h option will display the options for the available plugins.
The actual plugin pipeline can be specified with the -pipeline option, and then followed by any plugin-specific options, for example 2 valid calls, and hypothetical associated outputs, would be:
./launch_pretus -pipeline "videomanager>standardplanedetection>gui" --videomanager_input /folder1/video.mp4

./launch_pretus -pipeline "filemanager>pythonalgorithm>cppalgorithm>gui" --filemanager_input /folder2/files/

The software will load all plug-ins found in the plug-in folder.
Such folder can be given a default value at build time (defined through CMake with the variable PLUGIN_FOLDER), or can be set at any time in the config file <$HOME>/.config/iFIND/PRETUS.conf.
This configuration file is automatically created the first time the software is run.
If multiple plug-ins folders are required, they can be colon-separated and within double quotation marks, e.g. the file may look like this:
[MainApp]
plugin_folder="folder1/release/lib;/fodler1/subfolder2/lib"
Functionality is brought in via plug-ins. Al plug-ins must inherit the class Plugin in the PluginLib library.
Please read the documentation for each plug-in in terms of dependencies, build instructions, etc.
Two plugins (CppAlgorithm and PythonAlgorithm) are provided as tutorials to create new ones.
If you would like to contribute to PRETUS, please read the contribution guidelines.
PRETUS is currently provided as source code only, so users must build it. Follow the instructions below and if you have trouble please get in touch using the users group: pretus@googlegroups.com.
The requirements are:
- CMake 3.15
- Qt 5 (5.12)
- HDF5 1.10.4
- VTK 8.2.0
- OpenCV 3.4.4
- ITK 5.1.2
- Boost 1.71
- GCC 8.4
- Anaconda
- PyBind11
Below the order of building and whether other versions might work is indicated.
We suggest installing CUDA, then python and python dependencies , then C++ dependencies, and then building PRETUS itself.
CUDA is only required to run some of the plug-ins in the GPU, specifically those using deep learning models via tensorflow or pytorch. We have tested with CUDA 10.2. When modern GPUs are available, more modern versions of CUDA (11+) are preferred.
Python is not required to build PRETUS, however it is recommended and required for many plug-ins, such as Plugin_pythonaAlgorithm and Plugin_standardPlaneDetection.
As a result, we suggest to start by installing python with conda, then creating a virtual environment for PRETUS, and finally installing the required packages within the pretus environment using pip:
-
Install
Anaconda, following the instructions from here. -
Install pip:
conda install pip -
Create an environment for PRETUS using python 3.7
conda create --name pretus python=3.7 -
Install required python packages. We provide a
requirements_low.txtfile that can be used for systems with a low performance graphics card (tested with GeForce GTX 960M):conda activate pretus pip install -r pretus/src/Plugins/requirements_low.txt
You can install the required packages manually. The main ones to install, and their versions, are:
- dill==0.3.4
- h5py==2.10.0
- json5==0.9.6
- Keras==2.3.1
- matplotlib==3.4.3
- numpy==1.21.4
- opencv-python==4.5.4.58
- pandas==1.3.4
- Pillow==8.4.0
- scikit-image==0.18.3
- scikit-learn==1.0.1
- scipy==1.7.2
- SimpleITK==2.1.1
- tensorflow-gpu==1.14.0
- torch==1.10.0 (installed for the corresponding CUDA version, in this case 10.2)
- torchvision==0.11.1
If you are in Ubuntu 20.04x64, you can follow conda installation of the virtual-environment.
The dependencies should be built in the following order.
The build instructions and options assume, unless otherwise stated, that each library will be build from source using CMake and that the required options are CMake options.
Pre-requisites (likely already in your system!):
- Boost
- Tested with 1.71.0
- No need to build from source, use the package manager to install the latest version. See further instructions for Ubuntu 20.04x64.
- gcc
- Tested with 8.4.0
- No need to build from source, use the package manager instead. You might need to switch to another version of gcc.
- CMake 3.15 (versions >= 3.10 might work) this can be installed from a package manager. CMake-gui is recommended.
- Qt 5 (versions >= 5.12 might work). Installing binaries from the web based installer using the manager tool is recommended.
The installer,
qt-unified-linux-x64-4.2.0-online.runcan be downloaded from here and you need to create your Qt account to be able to install it.
-
Download and clone
## Cloning repo and checking out version
mkdir -p $HOME/repositories/ && cd $HOME/repositories/
git clone git@github.com:HDFGroup/hdf5.git HDF5
cd $HOME/repositories/HDF5
git checkout tags/hdf5-1_10_4

## Creating paths
mkdir -p $HOME/repositories/HDF5/build && cd $HOME/repositories/HDF5/build
mkdir -p $HOME/workspace/HDF5/release
mkdir -p $HOME/local/HDF_Group/HDF5/1.10.4
cmake-gui ../HDF5
-
hdf5should be built from source (tested version 1.10.4, other versions might work). The following CMake options should be enabled:- set
HDF5_GENERATE_HEADERSto beON. - set
HDF5_BUILD_CPP_LIBto beON. - set the
CMAKE_INSTALL_PREFIXto a specific location. Recommended a local folder, for example$HOME/local/HDF_Group/HDF5/1.10.4. Configure and generate in your CMake-gui, then go to the build folder and in a terminal domake && make install.
- set
- Download and clone
## Cloning repo and checking out version
mkdir -p $HOME/repositories/ && cd $HOME/repositories
git clone https://gitlab.kitware.com/vtk/vtk VTK

cd $HOME/repositories/VTK
git checkout tags/v8.2.0
git submodule init
git submodule update

## Creating paths
mkdir -p $HOME/workspace/VTK/release
cd $HOME/workspace/VTK/release
rm -rf *
mkdir -p $HOME/repositories/VTK/build && cd $HOME/repositories/VTK/build
cmake-gui ../VTK
vtkshould be built from source (tested version 8.2.0., other versions might work). The following CMake options should be enabled:VTK_LEGACY_SILENTCMake flag toON- Activate
VTK_Group_Qt,vtkGUISupportQtOpenGL,vtkImagingOpenGL2 - Set the
Qt5_DIRvariable to where Qt is installed, for example$HOME/local/Qt/5.12.1/gcc_64/lib/cmake/Qt5and make sure that all QT directories point at the downloaded QT installation, as in the figure: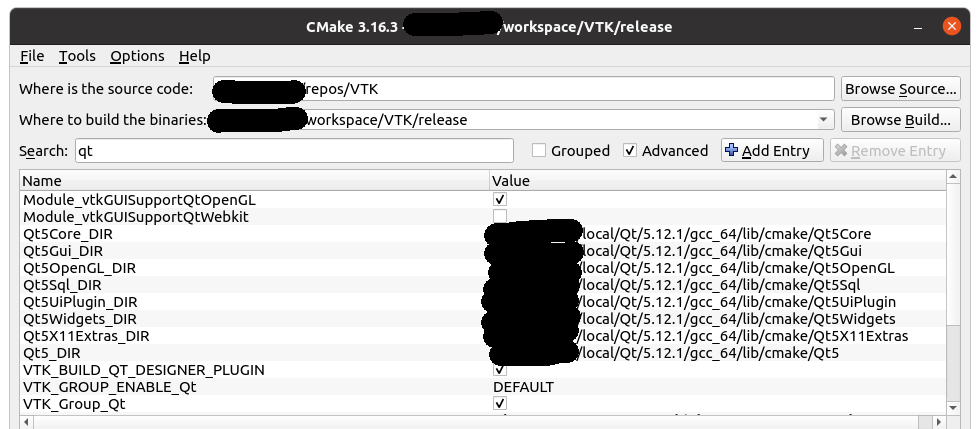
CMAKE_CXX_FLAGSset to-std=c++14 -fPICVTK_MODULE_ENABLE_VTK_libxml2set toNO(it might be a different tag which is dependent on the VTK version)X11_SM_LIBset to/usr/lib/x86_64-linux-gnu/libSM.so;-luuid- Activate
VTK_USE_SYSTEM_HDF5and set each HDF5-related folder to the subfolders of the HDF5 installation i.e.$HOME/local/hdf5/...as follows: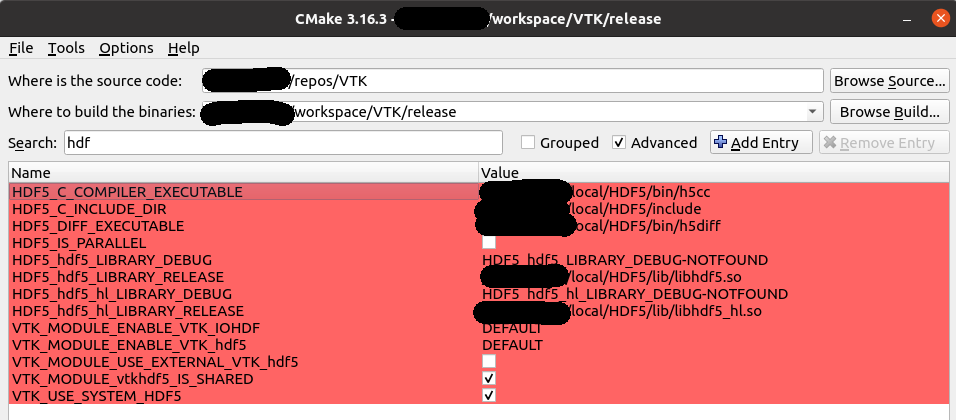
- Configure and generate in your CMake-gui, then go to the build folder and in a terminal do
make.


OpenCV and OpenCV contrib
-
Download and clone opencv and opencv_contrib from Github:
## Cloning repo and checking out version
mkdir -p $HOME/repositories/opencv_build && cd $HOME/repositories/opencv_build
git clone https://github.com/opencv/opencv.git
cd opencv
git checkout 3.4.4
cd ..

git clone https://github.com/opencv/opencv_contrib.git
cd opencv_contrib
git checkout 3.4.4
cd ..

## Creating paths
mkdir -p $HOME/repositories/opencv_build/opencv/build && cd $HOME/repositories/opencv_build/opencv/build
rm -rf *
-
Other opencv dependencies:
- gstreamer-1.0 (by doing in a terminal
sudo apt-get install libgstreamer-plugins-base1.0-dev) - jpeg (by doing in a terminal
sudo apt-get install libjpeg-dev) - tiff (by doing in a terminal
sudo apt-get install libtiff-dev) - png (by doing in a terminal
sudo apt-get install libpng-dev) - DC1394 video codecs (by doing in a terminal
sudo apt-get install libdc1394-dev) - NOTE: You might found problems finding ffmpeg which is unsolved for now but we would suggest to opening an issue.
- gstreamer-1.0 (by doing in a terminal
-
OpenCV version 3.4.4 seems to have a bug that prevents from building
cvvto which line 72 in the file$HOME/repositories/opencv_build/modules/cvv/src/qtutil/filter/diffFilterWidget.cppneed to replace as followscv::cvtColor(in.at(0).get(), originalHSV, COLOR_BGR2HSV); cv::cvtColor(in.at(1).get(), filteredHSV, COLOR_BGR2HSV);with
cv::cvtColor(in.at(0).get(), originalHSV, cv::COLOR_BGR2HSV); cv::cvtColor(in.at(1).get(), filteredHSV, cv::COLOR_BGR2HSV); -
In Windows, you may need to add the line
#include <stdexcept>to the same file as above$HOME/repositories/opencv_build/modules/cvv/src/qtutil/filter/diffFilterWidget.cppif the compiler complains about an isue withstd::logic_exceptbeing not part of std. -
The version of opencv and OpenCV_contrib are 3.4.4 and higher versions might work. To them build and install follow these steps:
-
Configure opencv, setting the following CMake variables:
OPENCV_EXTRA_MODULES_PATHto the source code where opencv_contrib is cloned, e.g.$HOME/repositories/opencv_build/opencv_contrib/modulesWITH_VTKenabled andVTK_DIRto the VTK build directory- HDF5 settings
HDF5_DIRto the installation of cmake location:$HOME/local/HDF_Group/HDF5/1.13.0/share/cmakeHDF5_DIFF_EXECUTABLEset to$HOME/local/HDF_Group/HDF5/1.10.4/bin/h5diff
- QT settings
WITH_QTenabledQT_DIRto the Qt directories of the QT installation (as with VTK), e.g.$HOME/Qt/5.12.5/gcc_64/lib/cmake/Qt5Qt5Widgets_DIRset to$HOME/Qt/5.12.5/gcc_64/lib/cmake/Qt5WidgetsQt5Test_DIRset to$HOME/Qt/5.12.5/gcc_64/lib/cmake/Qt5TestQt5Sql_DIRset to$HOME/Qt/5.12.5/gcc_64/lib/cmake/Qt5SqlQt5OpenGL_DIRset to$HOME/Qt/5.12.5/gcc_64/lib/cmake/Qt5OpenGLQt5Gui_DIRset to$HOME/Qt/5.12.5/gcc_64/lib/cmake/Qt5GuiQt5Core_DIRset to$HOME/Qt/5.12.5/gcc_64/lib/cmake/Qt5CoreQt5Concurrent_DIRset to$HOME/Qt/5.12.5/gcc_64/lib/cmake/Qt5Concurrent
WITH_TIFFdisabled.WITH_WEBPdisabled.CMAKE_CXX_FLAGSwith no tags.ENABLE_PRECOMPILED_HEADERSdisabled.WITH_GTKdisabled.WITH_CUDAdisabled.- set the
CMAKE_INSTALL_PREFIXto a specific location. Recommended a local folder, for example$HOME/local/opencv. BUILD_opencv_cvvdisabled (if available).- Go to the build folder, in a terminal do
make && make install.
-
Further instructions for installations are here.
- Download and clone
## Cloning repo and checking out version
mkdir -p $HOME/repositories/ && cd $HOME/repositories
git clone git@github.com:InsightSoftwareConsortium/ITK.git ITK
cd $HOME/repositories/ITK
git checkout v5.2.1
git submodule init
git submodule update

## Creating paths
mkdir -p $HOME/workspace/ITK/release && cd $HOME/workspace/ITK/release
mkdir -p $HOME/repositories/ITK/build && cd $HOME/repositories/ITK/build
rm -rf * # clean release build
- ITK has been build with version 5.1.2. It should also work with previous versions >= 4.9.1 with c++14 enabled. Set the following CMake-gui flags
ITKVideoBridgeOpencvoptionON, and theOpenCV_DIRser to the installation path, for example$HOME/local/opencv/share/OpenCVor$HOME/local/opencv/lib/cmake/opencv4- Enable
ITKVtkGlue, and set theVTK_DIRto the build folder for VTK. VNL_CONFIG_LEGACY_METHODSset to OFF- HDF5 settings
ITK_USE_SYSTEM_HDF5set to ON.HDF5_DIRset to$HOME/local/HDF_Group/HDF5/1.13.0/share/cmakeHDF5_CXX_LIBRARY_hdf5set to$HOME/local/HDF_Group/HDF5/1.13.0/lib/libhdf5.soHDF5_CXX_LIBRARY_hdf5_cppset to$HOME/local/HDF_Group/HDF5/1.13.0/lib/libhdf5_cpp.soHDF5_C_LIBRARY_hdf5set to$HOME/local/HDF_Group/HDF5/1.13.0/lib/libhdf5.soHDF5_DIFF_EXCECUTABLEset to/home/mx19/local/HDF_Group/HDF5/1.13.0/bin/h5diff
- QT settings
Qt5Core_DIRset to$HOME/Qt/5.12.5/gcc_64/lib/cmake/Qt5CoreQt5Gui_DIRset to$HOME/Qt/5.12.5/gcc_64/lib/cmake/Qt5GuiQt5OpenGL_DIRset to$HOME//Qt/5.12.5/gcc_64/lib/cmake/Qt5OpenGLQt5Sql_DIRset to$HOME/Qt/5.12.5/gcc_64/lib/cmake/Qt5SqlQt5Widgets_DIRset to$HOME/Qt/5.12.5/gcc_64/lib/cmake/Qt5Widgets
BUILD_TESTINGdisable- Go to the build folder, in a terminal do
make. - See further installation instructions here
- Download and clone
## Cloning repo and checking out version
mkdir -p $HOME/repositories/ && cd $HOME/repositories
git clone git@github.com:pybind/pybind11.git
cd $HOME/repositories/pybind11
git checkout v2.8.1

## Creating paths
mkdir -p $HOME/local/pybind11 && cd $HOME/local/pybind11
mkdir -p $HOME/repositories/pybind11/build && cd $HOME/repositories/pybind11/build
rm -rf * # clean release build
- PyBind11 version is 2.8.1 with python 3.7 in an anaconda environment.
- Make use of the following paths to build PyBind11 with Cmake-gui
- In the CMake, the python version used throughout must be indicated.
PYTHON_EXECUTABLEset to$HOME/anaconda3/envs/pretus/bin/python3.7mPYTHON_LIBRARYset to$HOME/anaconda3/envs/pretus/lib/libpython3.7m.soUSE_PYTHON_INCLUDE_DIRset toON- set the
CMAKE_INSTALL_PREFIXto a specific location. Recommended a local folder, for example<home>/local/pybind11. - Go to the build folder, in a terminal do
make && make install.
- Open terminal with conda environment
conda activate pretus
- Creating building paths
mkdir -p $HOME/local/pretus #
mkdir -p $HOME/build/pretus/release/ && cd $HOME/build/pretus/release/
- Open cmake-gui
cd $HOME/repositories/pretus/src
cmake-gui .
- Select paths for source code and build binaries:
$HOME/repositories/pretus/src
$HOME/build/pretus/release
- Setting up cmake tags in PRETUS
CMAKE_INSTALL_PREFIXset to$HOME/local/pretusVTK_DIRset to$HOME/workspace/VTK/releaseITK_DIRset to$HOME/workspace/ITK/releasepybind11_DIRset to$HOME/local/pybind11/share/cmake/pybind11- Qt settings
Qt5Concurrent_DIRset to$HOME/Qt/5.12.5/gcc_64/lib/cmake/Qt5ConcurrentQt5Core_DIRset to$HOME/Qt/5.12.5/gcc_64/lib/cmake/Qt5CoreQt5Gui_DIRset to$HOME/Qt/5.12.5/gcc_64/lib/cmake/Qt5GuiQt5OpenGL_DIRset to$HOME/Qt/5.12.5/gcc_64/lib/cmake/Qt5OpenGLQt5PrintSupport_DIRset to$HOME/Qt/5.12.5/gcc_64/lib/cmake/Qt5PrintSupportQt5Sql_DIRset to$HOME/Qt/5.12.5/gcc_64/lib/cmake/Qt5SqlQt5Widgets_DIRset to$HOME/Qt/5.12.5/gcc_64/lib/cmake/Qt5WidgetsQt5X11Extras_DIRset to$HOME/Qt/5.12.5/gcc_64/lib/cmake/Qt5X11ExtrasQt5Xml_DIRset to$HOME/Qt/5.12.5/gcc_64/lib/cmake/Qt5Xml
- Plugins settings
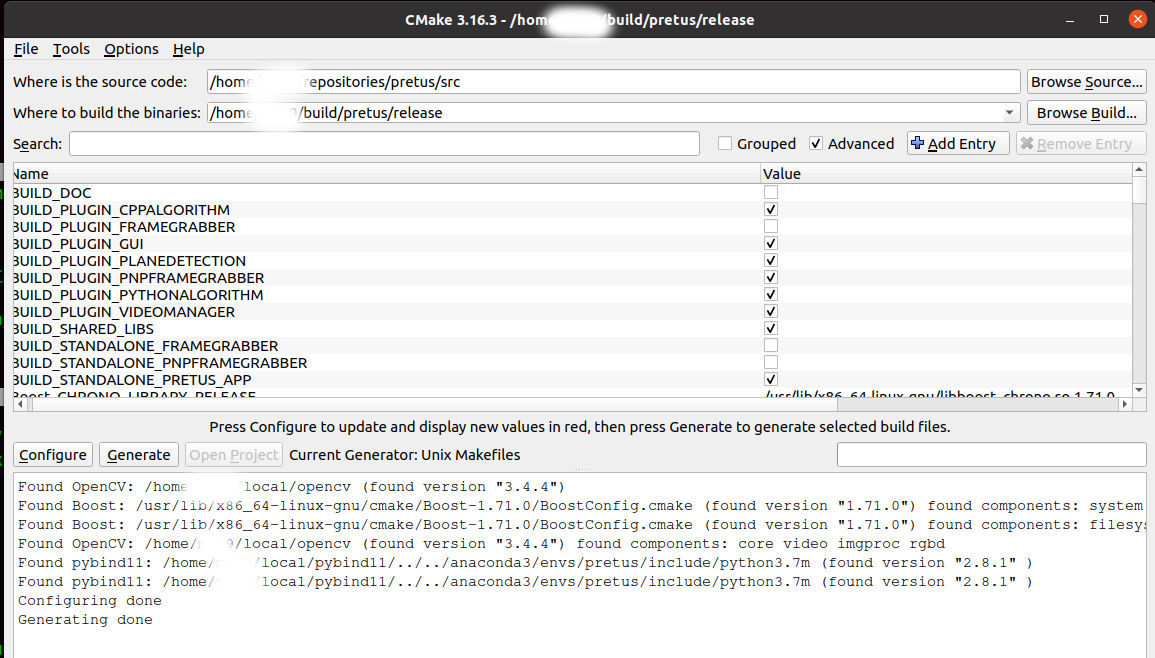
We recommend to initially build with the default enabled plug-ins, and gradually build the rest to isolate potential build errors.
BUILD_PLUGIN_GUIenabledBUILD_PLUGIN_CPPALGORITHMenabledBUILD_PLUGIN_PLANEDETECTIONenabledPYTHON_LIBRARYset to$HOME/anaconda3/envs/pretus/lib/libpython3.7m.soPYTHON_INCLUDE_DIRset to$HOME/anaconda3/envs/pretus/include/python3.7mpybind11_DIRset to$HOME/local/pybind11/share/cmake/pybind11
BUILD_PLUGIN_PYTHONALGORITHMenabledBUILD_PLUGIN_VIDEOMANAGERenabledBUILD_PLUGIN_PNPFRAMEGRABBERenabled (you might need an installed hardware driver)BUILD_PLUGIN_FRAMEGRABBERenabled (you need an hardware installed driver)
- Make project
The
make installstep is mandatory for if you use Python plug-ins (else PRETUS will not find the python sources)
cd $HOME/build/pretus/4cv
conda activate pretus
make
make install
- Build pretus with Cmake-gui as follows
 See plug-in further instructions on how to configure CMake options.

-
Application usage
- Launch help of the application
cd $HOME/local/pretus conda activate pretus sh launcher_pretus.sh -h - Launch example
sh launcher_pretus.sh -pipeline "videomanager>pythonalgorithm>cppalgorithm>gui" --videomanager_input $HOME/datasets/video-demo/echo.mp4 - Launch help of the application
-
Notes
- If you have external plug-ins built somewhere else, you need to specify the plug-ins build folder in the CMake entry
PLUGIN_FOLDER. These can be more than one folder, separated by;. - These folders can also be set after build in the config file (
<$HOME>/.config/iFIND/PRETUS.conf). - Each plug-in may have additional dependencies, so please do check the README in each Plug-in folder for specific build instructions.
- More comprehensive instructions and troubleshooting documentation can be found here.
- If you have external plug-ins built somewhere else, you need to specify the plug-ins build folder in the CMake entry
This work was supported by the Wellcome Trust IEH Award [102431], by the Wellcome/EPSRC Centre for Medical Engineering [WT203148/Z/16/Z], by the National Institute for Health Research (NIHR) Biomedical Research Centre at Guy's and St Thomas' NHS Foundation Trust and King's College London. The views expressed are those of the author(s) and not necessarily those of the NHS, the NIHR or the Department of Health.