This code samples were part of a more comprehensive workshop presented by @tamberg and me. The complete slides are available here.
- Plug dragino shield onto your Arduino
- Connect antenna
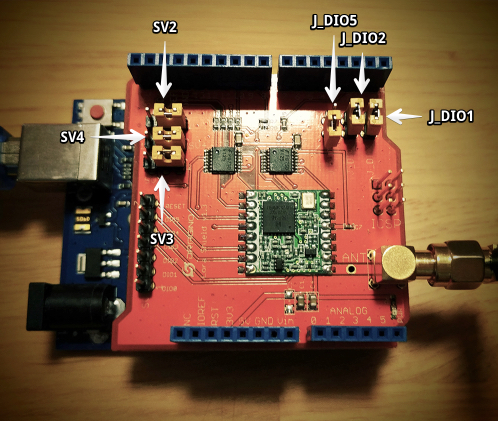
- Make sure jumpers are set as follows:
- Jumpers
SV2,SV3andSV4: right position - Jumpers
J_DIO1andJ_DIO2: closed - Jumpers
J_DIO5: open
- Jumpers
This is how it should look like:
There are two ways to use the TTN backend: command-line (ttnctl) and web-based (dashboard).
We'll be using command-line instructions, but the web-based options should be self-explanatory based on these anyway.
-
Download
ttnctl(download it again today, it updates often!) -
Create a user:
$ ./ttnctl user create yourname@email.com -
Login with your newly created user:
$ ./ttnctl user login yourname@email.com -
Create an application to interact with your devices:
$ ./ttnctl applications create "Name of your application" -
List your applications:
$ ./ttnctl applications -
Select the app you want to use:
$ ./ttnctl applications use [AppEUI] -
Register a new device. We use ABP (activation by personalization) and a flag (
--relax-fcnt) to make development easier:$ ./ttnctl devices register personalized -
Write down the
DevAddr,AppSKey, andNwkSKeythat are returned by the previous command, because you will need them in the next step (you can always query those later as well).
- Install the Arduino port of LMIC (LoRaMAC in C) into your Arduino IDE:
- Download the library as a ZIP file.
- On the Arduino IDE, go to
Sketch->Include Library->Add .ZIP Library...and select the ZIP file.
We're finally ready to start coding on our Arduino UNO:
-
Connect the Arduino to your computer using the USB cable
-
Select your Arduino board: go to
Tools->Board: ...and select the one matching your board, e.g.Arduino/Genuino Uno. -
Select the port: go to
Tools->Port: ...and select the one where your board shows up, e.g./dev/cu.usbmodem1431 (Arduino/Genuino Uno). -
Open the
hello-worldexample contained in this repository (link). -
Remember the keys you wrote down on while setting up your TTN account? Now is the time to use them! Notice that
ttnctloutputsDevAddrwithout the0xprefix, but you must add it for it to work. -
Upload and test it! 👍
-
You can see the data flowing in on the web-ui (TTN dashboard) immediately: just open the dashboard, open your application and see the messages from your node.
-
Alternatively, use the command line to subscribe to messages:
$ ./ttnctl subscribe
Start exploring the possibilities with the following code examples:
- hello-world: the canonical example to get started.
- send-sensor-data: a simple example to send a single integer value from analog pins.
- controlling-arduino: example using downlink messages to actuate your Arduino.
- kitchen-sink: example combining all of the above, plus additional memory optimizations and settings
