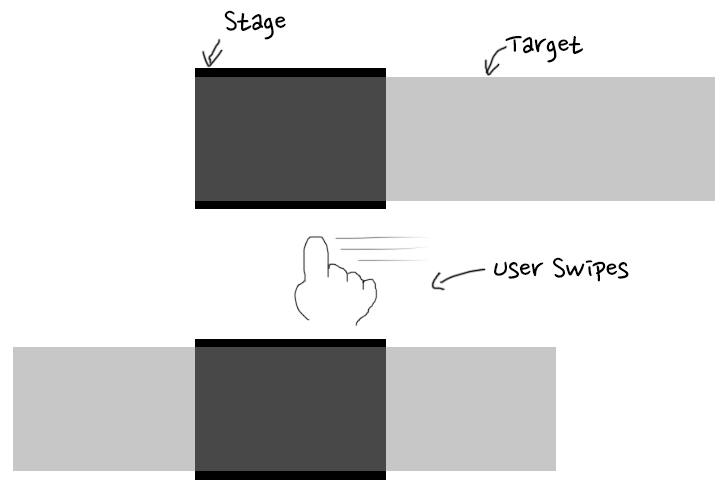
RecoPick Swipe는 데스크탑, 모바일 등 디바이스에 관계 없이 웹에서 간단히 사용할 수 있는 Swipe 라이브러리입니다.
UI가 보여질 정해진 크기의 stage에 stage보다 n배 큰(n페이지로 구성된) target을 위치시킵니다. 사용자의 swipe 동작에 따라 target의 위치가 조정됩니다.
우선 swipe.min.js, swipe.min.css를 로드합니다.
swipe.min.js는 전에 jQuery 라이브러리가 로드되도록 주의해주세요.
<link rel="stylesheet" href="path/to/swipe.min.css">
<script src="http://ajax.googleapis.com/ajax/libs/jquery/1.11.0/jquery.min.js"></script>
<script src="path/to/swipe.min.js"></script>
다음과 같은 형식의 HTML 코드를 준비합니다. 클래스명은 마음대로 지정하셔도 됩니다.
<div class="stage">
  <ul class="target">
    <li><img alt="" src="https://api.recopick.com/i/prd_sample/1.png" width="300" height="300"></li>
    <li><img alt="" src="https://api.recopick.com/i/prd_sample/3.png" width="300" height="300"></li>
    <li><img alt="" src="https://api.recopick.com/i/prd_sample/5.png" width="300" height="300"></li>
  </ul>
</div>
stage와 target의 초기상태를 CSS 코드로 정의합니다.
ul, li {
  margin: 0;
  padding: 0;
  list-style: none;
}
.stage {
  width: 300px;
  height: 300px;
  overflow: hidden;
}
.target {
  width: 900px;
}
.target li {
  float: left;
}
자바스크립트 코드를 통해 Swipe 기능을 실행합니다.
$('.stage').recopickSwipe({
  $target: $('.target'),
  total: 3 // total 3 pages
});
결과를 확인해볼까요? 터치 디바이스에서 확인하실 수 있습니다. 마우스를 사용하신다면 이전, 다음 버튼의 예제를 확인해보세요.
infinite 옵션을 추가하면 무한 Swipe를 만들 수 있습니다.
$('.stage').recopickSwipe({
  $target: $('.target'),
  total: 3,
  infinite: true
});
이전, 다음 버튼으로 쓰일 마크업을 추가하고 해당 jQuery Element를 각각
$prev, $next 옵션으로 지정하면 이전, 다음 버튼 기능을 추가할 수 있습니다.
<div class="stage">
  <ul class="target">
    <li><img alt="" src="https://api.recopick.com/i/prd_sample/1.png" width="300" height="300"></li>
    <li><img alt="" src="https://api.recopick.com/i/prd_sample/3.png" width="300" height="300"></li>
    <li><img alt="" src="https://api.recopick.com/i/prd_sample/5.png" width="300" height="300"></li>
  </ul>
  <div class="prev"></div>
  <div class="next"></div>
</div>
자바스크립트 코드에 $prev, $next 옵션을 추가합니다.
$('.stage').recopickSwipe({
  $target: $('.target'),
  total: 3,
  $prev: $('.prev'),
  $next: $('.next')
});
다음은 이전, 다음 버튼용 CSS 코드 예제입니다.
infinite 옵션을 지정하지 않은 경우
첫페이지의 이전 버튼, 끝페이지의 다음 버튼에 disabled 클래스가 추가됩니다.
.prev{cursor:pointer;position:absolute;top:350px;left:100px;width:47px;height:25px;background:url(http://mctenshi.github.io/recopick-swipe/images/prev.png) no-repeat 0 0;}
.prev.disabled{cursor:default;opacity:.3}
.next{cursor:pointer;position:absolute;top:350px;right:100px;width:47px;height:25px;background:url(http://mctenshi.github.io/recopick-swipe/images/next.png) no-repeat 0 0;}
.next.disabled{cursor:default;opacity:.3}
infinite 옵션을 지정하면 이전, 다음 버튼으로도 무한 스크롤이 가능합니다.
$('.stage').recopickSwipe({
  $target: $('.target'),
  total: 3,
  $prev: $('.prev'),
  $next: $('.next'),
  infinite: true
});
현재 페이지 번호를 표시할 마크업을 추가하고 해당 jQuery Element를
$curr 옵션으로 지정하면 이전, 다음 버튼 기능을 추가할 수 있습니다.
<div class="stage">
  <ul class="target">
    <li><img alt="" src="https://api.recopick.com/i/prd_sample/1.png" width="300" height="300"></li>
    <li><img alt="" src="https://api.recopick.com/i/prd_sample/3.png" width="300" height="300"></li>
    <li><img alt="" src="https://api.recopick.com/i/prd_sample/5.png" width="300" height="300"></li>
  </ul>
  <div class="prev"></div>
  <div class="pages">
    <strong class="curr">1</strong>
    /
    <span class="total">3</span>
  </div>
  <div class="next"></div>
</div>
자바스크립트 코드에 $curr 옵션을 추가합니다.
$('.stage').recopickSwipe({
  $target: $('.target'),
  total: 3,
  $prev: $('.prev'),
  $next: $('.next'),
  $curr: $('.curr')
});
다음은 현재 페이지용 CSS 코드 예제입니다.
.pages {position:absolute;top:350px;left:100px;width:100px;text-align:center;}
.curr {color:red}
RecoPick Swipe에서 지정할 수 있는 옵션입니다.
$target: (필수) 스크롤되는 콘텐츠 본체를 jQuery Element로 지정합니다.total: (필수) 전체 페이지 수를 지정합니다.$prev: 이전 버튼의 jQuery Element로 지정합니다.$next: 다음 버튼의 jQuery Element로 지정합니다.infinite: 무한 스크롤 여부를 true/false로 지정합니다. 기본값은 false.$curr: 현재 페이지 번호를 jQuery Element로 지정합니다.transition_ms: Swipe 효과의 속도를 millisecond 단위로 지정합니다. 기본값은 300.onPage: 페이지가 변경되면 호출되는 함수입니다. 첫번째 인자로 현재 페이지 번호가 전달됩니다.
swipe_total: 전체 페이지 수를 변경합니다.
$('.stage').trigger('swipe_total', 5);
swipe_page: 현재 페이지를 변경합니다. 현재 페이지가 전체 페이지 수보다 큰 경우 무시됩니다.
$('.stage').trigger('swipe_page', 1);
- 신세계면세점의 "고객님을 위한 추천상품": http://www.ssgdfs.com/shop/main
- 나인걸의 추천 인기상품 위젯: http://www.naingirl.com/shop/shopdetail.html?branduid=96849

