EasyRobotics is an inverse kinematics (IK) controller for the KSP Breaking Grounds DLC rotation and hinge servo parts. It allow to setup an IK chain made of several servos and of an effector. The controller adjust the servos target angle so the effector automatically reach a position and/or rotation in space which can be either manually defined or automatically set from a target part.
EasyRobotics is available from the Part Action Window (PAW) for the KAL-1000 part, as well as any modded part featuring the stock robotic controller.
Compatible with KSP 1.12.3 to 1.12.5 - Available on CKAN
Manual installation
- Go to the GitHub release page and download the file named
EasyRobotics_x.x.x.zip - Open the downloaded *.zip archive
- Open the
GameDatafolder of your KSP installation - Delete any existing
EasyRoboticsfolder in yourGameDatafolder - Copy the
EasyRoboticsfolder found in the archive into yourGameDatafolder
MIT
- HabTechRobotics by Benjee : Stockalike Canadarm 1 & 2 parts (Forum link)
- MissingRobotics by Aahz88 : Various additional robotic parts, including a set of tubes and rotational joints to make manipulators.
![]()
All controls are available from the KAL-1000 Part Action Window, both in the editor and in flight.
The KAL-1000 part can be placed anywhere, but it must stay on the same vessel as the servo and effector parts, something to keep in mind for "walking arms" designs such as the ISS canadarm.
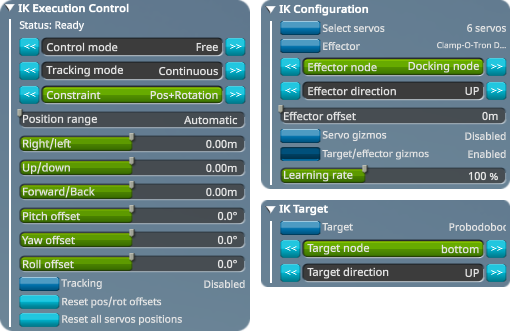
The first step for using the IK controller is to select which servos will be used, as well as which part is to be used as the effector.
This can be done from the IK Configuration section :
Select servos: Enter the servo selection mode. Hover the mouse on a servo part, then pressENTERto add it, orDELETEto remove it. To get out of the selection mode, either click again on the button or pressESC. You may select as many servos as you want and in any order, but they must form a single "chain". Selected servos and their rotation axis can be visualized by enabling theServo gizmostoggle.Effector: Enter the effector selection mode, similar controls as for the servo selection. You must have a single effector, and it can't be in the middle of the servo "chain".Effector node, direction and offset: Allow to change the controlled position and direction on the effector part, which can be visualized as green gizmo by enablingTarget/effector gizmosLearning rate: The IK algorithm works by trying to move the servos a little bit to see if that new pose is closer or further away from the target. The learning rate is how big those small moves are. Increasing it can greatly help the algorithm to find a solution, but lowering it can be necessary to avoid the solution "jittering" around the target. How that value should be set depends on the chain configuration, it is recommended to do some editor-time testing to tune it.
Once the servos and effector are properly configured, the Status label in the IK Execution Control tab should show ready. That label will also indicate what the IK controller state is when it is active.
Control modeFree: The target (red gizmo) position is relative to the first servo of the chain.Target: The target is a part (see the "IK target" section below).
Tracking modeContinous: Unlock theTrackingtoggle. When enabled, the IK controller is always active and will continously try to reach the target.On request: Unlock theRequest executionbutton, allowing you to request a single execution of the IK controller.
ConstraintPosition: The effector will try to reach the target positon from any angle.Pos+Direction: The effector will also try to match the direction of the target, but ignoring its "roll".Pos+Rotation: The effector will try to match the full rotation of the target, including its "roll".
Position range:Automatic: The min/max value of the target position sliders will be set based on the robotic chain length.Value in m: Custom min/max target position sliders value
Right/left,Up/down,Forward/back: sliders controlling the absolute position of the target. The axes are relative to the current target rotation, and the value is relative to either the first servo in theFreecontrol mode, or the targetted part in theTargetcontrol mode.Pitch offset,Yaw offset,Roll offset: incremental rotation offsets allowing to rotate the target freely.Reset pos/rot offsets: Reset all position and rotation offsets.Reset all servos positions: Instruct all controlled servos to go back to their original build angle.
Allow to select a part as target, to be used with the Target control mode. Like for the effector, you can select an arbitrary node and orientation.
Often, you will experience your setup starting to spin around or to get stuck, never reaching the target :
- In most cases, the reason is simply that in the servo configuration you designed, the target position and rotation can't be reached. In such situations, EasyRobotics will just keep trying forever. Putting together a kinematic chain for a full 5 or 6 degree of freedom (DoF) manipulator with a lot of reach and no dead zone can be pretty tricky, especially if you're using the Breaking Grounds hinges, as they can only actuate up to a ±90° angle.
- If you're sure that the kinematic configuration of your servos can actually reach the target, try increasing the
Learning ratesetting. - The IK algorithm isn't especially smart, and can easily get stuck in a combination of servo angles from which it can't find a way out. This is usally fixed by using the
Reset all servos positionsoption. - Try to make manipulators out of as few servos as possible. In theory, a 6-DoF manipulator only require 6 servos, such as is the case for most industrial manipulators. In particular, avoid having multiple servos in close proximity providing the exact same degree of freedom.
Other difficulties will come when using your contraption in flight :
- Breaking grounds servo joints aren't very strong, so any attempt at moving them fast will result in a lot of elastic behavior. In flight, the IK controller will try to correct for the position error induced by the various forces acting on the arm (like gravity, accelerations and decelerations...), but in order to do so, it needs all servos to reach a steady state at some point. So it can't do it if everything is wobbling or if the arm is continously moving.
- The main workaround is to make your servos move slower by limiting their traverse rate. Servos that are near the effector, or whose movement won't displace a lot of mass can move faster. Getting the right settings can be a bit time consuming, especially since the traverse rate can only be assessed in flight.
- A good workaround in "wobbling" situations is to use the
On requesttracking mode instead of theContinousmode, waiting for things to stabilize before hitting theRequest executionbutton.
- First public release