Yoast SEO integration for Neos CMS
What does it do
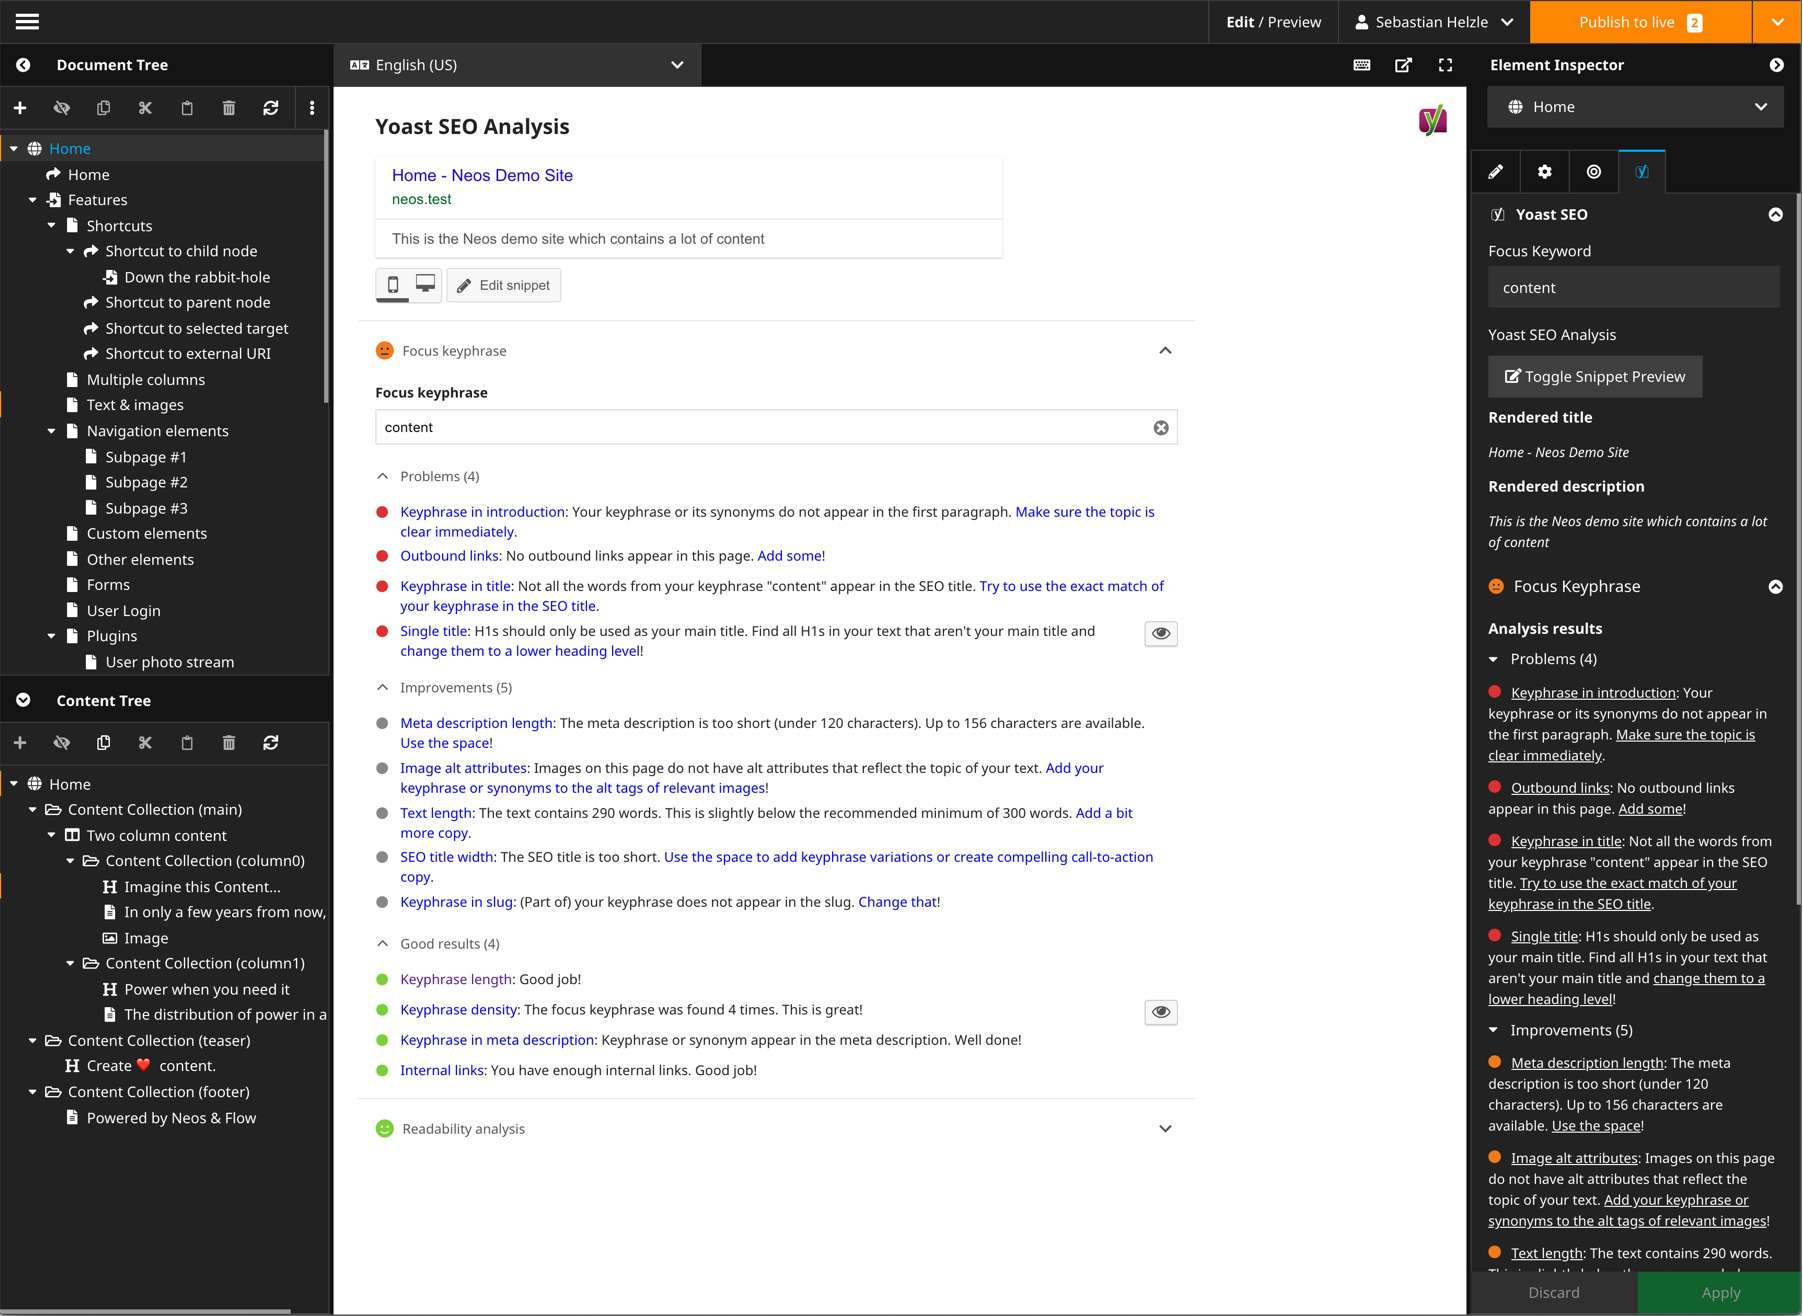
This package provides a new backend preview and inspector integration for Neos CMS to look at your page with the help of the Yoast SEO plugin.
This view will show you a preview snippet how the selected page will look in the Google search results and will give you insights and helpers to further improve the page for search engines.
These insights are generated via the official Open Source Yoast SEO javascript plugin by Yoast. This package is being developed in partnership with Yoast BV and has been moved into the Yoast namespace since version 1.0.
We try to keep this package up-to-date with releases by Yoast but depending on the compatibility and available time this might take up to a few weeks after Yoast releases a new version of their library.
Examples
Installation
Add the dependency to your site package like this
composer require --no-update yoast/yoast-seo-for-neosAnd then run composer update in your projects root folder.
Deploying to production
As the package adds some additional permissions to the system you should flush the session cache once after the first deployment of your website which includes this package. This prevents errors for your logged in editors:
./flow flow:session:destroyAllThis will force them to login again, so be careful and warn them before doing this.
Dependencies
This package currently only requires Neos >= 3.0 but it's suggested to also have the neos/seo package installed.
This package expects some document node properties to be present like titleOverride and metaDescription which
are provided via the neos/seo package. But you can of course provide them yourself if you don't want to use
the neos/seo package.
Supported languages
There are three different kinds of language support:
Backend localization for the Neos implementation
These are localizations for all Neos CMS specifics not related to the wordpress version of YoastSEO.
- English ✅
- German ✅
If you can provide the backend localizations for other languages than the ones provided in the table above, please create a PR.
Supported languages of the analyzer results in the backend
These are localizations for the recommendations that the analysis provides and will be selected based on the current users backend language.
Please consult YoastSEO on wordpress.
Supported content languages for the analyzer
These are the content languages that the analyzer supports. If the language of your content is not contained in the list the analysis will still work but not give the same quality of recommendations.
Please consult YoastSEO.js readme.
Configuration
In your Settings.yaml you can override the following options:
Yoast:
 YoastSeoForNeos:
   defaultContentLocale: en-US
   languageToLocaleMapping: [...]
and
Neos:
  Neos:
    Ui:
      frontendConfiguration:
        Yoast.YoastSeoForNeos:
          contentSelector: body
defaultContentLocale
The analyzer will use the lang attribute rendered by the Neos.Seo package of your website to detect the
language of your content. This option sets the default if Neos.Seo cannot detect it.
If no lang attribute is rendered the javascript part will use en_US.
Note that the html standard requires a - in the locale while Neos and Yoast internally use _ and convert if needed.
Check https://github.com/Yoast/YoastSEO.js#supported-languages for supported languages and the capabilities. If you use a locale that Yoast doesn't understand don't expect perfect results.
languageToLocaleMapping
This array defines which translation should be used in the Yoast SEO analyzer depending on the selected interface language of a Neos user.
See the Settings.yaml of this package and if you for example want a different version localized translation,
check out the folder Resources/Private/Languages and see which ones are supported and then update the mapping
accordingly.
For example the default mapping for de is de_DE but can be changed to Swiss German with the following configuration:
Yoast:
  YoastSeoForNeos:
    languageToLocaleMapping:
      de: de_CH
contentSelector
This setting allows you to specify a different element in your rendered page where the analysis should retrieve it's content from. This can be used for example to select your content wrap to exclude hidden content for modals and other elements.
Example:
Neos:
  Neos:
    Ui:
      frontendConfiguration:
        Yoast.YoastSeoForNeos:
          contentSelector: .my-content
Usage
Preview mode
After installation the new preview mode is available in the Neos backend which you can select form the Edit / Preview panel.
This is useful to check several pages after another and optimize SEO properties. The preview also shows a preview how a page could look as Google search result.
Inspector
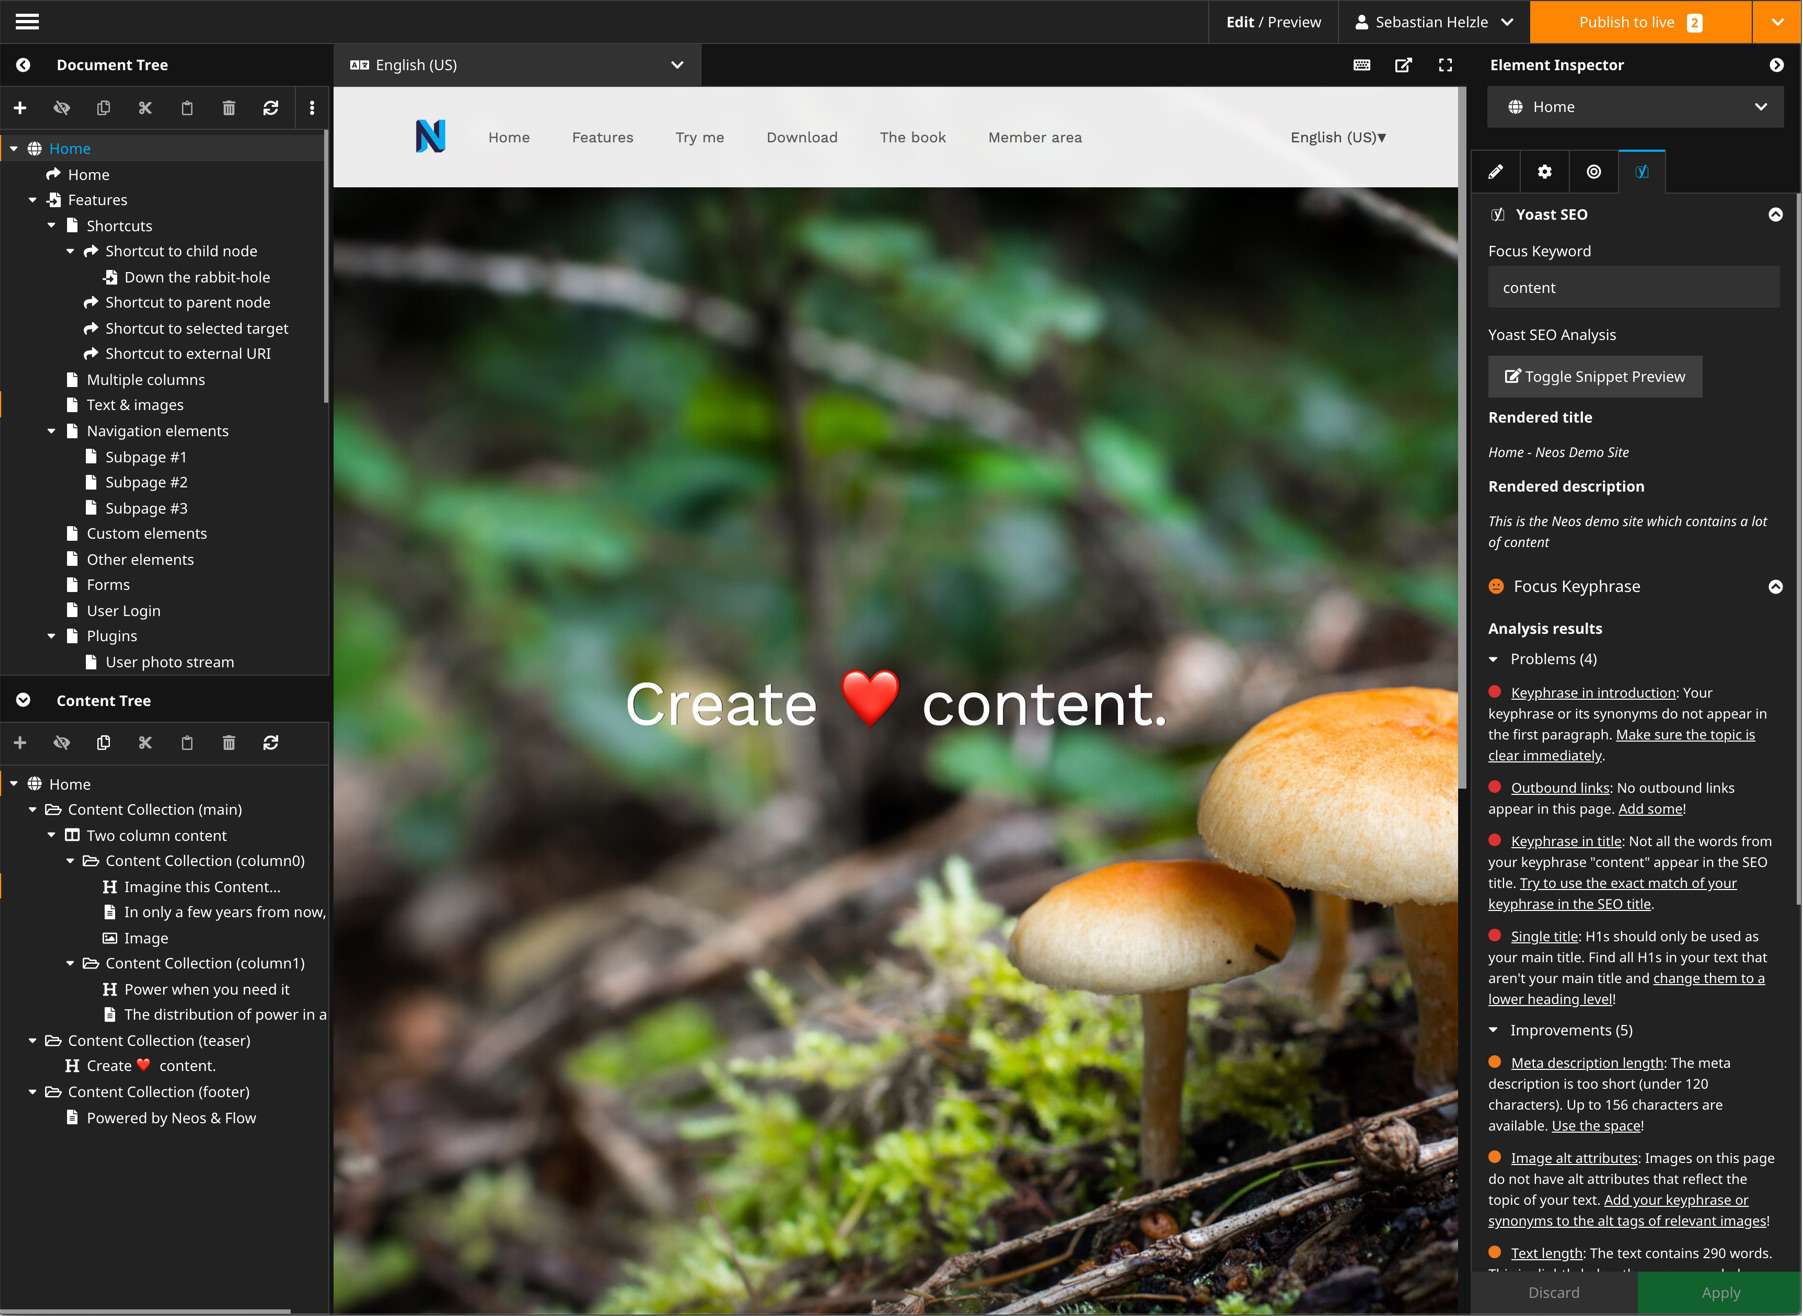
In the inspector a new group "Yoast" is added in the SEO-Tab with the following fields:
- focusKeyword: The main keyword this document is optimized for. This is needed by yoast for calculating metrics.
- isCornerstone: Mark the document as exceptionally important for yoast. This will enforce more strict content-rules.
The group also contains a live analyzer which will check your content and SEO data and show you the results. Depending on your nodetype configuration the analyzer will update after you change something and show you up-to-date information without needing a reload of the whole page.
This view is helpful when optimizing a single page while working on it's content.
FAQ
I get a login modal after opening the Yoast tab in the inspector
First try to log out and log in again as the session might be missing some policy information.
If that doesn't help then the policy file of this package might not have been loaded.
Clear your caches and make sure they appear when running flow security:showeffectivepolicy --privilegeType "Neos\Flow\Security\Authorization\Privilege\Method\MethodPrivilege".
Then logout and login again and everything should work again.
Contributing && issues
- Contributions are very welcome.
- Pull requests are even better!
- Please open issues for this project if you have problems with the backend module or other Neos specific features.
- Please open issues for Yoast SEO if you have problems with the analyzer itself or translations of any hints and warnings generated by the analyzer.
Building the assets
First install dependencies with yarn:
yarnYou can generate the js and css files by running the following command:
yarn buildBuilding and watching the app for the edit mode
yarn build:editModeyarn watch:editModeBuilding and watching the inspector view
yarn build:inspectorViewyarn watch:inspectorView
