This repository is a minimal verison for the URL shortener taken from https://github.com/aws-samples/amazon-api-gateway-url-shortener. Only the API gateway and DDB were kept in this repository, all other resources have been removed.
This app creates a URL shortener without using any compute. All business logic is handled at the Amazon API Gateway level. The basic app will create an API Gateway instance and Amazon DynamoDB table for data storage.
Read the blog series from AWS about this application:
- Building a serverless URL shortener app without AWS Lambda – part 1
- Building a serverless URL shortener app without AWS Lambda – part 2
- Building a serverless URL shortener app without AWS Lambda – part 3
-
Forked copy of this repository. Instructions for forking a GitHib repository can be found here
-
A GitHub personal access token with the repo scope as shown below. Instructions for creating a personal access token can be found here
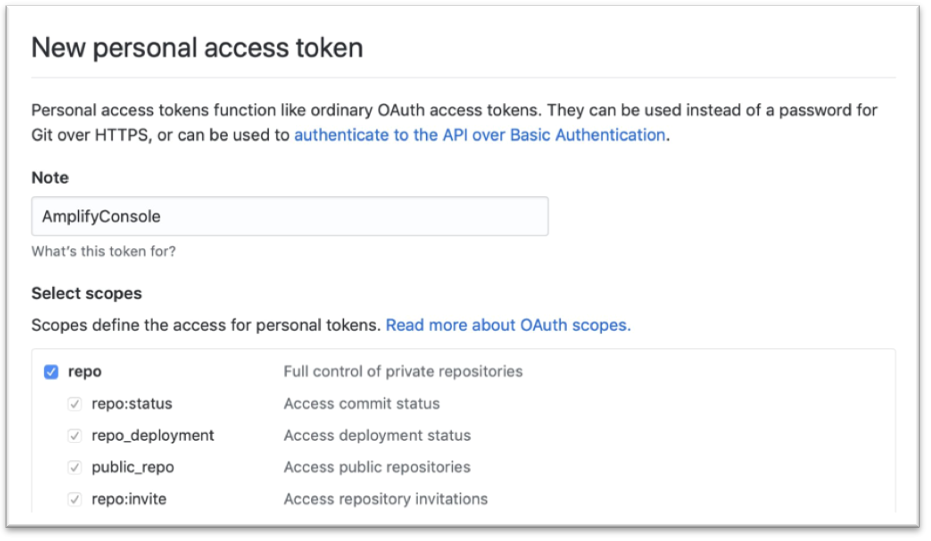
Be sure and store you new token in a place that you can find it.

Note: This stack includes an Amazon CloudFront distribution which can take around 30 minutes to create. Don't be alarmed if the deploy seems to hang for a long time. In the terminal, use the SAM CLI guided deployment the first time you deploy
sam deploy -gYou can choose the default for all options except GithubRepository and **
## The name of the CloudFormation stack
Stack Name [URLShortener]:

## The region you want to deploy in
AWS Region [us-west-2]:

## Existing Cognito User Pool
Arn of Cognito User Pool [CognitoUserPoolArn]:

## Shows you resources changes to be deployed and requires a 'Y' to initiate deploy
Confirm changes before deploy [y/N]:

## SAM needs permission to be able to create roles to connect to the resources in your template
Allow SAM CLI IAM role creation [Y/n]:

## Save your choice for later deployments
Save arguments to samconfig.toml [Y/n]:
SAM will then deploy the AWS CloudFormation stack to your AWS account and provide required outputs for the included client.
After the first deploy you may re-deploy using sam deploy or redeploy with different options using sam deploy -g.
The client can also be run locally for debugging. Instructions can be found here.
The client is a Vue.js application that interfaces with the backend and allows you to authenticate and manage URL links. The client is hosted using Amplify Console. To avoid circular dependencies, we need to provide some information for the client after stack is built. The information needed is provided at the end of the deploy process. If you do not have the information you can run the following:
aws cloudformation describe-stacks --stack-name URLShortenerWe need to add this information to the environment variables for the Amplify Console app. There are two options for adding the variables.
Option 1: using the AWS CLI (Update the <values> to reflect the information returned from the deployment.)
aws amplify update-app --app-id <MyAmplifyAppId> --environment-variables \
VUE_APP_NAME=<VueAppName>\
,VUE_APP_CLIENT_ID=<VUE_APP_CLIENT_ID>\
,VUE_APP_API_ROOT=<VUE_APP_API_ROOT>\
,VUE_APP_AUTH_DOMAIN=<VUE_APP_AUTH_DOMAIN>
Also available in the stack output as AmplifyEnvironmentUpdateCommand
- Open the Amplify Console page
- On the left side, under All apps, choose Url-Shortner-Client
- Under App settings choose Environment variables
- Choose the manage variables button
- Choose add variable
- Fill in the variable and it's corresponding Value
- Leave defaults for Branches and Actions
- Repeat for all four variables
- Choose save
After deploying the CloudFormation template, you need to go into the Amplify Console and trigger a build. The CloudFormation template can provision the resources, but can’t trigger a build since it creates resources but cannot trigger actions. This can be done via the AWS CLI.
Option 1: Using the AWS CLI (Update the <values> to reflect the information returned from the deployment.)
aws amplify start-job --app-id <MyAmplifyAppId> --branch-name master --job-type RELEASEAlso available in the stack output as AmplifyDeployCommand
To check on the status, you can view it on the AWS Amplify Console or run:
aws amplify get-job --app-id <MyAmplifyAppId> --branch-name master --job-id <JobId>- Open the Amplify Console page
- On the left side, under All apps, choose Url-Shortner-Client
- Click Run build
*Note: this is only required for the first build subsequent client builds will be triggered when updates are committed to your forked repository.
- Open the CloudFormation console
- Locate a stack named URLShortener
- Select the radio option next to it
- Select Delete
- Select Delete stack to confirm
*Note: If you opted to have access logs (on by default), you may have to delete the S3 bucket manually.