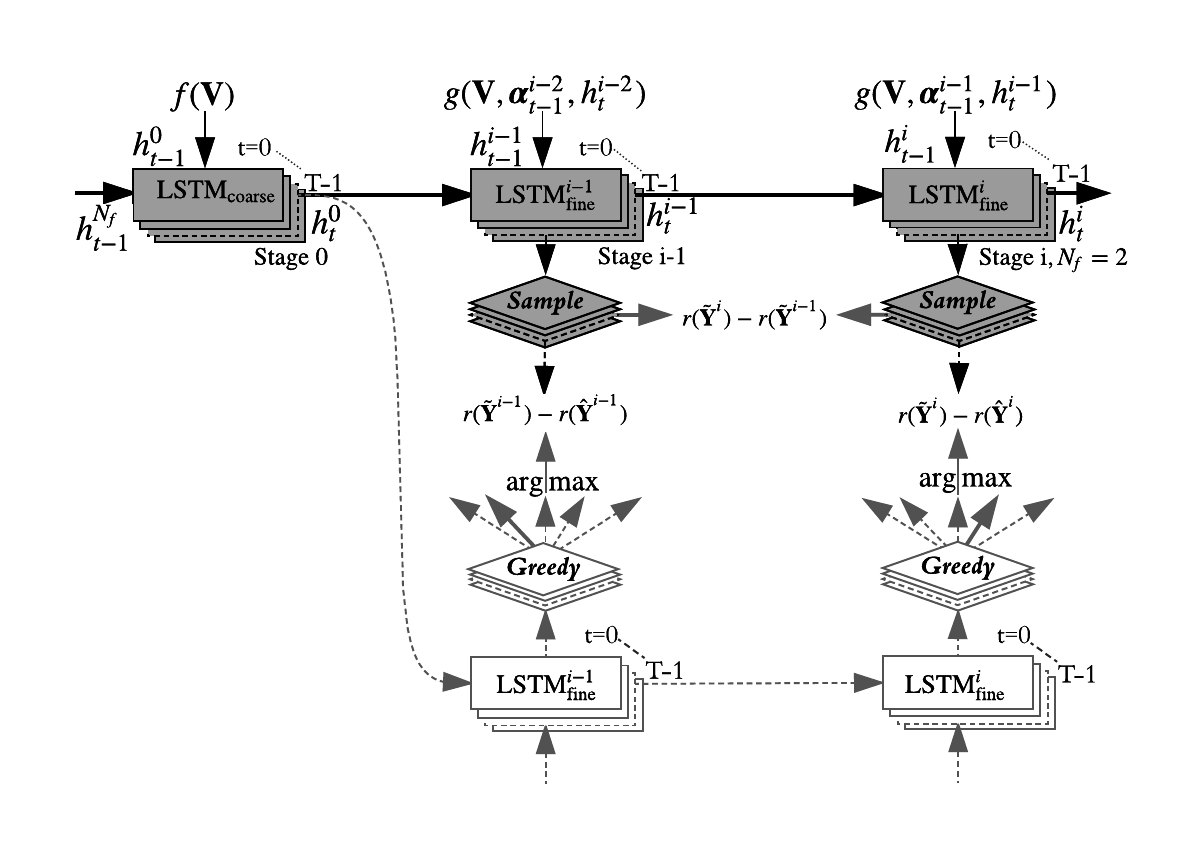
Accepted as an oral presentation at AAAI-2018.
@inproceedings{gu2017stack,
  title={Stack-captioning: Coarse-to-fine learning for image captioning},
  author={Gu, Jiuxiang and Cai, Jianfei and Wang, Gang and Chen, Tsuhan},
  booktitle={AAAI},
  year={2018}
}
CUDA Python 2.7 PyTorch 0.2 (along with torchvision) tensorboard-pytorch jieba hashlib caffe
Some evaluation tools:
- Download COCO dataset and preprocessing
First, download the coco images from link. We need 2014 training images and 2014 val. images. You should put the train2014/ and val2014/ in the same directory, denoted as $IMAGE_ROOT.
Download preprocessed coco captions from link from Karpathy's homepage. Extract dataset_coco.json from the zip file and copy it in to data/. This file provides preprocessed captions and also standard train-val-test splits.
Once we have these, we can now invoke the prepro_*.py script, which will read all of this in and create a dataset (two feature folders, a hdf5 label file and a json file).
$ python scripts/prepro_labels.py --input_json data/dataset_coco.json --output_json data/cocotalk.json --output_h5 data/cocotalk
$ python scripts/prepro_feats.py --input_json data/dataset_coco.json --output_dir data/cocotalk --images_root $IMAGE_ROOT
prepro_labels.py will map all words that occur <= 5 times to a special UNK token, and create a vocabulary for all the remaining words. The image information and vocabulary are dumped into data/cocotalk.json and discretized caption data are dumped into data/cocotalk_label.h5.
prepro_feats.py extract the resnet101 features (both fc feature and last conv feature) of each image. The features are saved in data/cocotalk_fc and data/cocotalk_att, and resulting files are about 200GB.
(Check the prepro scripts for more options, like other resnet models or other attention sizes.)
Warning: the prepro script will fail with the default MSCOCO data because one of their images is corrupted. See this issue for the fix, it involves manually replacing one image in the dataset.
First, download the ai_challenger images from link. We need both training and validationd data. We decompress the data into a same folder, say data/ai_challenger, the structure would look like:
├── data
│   ├── ai_challenger
│   │   ├── caption_train_annotations_20170902.json
│   │   ├── caption_train_images_20170902
│   │   │   ├── ...
│   │   ├── caption_validataion_annotations_20170910.json
│   │   ├── caption_validation_images_20170910
│   │   │   ├── ...
│   ├── ...
Once we have the images and the annotations, we can now invoke the prepro_*.py script, which will read all of this in and create a dataset (two feature folders, a hdf5 label file and a json file).
$ python scripts/prepro_split_tokenize.py --input_json ./data/ai_challenger/caption_train_annotations_20170902.json ./data/ai_challenger/caption_validation_annotations_20170910.json --output_json ./data/data_chinese.json --num_val 10000 --num_test 10000
$ python scripts/prepro_labels.py --input_json data/data_chinese.json --output_json data/chinese_talk.json --output_h5 data/chinese_talk --max_length 20 --word_count_threshold 20
$ python scripts/prepro_reference_json.py --input_json ./data/ai_challenger/caption_train_annotations_20170902.json ./data/ai_challenger/caption_validation_annotations_20170910.json --output_json ./data/eval_reference.json
$ python scripts/prepro_ngrams.py --input_json data/data_chinese.json --dict_json data/chinese_talk.json --output_pkl data/chinese-train --split train
prepro_split_tokenize will conbine both training and validation data, and randomly the dataset into train, val and test. It will also tokenize the captions using jiebe.
prepro_labels.py will map all words that occur <= 20 times to a special 卍 token, and create a vocabulary for all the remaining words. The image information and vocabulary are dumped into data/chinese_talk.json and discretized caption data are dumped into data/chinese_talk_label.h5.
prepro_reference_json.py will prepare the json file for caption evaluation.
prepro_ngrams.py will prepare the file for self critical training.
(Check the prepro scripts for more options, like other resnet models or other attention sizes.)
We use bottom-up features to get the best results. However, if the code should also support using resnet101 features.
- Using resnet101
$ python scripts/prepro_feats.py --input_json data/data_chinese.json --output_dir data/chinese_talk --images_root data/ai_challenger --att_size 7
This extracts the resnet101 features (both fc feature and last conv feature) of each image. The features are saved in data/chinese_talk_fc and data/chinese_talk_att, and resulting files are about 100GB.
- Using bottom-up-features
Here is the pre-extracted feature for downloading link.
Code for extracting the features is here
$ python train.py --id fc --caption_model fc --input_json data/cocotalk.json --input_fc_dir data/cocotalk_fc --input_att_dir data/cocotalk_att --input_label_h5 data/cocotalk_label.h5 --batch_size 10 --learning_rate 5e-4 --learning_rate_decay_start 0 --scheduled_sampling_start 0 --checkpoint_path log_fc --save_checkpoint_every 6000 --val_images_use 5000 --max_epochs 30The train script will dump checkpoints into the folder specified by --checkpoint_path (default = save/). We only save the best-performing checkpoint on validation and the latest checkpoint to save disk space.
To resume training, you can specify --start_from option to be the path saving infos.pkl and model.pth (usually you could just set --start_from and --checkpoint_path to be the same).
If you have tensorflow, the loss histories are automatically dumped into --checkpoint_path, and can be visualized using tensorboard.
The current command use scheduled sampling, you can also set scheduled_sampling_start to -1 to turn off scheduled sampling.
If you'd like to evaluate BLEU/METEOR/CIDEr scores during training in addition to validation cross entropy loss, use --language_eval 1 option, but don't forget to download the coco-caption code into coco-caption directory.
For more options, see opts.py.
A few notes on training. To give you an idea, with the default settings one epoch of MS COCO images is about 11000 iterations. After 1 epoch of training results in validation loss ~2.5 and CIDEr score of ~0.68. By iteration 60,000 CIDEr climbs up to about ~0.84 (validation loss at about 2.4 (under scheduled sampling)).
Train using self critical
First you should preprocess the dataset and get the cache for calculating cider score:
$ python scripts/prepro_ngrams.py --input_json .../dataset_coco.json --dict_json data/cocotalk.json --output_pkl data/coco-train --split train
And also you need to clone my forked cider repository.
Then, copy the model from the pretrained model using cross entropy. (It's not mandatory to copy the model, just for back-up)
$ bash scripts/copy_model.sh fc fc_rl
Then
$ python train.py --id fc_rl --caption_model fc --input_json data/cocotalk.json --input_fc_dir data/cocotalk_fc --input_att_dir data/cocotalk_att --input_label_h5 data/cocotalk_label.h5 --batch_size 10 --learning_rate 5e-5 --start_from log_fc_rl --checkpoint_path log_fc_rl --save_checkpoint_every 6000 --language_eval 1 --val_images_use 5000 --self_critical_after 30You will see a huge boost on Cider score, : ).
A few notes on training. Starting self-critical training after 30 epochs, the CIDEr score goes up to 1.05 after 600k iterations (including the 30 epochs pertraining).
Now place all your images of interest into a folder, e.g. blah, and run
the eval script:
$ python eval.py --model model.pth --infos_path infos.pkl --image_folder blah --num_images 10This tells the eval script to run up to 10 images from the given folder. If you have a big GPU you can speed up the evaluation by increasing batch_size. Use --num_images -1 to process all images. The eval script will create an vis.json file inside the vis folder, which can then be visualized with the provided HTML interface:
$ cd vis
$ python -m SimpleHTTPServer
Now visit localhost:8000 in your browser and you should see your predicted captions.
$ python eval.py --dump_images 0 --num_images 5000 --model model.pth --infos_path infos.pkl --language_eval 1The defualt split to evaluate is test. The default inference method is greedy decoding (--sample_max 1), to sample from the posterior, set --sample_max 0.
Beam Search. Beam search can increase the performance of the search for greedy decoding sequence by ~5%. However, this is a little more expensive. To turn on the beam search, use --beam_size N, N should be greater than 1.
Using cpu. The code is currently defaultly using gpu; there is even no option for switching. If someone highly needs a cpu model, please open an issue; I can potentially create a cpu checkpoint and modify the eval.py to run the model on cpu. However, there's no point using cpu to train the model.
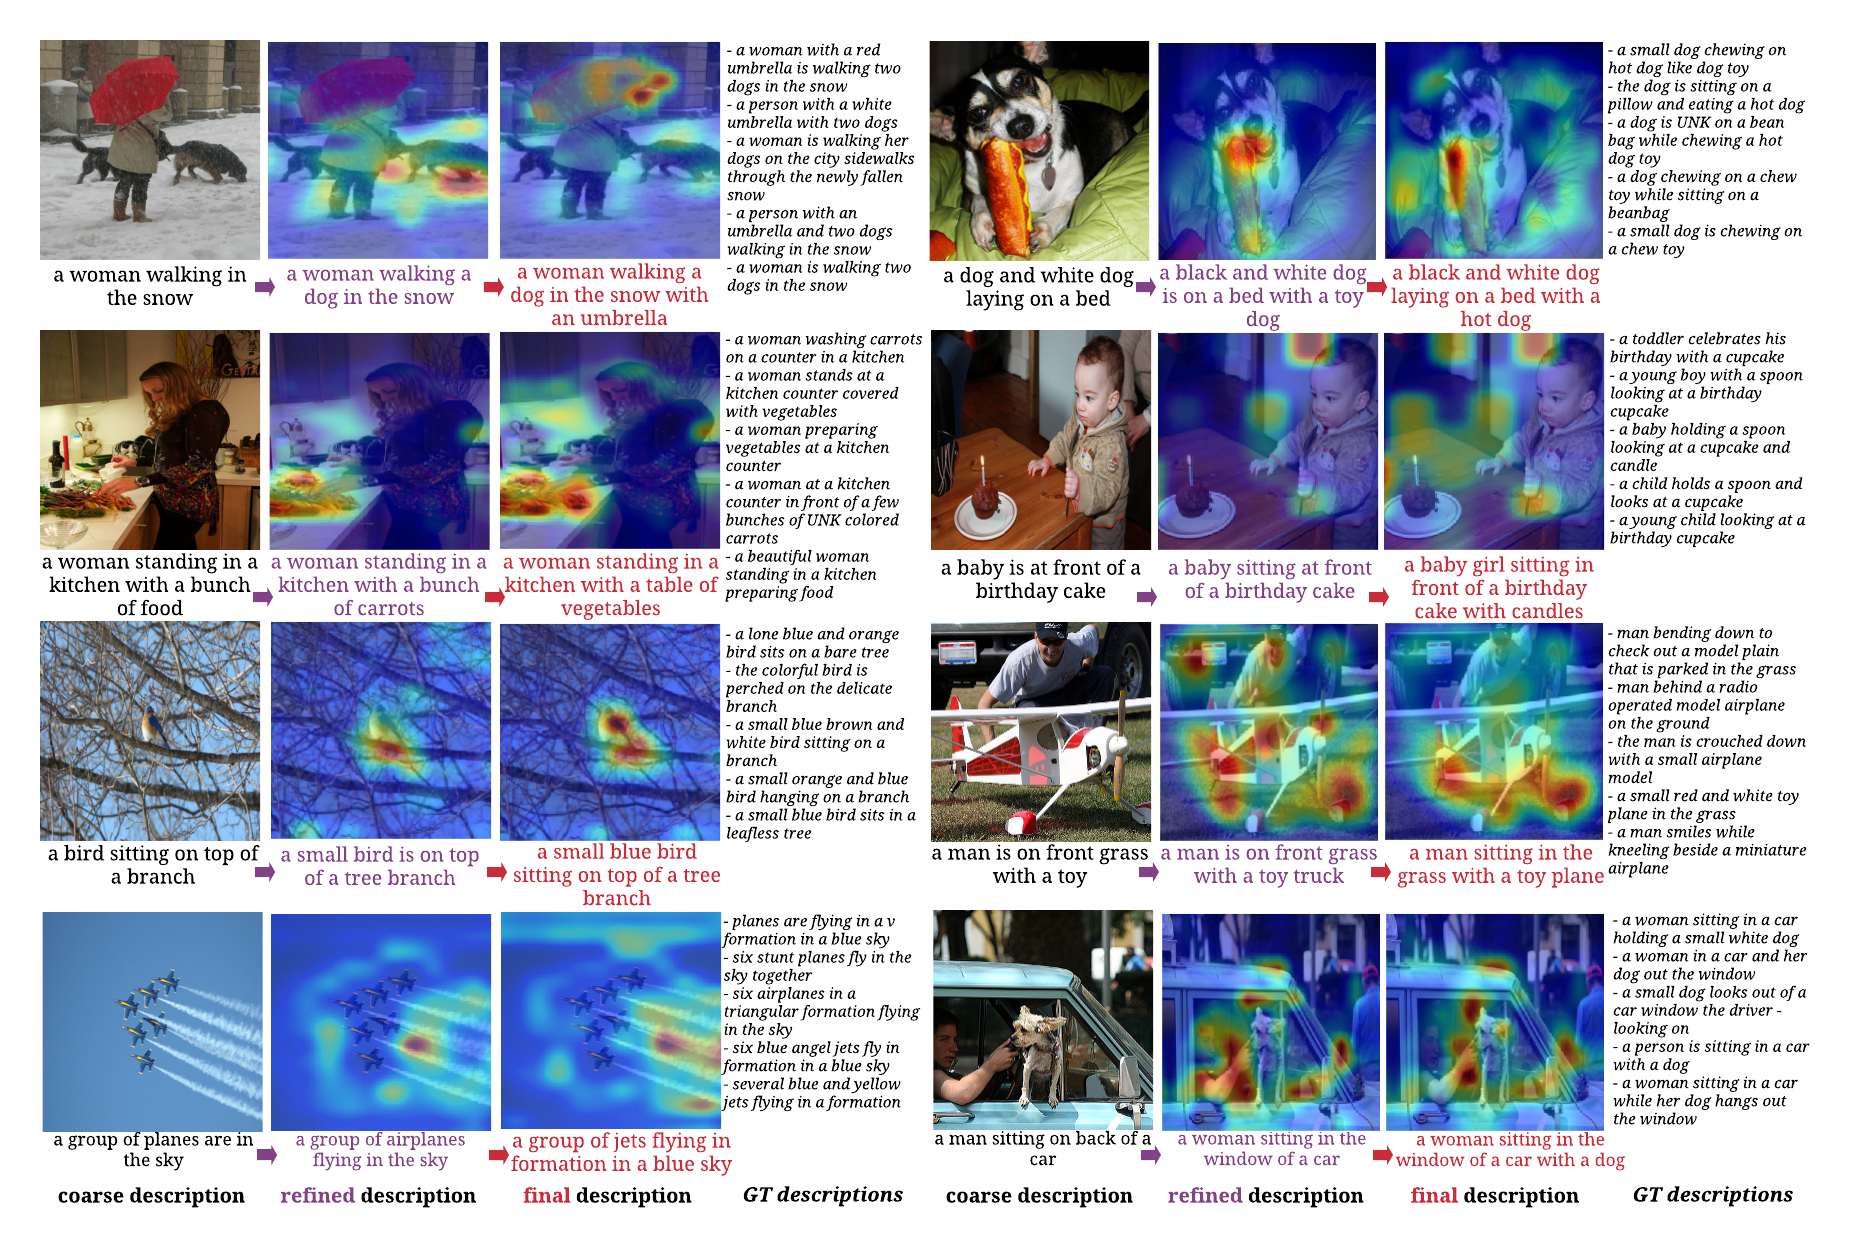
The current code is a complete mess, I am too lazy to clean it up. If you run the two stage model, you will have the following results:
Beam size: 5, image 217951: a man is flying a kite in the water
Beam size: 5, image 130524: a desk with two laptops and a laptop computer
Beam size: 5, image 33759: a young boy swinging a baseball bat at a ball
Beam size: 5, image 281972: a young boy holding a baseball bat at a ball
Beam size: 5, image 321647: a baseball player holding a bat on a field
Beam size: 5, image 348877: a close up of a pizza on a table
Beam size: 5, image 504152: a kitchen with lots of tools hanging on a wall
Beam size: 5, image 335981: a group of people standing in front of a store
Beam size: 5, image 455974: an open refrigerator filled with lots of food
Beam size: 5, image 237501: two teddy bears sitting next to each other
Beam size: 5, image 572233: a bride and groom are cutting a wedding cake
Beam size: 5, image 560744: a man sitting at a table with a glass of wine
Beam size: 5, image 74478: a group of people standing around a table
evaluating validation preformance... -1/5000 (0.000000, with coarse_loss 0.000000)
coco-caption/annotations/captions_val2014.json
loading annotations into memory...
Done (t=0.91s)
creating index...
index created!
using 5000/5000 predictions
Loading and preparing results...
DONE (t=0.05s)
creating index...
index created!
tokenization...
PTBTokenizer tokenized 307086 tokens at 795949.92 tokens per second.
PTBTokenizer tokenized 52259 tokens at 404650.36 tokens per second.
setting up scorers...
computing Bleu score...
{'reflen': 47118, 'guess': [47260, 42260, 37260, 32260], 'testlen': 47260, 'correct': [37136, 20995, 10427, 4984]}
ratio: 1.00301371026
Bleu_1: 0.786
Bleu_2: 0.625
Bleu_3: 0.478
Bleu_4: 0.360
computing METEOR score...
METEOR: 0.274
computing Rouge score...
ROUGE_L: 0.569
computing CIDEr score...
CIDEr: 1.208
loss: 0.0
{'CIDEr': 1.2080340073111597, 'Bleu_4': 0.3604371079856478, 'Bleu_3': 0.47804425685454716, 'Bleu_2': 0.6248041363880169, 'Bleu_1': 0.7857807871349813, 'ROUGE_L': 0.5689710128497217, 'METEOR': 0.2741939977947479}This framework followed by ruotian's image captioning project

