- Introduction
- Purpose
- Prerequisites
- Deployment
- Post Deployment
This template deploys necessary resources to run an Azure Synapse Proof-of-Concept. Following resources are deployed with this template along with some RBAC role assignments:
- An Azure Synapse Workspace with batch data pipeline and other required resources
- An Azure Synapse SQL Pool
- An optional Apache Spark Pool
- Azure Data Lake Storage Gen2 account
- A new File System inside the Storage Account to be used by Azure Synapse
- A Logic App to Pause the SQL Pool at defined schedule
- A Logic App to Resume the SQL Pool at defined schedule
- A key vault to store the secrets
The data pipeline inside the Synapse Workspace gets Newyork Taxi trip and fare data, joins them and perform aggregations on them to give the final aggregated results. Other resources include datasets, linked services and dataflows. All resources are completely parameterized and all the secrets are stored in the key vault. These secrets are fetched inside the linked services using key vault linked service. The Logic App will check for Active Queries. If there are active queries, it will wait 5 minutes and check again until there are none before pausing
This template allows the Administrator to deploy a Proof-of-Concept environment of Azure Synapse Analytics with some pre-set parameters. This allows more time to focus on the Proof-of-Concept at hand and test the service.
Owner role (otherwise Contributor + User Access Administrator roles) for the Azure Subscription the template being deployed in. This is for creation of a separate Proof-of-Concept Resource Group and to delegate roles necessary for this proof of concept. Refer to this official documentation for RBAC role-assignments.
-
Fork out this github repository into your github account.
-
Click 'Deploy To Azure' button given below to deploy all the resources.
-
Provide the values for:
- Resource group (create new)
- Region
- Company Tla
- Option (true or false) for Allow All Connections
- Option (true or false) for Spark Deployment
- Spark Node Size (Small, Medium, large) if Spark Deployment is set to true
- Sql Administrator Login
- Sql Administrator Login Password
- Sku
- Option (true or false) for Metadata Sync
- Frequency
- Time Zone
- Resume Time
- Pause Time
- Option (Enabled or Disabled) for Transparent Data Encryption
- Github Username (username for the account where this github repository was forked out into)
-
Click 'Review + Create'.
-
On successfull validation, click 'Create'.
-
- Current Azure user needs to have "Storage Blob Data Contributor" role access to recently created Azure Data Lake Storage Gen2 account to avoid 403 type permission errors.
- After the deployment is complete, click 'Go to resource group'.
- You'll see all the resources deployed in the resource group.
- Click on the newly deployed Synapse workspace.
- Click on link 'Open' inside the box labelled as 'Open Synapse Studio'.
- Click on 'Log into Github' after workspace is opened. Provide your credentials for the github account holding the forked out repository.
- After logging in into your github account, click on 'Integrate' icon in the left panel. A blade will appear from right side of the screen.
- Make sure that 'main' branch is selected as 'Working branch' and click 'Save'.
- Now open the pipeline named 'TripFaresDataPipeline'.
- Click on 'Parameters' tab at bottom of the window.
- Update the parameters' values. You can copy the resources' names from the resource group recently deployed.
- Make sure the SQL login username is correct and the workspace name is fully qualified domain name, i.e. workspaceName.database.windows.net
- After the parameters are updated, click on 'Commit all'.
- After successful commit, click 'Publish'. A blade will appear from right side of the window.
- Click 'Ok'.
- Once published all the resources will now be available in the live mode.
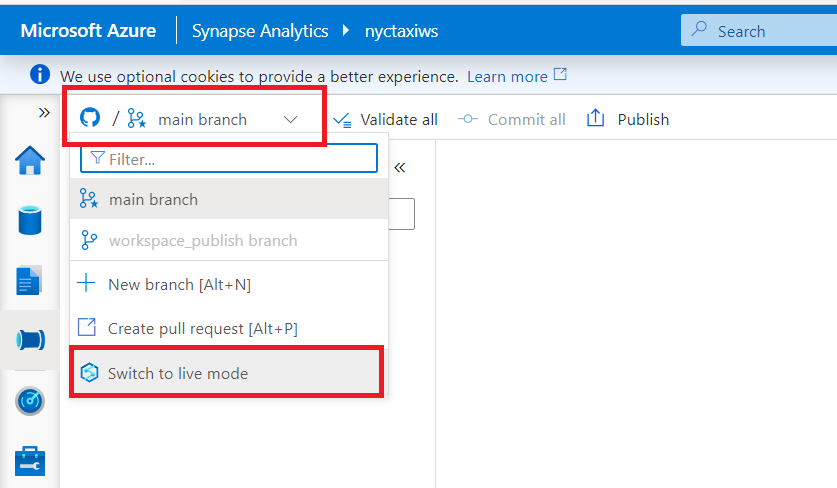
- To switch to the live mode from git mode, click the drop down at top left corner and select 'Switch to live mode'.
- Now to trigger the pipeline, click 'Add trigger' at the top panel and click 'Trigger now'.
- Confirm the pipeline parameters' values and click 'Ok'.
- You can check the pipeline status under 'Pipeline runs' in the 'Monitor' tab on the left panel.
- To run the notebook (if spark pool is deployed), click on 'Develop' tab on the left panel.
- Now under 'Notebooks' dropdown on left side of screen, click the notebook named 'Data Exploration and ML Modeling - NYC taxi predict using Spark MLlib'.
- Click 'Run all' to run the notebook. (It might take a few minutes to start the session)


