A quick way for everyone to learn how to use GitHub and Markdown. (Site design based on al-folio.)
Hopefully, everyone in the lab will be able to:
To do this, you'll first need to understand a little about:
- GitHub. For our purposes, you can think of GitHub as being like supercharged Google Docs for code. Multiple people can work on the same code, it keeps track of who made what changes and when, it's easy to reverse changes that have been made, and different versions can be developed at the same time. One nice feature for our site: instead of directly editing in HTML (which is not a language really meant for humans to understand), you'll be giving GitHub information in two human-readable formats, which a GitHub tool called Jekyll will use to generate the HTML.
- Markdown. This README.md file is written in Markdown. Markdown allows
for simple formatting like bold (double asterisks like this:
**bold**), italics (single asterisks like this:*italics*), and hyperlinks (put the linked text in square brackets immediately followed by the address in parens, like:[hyperlinks](http://www.ucsf.edu)). See this cheatsheet for more details; you can also check out the markdown in this README file by opening decisionlabucsf.github.io/README.md and clicking "Raw." - YAML. YAML is a structured data format that uses space-indents
(no tab-indents!) to show structure and uses colons to associate fields with
values. For example:
This list has three entries. Each entry has fields for name, position, and e-mail address. Note that you don't have to put strings within quotation marks, although sometimes this is helpful if your string has special characters like colons or quotation marks. You can also often embed Markdown code like asterisks in these strings.
- name: Alex Beagle
  position: Medical Student
  email: alex.beagle (at) ucsf.edu
- name: Julia Heunis
  position: Medical Student
  email: julia.heunis (at) ucsf.edu
- name: Carson Quinn
  position: Medical Student
  email: carson.quinn (at) ucsf.edu
Two steps:
A good size for team member pictures on this site is 311 pixels wide, in jpeg or
png format. Name your picture file something descriptive that won't be mistaken
for any other image on the site (like team_your-name.jpg -- underscores to
separate kinds of info and hyphens to break up words). Navigate to
/assets/img/
and drag-and-drop the picture file from your desktop into the browser window.
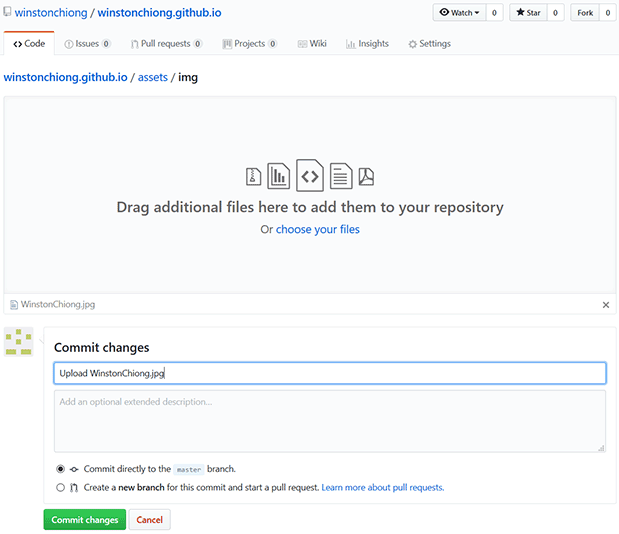
You'll then be asked to make a "commit":
In the box below Commit changes, instead of "Add files via upload" type in a
more informative description like "upload YOUR FILENAME for members.yml" and
click the green button to commit the file directly to the master branch.
Navigate to /_data/members.yml and click the pencil for "Edit this file":
If you already have a profile, you'll see fields for your name, degrees, position, e-mail address and so forth. E.g.:
- name: Ali Zahir
  image: team_Ali-Zahir.jpg
  altimage:
  position: Research Coordinator
  email: ali.zahir (at) ucsf.edu
  scholar:
  twitter:
  description: Ali, a clinical research coordinator working for Dr. Winston Chiong, currently oversees
              the coordination of a number of studies which center around decision-making in the aging brain,
              with a particular focus on how brain structures involved in financial and medical decisions are...
If you don't yet have a profile, you'll need to create a new one roughly
matching the format of the existing entries. (The entries will be displayed on
the site in the same order that they are here, so put yours in the appropriate
place.) Each entry begins with a hyphen and a space, and then each subsequent
part of that entry needs to be preceded by at least two spaces. If you added a
picture in the previous step, type in the filename you assigned it after image: .
Not every field needs to be filled in, e.g. if you don't have or don't want to
list a twitter account. After description: give yourself a quick bio. Feel
free to write two or three paragraphs in the first person, include something
about how you've gotten interested in neuroscience or working with patients,
and maybe something about yourself outside of work. Three carriage returns makes
a new paragraph, as long as all the lines in the description are indented to the
same degree.
At the bottom of the page you'll see another Commit changes box. In the box
below, you can write something like "Update members.yml to include YOUR NAME"
and click the green button to commit the file directly to the master branch.
After you commit, it might take a minute or two to see these changes reflected in the "team" page, and you might need to refresh your browser.
For journal articles and reviews: no book chapters, letters to the editor, conference abstracts, etc.
Start by going to pubmed.gov (or
pubmed.ucsf.edu from campus) to find the article. (You
can enter the title or search for Winston's articles by putting chiong w [au]
in the search bar.) Just to the left of each paper entry is a checkbox, a
numeral and the word "Cite." Click on "Cite" and you can copy a citation for
the paper of interest, in AMA format (a version of Vancouver).
If this is a quantitative paper, try to find the most interesting or revealing
figure from the paper. Click on the article link to bring up that individual
article's PubMed abstract, and follow the Full Text Links (such as UC-eLinks) to
the paper. IF you see a good image, download it and save it to your computer in
PNG or JPEG format with a short descriptive name like
"pubs_YEAR_ARTICLE-KEYWORDS.png". (Even better: use Photoshop or other editing
software to resize to a width of 185 pixels.)
If it's a qualitative or ethics paper that doesn't have useful figures, see if you can find a freely-usable image that fits with the theme. Two sources here are unsplash.com and Google Images--if you're using the latter, click on "Tools" and select "Usage Rights -> Creative Commons licenses for freely-usable images.
Use the methods described above in (1. If you don't have one yet, add a picture to /assets/img/) to upload the publication image to /assets/img/.
Use the same methods described above (2. Edit the team member data in the YAML file /_data/members.yml) to edit publications.yml. This list contains publications in reverse chronological order, try to put the new article in the right place. Use the Vancouver-formatted text file that you downloaded to your computer to fill out these data entries, roughly matching the format of the existing entries, e.g.:
- authors: "**Chiong W**, Kim AS, **Huang IA**, Farahany NA, Josephson SA."
  title: "Testing the presumption of consent to emergency treatment for acute ischemic stroke."
  details: "JAMA. 2014; 311(16):1689-91."
  year: 2014
  image: pubs_2014_testingpresumption_resized.png
  pmid: 24756520
  pmcid: PMC4126238
  openaccess: https://jamanetwork.com/journals/jama/fullarticle/1861784
  doi: 10.1001/jama.2014.3302
  file:
  filetype:
  github:
  biorxiv:
  psyarxiv:
  contentshare:
  preregistered: https://osf.io/ny3je/
  opendata: https://osf.io/m8dtk/
  openmaterials: https://osf.io/m8dtk/
In authors: use double asterisks (**Name**) to highlight lab members'
names. For consistency, keep the final period . at the end of the string for
authors: , title: and details: , and change the title to
sentence case if
necessary. Also under details: , spell out the actual journal title but leave
out "The" at the beginning of journal
titles, e.g. "The Journal of XYZ." After image: , enter the name of the
publication image you uploaded to
/assets/img/
in the previous step. Add the "pmid" (the PMID or PubMed ID number, usually 9
digits), the "pmcid" (the PMCID or PubMed Central ID number, usually the letters
"PMC" followed by a string of numerals) and the DOI number from the PubMed
abstract for the article.
Commit changes when you're done, using the green button to commit the file directly to the master branch and the description box below to leave a brief description.
In the entry above, there were several options after doi: that were not all
filled in. openaccess: is for articles that are Gold OA--that is, for which
anyone can read the formatted article on the website. contentshare: is a bit
similar, in which authors have a link that provides access that they can share
with others. If the article is either of those, enter the URL where the paper
can be found.
In some cases, if a paper is not Gold OA or we don't have a Content Sharing link, we will want to host PDFs of our papers so that people who don't have journal subscriptions can read them. Each journal has different policies about whether they allow this for articles published in their journal - you should check the journal's website (there's a general database on this called SHERPA/RoMEO that's also worth consulting.) We are interested in what RoMEO calls "green" and "blue" archiving policies. That is, we want to post versions that are word-for-word identical to the final version, whether this is what we call the "pdf - published version" (including all the typesetting and formatting of the journal), or the "pdf - author manuscript version (peer-reviewed & edited)" (final text including changes from peer review, but without the fancy journal formatting). We don't want to host the "pre-print" or "original version," which is the version of papers prior to peer review.
If we are self-hosting a paper on our website, rename the document file as
"AUTHORS - TITLE.pdf" and place it in
/assets/papers/.
Then in the entry for file: enter the document name, and in the entry for
filetype: indicate whether this is a "pdf - published version" or a "pdf -
author manuscript version (peer-reviewed & edited)."
Finally, biorxiv: and psyarxiv: are options for papers in which we've
posted a preprint prior to publication; preregistered: allows us to link to
preregistrations for a paper, and opendata: and openmaterials: allow us to
link to repositories where readers can download our data and materials (e.g., if
they're interested in reproducing our analyses or our experiments).
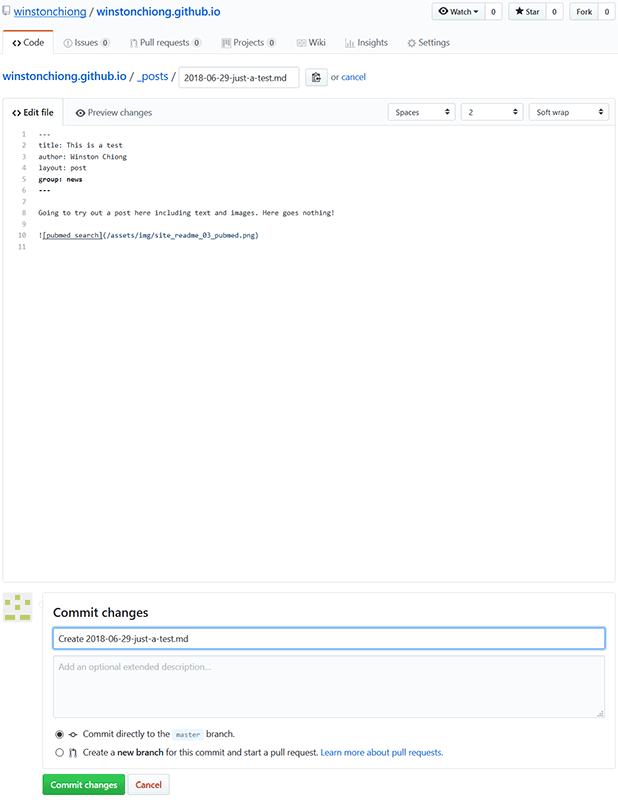
For this you will create a Markdown file containing the news post. Navigate to /_posts/ and click Create new file.
The filename must begin with the date in YYYY-MM-DD format, followed by a brief
title delimited by hyphens and then the extension .md. The post must begin
with these six lines:
---
title:
author:
layout: post
group: news
---
For title: , enter the post title as you want it to appear on the News page.
For author: , enter your own name as it is spelled in
/_data/members.yml.
If you would like to include an image, upload a JPEG or PNG file to
/assets/img/
(ideally, with a width of 490 pixels) and include a tag in your post using the
format:

where for ALT-TITLE you put in a brief description and for FILENAME you
enter the filename of the image you uploaded to
/assets/img/.
(I suggest naming it something like "news_YEAR_key-words.png".)
When you're done, commit changes, using the green button to commit the file directly to the master branch and the description box below to leave a brief description.


