Rails (ActiveRecord) integration with the Google Authenticator apps for Android and the iPhone. Uses the Authlogic style for cookie management.
Add this line to your application's Gemfile:
gem 'google-authenticator-rails'
And then execute:
$ bundle
Or install it yourself as:
$ gem install google-authenticator-rails
Example:
class User
  acts_as_google_authenticated
end

@user = User.new
@user.set_google_secret           # => true
@user.google_secret_value         # => 16-character plain-text secret, whatever the name of the secret column
@user.google_qr_uri               # => http://path.to.google/qr?with=params
@user.google_authentic?(123456)   # => true
@user.clear_google_secret!        # => true
@user.google_secret_value # => nilWhen setting up an account with GoogleAuthenticatorRails you need to provide a label for that account (to distinguish it from other accounts).
GoogleAuthenticatorRails allows you to customize how the record will create that label. There are three options:
- The default just uses the column
emailon the model - You can specify a custom column with the
:column_nameoption - You can specify a custom method via a symbol or a proc
Example:
class User
  acts_as_google_authenticated :column_name => :user_name
end

@user = User.new(:user_name => "ted")
@user.google_label                      # => "ted"

class User
	acts_as_google_authenticated :method => :user_name_with_label

	def user_name_with_label
	  "#{user_name}@example.com"
	end
end

@user = User.new(:user_name => "ted")
@user.google_label                    # => "ted@example.com"

class User
	acts_as_google_authenticated :method => Proc.new { |user| user.user_name_with_label.upcase }

	def user_name_with_label
	  "#{user_name}@example.com"
	end
end

@user = User.new(:user_name => "ted")
@user.google_label                    # => "TED@EXAMPLE.COM"
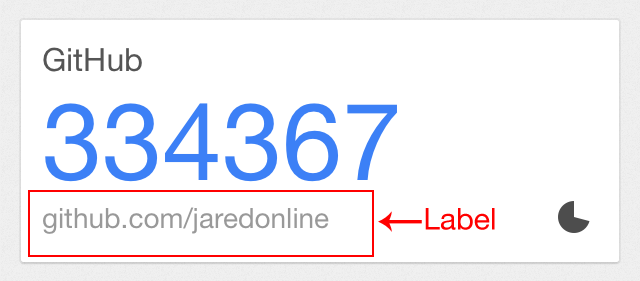
Here's what the labels look like in Google Authenticator for iPhone:
The "google secret" is where GoogleAuthenticatorRails stores the
secret token used to generate the MFA code.
You can also specify a column for storing the google secret. The default is google_secret.
Example
class User
	acts_as_google_authenticated :google_secret_column => :mfa_secret
end

@user = User.new
@user.set_google_secret
@user.mfa_secret # => "56ahi483"You can specify a custom drift value. Drift is the number of seconds that the client and server are allowed to drift apart. Default value is 5 seconds.
class User
  act_as_google_authenticated :drift => 31
endYou can also specify which column the appropriate MfaSession subclass should use to look up the record:
Example
class User
  acts_as_google_authenticated :lookup_token => :salt
end
The above will cause the UserMfaSession class to call User.where(:salt => cookie_salt) or User.scoped(:conditions => { :salt => cookie_salt }) to find the appropriate record.
GoogleAuthenticatorRails makes one very large assumption when attempting to lookup a record. If your MfaSession subclass is named UserMfaSession it assumes you're trying to lookup a User record. Currently, there is no way to configure this, so if you're trying to lookup a VeryLongModelNameForUser you'll need to name your MfaSession subclass VeryLongModelNameForUserMfaSession.
For example:
# app/models/user.rb
class User < ActiveRecord::Base
  acts_as_google_authentic
end

# app/models/user_mfa_session.rb
class UserMfaSession < GoogleAuthenticatorRails::Session::Base
endGoogleAuthenticatorRails looks up the record based on the cookie created when you call MfaSession#create. The #create method looks into the record class (in our example, User) and looks at the configured :lookup_token option. It uses that option to save two pieces of information into the cookie, the id of the record and the token, which defaults to persistence_token. persistence_token is what Authlogic uses, which this gem was originally designed to work with.
This can cause a lot of headaches if the model isn't configured correctly, and will cause a GoogleAuthenticatorRails::Session::Persistence::TokenNotFound error.
This error appears for one of three reasons:
userisniluserdoesn't respond to:persistence_tokenuser.persistence_tokenis blank
For example:
# app/models/user.rb
class User < ActiveRecord::Base
  acts_as_google_authentic
end

# Model has attributes:
# id:   integer
# name: string
# salt: string

# app/models/user_mfa_session.rb
class UserMfaSession < GoogleAuthenticatorRails::Session::Base
end

# app/controllers/mfa_session_controller.rb
class MfaSessionController < ApplicationController
  def create
    UserMfaSession.create(user) # => Error: GoogleAuthenticatorRails::Session::Persistence::TokenNotFound
  end
end
The above example will fail because the User class doesn't have a persistence_token method. The fix for this is to configure actions_as_google_authentic to use the right column:
# app/models/user.rb
class User < ActiveRecord::Base
  acts_as_google_authentic :lookup_token => :salt
end

# Model has attributes:
# id:   integer
# name: string
# salt: string

# app/models/user_mfa_session.rb
class UserMfaSession < GoogleAuthenticatorRails::Session::Base
end

# app/controllers/mfa_session_controller.rb
class MfaSessionController < ApplicationController
  def create
    UserMfaSession.create(user)
  end
end
This call to #create will succeed (as long as user.salt is not nil).
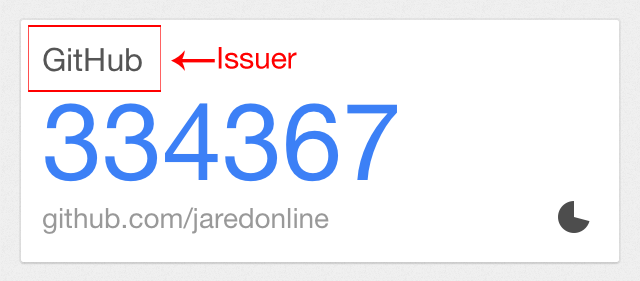
You can also specify a name for the 'issuer' (the name of the website) where the user is using this token:
Example
class User
  acts_as_google_authenticated :issuer => 'example.com'
end
You can also use a Proc to set a dynamic issuer for multi-tenant applications or any other custom needs:
class User
  acts_as_google_authenticated :issuer => Proc.new { |user| user.admin? ? "Example Admin" : "example.com" }
end
This way your user will have the name of your site at the authenticator card besides the current token.
Here's what the issuers look like in Google Authenticator for iPhone:
This is a very rough outline of how GoogleAuthenticatorRails is meant to manage the sessions and cookies for a Rails app.
# Gemfile

gem 'rails'
gem 'google-authenticator-rails'
First add a field to your user model to hold the Google token.
class AddGoogleSecretToUser < ActiveRecord::Migration
  def change
    add_column :users, :google_secret, :string
  end
end
# app/models/users.rb
class User < ActiveRecord::Base
acts_as_google_authenticated
endIf you want to authenticate based on a model called User, then you should name your session object UserMfaSession.
# app/models/user_mfa_session.rb

class UserMfaSession <  GoogleAuthenticatorRails::Session::Base
  # no real code needed here
end
# app/controllers/user_mfa_session_controller.rb
class UserMfaSessionController < ApplicationController
def new
# load your view
end
def create
user = current_user # grab your currently logged in user
if user.google_authentic?(params[:mfa_code])
UserMfaSession.create(user)
redirect_to root_path
else
flash[:error] = "Wrong code"
render :new
end
end
end# app/controllers/application_controller.rb
class ApplicationController < ActionController::Base
before_filter :check_mfa
private
def check_mfa
if !(user_mfa_session = UserMfaSession.find) && (user_mfa_session ? user_mfa_session.record == current_user : !user_mfa_session)
redirect_to new_user_mfa_session_path
end
end
endYou can configure the MfaSession cookie by creating an initializer:
# config/initializers/google_authenticator_rails.rb

# The cookie normally expires in 24 hours, you can change this to 1 month
GoogleAuthenticatorRails.time_until_expiration = 1.month

# You can override the suffix of the cookie's key, by default this is mfa_credentials
GoogleAuthenticatorRails.cookie_key_suffix = 'mfa_credentials'

# Rails offers a few more cookie options, by default only :httponly is turned on, you can change it to HTTPS only:
GoogleAuthenticatorRails.cookie_options = { :httponly => true, :secure => true, :domain => :all }
Additional cookie option symbols can be found in the Ruby on Rails guide.
If you want to manually destroy the MFA cookie (for example, when a user logs out), just call
UserMfaSession::destroyNormally, if an attacker gets access to the application database, they will be able to generate correct authentication codes,
elmininating the security gains from two-factor authentication. If the application's secret_key_base is handled more securely
than the database (by, for example, never putting it on the server filesystem), protection against database compromise can
be gained by setting the :encrypt_secrets option to true. Newly-created secrets will then be stored in encrypted form.
Existing non-encrypted secrets for all models for which the :encrypt_secrets option has been set to true
can be encrypted by running
rails google_authenticator:encrypt_secretsThis may be reversed by running
rails google_authenticator:decrypt_secretsthen by removing, or setting false, the :encrypt_secrets option.
If secret_key_base needs to change, set old_secret_key_base to the old key in config/secrets.yml before generating the new key.
Then run
rails google_authenticator:reencrypt_secretsto change all encrypted google secret fields to use the new key.
If the app is not running under Rails version 4.1 or above, encryption will be disabled, and a warning issued if :encrypt_secrets
is enabled on a model.
If encryption is enabled for a model, the Google secret column of its table must be able to hold at least 138 characters, rather than just 16.
- Fork it
- Create your feature branch (
git checkout -b my-new-feature) - Commit your changes (
git commit -am 'Added some feature') - Push to the branch (
git push origin my-new-feature) - Create new Pull Request
MIT.


