StoryToolkitAI
Description
StoryToolkitAI is a film editing tool that can help editors work more efficiently by automatically transcribing audio and allowing them to search transcripts semantically with the help of AI.
The tool works locally, independent of any editing software, but it also functions as a Davinci Resolve Studio 18 integration via API. It is using OpenAI Whisper for speech-to-text, sentence transformers for semantic search and a few other AI technologies to get stuff done.
Key Features
- Free Automatic Transcriptions in many languages on your local machine directly from Resolve or local files
- Free Automatic Translation to English on your local machine
- Advanced Search - allows you to search one or many transcripts semantically using AI
- Mark and Navigate Resolve Timelines via Transcript, plus other handy Resolve-only features
- Transcript Segment Groups allows the grouping of transcription segments into groups similar to marking in NLEs
- Import subtitles after transcription from the tool directly into Resolve
- Convert existing SRT files to transcripts and use them in the tool (non-standalone version only until next release)
- Export of transcripts to multiple formats, including SRT and TXT
- Batch transcriptions using transcription queuing
- Partial re-transcriptions of timelines/videos/audio files
Work in progress
- Speaker Recognition
- Advanced Search on Markers - for Resolve (and possibly other NLE) markers
- Integration with other AI / ML tools
- Integration with other NLEs / standalone players
- Plus more flashy features as clickbait to unrealistically raise expectations and destroy competition
Our plan is to incorporate more AI technologies that make editors' work easier and more efficient, something similar to having an AI Assistant Editor which knows what is where in your footage and can even classify footage by meaning, emotions, visual content etc. Automated transcriptions are simply a means to an end.
For more details regarding features, go here.
The app is in this stage raw and not polished at all, but we use it daily in our editing room. It's for free not only out of sheer generosity, but also because we'd like to change how people approach editing by using AI.
Some of the above features are only available in the non-standalone version of the tool, but they will be available in the standalone version in the next release.
Is it really completely free?
Yes, the tool runs locally like butter and there's no need for any additional account to transcribe, translate to English, or use any of its features. We may develop features that depend on external services, but the current features will always be free and will never be capped.
Of course, we won't say no to envelopes with foreign currency banknotes or cases with contraband CRT editing screens.
Transcription Results
The results we get with Whisper are significantly better than other Speech-to-Text model (including Google, AWS etc.) out there and the models are free to use. According to OpenAI, the models have been trained on data in 98 different languages (cca. 65% of data in English) and show strong Automated Speech Recognition results in ~10 languages. More technical blabla on the OpenAI Whisper Github or the Scientific Paper, for hardcore enthusiasts.
The magic takes over even for the most difficult noisy low bitrate stuff you can feed it - like recordings of your assistant editor complaining about you without realizing that their back pocket is sending voice messages to random people from their contacts list.
The results are almost perfect for at least 10 languages, but remember, this is a machine doing transcriptions for you. And machines, just like unpaid interns have dreams too... For example, on longer periods of silence in your audio, you may expect to see words that aren't there. Also, for uncommon names, it might give you nicknames instead, just to mess with your feelings.
Transcription Speed
We used the expression "runs like butter" above. There's one thing you need to know about butter - it's good when it's fresh, but when it gets old it might get clumpy and smelly. Similar, the more state-of-the-art your machine CPU or GPU is, the faster you get results. Please don't use this on your grandpa's Pentium 4 from the closet.
Totally unscientific anecdotal tests:
Macbook Pro M1 8-core 16GB RAM - 30-second timeline transcribed in cca. 45 seconds (1.5x time length of audio)
Windows Workstation with GTX1070 - 60-second timeline transcribed in cca. 20 seconds (0.25x time length of audio)
We also received reports of transcriptions on RTX GPUs needing around 0.05-0.10x the time of the audio. So if you're editing faster than that, please stop, you're embarrassing the rest of us.
Contributions
This tool is coded by Octavian Mot, your friendly filmmaker who hates to code and tries to keep it together as half of mots. Our team uses it daily in our editing room which allows us to update it with features that we need and think will be useful to others.
Feel free to get in touch with compliments, criticism, and even weird ideas for new features.
The tool would be useless without using the following open source projects:
- OpenAI Whisper
- Sentence Transformers
- and many others packages that are listed in the requirements.txt file
Setup & Installation
We're currently working to get the app in a standalone binary version for different operating systems and platforms, so before anything else, check if there is a release available for your OS and platform here
But if a binary isn't available, before you attempt something silly like actually installing this tool on your machine, please keep in mind that by clicking on the instructions you will see many computer commands which are the main method used by our ancestors to tame their machines. Approach them with no fear. But do keep in mind that you might end up ruining your computer, destroying the Internet, starting AI apocalypse, losing your job and your only real friend, have children out of wedlock, and/or marry your lost non-identical twin by mistake - not necessarily in that order and highly unlikely because of the commands, but still slightly possible. Nevertheless, we're not responsible for any of it or anything else that might happen.
Nevertheless, for detailed installation instructions go here.
How to transcribe:
The following process assumes that you have Davinci Resolve Studio installed. However, the tool also works without Resolve on the machine.
1. Open Resolve and StoryToolkitAI
Open a project in Resolve and then StoryToolkitAI (or the other way around... why not make it harder for yourself?)
2. Open the Timeline and Press Transcribe
Go to Resolve and open the Timeline that you want to transcribe, then click the "Transcribe Timeline" button.
3. Wait a bit
Your current timeline will automatically render to Audio Only WAV, and then a window with the transcription settings will pop up.
Enter the transcription settings (more info about settings here) and then hit "Start".
Once the process has started, it needs a bit of time to transcribe. After all, there is a human-like AI trapped in your machine doing your job for you on a mechanical typewriter with missing keys... It has the right to have day-dreams too.
As soon as it's done, the transcription will be saved on your machine.
Important Note: The first time you transcribe something, it will take a bit longer to start the process because Whisper needs to download the model file (around 1.5GB for the medium model) to your local cache. But, after the model is saved on your machine, transcriptions will take less.
4. Transcription Finished
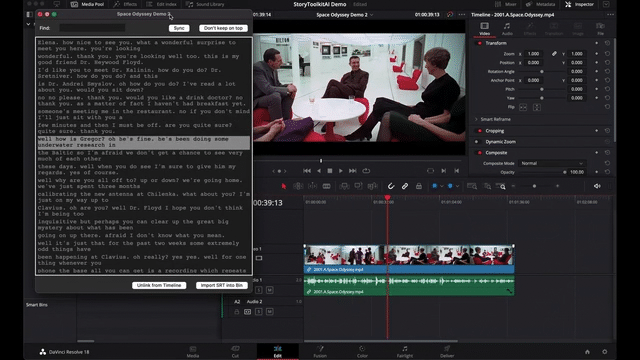
When the transcription is ready, a Transcription Window will pop up, showing you the transcript and allowing you to do all sorts of magic things, like:
- linking the transcript to the current Resolve timeline (which will automatically open the transcript whenever you open the timeline in resolve)
- importing the generated SRT file into the current Resolve bin.
- searching words or concepts in the transcript
- clicking on phrases to take your Resolve playhead on the right timecode
- etc.
Less Important Note: Please make sure you sit down and have a glass of fresh water next to you when you see your first transcription using OpenAI Whisper. Don't worry, the water coming down your cheeks are tears of joy. In the likely case of hyperventilation, take a deep long breath and drink a bit of water. But, yet again, if the transcription is not above average, don't despair, it's better to be prepared than sorry.
Features Info
Transcription Settings
Before starting the transcription process, you can tweak different options, including selecting the source language of the footage, choosing between different Whisper models, the processing device, etc. For faster and better results, we recommend at least selecting the source language.
Note: when selecting "transcribe+translate" as "task", the tool will add both a transcription and a translation job to the queue, as if you selected them individually. The translation will not use the previous transcription process results at all, so this means that the process will take 2x the processing time.
For details regarding the models and their performance, please check this section from the OpenAI Whisper repo. Also, keep in mind that if you're transcribing on a CUDA device, you need minimum 5GB of VRAM for the medium model, and minimum 10GB for the large model.
Starting with version 0.16.16, we added a setting called Initial Prompt. This is useful if you want the transcription algorithm to adopt a certain style (for eg. separating speaker sentences, or using caps after punctuation), or even prime it to use certain names (for eg. "Helena" instead of "Elena"), or avoid rookie mistakes (for eg. showing "Hey, Wood!" instead of "Heywood"). The default prompt separates speaker sentences and uses caps after punctuation. Remember: this is kind of like telling your assistant editor "do that", but it's up to them if they want to follow your instructions or not - welcome to the wonderful world of AI. This feature is super experimental - it might even accept instructions like "separate speakers" or "make me coffee", but you have to try it on your own.
Time Intervals allows you to selectively transcribe only a portion of the timeline and Exclude Time Intervals allows you to exclude certain portions of the timelines. The recommended format for these two fields is: "0.00 - 0.00". For eg., if you want to transcribe the first 10 seconds of the audio and the portion between 30 and 40 seconds, you would enter this in the Time Intervals field:
0.00 - 10.00
30.00 - 40.00
Resolve "transcription_WAV" Preset
If you're transcribing timelines directly from Resolve and prefer to save them in WAV instead of MOV, go to the Resolve Render Page, select the Audio Only preset, make sure that the "Export Video" in the Video tab is disabled, then, in the "Audio" tab, select the "Wave" format and "Linear PCM" as codec. Then save this preset as "transcription_WAV", and the next time you transcribe, you should see Resolve rendering wav files.
As a matter of fact, you can use any preset you want, as long as it renders audio too (Linear PCM preferred). For eg., if you want to render out an H264 proxy and include Data Burn-In with timecode info, just create that preset in Resolve and then modify the value of the 'transcription_render_preset' setting in the StoryToolkitAI config.json file in your user data folder (in the future, this will be editable from the GUI). Just keep in mind that before going through the transcription process, the tool will re-interpret the audio internally as Linear PCM (and you might need ffmpeg on your machine for that), so if you're using a CPU-intense codec, the process might take longer.
Another important thing to note is that your audio channels are best left as Mono on your timeline and/or renders, since the algorithm may ignore one channel or the other, and therefore only give you a partial transcription.
Re-transcribing Transcripts
In some instances you might want to re-transcribe a transcript, for example if you want to change the Whisper model, or if the speech was in a different language for that particular portion of the transcript.
To re-transcribe the entire transcript, you need to have the transcription window open, and then press the key T on your keyboard.
To re-transcribe only a portion of the transcript, select which segments you want to re-transcribe, and then press the key T on your keyboard - the tool will automatically fill the Time Intervals field in the Transcription Settings window.
You can also not select any segments, but press the key T and then manually enter the time intervals that you want re-transcribed in the Time Intervals field.
Note: our tests show that re-transcribing only a short portion of the transcript sometimes doesn't give out the best results and most likely messes up with the transcript timings for that particular portion that you've re-transcribed. This is probably due to the fact that the Whisper model works better when it has more context to work with. In these cases, try to use either a larger model, or provide Whisper with more info using the Initial Prompt. Let us know what tricks you use to get the best results!
Advanced Transcript Search
Transcription windows have an "Advanced Search" button that will open up a separate search window. The system is now quite experimental and very raw, but it will allow you to search transcripts almost like you search something on Google. This means that whenever you enter your search term, the tool will try to understand its meaning and find the phrases that have the most similar meaning. The results will be ranked by a score that takes into account the semantic similarity with your search term. Once the results appear in the window, you can click them and the tool will select the respective segment in the transcript and move the playhead to the respective timecode in Resolve (if connected). CMD/CTRL+Click will select the segments in the transcript and allow you to mark them later in Resolve (see Adding Markers section above).
There's also an Advanced Search button in the main window that will allow you to search in all the transcription files you select. If you press Shift while clicking the button it will prompt you with a folder selection instead, so you can actually feed it multiple transcription from different directories.
This is basically like having a search engine connected to Resolve on your machine.
You can also pass multiple search terms, using the | (pipe) character to separate them. For example, if you want to
search for "about life events" or "about sports", you can enter about life events | about sports in the search field.
The tool will then search for each term separately and return separate results for each term in the same search window.
If you want to tell the tool how many results you want to see, just use [max_results] at the beginning of the search,
for eg.: [20] about life events | about sports. This will return the top 20 results for each term.
For now, the search relies on punctuation in the transcripts to separate phrases and feed them to the algorithm, but this will be improved in a future update by allowing AI to look deeper into your transcripts.
The quality of your results will depend on the terms you use for search. Just like on a web search engine, you should be kind of specific, but not too specific about what you're searching. For eg., if you want to search for phrases where your characters are talking about "genders", you should probably use "about genders". Simply typing "genders" in the search box, will probably also include people names since the alghorithm will think that names are related to genders.
Keep in mind that we're using a very basic algorithm for now, so the results might not be perfect, but it can already give you some really good results if you prompt it right - remember it's a neural network behind the thing! Feel free to be as descriptive as you want in your search, and try to tweak the search terms until you get the results you're looking for.
Important Note: The first time you use this feature, it will take a bit longer to start the process because the tool needs to download the model file (around 500MB) to your local cache. But, after the model is saved on your machine, the search should work almost in real time.
About search speed: the search is pretty fast, but it will depend on the size of the transcript (or transcripts) you're searching. Using a lot of transcripts will make the search slower, so a smaller transform model is recommended (more on that later). On a Mac M1, using the all-MiniLM-L6-v2 model, searching through an hour of audio (cca. 700 phrases) takes around 2 seconds, while searching through 40+ hours of audio (cca. 34k phrases) takes around 2 minutes.
Transcript Word Search
Once a transcript is loaded, a basic search function will let you find words in the transcript and show you their position. Once you find what you're looking for, simply clicking the phrase will move the Resolve playhead to the respective timecode.
Transcript Groups
Starting with v0.17.5, you can group transcript segments together so that you can easily select them later if you need to. To add segments to groups, select them with V (or CMD/CTRL+Click, or other selection shortcuts) and then press CMD/CTR+G. To see the group list for each transcript, click CMD/CTRL+G while in the transcription window. From there, you can also add group notes for each group. For eg. if you group certain segments on a certain topic, you can add your notes on that particular topic in the group notes field. You can also use the groups to select all the segments of a certain character and so on.
Note: the groups are based on time intervals, so if you change the start or end times of segments, they might drift outside of certain groups that they're in. Simply click on the group, select the segments and press CMD/CTR+G again to re-add them to the group
In the future, we will add the ability to perform an advanced search on one on more groups.
Also, we will most likely have a few features which will auto-group segments together (for eg. character recognition, topic classification, Resolve / NLE markers to group segments, etc.)
Direct Translations to English
The tool also supports direct translation to English by clicking the "Translate Timeline to English" button. However, it will not generate any original language transcription together with the translation, meaning that you'll have to transcribe and translate in two different processes.
Opening SRT Files as Transcripts
(only available in non-standalone version until next release) If you click on "Open Transcript" and select an SRT file, the tool will automatically convert it to a transcription file and open it in the transcription window. This is useful if you want to use transcripts made by other apps in the tool, for eg. to search through them, navigate and mark timelines in Resolve etc.
Davinci Resolve integrations
Linking Transcriptions to Timelines
In the transcription window, the "Link" button will attach the transcription to the currently opened timeline in Resolve. This will make the tool automatically open the right transcription when you switch between timelines in Resolve. In a future update, this will also help the Global Search function know in which timeline, at what timecode you can find the term you're looking for.
Timeline Navigation via Transcript
Clicking on the transcript segments (phrases) will move the playhead to the respective timecode in Resolve. UP/DOWN keys will also let you navigate between transcript phrases (see more transcription window shortcuts below)
Adding Markers to Timeline via Transcript
You can now add markers that include the selected phrases in the transcript by pressing either M or SHIFT+M (see more shortcuts below)
Resolve Playhead to Transcript Sync
The tool highlights the transcript words at the current timecode in Resolve. To activate this function, simply press "sync" in the transcription window and the words will be highlighted each time the playhead stops moving in Resolve.
Note: we found some issues when synching timelines that have a frame rate of 23.976fps because of a bug in the Resolve API. Unfortunately, the synching of these timelines might drift until Blackmagic solves the bug.
Copy Timeline Markers to Same Clip
This copies the current markers to its corresponding clip in the media bin. Due to Resolve API limitations, it's important that the corresponding clip is in the bin that is currently opened in the Media Panel. The clip's existing markers will be deleted before the new ones are copied!
Copy Clip Markers to Same Timeline
Same as the function above, but in this case, the markers of the clip are copied to the timeline.
Render Markers to Stills
This will render to TIFF and JPEG the first frame of the markers of a certain color. Works only on markers from the opened timeline. The first time you use this function, it should also add a Still_TIFF render preset in Resolve. This is necessary to render the stills in TIFF format, which then should get converted to JPEG if you have FFMPEG on your machine.
Render Markers to Clips
This will render to H.264 the entire duration of the markers of a certain color from your currently opened Resolve timeline.
Transcription Window Shortcuts
Mouse Click     - move active segment on clicked text and move playhead to start of active segment

CMD/CTRL+Click  - add clicked text to selection

OPT/ALT+Click   - edit transcript segment

Up, Down keys   - move the cursor up and down on the transcript (we call it "active segment")

Semicolon (;)   - move playhead to start of active segment (or of selection)

Apostrophe (')  - move playhead to end of active segment (or of selection)

Colon (:)       - align start of active segment with Resolve playhead

DoubleQuote (") - align end of active segment with Resolve playhead

V               - add active segment to selection

Shift+V         - deselect all active segments

CMD/CTRL+A      - select all transcript segments

Shift+A         - create selection between the previously active and the currently active segment
                  also works to create a selection for the last played segments in Resolve (if sync is active):
                  for eg.:
                  press 'sync', click a phrase, press play in Resolve, stop, then press Shift+A in the tool

Shift+C         - copy transcript of active segment/selection with timecodes at the beginning of each block of text
                  (if Resolve is available)

CMD/CTRL+Shift+C- copy transcript of selection with timecodes at the beginning of each transcript line
                  (or transcript seconds, if Resolve is not available)

Backspace       - delete active segment (will ask for confirmation)

m               - add duration markers for the active segment/selection
                  in case there are gaps between the text segments,
                  the tool will create a marker for each block of uninterrupted text

Shift+M         - add duration markers as above, but with user prompt for the marker name

q               - close transcript window

Shift+L         - link transcription to the current timeline (if available)

s               - enable sync

Tab             - cycle between search and transcript navigation

CMD/CTRL+E      - edit transcript

Escape          - when editing transcripts, this will defocus and save the transcript

t               - re-transcribe current transcription or selected segments

CMD/CTRL+G      - group selected segments (or update an existing group, if a group is selected)

Shift+G         - open groups window
Other shortcuts etc.
Shift+Click on                      - allows you to batch transcribe multiple files
"Transcribe/Translate Timeline"       from your drive instead of the current timeline

Shift+Click on                      - allows you to select which folders to use
"Advanced Transcript Search"          for the transcript search corpus

CMD/CTRL+Click on                   - selects all the lines containing the clicked
search results                        result in the transcript window
Known issues
If the tool doesn't connect with Resolve:
Make sure that, in Davinci Resolve Preferences -> General, "External Scripting using" is set to Local. Again, the tool only works with Resolve Studio and not the free version of Resolve (not that we know of).
Tool freezing during playback
Currently, the tool gets stuck as it waits a reply from the Resolve API, while Resolve is playing back, but it gets un-stuck as soon as the playhead stops moving. This will be fixed in a future update soon.
Hallucinations during audio silence
In some cases, on chunks of audio that are silent, Whisper sometimes writes phrases that aren't there. This is a known issue, and we'll code a workaround soon.
Timecode issues with 23.976 timelines
A bug in the Resolve API which sometimes reports 23.976 fps as 23fps creates a bunch of issues mainly for operations that use timecode (transcript to playhead navigation, adding markers at the precise frame etc.). Unfortunately, this can only be fixed by Blackmagic within Resolve itself (fingers crossed for an update?)
Black Interface / Flickering on Intel Macs
Some users are experiencing weirdness with the interface on Intel Macs. This is due to a bug in Tcl/Tk - a package required to create the interface, which needs to be re-installed together with Python and everything else on the machine. Details here and a possible fix
RuntimeError: CUDA out of memory
If you get this message while transcribing on the GPU, it means that your GPU doesn't have enough memory to run the model you have selected. The solution is to either use a smaller model, or to transcribe on the CPU.
here.
Please report any other issues
As mentioned, the tool is in a super raw state of development. We use it every day in our editing workflow, but some issues might escape us. Please report anything weird that you notice and we'll look into it.
To report any issues, please use the Issues tab here on Github: https://github.com/octimot/StoryToolkitAI/issues