The ESP8266 is a low-cost WiFi module built by Espressif Systems. Its popularity has been growing among the hardware community thanks to it’s nice features and stability, to the point that it can be easily programmed using your Arduino IDE.
- An ESP8266 module.
- An Arduino UNO, UartSBee or any Uart to USB device.
- Arduino IDE 1.6.5 or higher
- UbidotsMicroESP8266 library
- Jumper wires.
NOTE: This library is also compatible with the NodeMcu v1.0, on our help center you'll find a guide with the setup and examples codes.
First we’ll need to identify the pinout of ESP8266.
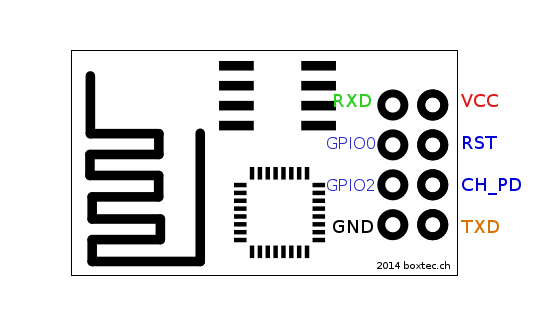
| ESP8266 | UARTbee | Arduino UNO |
|---|---|---|
| RXD | TXD | RX |
| GPIO0 | GND | GND |
| GPIO2 | — | — |
| GND | GND | GND |
| VCC | 3.3V | 3.3V |
| RST | — | — |
| CH_PD | 3.3V | 3.3V |
| TXD | RXD | TX |
Note: If you are using an Arduino UNO you will need to set Arduino RST to GND. Please be careful with the VCC of the ESP8266, it works only with a 3.3V supply.
- Download Arduino IDE.
- Open you IDE and click on File -> Preferences.
- In Aditional Boards Manager URLs add this line and click on “OK”: “http://arduino.esp8266.com/stable/package_esp8266com_index.json”
- Open Boards Manager from Tools -> Board menu and install esp8266 platform.
- Select the ESP8266 board from Tools > Board > Generic ESP8266 Module.
- Download the UbidotsMicroESP8266 library here.
- Now, click on Sketch -> Include Library -> Add .ZIP Library.
- Select the .ZIP file of UbidotsMicroESP8266 and then "Accept" or "Choose".
- Close the Arduino IDE and open it again.
Note: The library will create a new Ubidots data source named "ESP8266" getting the mac of the ESP8266 as device label. If you desire assign a different device name and label, you can add the add to your code the following lines
- To change the Device Name:
client.setDataSourceName("New_name");
- To change the Device label:
client.setDataSourceLabel("New_label");
You send values using the variable label or the variable ID, also you can send values with timestamp and context.
The following example is to send one value to Ubidots, it will create the variable automatically with the label assign by you on the code. If you desire send more than one value just add this line client.add("variable_name", value); to your code with the parameters needed.
Also, you can find the example on the library examples. Go to Sketch -> Examples -> ubidots-esp8266-master library and select the "UbidotsSaveValueWithLabel" example.
Add your Ubidots TOKEN where indicated, as well as the WI-FI settings.
#include "UbidotsMicroESP8266.h"

#define TOKEN  "Your_token_here"  // Put here your Ubidots TOKEN
#define WIFISSID "Your_WiFi_SSID" // Put here your Wi-Fi SSID
#define PASSWORD "Your_WiFi_Password" // Put here your Wi-Fi password

Ubidots client(TOKEN);

void setup(){
    Serial.begin(115200);
    client.wifiConnection(WIFISSID, PASSWORD);
    //client.setDebug(true); // Uncomment this line to set DEBUG on
}

void loop(){
    float value1 = analogRead(0);
    //float value2 = analogRead(2)
    client.add("temperature", value1);
    //client.add("switch", value2);
    client.sendAll(true);
    delay(5000);

}The following example is to send one value to Ubidots, you have to assing the variable ID to the code. Take a look of this guide to know where you can get the variable ID. If you desire send more than one value just add this line client.add("variable_name", value); to your code with the parameters needed.
Also, you can find the example on the examples folder. Go to Sketch -> Examples -> ubidots-esp8266-master library and select the "UbidotsSaveValueWithID" example.
Add your Ubidots TOKEN and variable ID where indicated, as well as the WI-FI settings.
#include "UbidotsMicroESP8266.h"

#define TOKEN  "Your_token_here"  // Put here your Ubidots TOKEN
#define ID_1 "Your_variable_ID_here" // Put your variable ID here
//#define ID_2 "Your_variable_ID_here" // Put your variable ID here
#define WIFISSID "Your_WiFi_SSID" // Put here your Wi-Fi SSID
#define PASSWORD "Your_WiFi_Password" // Put here your Wi-Fi password

Ubidots client(TOKEN);

void setup(){
    Serial.begin(115200);
    client.wifiConnection(WIFISSID, PASSWORD);
    //client.setDebug(true); // Uncomment this line to set DEBUG on
}

void loop(){
    float value1 = analogRead(0);
    //float value2 = analogRead(2)
    client.add(ID_1, value1);
    //client.add(ID_2, value2);
    client.sendAll(false);
    delay(5000);
}The following example is to send one value with timestamp to Ubidots, it will create the variable automatically with the label assign by you on the code.
Add your Ubidots TOKEN where indicated, as well as the WI-FI settings.
#include "UbidotsMicroESP8266.h"

#define TOKEN  "Your_token_here"  // Put here your Ubidots TOKEN
#define WIFISSID "Your_WiFi_SSID" // Put here your Wi-Fi SSID
#define PASSWORD "Your_WiFi_Password" // Put here your Wi-Fi password

Ubidots client(TOKEN);

void setup(){
    Serial.begin(115200);
    client.wifiConnection(WIFISSID, PASSWORD);
    //client.setDebug(true); // Uncomment this line to set DEBUG on
}

void loop(){
    float value = analogRead(0);
    unsigned long t = client.ntpUnixTime(); // calculates your actual timestamp in SECONDS

    client.add("humidity", value, NULL, t-20000);
    client.sendAll(true);
    delay(5000);
}The following example is to send one value with context to Ubidots, it will create the variable automatically with the label assign by you on the code.
Add your Ubidots TOKEN where indicated, as well as the WI-FI settings.
#include "UbidotsMicroESP8266.h"

#define TOKEN  "Your_token_here"  // Put here your Ubidots TOKEN
#define WIFISSID "Your_WiFi_SSID" // Put here your Wi-Fi SSID
#define PASSWORD "Your_WiFi_Password" // Put here your Wi-Fi password

Ubidots client(TOKEN);

void setup(){
    Serial.begin(115200);
    client.wifiConnection(WIFISSID, PASSWORD);
    //client.setDebug(true); // Uncomment this line to set DEBUG on
}

void loop(){
    float value = analogRead(0);
    char context[25];
    sprintf(context, "lat=1.2343$lng=132.1233"); //Sends latitude and longitude for watching position in a map

    client.add("humidity", value, context);
    client.sendAll(true);
    delay(5000)
}To get the last value of a variable from Ubidots you can use three different functions:
- client.getValueWithId(ID)
- client.getValueWithDevice(DEVICE_LABEL, VARIABLE_LABEL)
On the example folder you'll find all the examples codes. Go to Sketch -> Examples -> ubidots-esp8266-master library and select the one that you need "UbidotsGetValueWithId";"UbidotsGetValueWithDevice".
This function let you get de last value of a variable using the variable ID. Returns constant ERROR_VALUE if an error is handled.
Add your Ubidots TOKEN and variable ID where indicated, as well as the WI-FI settings.
#include "UbidotsMicroESP8266.h"

#define ID  "..."  // Put here your Ubidots variable ID
#define TOKEN  "..."  // Put here your Ubidots TOKEN
#define WIFISSID "..." // Put here your Wi-Fi SSID
#define PASSWORD "..." // Put here your Wi-Fi password

Ubidots client(TOKEN);

void setup() {
    Serial.begin(115200);
    client.wifiConnection(WIFISSID, PASSWORD);
    //client.setDebug(true); // Uncomment this line to set DEBUG on
}

void loop() {
    float value = client.getValueWithId(ID);
    if (value != ERROR_VALUE){
      Serial.print(F("value obtained: "));
      Serial.println(value);
    }else{
      Serial.println(F("Error getting value"));
    }
    delay(1000);
}This function let you get de last value of a variable using the device and varriable labels. Returns constant ERROR_VALUE if an error is handled.
Add your Ubidots TOKEN, device label, and variable label where indicated, as well as the WI-FI settings.
#include "UbidotsMicroESP8266.h"

#define DEVICE  "..."  // Put here your Ubidots device label
#define VARIABLE  "..."  // Put here your Ubidots variable label
#define TOKEN  "..."  // Put here your Ubidots TOKEN
#define WIFISSID "..." // Put here your Wi-Fi SSID
#define PASSWORD "..." // Put here your Wi-Fi password

Ubidots client(TOKEN);

void setup() {
    Serial.begin(115200);
    client.wifiConnection(WIFISSID, PASSWORD);
    //client.setDebug(true); // Uncomment this line to set DEBUG on
}

void loop() {
    float value = client.getValueWithDevice(DEVICE, VARIABLE);
    if (value != ERROR_VALUE){
      Serial.print(F("value obtained: "));
      Serial.println(value);
    }else{
      Serial.println(F("Error getting value"));
    }
    delay(1000);
}This function let you get the variable's timestamp using the variable ID. Returns constant ERROR_VALUE if an error is handled.
On the example folder you'll find the example code. Go to Sketch -> Examples -> ubidots-esp8266-master library and select the "UbidotsGetVarTimestamp" example.
Add your Ubidots TOKEN and variable ID where indicated, as well as the WI-FI settings
#include "UbidotsMicroESP8266.h"

#define ID  "..."  // Put here your Ubidots variable ID
#define TOKEN  "..."  // Put here your Ubidots TOKEN
#define WIFISSID "..." // Put here your Wi-Fi SSID
#define PASSWORD "..." // Put here your Wi-Fi password

Ubidots client(TOKEN);

void setup() {
    Serial.begin(115200);
    client.wifiConnection(WIFISSID, PASSWORD);
    //client.setDebug(true); // Uncomment this line to set DEBUG on
}

void loop() {
    long timestamp = client.getVarTimestamp(ID);
    if (timestamp != ERROR_VALUE){
      Serial.print(F("timestamp: "));
      Serial.println(timestamp);
    }else{
      Serial.println(F("Error getting timestamp"));
    }
    delay(1000);
}This function let you get the variable's context using the variable ID. Returns constant character 'e' if an error is handled.
On the example folder you'll find the example code. Go to Sketch -> Examples -> ubidots-esp8266-master library and select the "UbidotsGetVarContext" example.
Add your Ubidots TOKEN and variable ID where indicated, as well as the WI-FI settings
#include "UbidotsMicroESP8266.h"

#define ID  "..."  // Put here your Ubidots variable ID
#define TOKEN  "..."  // Put here your Ubidots TOKEN
#define WIFISSID "..." // Put here your Wi-Fi SSID
#define PASSWORD "..." // Put here your Wi-Fi password

Ubidots client(TOKEN);

void setup() {
    Serial.begin(115200);
    client.wifiConnection(WIFISSID, PASSWORD);
    //client.setDebug(true); // Uncomment this line to set DEBUG on
}

void loop() {
    char* context = client.getVarContext(ID);
    if (strcmp ("e", context) != 0){
      Serial.print(F("context: "));
      Serial.println(context);
    }else{
      Serial.println(F("Error getting context"));
    }
    delay(1000);
}