Monocular-to-3D Virtual Try-On using Deep Residual U-Net
A course project for COMP 6381 Digital Geometric Modeling, Fall 2021.

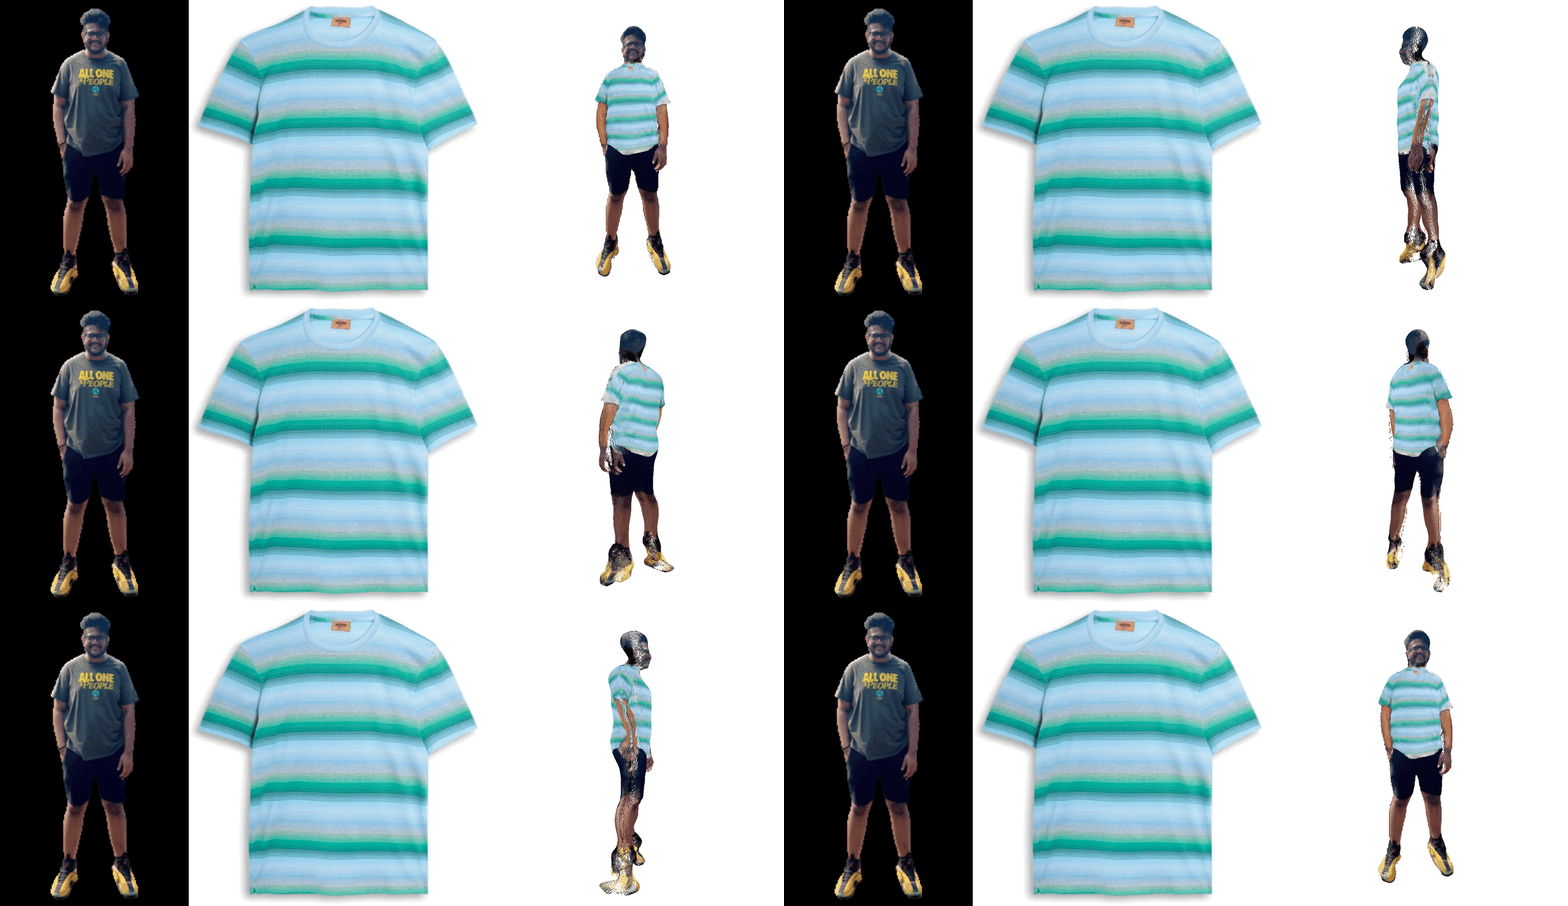
Figure 1. Given the reference person image (left) and target clothing image (middle), our method can reconstruct the 3D try-on mesh (right) with the clothing changed and person identity retained.
This code is built on top of ICCV 2021 paper M3D-VTON: A Monocular-to-3D Virtual Try-On Network (Paper, Code)
Make environment
Python >= 3.8.0 required. Run below commands.
conda create --name comp6381 python=3.8
conda activate comp6381
conda install pytorch torchvision torchaudio cudatoolkit=11.1 -c pytorch-lts -c nvidia
conda install -c conda-forge jupyterlab
pip install opencv-python, matplotlib, sklearn, tqdm, pycocotools, tensorboard
OR run conda env create -f <environment-name>.yml.
Preprocess data
After downlaoding dataset, keep it in a folder named datasets in the root directory and then run:
python util/data_preprocessing.py --MPV3D_root datasets/MPV3D/Train MTM module
python train.py --model MTM --name MTM --dataroot datasets/MPV3D/ --datalist train_pairs --checkpoints_dir logs/res-m3dvtonthen run the command below to obtain the --warproot (here refers to the --results_dir) which is necessary for the other two modules:
python test.py --model MTM --name MTM --dataroot datasets/MPV3D/ --datalist train_pairs --checkpoints_dir logs/res-m3dvton/ --results_dir outs/mtm_outputsTrain DRM
python train.py --model DRM --name DRM --batch_size 4 --dataroot datasets/MPV3D/ --warproot outs/mtm_outputs/aligned/MTM/train_pairs --datalist train_pairs --checkpoints_dir logs/res-m3dvtonTrain Residual U-Net TFM
python train.py --model TFM --name TFM --batch_size 2 --dataroot datasets/MPV3D/ --warproot outs/mtm_outputs/aligned/MTM/train_pairs --datalist train_pairs --checkpoints_dir logs/res-m3dvton(See options/base_options.py and options/train_options.py for more training options.)
Test model
Run bash infer.sh.
Now you should get the point cloud file prepared for remeshing under results/aligned/pcd/test_pairs/*.ply. MeshLab can be used to remesh the predicted point cloud, with two simple steps below:
-
Normal Estimation: Open MeshLab and load the point cloud file, and then go to Filters --> Normals, Curvatures and Orientation --> Compute normals for point sets
-
Possion Remeshing: Go to Filters --> Remeshing, Simplification and Reconstruction --> Surface Reconstruction: Screen Possion (set reconstruction depth = 9)
Now you will get the final 3D try-on result!
Running on custom images
See notebooks/custom.ipynb for resizing, binary segmentation and pose estimation. Also see notebooks/parsing_colab.ipynb for human parsing/multi-clas segmentation.
Prepare person image by following:
- Get a full body person image (P) and remove background with https://www.remove.bg/.
- Resize P to 320*512
- Get pose from P
- Get segmentation label from P
Prepare clothing image by following:
- Get frontal clothing image (C) and resize to to 320*512
- Get binary mask of C
Rename files following the MPV3D data format and then run python util/data_preprocessing.py --MPV3D_root mpv3d_example_custom to get
preprocessed data. Finally run bash infer_custom.sh and follow steps above to get 3D tryon outputs.
References
- M3D-VTON: A Monocular-to-3D Virtual Try-On Network
- Metrics computed using PyTorch FID and PyTorch SSIM packages.