varx brings Reactive Extensions (Rx) to JUCE. It helps to connect our app's user interface, parameters and audio processing in a simple, flexible and consistent way. It reduces boilerplate and prevents errors.
varx uses the great RxCpp under the hood.
Let's see how varx can reduce boilerplate code and errors in our apps.
Say we have a distortion plug-in with a Slider for the distortion amount. We want to show this amount in words in a Label. This is our main Component:
class MainComponent : public Component {
public:
  MainComponent() { /*call addAndMakeVisible(), etc. */ }

private:
  Slider distortionSlider;
  Label warmthLabel;

  static String textForDistortion(double distortion) {
    return (distortion < 5 ? "cold" : "hot!");
  }
};
The textForDistortion function creates the text for a given distortion value.
Now, let's update the Label when the Slider changes. First we'll do it using plain JUCE, but feel free to skip to the solution using varx.
First, we inherit from Slider::Listener:
class MainComponent : public Component,
                      private Slider::Listener {
In the MainComponent() constructor, we subscribe to changes from the Slider:
distortionSlider.addListener(this);Then, we add the sliderValueChanged member function, to react to value changes:
void sliderValueChanged (Slider *slider) override {
  warmthLabel.setText(textForDistortion(slider->getValue()),
                      dontSendNotification);
}
And we're not quite done yet: If we run it, the warmthLabel is initially empty, and only starts to show text once we move the Slider. This is because sliderValueChanged hasn't been called yet. So we need something like this in the constructor:
sliderValueChanged(&distortionSlider);That's confusing to read, because the Slider value hasn't actually changed at that point. Alternatively, you could copy-and-paste the warmthLabel.setText(...) code from sliderValueChanged into the constructor. Or create a new member function, adding boilerplate.
And when we add more Sliders, they all call the same sliderValueChanged member function. So we have to add if statements to distinguish between Sliders:
if (slider == &distortionSlider) {
  warmthLabel.setText(...);
} else if (slider == &toneSlider) {
  // ...
} else if (slider == &feedbackSlider) {
  // ...
}
Now, let's see what varx can do for us.
Instead of just Slider and Label, we define the members like this:
Reactive<Slider> distortionSlider;
Reactive<Label> warmthLabel;
Then we put two lines in the constructor:
Observable text = distortionSlider.rx.value.map(&MainComponent::textForDistortion);
text.subscribe(warmthLabel.rx.text);
And that's it. No need to inherit, listen, or add a member function. And no need to set the initial text by hand.
When we add more Sliders, we just declare them as Reactive<Slider> and connect them in the constructor. No cascaded if statements.
To find out what Observable, rx and map is all about, continue with Getting Started.
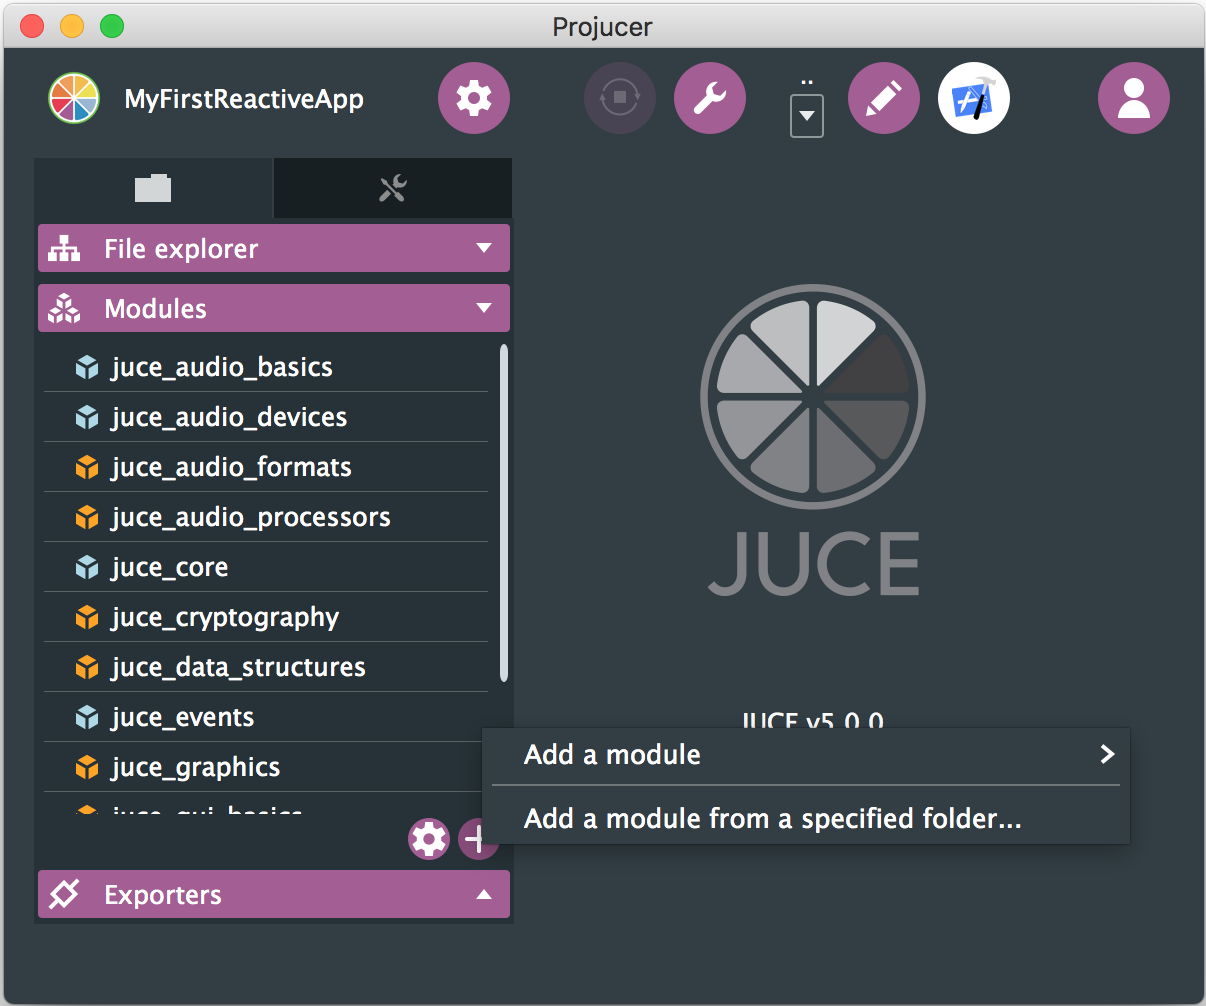
Download varx and un-zip it. In Projucer, expand the Modules section, click the + button and choose “Add a module from a specified folder…”:
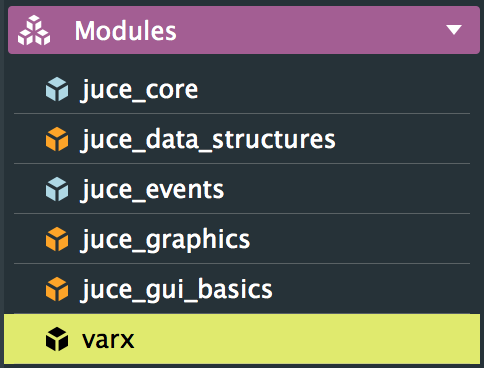
Now find the varx folder you just unzipped. It will then appear in the list of modules:
Done! You can now use all the varx beauty in your code.
This section explains the basics of connecting GUI components, so they update automatically.
In the above example, instead of using plain Slider and Label, we wrote:
Reactive<Slider> distortionSlider;
Reactive<Label> warmthLabel;
A Reactive<Slider> is the same as a normal JUCE Slider, except that it has one new member called rx.
This member is different depending on whether it's a Reactive<Slider> or a Reactive<Label>. For Reactive<Slider>, the rx object has members such as value, maximum, dragging, and so on. For Reactive<Label>, it has members like text and font.
Now, consider this line we wrote above:
Observable text = distortionSlider.rx.value.map(&MainComponent::textForDistortion);As you can see, text is an Observable. An Observable is a value that changes over time. It's called Observable because you can observe it and get notified whenever its value changes. When we move the distortionSlider to the right, text automatically changes from "cold" to "hot!".
Let's look at the right side of the =. We start with distortionSlider.rx.value. This is an Observable, too. When you move the distortionSlider, it changes from 0.0 to 3.572 (or some other number).
And then there's .map(&MainComponent::textForDistortion). This map has nothing to do with JUCE's HashMap or std::map. It means: Whenever distortionSlider.rx.value changes, call textForDistortion with the new value, and set value of text to the returned String.
Now for the second line:
text.subscribe(warmthLabel.rx.text);warmthLabel.rx.text is an Observer. An Observer receives values and does something whenever a new value arrives. The warmthLabel.rx.text observer calls JUCE's Label::setText with every new value, making the Label update its text on the screen.
Finally, the text.subscribe(...) means: Whenever text changes its value, notify the warmthLabel.rx.text observer. Here, it also notifies the Observer with the current value.
So to recap, an Observable emits values, an Observer receives them. Here we've used this to update a Label depending on a Slider value, by turning each new value into a String.
There's also Reactive<Button> which gives you Observables like clicked and buttonState. And Observable<ImageComponent>, which gives you an image observer. But varx is not just for GUI components: You can use Observables and Observers to propagate any change or event in your app.
You can combine two or more Observables into a new Observable. Let's say you're building a subtractive synth and you have two Sliders:
Reactive<Slider> filterCutoff;
Reactive<Slider> filterResonance;
You can combine the Observables of both Sliders, to calculate new filter coefficients whenever either Slider is moved:
auto calculateCoefficients = [](double cutoff, double resonance) {
  // TODO: Calculate real coefficents based on cutoff and resonance
  return Array<var>({0.1930, 0.2035, 0.2071, 0.2035, 0.1930});
};

Observable coefficients = filterCutoff.rx.value.combineLatest(filterResonance.rx.value,
                                                              calculateCoefficients);
The combineLatest member function combines multiple observables into one, using a given function (calculateCoefficients in this case). Whenever one of the Sliders changes its value, the coefficients observable emits a new Array.
As we've seen, we can use text.subscribe(someObserver) to connect an Observer to an Observable. But what if we want to execute some piece of code whenever an Observable emits a new value? Simple: You just pass a lambda to subscribe:
DisposeBag disposeBag;

// Observable coefficients as defined above
coefficients.subscribe([](const Array<var>& coefficients) {
  // Do something with coefficients here
}).disposedBy(disposeBag);
Now the lambda gets called whenever the coefficients observable emits a new Array. But do we need the DisposeBag?
Without the DisposeBag, our lambda will be called until the Observable stops emitting items. There's no way to say: “I'm not interested anymore, stop calling me.” When we use a DisposeBag as shown, the lambda gets called until the DisposeBag is destroyed. This way, we can control until when we get notified.
We've just scratched the surface of how Rx can help build great apps. If you would like to learn more about Observables and Rx, I highly recommend this guide.
The complete API reference is available here.
varx is well-tested. To run the tests, please clone this repo and open Tests/varx-Tests.jucer in Projucer. Modify it to point to your local JUCE folder, and open the project in Xcode or Visual Studio. If you run it, you should see the output: All tests passed.
- varx uses the great RxCpp under the hood. It would not be possible without it.
- Documentation from ReactiveX.io is used in the source code, under the terms of the Creative Commons Attribution 3.0 License. Documentation has been adopted and changed for the purpose of this project.
Copyright 2017 Martin Finke
Permission is hereby granted, free of charge, to any person obtaining a copy of this software and associated documentation files (the "Software"), to deal in the Software without restriction, including without limitation the rights to use, copy, modify, merge, publish, distribute, sublicense, and/or sell copies of the Software, and to permit persons to whom the Software is furnished to do so, subject to the following conditions:
The above copyright notice and this permission notice shall be included in all copies or substantial portions of the Software.
THE SOFTWARE IS PROVIDED "AS IS", WITHOUT WARRANTY OF ANY KIND, EXPRESS OR IMPLIED, INCLUDING BUT NOT LIMITED TO THE WARRANTIES OF MERCHANTABILITY, FITNESS FOR A PARTICULAR PURPOSE AND NONINFRINGEMENT. IN NO EVENT SHALL THE AUTHORS OR COPYRIGHT HOLDERS BE LIABLE FOR ANY CLAIM, DAMAGES OR OTHER LIABILITY, WHETHER IN AN ACTION OF CONTRACT, TORT OR OTHERWISE, ARISING FROM, OUT OF OR IN CONNECTION WITH THE SOFTWARE OR THE USE OR OTHER DEALINGS IN THE SOFTWARE.

