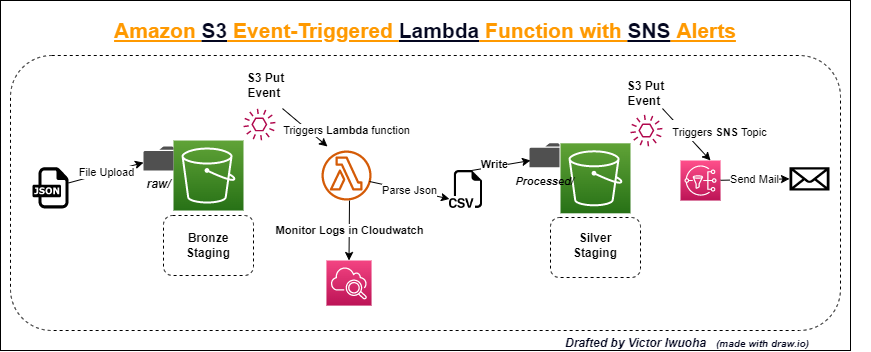
- The Workflow of this project is shown below depicting how the following AWS solutions are used and can aid your data engineering processes. AWS provides cloud serveless compute solutions like Lambda & Glue, storage services like s3 - (Simple Storage Service) alongside an array of pay-as-you-go services which are cheap and affordable.
Occassionally, as part of your ETL/ELT process as a data engineer, you would want to save raw data from apllications to your data lake in an unprocessed format (bronze form) and then begin downstream processing to either silver format or even a usable format for analytics like loading to an RDBMS (Relational Database Management System). However, on some occassions you may want the following ;
- If the process would be recurrent, you may want to make it fully automated.
- Trigger one event after another
- To get notifications when a task is complete/ encounters a failure.
In the above workflow, we assume you already have a loading system in place that ingests files into your s3 bucket in json format . Our sample file is the transactions.json file. The Automation is as follows;
- Immediately a file arrives the raw zone of your s3 bucket (data lake).
- An s3 Put event is Triggered and subsequently makes a call to a Lambda function .
- N/B : Lambda is a serveless compute solution that can run your workloads . It can use either a python or node.js runtime as at the time of this writing. So in this case we have a python script running on Lambda to process our json data to a more readable fromat (
.csv) which can easily be loaded to a RDBMS/Data Warehouse (eg; AWS Redshift, for downstream queries by data analysts/BI analysts). or for raw access by your business teams.
- N/B : Lambda is a serveless compute solution that can run your workloads . It can use either a python or node.js runtime as at the time of this writing. So in this case we have a python script running on Lambda to process our json data to a more readable fromat (
- Lastly once a transaction stream is processed and written to the processed zone of our s3 bucket, we want our s3 bucket put event to also trigger an email using SNS (Simple Notification Service) to let us know some details about the workload like runtime, and some metadata of what was put into the s3 bucket.
- N/B : SNS helps us create Topics that users can subscribe to in order to be able to receive simple notification on events. This can be either email or SMS.
- We also want to be able tocheck our logs using Cloudwatch.
- N/B : Cloudwatch is a monitoring and observability service that helps us monitor applications/infrastructure on AWS. In simple terms, this service allows us to see logs for events used on AWS. Each log is stored with a corresponding timestamp for easy tracking.
- An AWS account (Free)
- Basic Understanding of the above workflow and what we are tring to achieve
- Lambda code in `lambda_function.py` - from repository
- Sample file - `transactions.json` - from repository
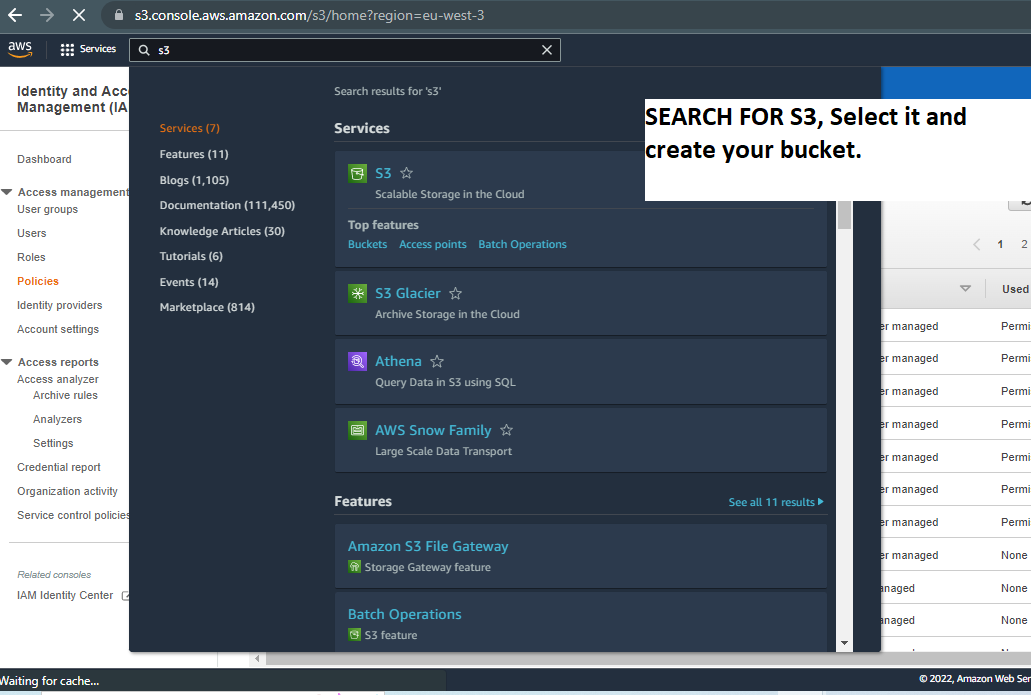
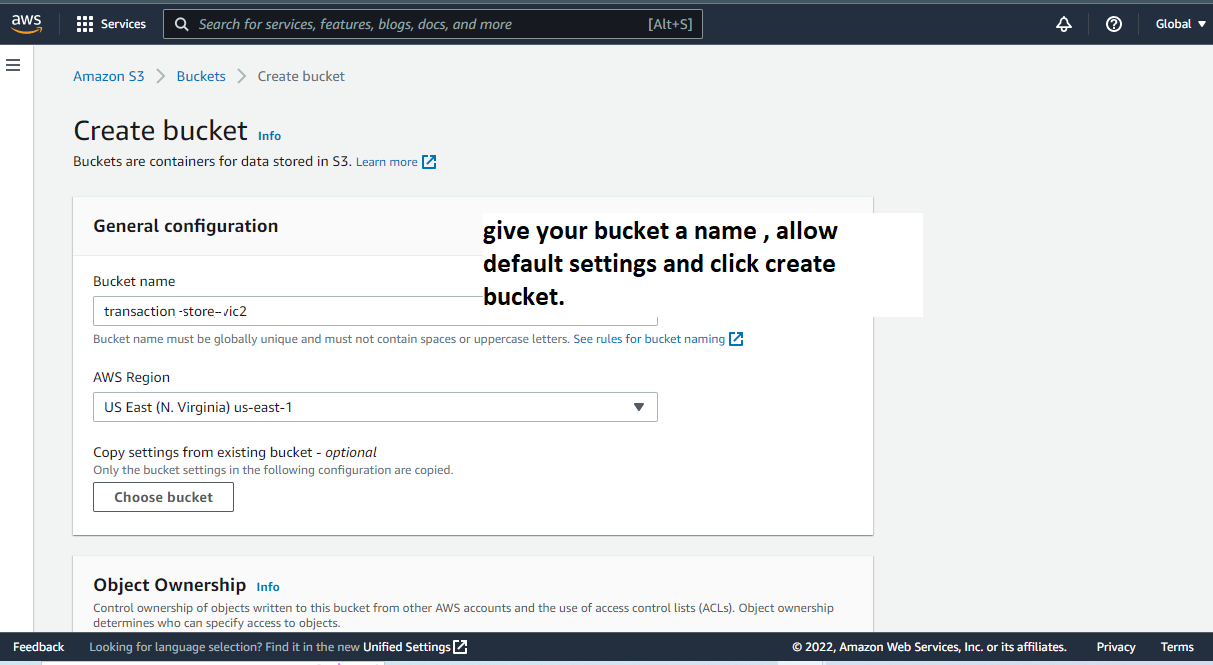
Go to your AWS console and search for S3 follow the steps in the image below.
-
d) Cheers..., Now we are done with setting up our s3 Bucket. We'd come bact to it in STEP 5.
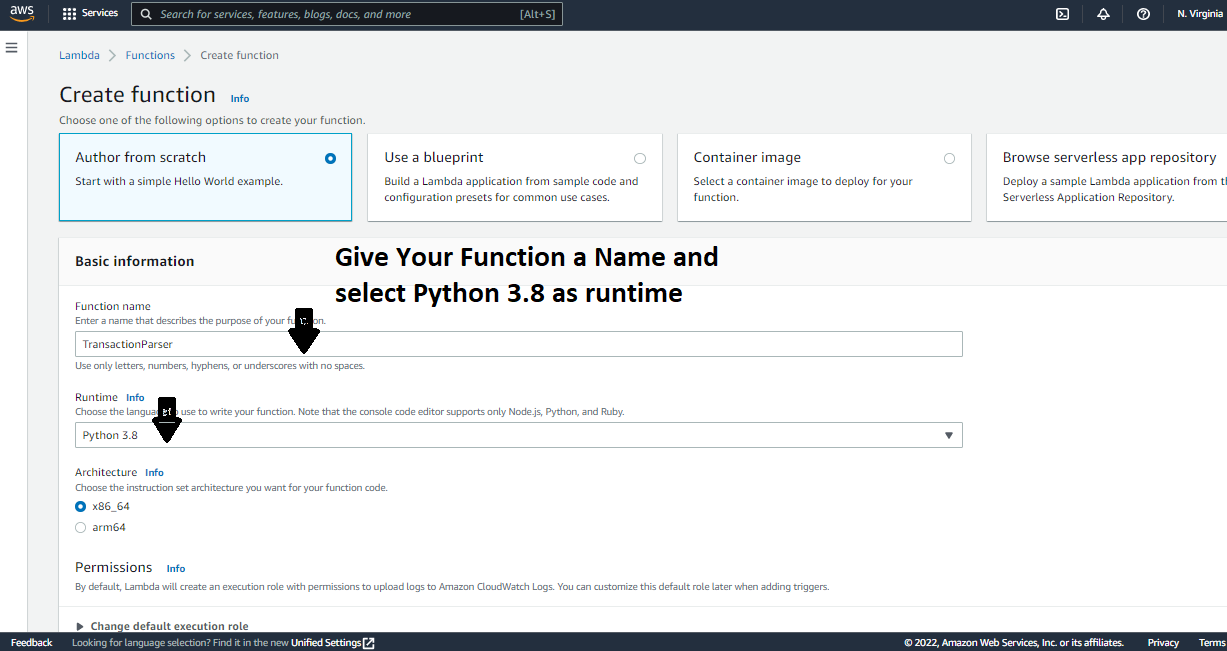
Now let us set up our lambda function which is going to be at the heart of our data transformation. This Function would parse/deserialize the json object's into a pandas dataframe (in memory) and subsequently write it to the /processed directory of our s3 bucket. On your console, search for Lambda and follow the steps below.
-
b) - While creating the Lambda Function, set up IAM role for the lambda function On AWS , IAM stands for Identity Access Management. and is used to define roles an dpolicies which different users/services can assume within your cloud infrastructure. It helps with manageing secure access to services . Read/write access and scope can be configured on a defined role and also be re-used across similar workflows on AWS cloud. Below we simply call it lambdas3ReadRole .

-
c) Copy the script from the
lambda_function.pyfile on this github repository and paste it within that of your newly created lambda function.
-
d) In the Next 5 steps, we would modify the policy for the role we created for our Lambda function to also allow Lambda access to write to s3. Note that Failure to do this will result in an 'Access Denied Error' as seen here
-
iv ] Since this policy is for Amazon s3 bucket we search for s3

For our Lambda Function to run properly, we would need to import the pandas library in a layer. This is because, by default, the pandas library does not come with the python 3.8 runtime on AWS. Below is a sample of Runtime error we would encounter if we tried to run our lambda function before adding the virtual environment layer containg pandas.
While we can import this environment layer as a zipfile, To easily package this layer on AWS, we can run some commands on Cloud9 against an EC-2 Instance.
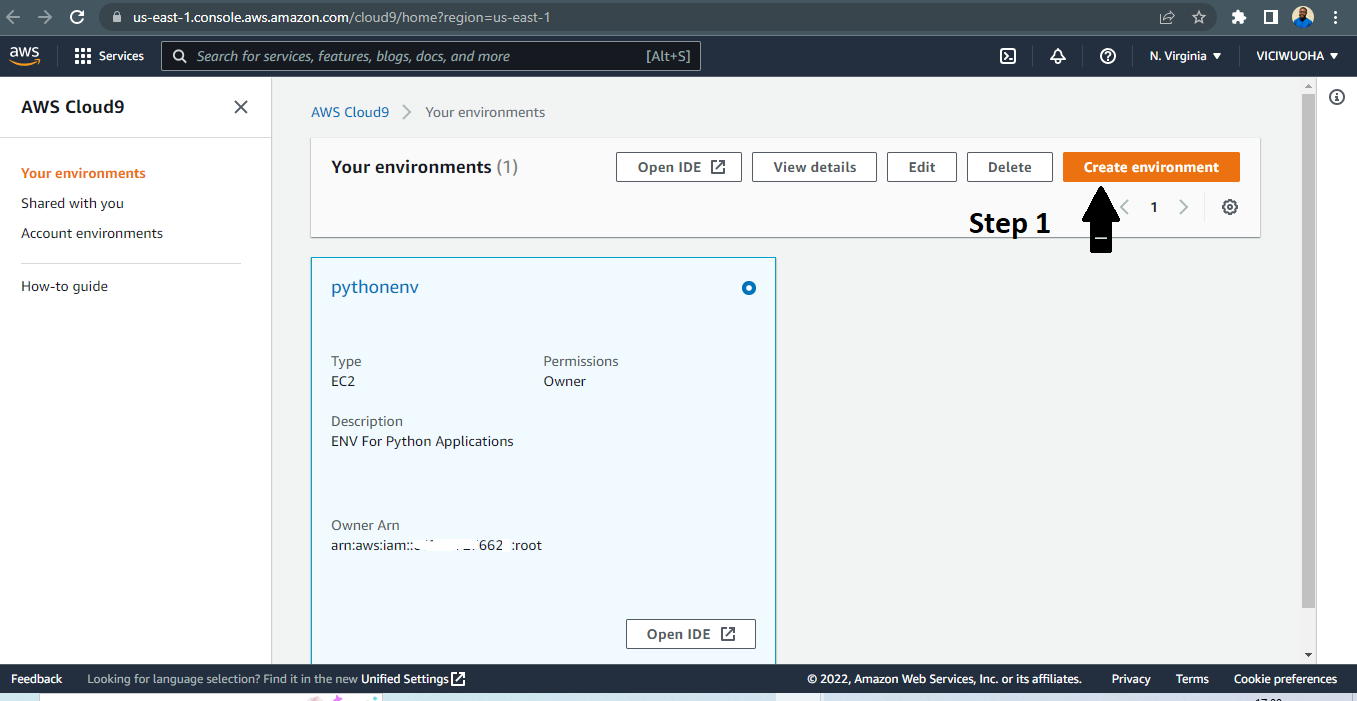
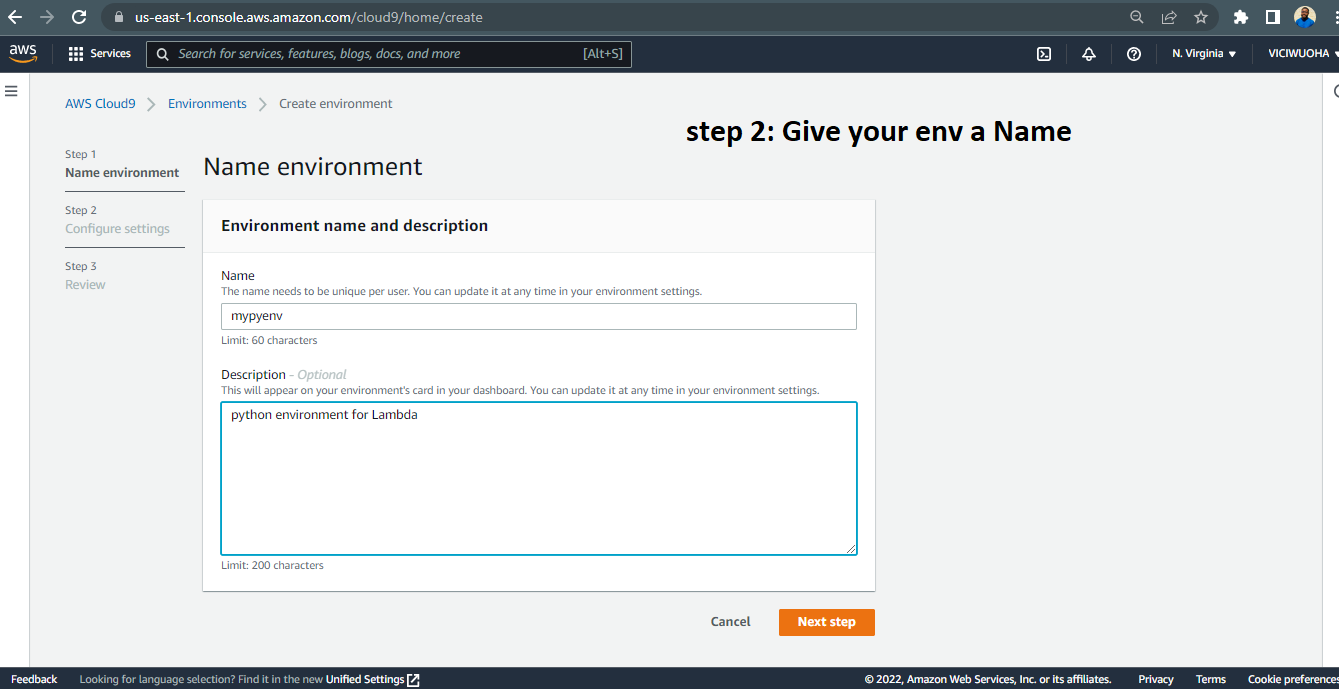
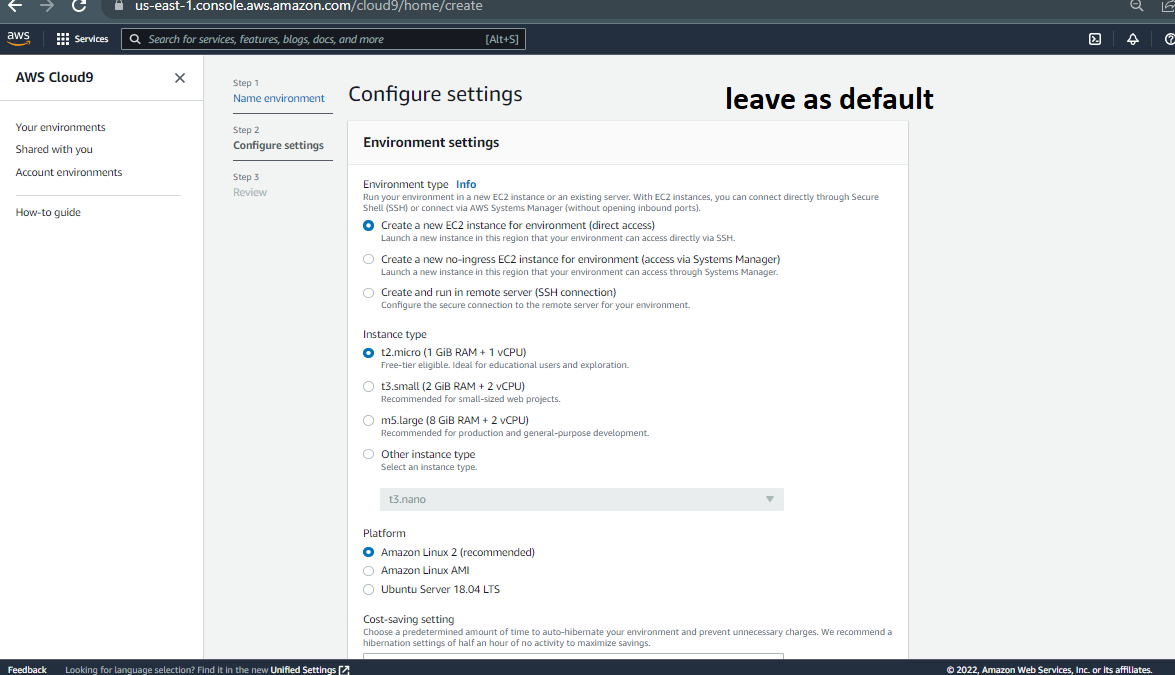
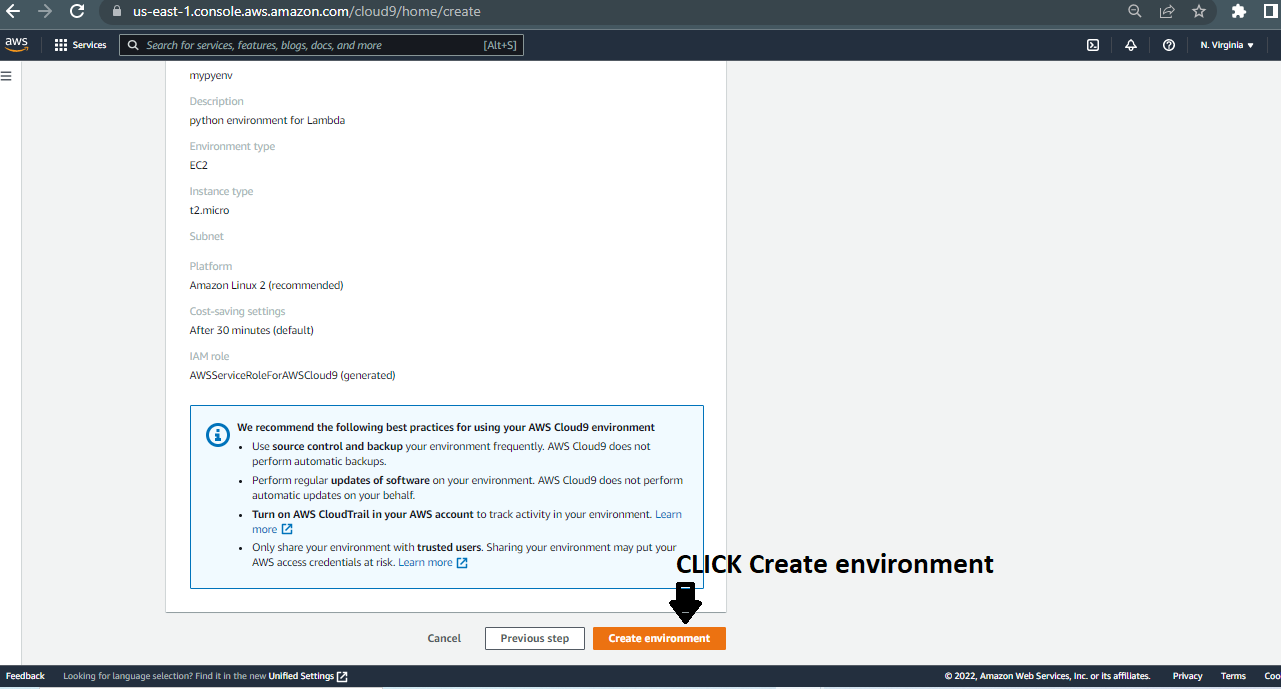
Navigate back to your console, and search for cloud9 and follw the steps in the images below.
-
v ] Once you are done with the tasks above , click on 'Open IDE' to open up the command session of your EC-2 instance where you can now run your commands.
-
vi ] Next, run the commands outlined in the
cloud9_IDE_scripts.shfile within the github repository. Copy and run them line by line. -
vii ] After the above execution , this layer should now be accessible to our Lambda Function.
In this step we would add the Layer created in Step 3 above to our Lambda Function. To do this, follow the images below;
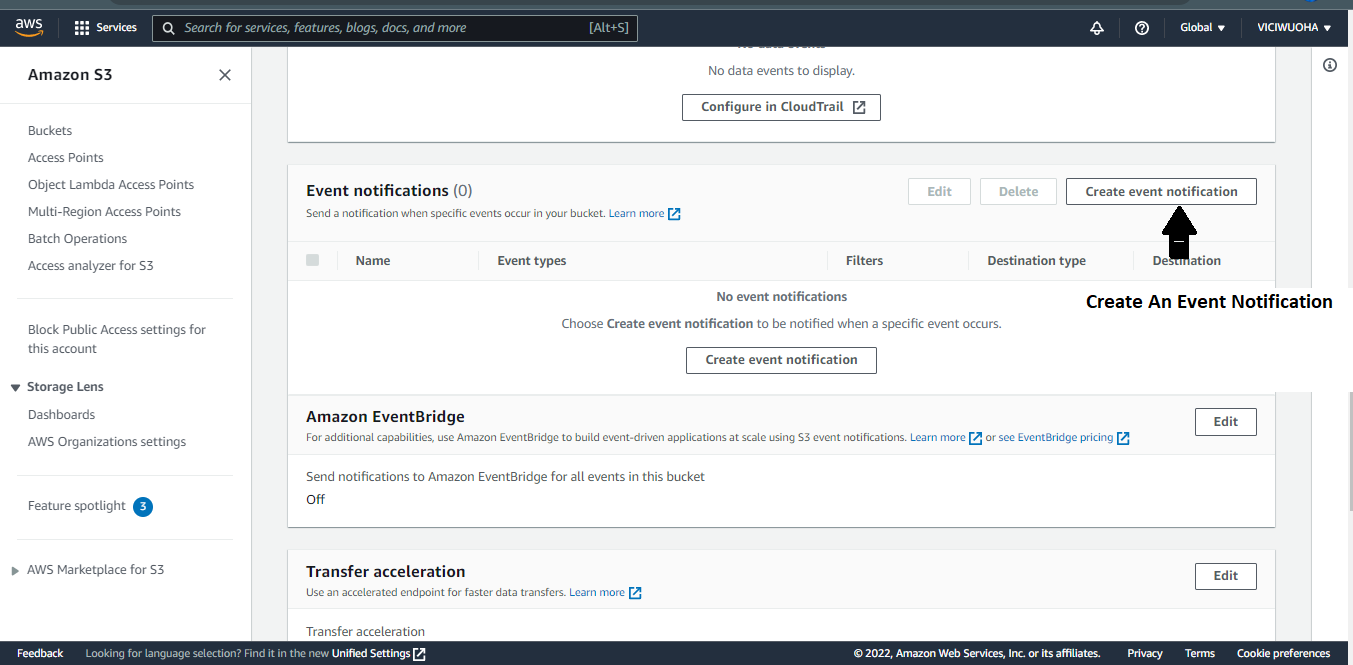
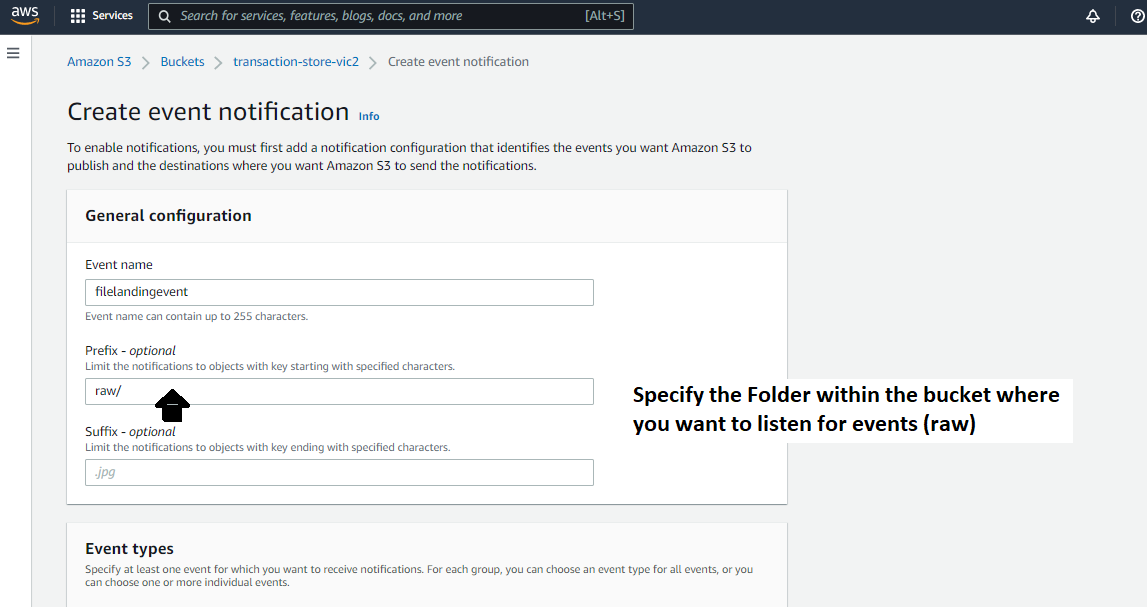
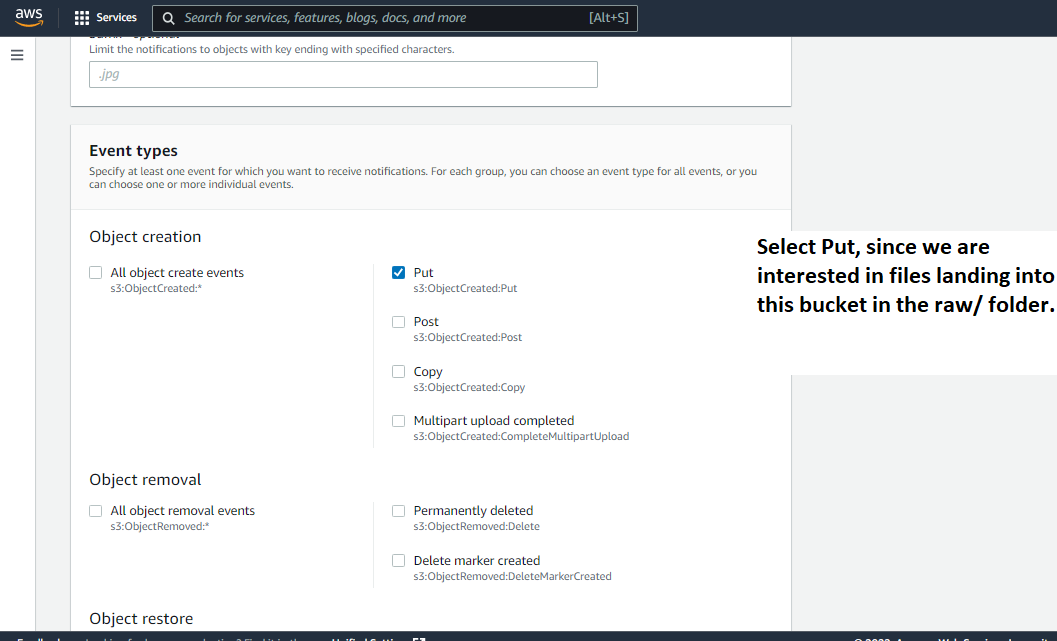
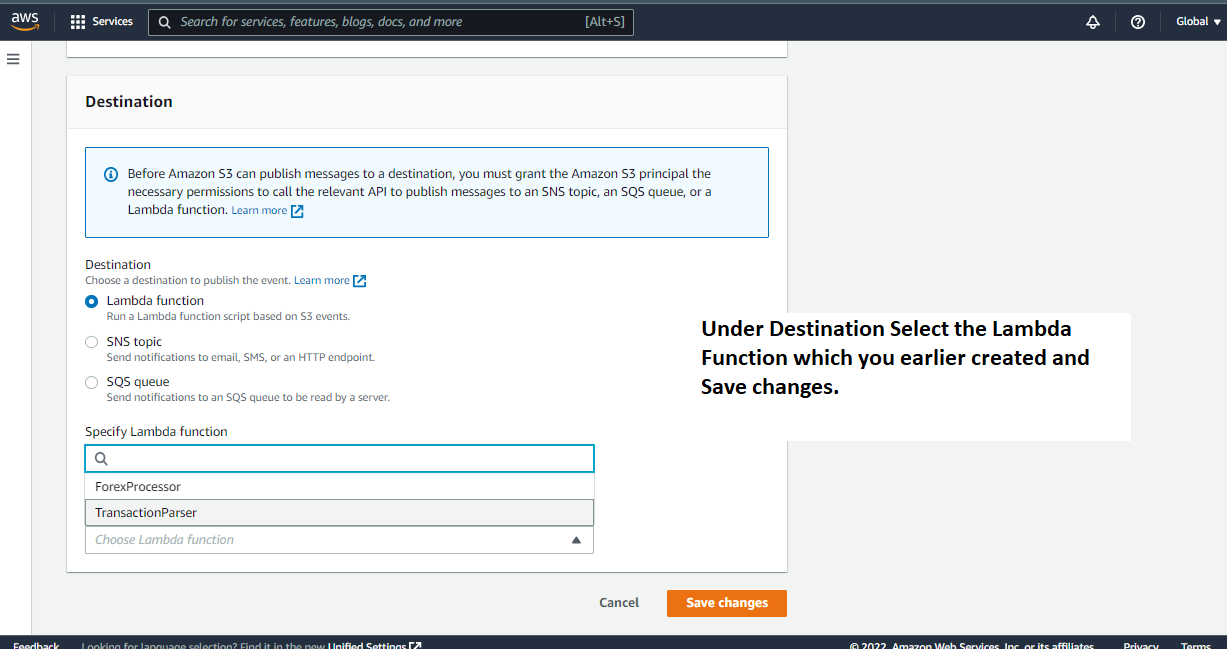
For Lambda to be triggered when an event occurs in s3, we need to configire our s3 Events. In this case, we are interested in Put Events. Navigate back to your earlier created s3 bucket and go to the Event Notification section and follow the steps below;
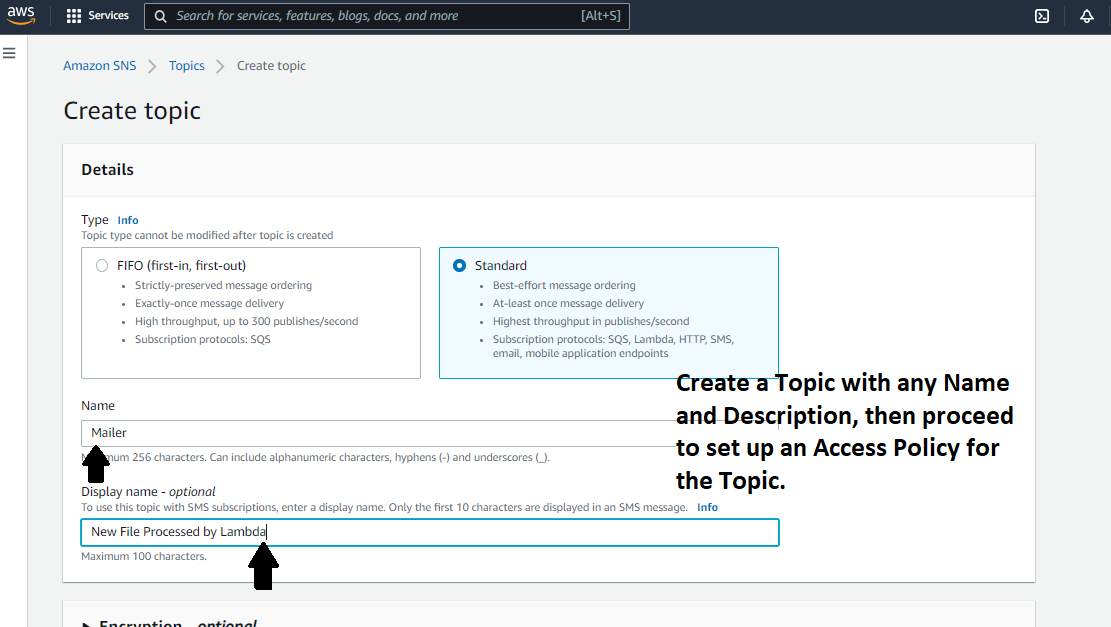
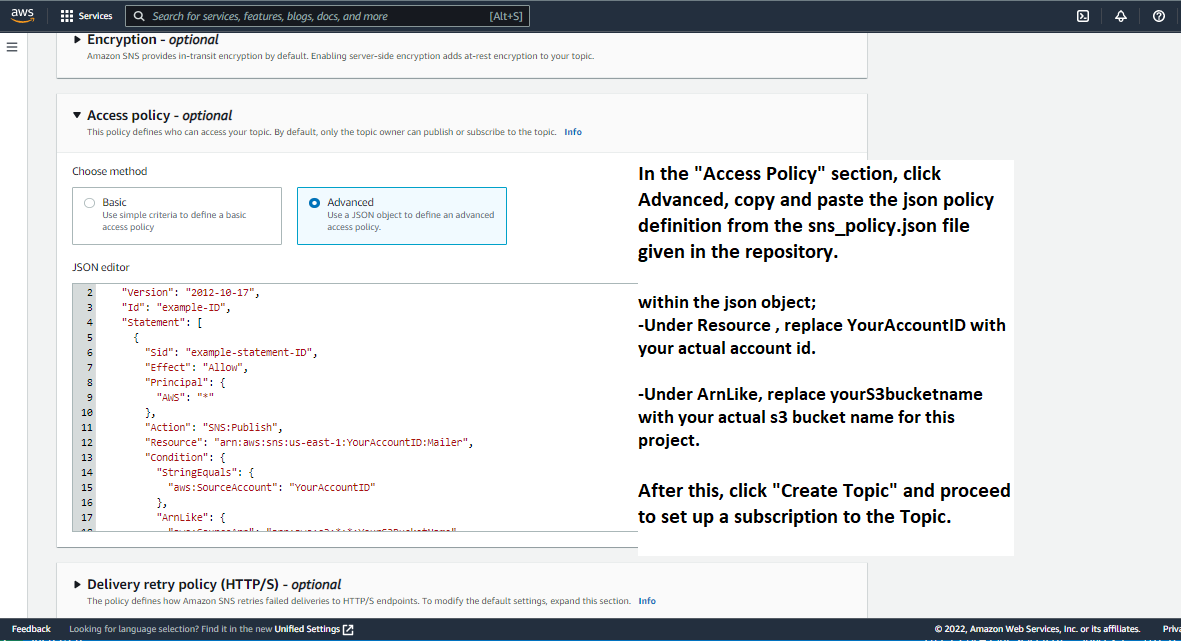
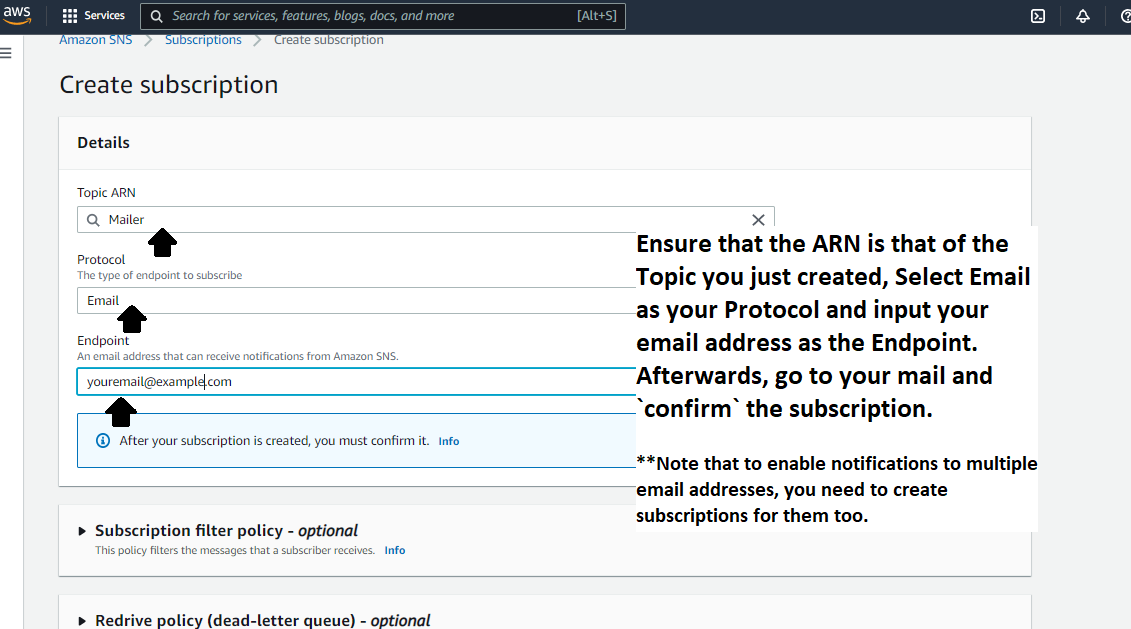
In Order for us to receive Mail alerts when our file is processed, we would create an SNS Topic to do this for us. On your Console, search for SNS and Follow the steps in the images below;
-
iv ] Immediately after the subscription above , navigate to your inbox to find a mail that looks like the one shown below.
Click Confirm.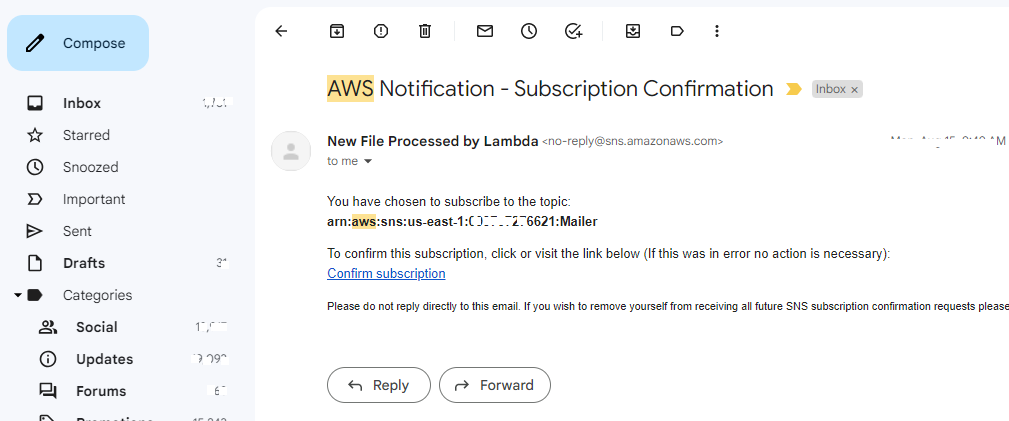
-
v ] After confirmation, you should see a page that looks like the one shown below.

-
vi ] When you go back to the SNS Console, you should now see the confirmed status on that subscription. It should look similar to the image shown below.

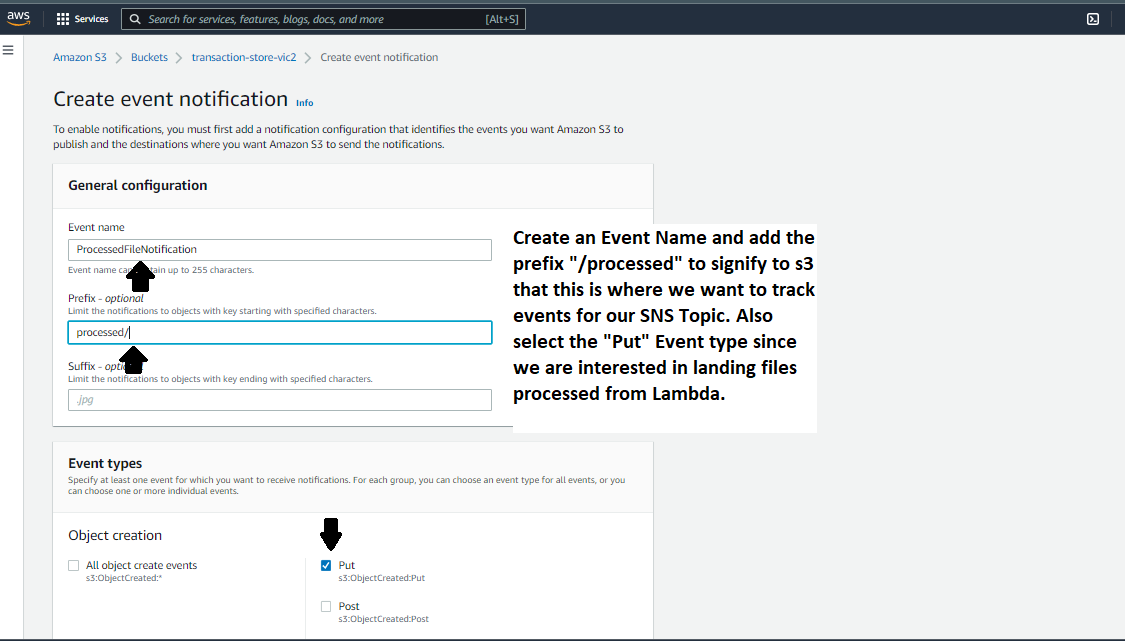
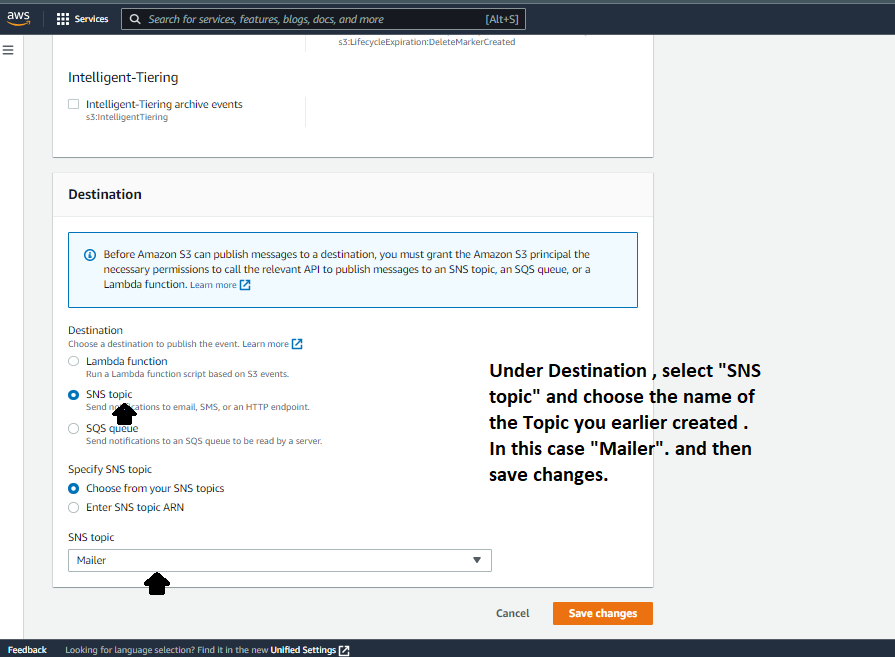
Lastly ,For Our SNS to be able to send messages whn an event occurs in the processed section of our s3 bucket, we would need to configure a new even notification on our s3 bucket similar to what we did for the /raw section for our Lambda Function.
On your Console, Navigate back to the s3 Bucket created earlier and go to the Event Notification section, then follow the steps in the images below;
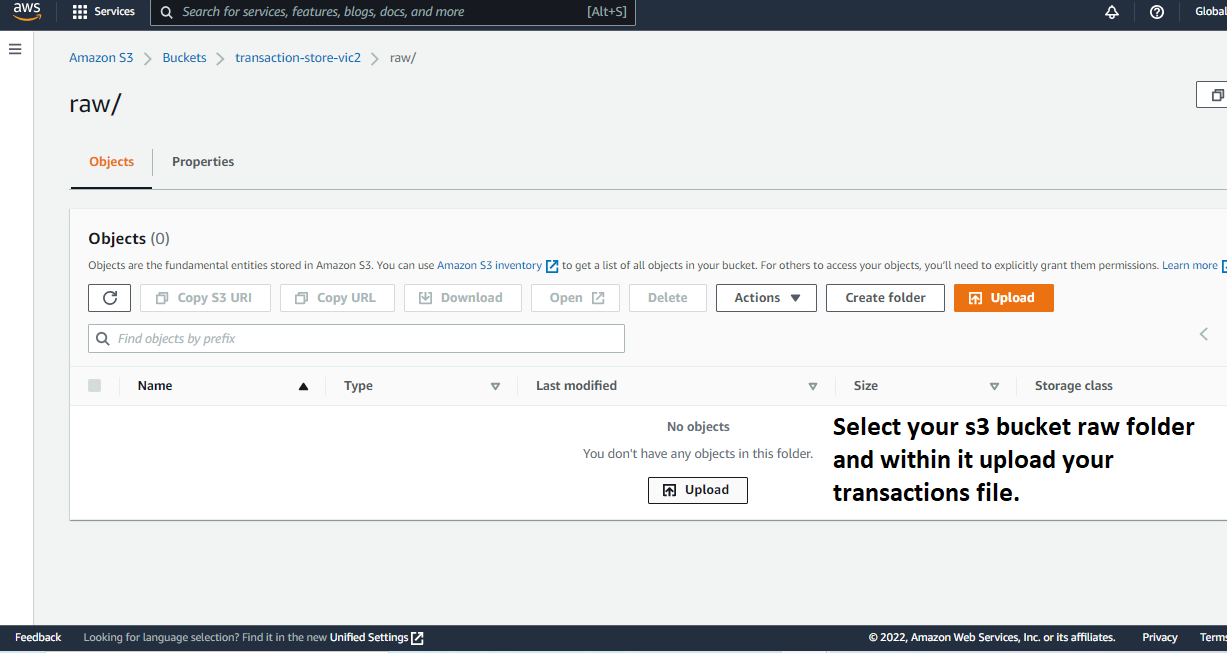
With everything now set up, we can go ahead to upload a sample json file into the /raw directory of our s3 bucket. Use the file called transactions.json from the github repository. Follow the steps below to see the Magic afterwards !! ..
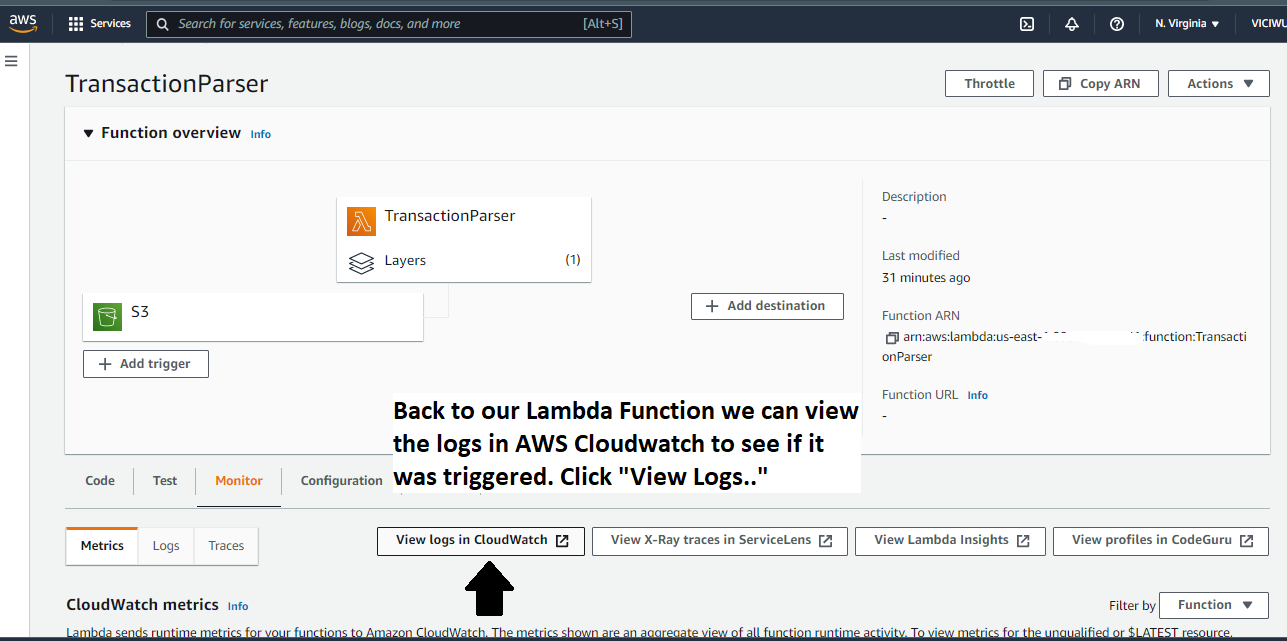
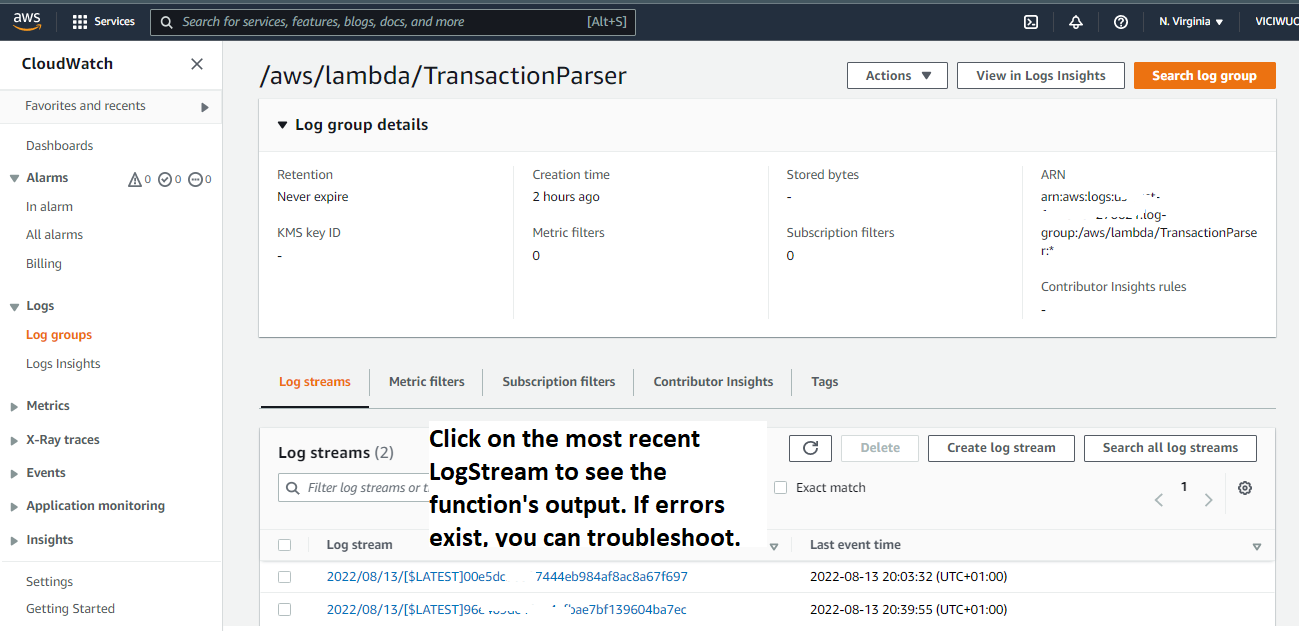
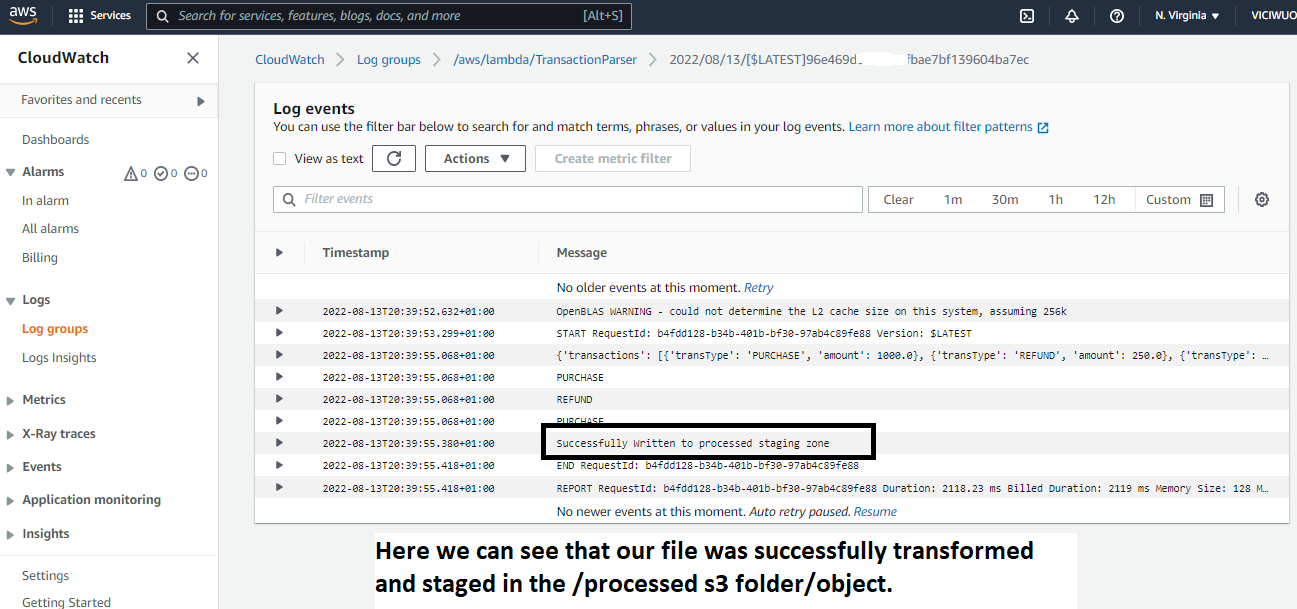
Now that we are done with this, let's navigate to Cloudwatch to see what has occurred almost instantly.
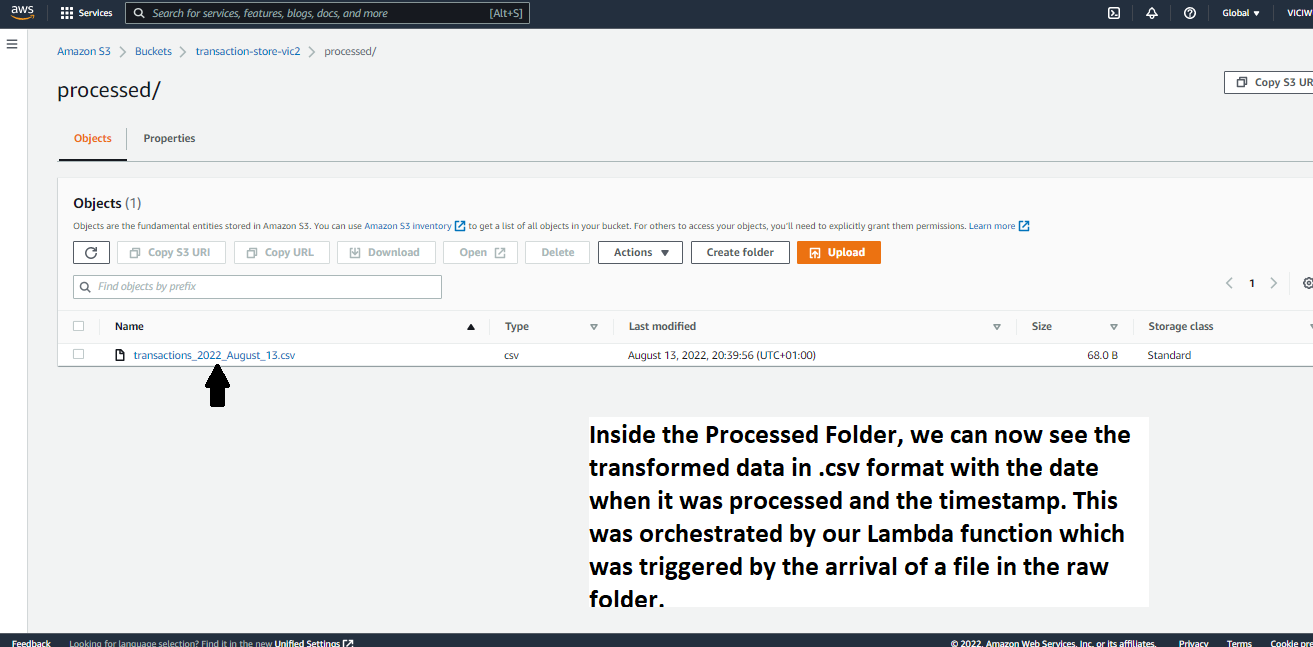
WE can also go to our S3 bucket to see if a processed file landed in our /processed directory.
A sample of the File shown above is accessible here.
Oh Yes... And Lastly,, your email notification must have landed almost instantly.....
Within your inbox, you should see a mail similar to the one shown below.
-
Congratulations on Successfully completing this project on AWS. Amazon Web Services like other major cloud providers, gives an array of cloud computing services which can greatly increase efficiency of engineering teams within any establishment.
-
You might have run into errors while executing this project, That is part of the learning/implementation journey. Do well to check out AWS Community pages /Faq pages for solutions to your errors. You can also contact me via Linkedin @viciwuoha.
-
Depending on your Use Case for similar operations, AWS advices that you use two different s3 buckets to avoid conflicts during transactions within one bucket. However, this use case is a sample and can cover for that.
-
In the course of developing this project, this video from Be A Better Dev on Youtube was helpful. You can check it out.
-
If you are not using this in production, Remember to delete the resources you used for this project to avoid encountering unprecedented bills. In my case, i used these services on the Free Tier provided by AWS, hence my bill was $0 as seen here.
