This repo aims to help Logseq users to sync their data with Git and GitHub.

Credits to @danieltomasz1, @Sawhney2, @Caps3, @Abulafia4 @qwxlea5 for the workflow build up. And credits to @danzu6 for the incredicable diagram!
FYI, those IDs are IDs in Logseq Discord Server.

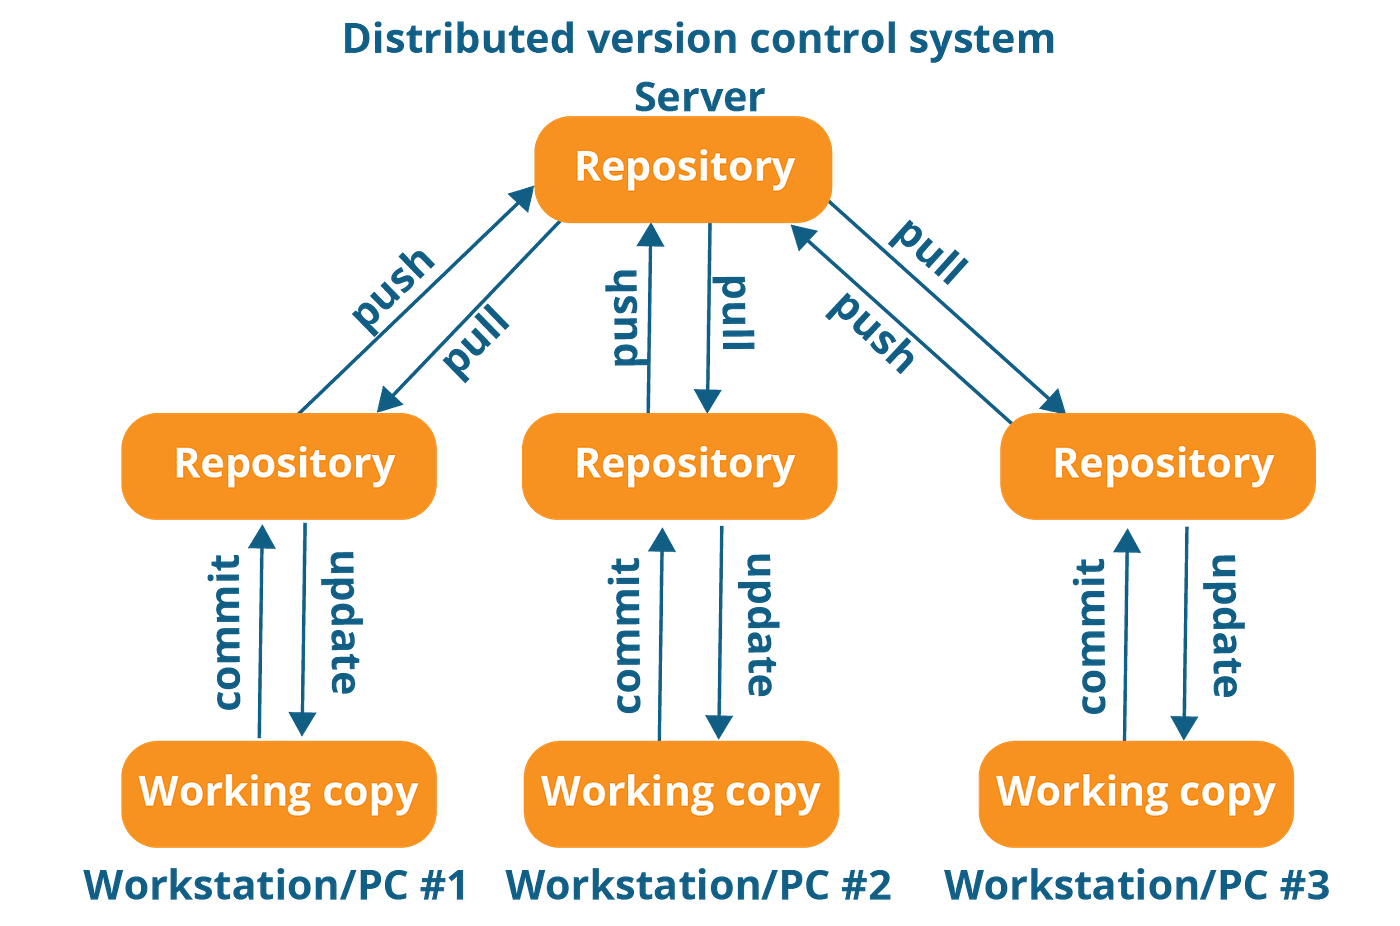
From the above diagram, it's pretty obvious that Git is the most robust way to sync your graph. iCloud is slow and problematic, and Syncthing is not available on iOS/iPadOS.
However, Git is quite scary for non-programmers, so this doc is here to help!
- GitHub account.
- Git, for computer users.
- Working Copy, for iOS/iPadOS users.
- Termux, for Andriod users.
What is Git?
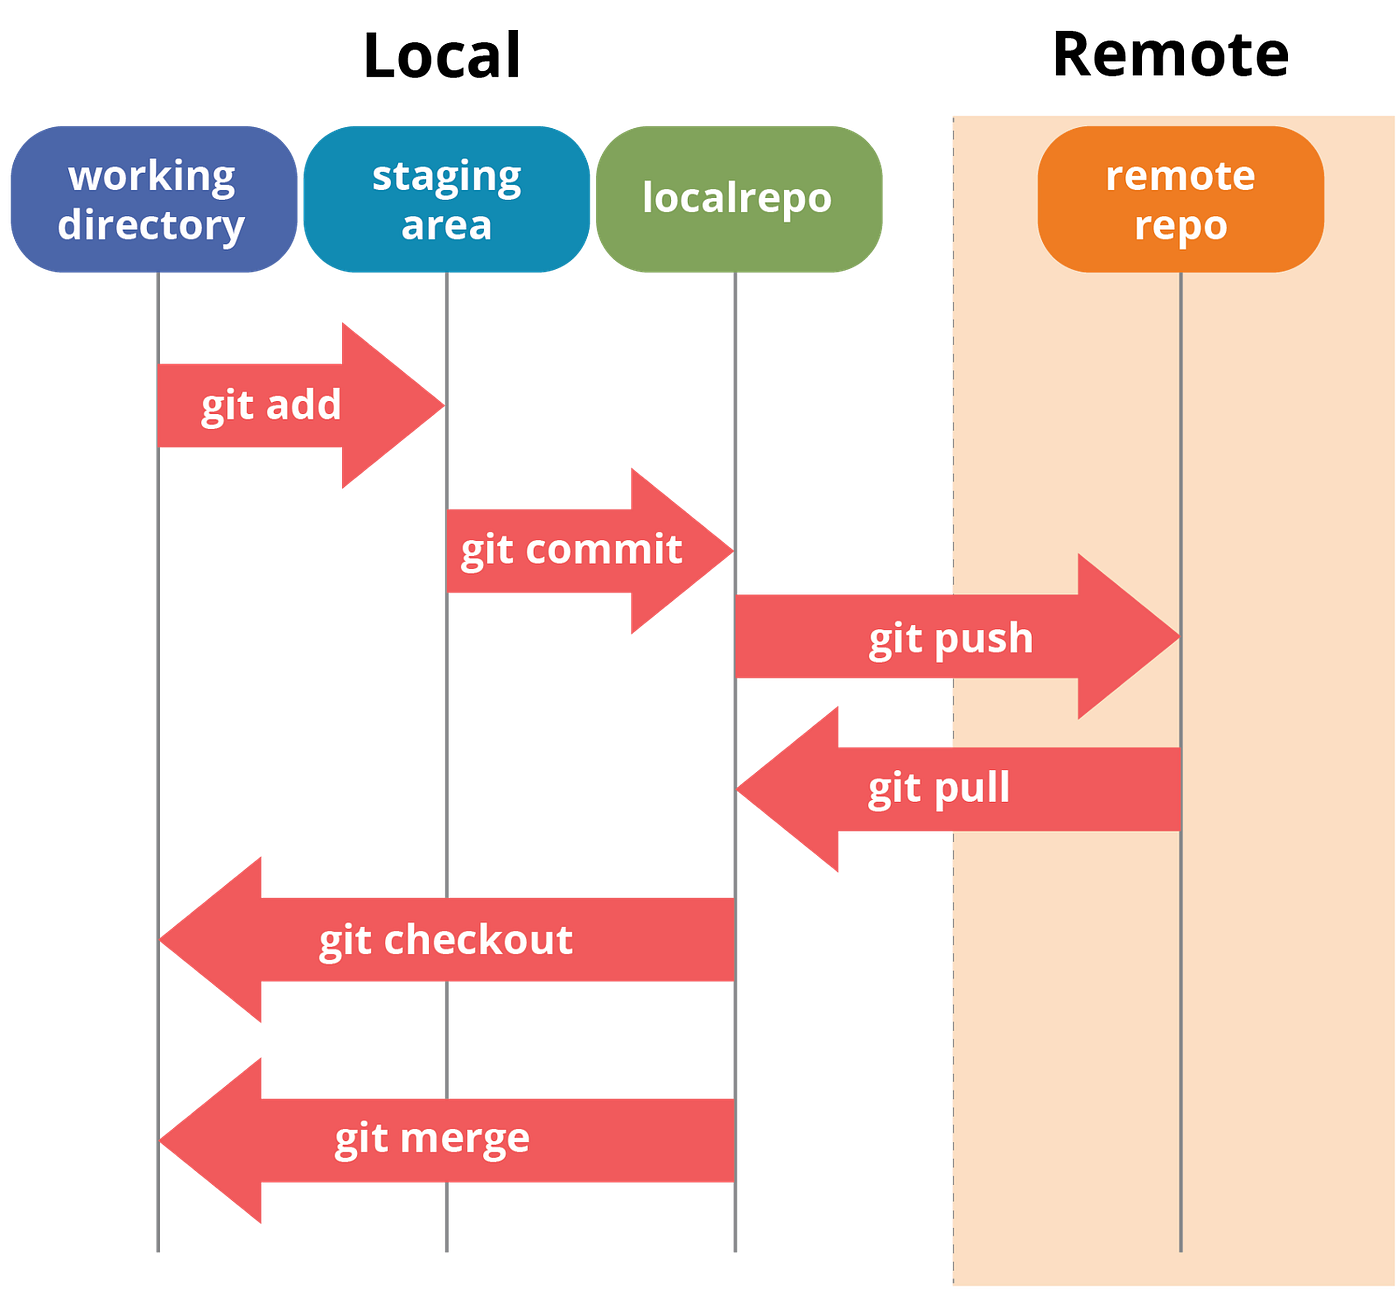
Git is a free and open source distributed version control system created by Linus Torvalds in 2005.What is GitHub?
GitHub is a for-profit company that offers a cloud-based Git repository hosting service. Essentially, it makes it a lot easier for individuals and teams to use Git for version control and collaboration.How does Git works?
- Recommend repositories remain small, ideally less than 1 GB, and less than 5 GB is strongly recommended.
- GitHub blocks pushes that exceed 100 MB, and you will receive a warning form Git when you attempt to add or update a file larger than 50 MB.
- Use Git Large File Storage (Git LFS), if you really need to track those big files with Git.
- Open multiple instances of Logseq at a time, e.g. open Logseq on your computer and on your phone at the same time. This will cause conflict in your repo.
- Put large files in
assetsfolder, like images, videos, etc.
Git Conflicts happen when you have two commits modifying same line of the files.
Git Conflicts are something every Git users will meet eventually. It's important to know how to solve them.
For example, You type "I'm faithful to Logseq." in your journal on your pc, but you also type "Na, I also use other note-taking tools." in your journal on your phone at the same time. GitHub will accept the first commits you push to it. But when you push the second commits, Git will say something like:
error: failed to push some refs to 'github.com:{your-username}/{your-reponame}.git'
hint: Updates were rejected because the tip of your current branch is behind
hint: its remote counterpart. Integrate the remote changes (e.g.
hint: 'git pull ...') before pushing again.
hint: See the 'Note about fast-forwards' in 'git push --help' for details.
which basicly means: "WTF Bruh, I can't believe you just lied to me. How can I trust you again?"
So you type git pull in your Git Bash/iTerms/Termux to gain GitHub's trust again, like what Git suggested in hint:. And that's how to resolve most of Git Conflicts.
But sometimes that's not enough. Git will say:
Auto-merging {the conflict file} #e.g. journals/2022_04_23.md
CONFLICT (content): Merge conflict in {the conflict file}
Automatic merge failed; fix conflicts and then commit the result.
which basicly means you have to manually delete which part you don't want.
So you open {the conflict file} with whatever text editor you like and fix it.
In the text editor:
<<<<<<< HEAD
- I’m faithful to Logseq. # Ok, I choose to keep this part.
=======
- Na, I also use other note-taking tools.
>>>>>>> 744f5cf94a46da43f5b318dab74c0f672bae31e2
After deletion ==> :
- I’m faithful to Logseq.Open Logseq and that let Logseq do the rest for you. Now you should only see the chosen part remain in your GitHub repo. And you are again a happy Logseq user now! 😍
This is like typing in the account/passward, so make sure you follow ALL the steps in set-up-git.
※ Noted: SSH-keys is prefered to use in this workflow, PLEASE set it properly, PLEASE. Connecting over SSH Section Link
This is like creating a folder in GitHub, follow create-a-repo to create a private repo.
※ Noted: If you create a public repo, that means everyone on GitHub can see what you put in there. You don't want that, do you?
In your repo page > Add file > Create new file > Name your file: .gitignore.
Type those:
logseq/bak/
logseq/.recycleClike the green Code button and Download ZIP, then unzip it for later use.

After Git is set and a private repo is created:
- Go to your local drive (for example:
D:\) and right-click on it. - You should see
Git Bash Here, click it. - type
git clone git@github.com:{your-username}/{your-reponame}.gitand hit enter. - If it's your first time git clone something from GitHub, it will probably ask if you agree to authorized the connection, just type
Yesand hit enter. - After it's done, you should see a new folder with your repo name.
- Open the folder, there should have a hidden folder named
.git. - Copy&paste the
post-commitandpre-commitin.git/hooks. - Open Logseq and add the folder with
.gitas your new graph. - Open Logseq > Settings > Version control > Enable Git auto commit.
- Type something and wait few minutes to see if what you typed has also appear in GitHub.
- If nothiong goes wrong, you are a happy Logseq user!

After Git is set and a private repo is created:
- Go to your local drive and right-click on it.
- You should see
New Terminal at folder, click it. If you don't see this option, check this link to enable it. - type
git clone git@github.com:{your-username}/{your-reponame}.gitand hit enter. - If it's your first time git clone something from GitHub, it will probably ask if you agree to authorized the connection, just type
Yesand hit enter. - After it's done, you should see a new folder with your repo name.
- Open the folder, there should have a hidden folder named
.git. - Copy&paste the
post-commitandpre-commitin.git/hooks. - Open Logseq and add the folder with
.gitas your new graph. - Open Logseq > Settings > Version control > Enable Git auto commit.
- Type something and wait few minutes to see if what you typed has also appear in GitHub.
- If nothiong goes wrong, you are a happy Logseq user!
- Pay for the Pro version of Working Copy, it really cheap since you will never bother by iCloud crashing your Logseq anymore.
- Open Working Copy > Seetings(⚙️) > Hosting Providers > Click
Test> Sign-in to your GitHub account. - Open
Working Copy> click+> Clone repository > Choose your repo. - When download is done, long-press on the repo > Share > Link Repository to Folder > My iPhone/iPad (I would suggest don't choose iCloud) > Logseq-icon folder > create a new sub-folder under the Logseq-icon one (I would suggest don't name the folder with the same name as your repo.) > click
Done - Open
Logseqand add new graph to that folder. - Open
ShortCuts> Automation > Create Personal Automation:- On App Open:
App> chooseLogseq> clickNext- Search actions >
Pull Repository- Repo: your Logseq repo - Turn off ask before running (or leave it on up to you)
- On App Close:
App> chooseLogseq> clickNext- Search actions >
Stage for Commit- Path:*, Repo: your Logseq repoCommit Repository- Repo: your Logseq repo, Message:Auto-commit from iOS/iPadOSPush Repository- Repo: your Logseq repo
- Turn off ask before running (or leave it on up to you)
- On App Open:
- Type something and wait few minutes to see if what you typed has also appear in GitHub.
- If nothiong goes wrong, you are a happy Logseq user!
※ Noted: If you are a student, you can sign up github student pack and apply for free Working Copy Pro.
 For Android users, by @Abulafia4

- Install
Termuxin Android, using F-droid app. Follow instructions here - Open Termux and type
pkg install gitto install git - Configure git username and email:
git config --global user.name "John Doe"andgit config --global user.email johndoe@example.com(this is the name and email which will go in the commits, it can be anything, not related with your Github account) - In termux terminal create a folder for your graph, for example
cd documents; mkdir MyGraphand clone your repo there with the commandgit clone git@github.com:{your-username}/{your-reponame}.git ~/documents/MyGraph - Open logseq and add a graph on that folder. Check that all looks ok.
-
Install
Termux:Widgetsfrom F-droid -
In termux, enter folder
~/.shortuctsand edit a file named for examplepull-graphcontaining:#!/usr/bin/bash source bin/source-ssh-agent cd {your repo location} # eg: cd ~/documents/MyGraph git pull
※ Noted: If you use password-free private keys for git you don't need the
ssh-agentline. You can include it to avoid typing the private key passphrase each time. -
In the same
~/.shortcutsfolder create a second one named for examplepull-graphcontaning:#!/usr/bin/bash source bin/source-ssh-agent cd {your repo location} git add -A git commit -m "sync from android" git push
-
Add to the Android screen a widget for
Termux Widgetapp, which will show the scripts available in~/.shortcuts(in our example, it will show pull-graph and push-graph). Taping on them, they will be executed by Termux.
- Tap "pull-graph" to download from github the most recent version of your graph
- Open Logseq and admire the latest version of your notes
- Edit/add notes, work on them
- Exit logseq and tap "push-graph" to upload your changes to github

Linux users click here
If you are a Linux user, why are you still watching this repo? Shooo. 😎- Working Copy on iOS, by @danieltomasz1.
- Steps to auto sync iOS + Windows, by @Caps3.
- Gitea - self hosted git server, by @Sawhney2.
- Self Managed Sync + Android setup, by @danzu5 and @Abulafia4.
- git hooks settings
- What is github?
- How does Git work?
- Repository size limits for GitHub.com
- About large files on GitHub