This project allows you to control and monitor Pylontech US2000B and US2000C batteries via console port over WiFi. It it's a great starting point to integrate battery with your home automation.
I ACCEPT NO RESPONSIBILTY FOR ANY DAMAGE CAUSED, PROCEED AT YOUR OWN RISK
- Low cost (around 20$ in total).
- Adds WiFi capability to your Pylontech US2000B/C battery.
- Device exposes web interface that allows to:
- send console commands and read response over WiFi (no PC needed)
- battery information can be retrevied also in JSON format for easy parsing
- MQTT support:
- device pushes basic battery data like SOC, temperature, state, etc to selected MQTT server
- Easy to modify code using Arduino IDE and flash new firmware over WiFi (no need to disconnect from the battery).
See the project in action on Youtube:
- Wemos D1 mini microcontroller.
- SparkFun MAX3232 Transceiver.
- US2000B: Cable with RJ10 connector (some RJ10 cables have only two wires, make sure to buy one that has all four wires present).
- US2000C: Cable with RJ45 connector (see below for more details).
- Capacitors C1: 10uF, C2: 0.1uF (this is not strictly required, but recommended as Wemos D1 can have large current spikes).
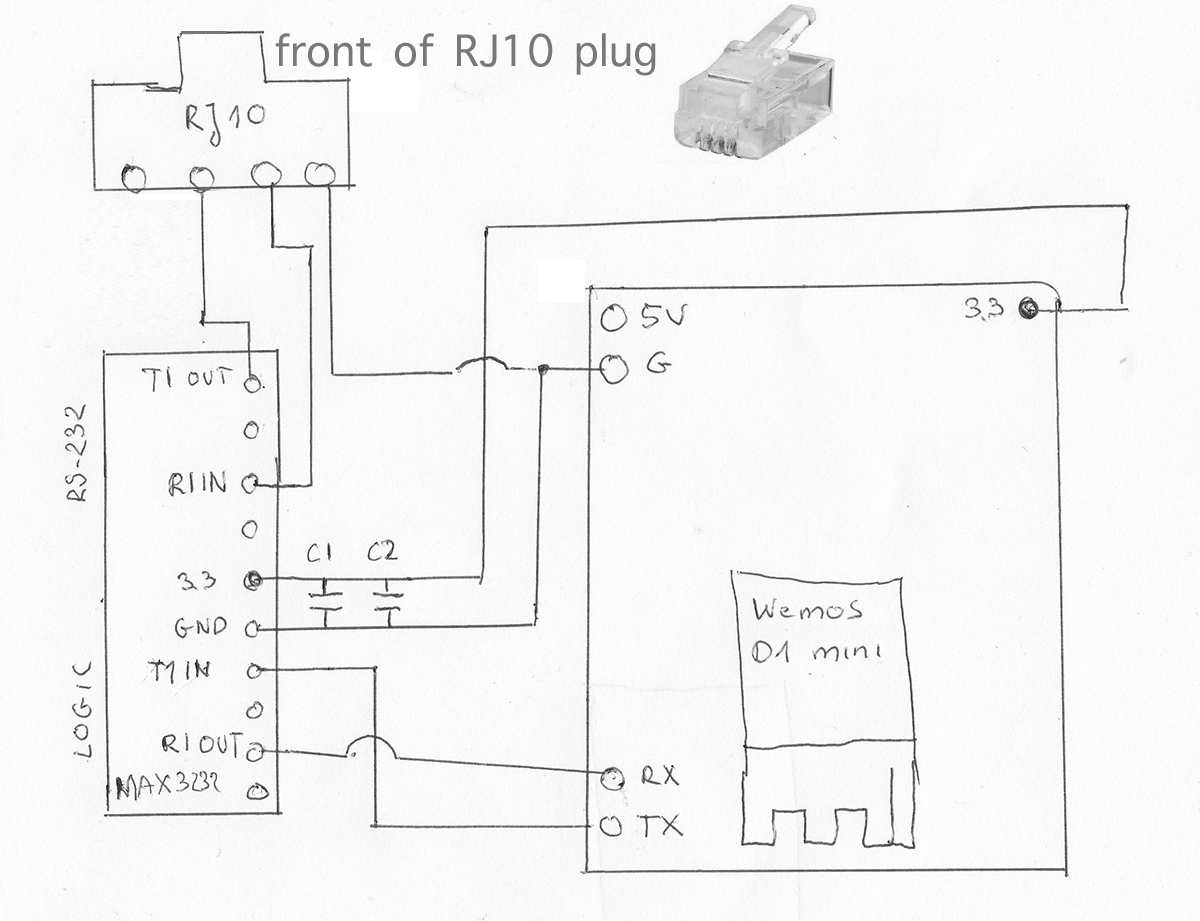
This battery uses RJ45 cable instead of RJ10. Schematics is the same only plug differs:
- Get Wemos D1 mini
- Install arduino IDE and ESP8266 libraries as described here
- Open PylontechMonitoring.ino in arduino IDE
- Make sure to copy content of libraries subdirectory to libraries of your Arduino IDE.
- Specify your WiFi login and password at the top of the file (line 13-14)
- If you want MQTT support, uncomment line 17 and fill details in lines 21-24
- Upload project to your device
- Connect Wemos D1 mini to the MAX3232 transreceiver
- Connect transreceiver to RJ10/RJ45 as descibed in the schematics (all three lines need to be connected)
- Connect RJ10/RJ45 to the serial port of the Pylontech US2000 battery. If you have multiple batteries - connect to the master one.
- Connect Wemos D1 to the power via USB
- Find what IP address was assigned to your Wemos by your router and open it in the web-browser
- You should be able now to connunicate with the battery via WiFi


