Webbased application for the Raspberry Pi and the 12 MP HQ camera for taking stills, especially tailored for the use with a (gemmological) microscope, but it is not limited to this.
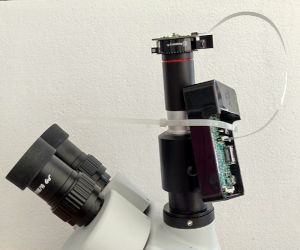
Connection of the camera to the third tube of a microscope.
The raspberry PI is intended to be operated in headless mode over wifi. In this way, only the usb-powercord is attached to the pi, which has almost no effect on the mechanical stability of the camera, reducing vibrations (as an ethernet cable will).
These are more or less generic instructions, they are here to have a guide at hand.
- Use a raspberry Pi 3B+ (or better), with a casing
- Install Raspberry PI OS (32bit), preferrably the light version without the desktop ("headless mode")
(https://www.raspberrypi.org/documentation/installation/installing-images/), use the legacy Debian Buster variant.
- NOTE: Allthough headless configuration is possible, it is my experience that the first setup should be done with keyboard and monitor connected. This way errors by yourself, or by the PI, or errors in the OS are much easier to detect.
- Enable SSH (https://www.raspberrypi.org/documentation/remote-access/ssh/), by placing an empty file "ssh" in the boot partition of the SD card
- Enable headless wifi (https://www.raspberrypi.org/documentation/configuration/wireless/headless.md)
- Put SD card in PI and login to the PI (preferably with keyboard and monitor attached)
- To enable setting a simple password, use:
sudo passwd pi - Use:
for set-up
sudo raspi-config - Shut the pi down:
And remove the power when it is done.
sudo shutdown now - Attach the HQ camera.
After this start the Pi and use it in headless mode. It is sometimes a pain to find the IP of the Pi. Usually I will bind the MAC adress to a fixed IP in the router, and use a symbolic name in the HOSTS file on my PC.
-
Enable the camera with raspi-config.
-
When using raspios buster: Test with raspistill (https://www.raspberrypi.org/documentation/usage/camera/raspicam/raspistill.md).
raspistill -t 1 -o cam.jpgIf no errors are shown, and a file cam.jpg is written, all is well.
-
When using raspios bullseye: Test with libcamera-jpeg: https://www.tomshardware.com/how-to/use-raspberry-pi-camera-with-bullseye
libcamera-jpeg -o test.jpgIf no errors are shown, and a file cam.jpg is written, the camera is connect.
-
Bullseye only(!):: the old working camerastack must be activated. It will replace the non functional libcamera stack. Do the following in the /boot/config.txt: Edit /boot/config.txt, remove the line "camera_auto_detect=1", and add "start_x=1" and "gpu_mem=128" (for background info read: https://forums.raspberrypi.com/viewtopic.php?t=323390) Gemcam will work now, raspistill and libcamera-jpeg won't.
Install two necessary applications:
- Git for installing and updating. Of course you could also download a zip, but upgrading later is easier this way. And installing Git is very simple (https://linuxize.com/post/how-to-install-git-on-raspberry-pi/).
- Install Apache and PHP (https://www.raspberrypi.org/documentation/computers/remote-access.html#setting-up-an-apache-web-server). Remove the
index.html file as instructed:
If there were no errors during installation, you can skip the part where a test version of the index.php is made. If you want to use virtual hosts, consult the documentation on raspberry.org.
sudo rm /var/www/html/index.html - Fire a webbrowser on a remote system, and enter the IP (or your name from the hosts file) in the address bar like http://<ip number> A Page with "Index of" must be shown now.
Clone this repository inside the webroot (normally /var/www/html). In the webroot on the pi enter (note: instead of the directory name "gemcam" you can choose any name you wish. In the remainer of this document, I assume you choose gemcam):
cd /var/www/html
sudo git clone https://github.com/henkrijneveld/Microscope-PiCam.git gemcam
Go to the install directory and execute the install script
cd gemcam
cd install
sudo ./install.sh
If it is the first time gemcam is installed, reboot:
sudo shutdown -r now
Go to your browser:
http://<ip or name of connected pi>/gemcam
Then click the Start Camera button. A picture should be visible (if camera attached and enough light). Sometimes the camera needs some time and won't adjust to the lighting. Push ctrl+F5 to reload the page and restart the camera.
If the white balance won't work, switch to auto and manual and back. The Camera is very picky on the sequence in which commands are sent.
Errors? open the console log in your browser (F12 key)
User configuration can be done in config/config.overrides.js and config/raspigemcam.overrides.cfg
Go to the installation directory from the webroot, do a git pull, and run install again. Example:
cd /var/www/html/gemcam
sudo git pull
cd install
sudo ./install.sh
If this leads to an unstable system, remove the gemcam directory entirely and re-install. In this situation, make sure all files are deleted.
-
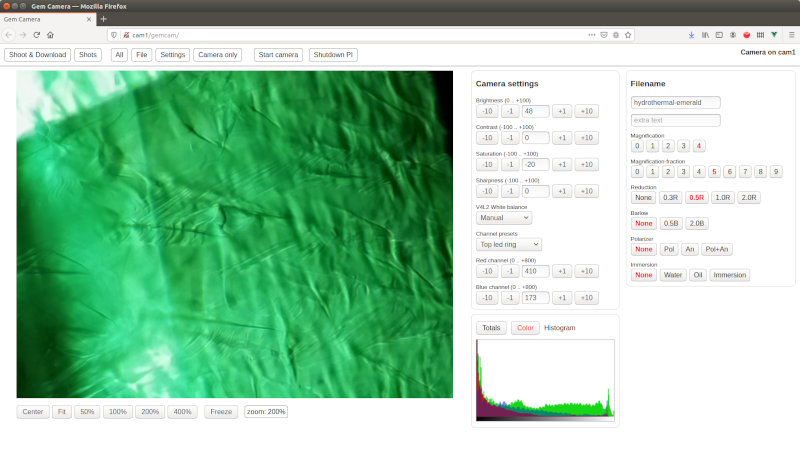
The User Interface runs in a webbrowser, open it on a different system.
-
When using a microscope with standard foto software, I ran into the inconvenience that it was necessary during the work to note seperately the subject, the magnification and other parameters. Later on I had to change the filename, leading to mistakes and a very cumbursome process. Microscope-PiCam let you specify the filename with alle relevant information. This results in meaningfull filenames like: garnet-1.5x-0.5R-inclusion-20210321-210304.jpg. Files are downloaded to your system, and stored in a mediafolder on the Pi itself. Maybe it seems strange at first, ben when you start copying files it is a very convenient way to not get confused.
-
The second problem using a camera with a microscope is focussing. A (gemmological) stereo microscope has objectives somewhat tilted from the horizontal plane to achieve the 3D effect. In Microscope-PiCam, you see a preview (in reduced resolution: 1024px. Full picture resolution will be 4056px). However, with a 4x or 8x magnification it is possible to get good focussing.
-
The whitebalance is an other issue. Through the microscope you can seldom use the balancing out of the box. Microscope-PiCam let you manually select the gains in red and blue (green stays constant as part of the design of the HQ camera). By carefully obsering the image, comparing it to the image in the microscope ("eye-balling") it can be fine tuned to achieve the right colors. Note that white balancing is processed on the camera, so 10 or 12 bits are used (raw processing). An additional grey card (with white, 18% grey, and black) can be helpfull.
Just play with the software!
Keep an eye on the histogram, it should not clip, and use the whole range for the totals. If you want to find the correct whitebalance, the color tab is very handy with a gray card.
Start out with exposure set to auto, and switch to off if it settled. You can now change the external lightning or the exposure compensation. The other controls can be set to get the most detail and dynamic range. Look at the live histogram to avoid clipping. Sometimes the camera will need less light then the eye, so also play with the brightness controls on your microscope.
If you want to make a stack, switch to stackmode and rest the counter. Make consecutive pictures and use stacking software. I do not use a gemmological microscope when stacking, but a 300x objective on a column stand.
After initial load, the camera must be started with the button "start camera". Sometimes you have to restart twice.
When done, shutdown the PI with the button in the upper bar. Wait a while before removing power.
Note that the primary driver for the quality of the picture is the reduction lens between microscope and camera.
In use with a synthetic hydrothermal emerald.
The software was developed with phpstorm, and the pi was connected as a remote server.
The UI can be developed (for a part) with no Pi connected. Go to the docker subdirectory and start:
cd /var/www/html/gemcam/docker
# start docker
./start.sh

# refresh docker after changes to the docker files itself
./refresh.sh

# enter the docker image
./gotowebserver.sh

# stop and remove all containers on your PC
./stopandremove.sh
You can use the testsystem on localhost. When the software detects that localhost is used, it will show two images as testimage. Note, that the camerasettings can be adapted, but will have no effect (the settings are processed in the camera module itself, so when it is not attached, nothing will happen to the picture).
None, anybody on the same (w)lan can access the camera.
The application is meant to be connected to a PC in the direct vicinity of the microscope/camera. All security must be implemented by using a dedicated wifi wlan. For technical reasons, the apache user (www-data) runs with full sudo rights, no password necessary. Making this secure would require a lot of extra effort with no pay-off in this use case. Highly recommended to make this application not available on a broader network.
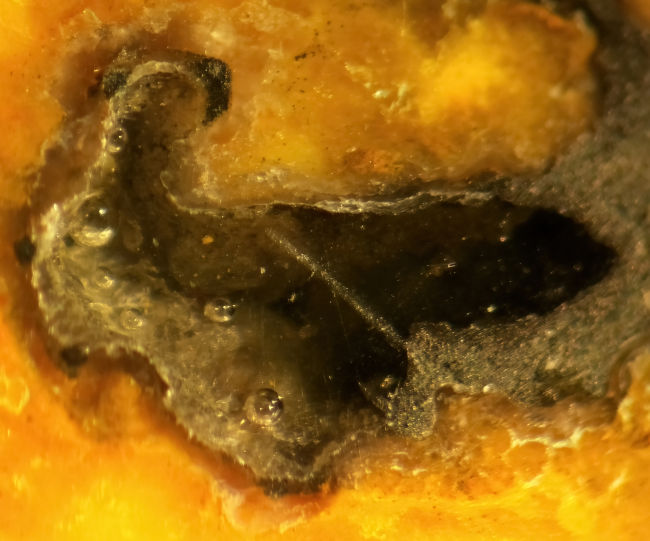
Air bubbles in resin filled cavity of a bumlbee jasper (horizontal field of view 3mm).
- The exposure settings do seem to be somewhat unstable. I am not sure if this is in the PI or the driver. It can sometimes lead to a crash of apache. The only way to solve this is to ssh into the PI, go to the gemcam subdir. Run "sudo ./stop.sh" and restart apache: "sudo service apache2 restart". I am currently investigating this.
- It is tested only on my own systems: 2 Raspberry 3B+ with a camera connected. I expect some difficulties for first time users.
- This is my first Vue application. There are still some quirks in the event handling. It runs with vue.js in development mode.
- Error messages on the UI itself are almost absent. When an error occurs, it is best to go to the development tools in the browser (F12 key), and inspect the log in the console.
- The ISO is fixed on 100. You can never be sure with the camera drivers, but the lower the ISO, the sharper the image. It may result in longer exposure times.
The mediabrowser is the "Tiny File Manager" script (https://tinyfilemanager.github.io), renamed to index.php in php/filemanager. The config.php used with this filemanager is adapted to automatically set the media directory to the media subdirectory under the site root.
The gemcamdriver is from https://github.com/henkrijneveld/userland, subdir raspigemcam-bin. It is a non-backwards compatible adapted copy from raspimjpeg. For more information, see the readme accompanying the aforementioned repository.
The vue script is from vuejs.org
The general idea of Microscope-PiCam is based on RPi_Cam_Web_Interface (https://github.com/silvanmelchior/RPi_Cam_Web_Interface). This is a very generic application with a lot of functionality of no use for still fotography. I considered the userinterface suboptimal for my goals. Unfortunately, the UI was based on plain javascript and ajax. Vue seems a better choice nowadays. The wiki of this project can be of use: https://elinux.org/RPi-Cam-Web-Interface


