In this workshop, you will get hands-on experience with the open source framework Keptn and see how it can help you to self-healing your applications. There is no need to install any software on your local machine, instead we will use cloud resources for the course of this workshop.
- Dynatrace - We will use Dynatrace to monitor our cluster as well as all our sample application. You will find the login information on the handout on your place.
- Kubernetes Cluster - A Kubernetes Cluster is provided for you to deploy and run the sample application on.
We are going to reset our environment for this part and start over with fresh installation.
kubectl delete namespace dynatrace tower productionThere is no need to install anything on your local machine, instead we are going to use a web browser to connect to our workshop environment.
Please find the login information at your place or ask the instructor. Open a web browser and login to the bastion host with the provided credentials.
-
Open a browser and login to the Bastion host via ShellInABox. You will find the URL on your handout cards.
-
Start the Docker container that contains all scripts we need in this workshop setting.
docker run -d --name ${USER} -it --mount type=bind,source=/home/${USER}/.kube/,target=/root/.kube/ jetzlstorfer/hotday-gke:0.6.0 && docker exec -it ${USER} /bin/bashNote: If you have already started the Docker container, but lost connection and want to connect to it again, pleae use:
docker exec -it ${USER} /bin/bash -
Verify your Kubernetes configuration
kubectl config current-contextShould give you something like (numbers at the end will vary)
sealfhealing01 -
Verify that all files are available
cd examples
ls
Should give you:
bridge load-generation onboarding-carts unleash-server -
Clean up previously installed OneAgent Operator.
Since in the previous class we already deployed the Dynatrace OneAgent Operator into our cluster, we first remove it to make sure to have a fresh start.
kubectl delete namespace dynatrace
Install the Keptn control plane components into your cluster, using the Keptn CLI:
keptn install --platform=kubernetesIt will prompt again for confirmation, if everything is fine, go ahead and install Keptn.
Please note that the Keptn install command does offer support for other platforms as well. A list of all supported platforms can be retrieved by executing keptn install --help .
The installation will take about 5 minutes to perform.
Details about this step
The Keptn CLI will now install all Keptn core components into your cluster, as well authenticating the Keptn CLI at the end of the installation.
Once the installation is finished you should find a couple of pods running in your keptn namespace.
$ kubectl get pods -n keptn

NAME                                                              READY   STATUS    RESTARTS   AGE
api-54699455d6-gk9pn                                              1/1     Running   0          117s
bridge-8ccf45786-dknf5                                            1/1     Running   0          117s
configuration-service-84b9b59c98-54kf8                            1/1     Running   0          115s
eventbroker-go-64648bcf49-9gtcd                                   1/1     Running   0          117s
gatekeeper-service-5779d4948c-d8gm2                               1/1     Running   0          60s
gatekeeper-service-evaluation-done-distributor-6cdbcc8c75-mlvxd   1/1     Running   0          60s
helm-service-7cdd9bf76f-nwf27                                     1/1     Running   0          116s
helm-service-configuration-change-distributor-85fb46f6d6-822rz    1/1     Running   0          60s
helm-service-service-create-distributor-7cd475dc5b-5ffn6          1/1     Running   0          116s
jmeter-service-54db444865-gs6x5                                   1/1     Running   0          60s
jmeter-service-deployment-distributor-7dcd54dd58-qtwsp            1/1     Running   0          59s
keptn-nats-cluster-1                                              1/1     Running   0          2m5s
lighthouse-service-6d99dcbc4d-6p89d                               1/1     Running   0          59s
lighthouse-service-get-sli-done-distributor-665df8b596-ps8kv      1/1     Running   0          59s
lighthouse-service-start-evaluation-distributor-78874b45f7jj7x4   1/1     Running   0          59s
lighthouse-service-tests-finished-distributor-5f574b4897-ttckb    1/1     Running   0          59s
nats-operator-7dcd546854-sw85h                                    1/1     Running   0          2m32s
remediation-service-79c9f76c88-srcjb                              1/1     Running   0          58s
remediation-service-problem-distributor-6b69d584c6-qh7z2          1/1     Running   0          58s
shipyard-service-79ff45984-mkhrm                                  1/1     Running   0          116s
shipyard-service-create-project-distributor-7b5b9bcfc6-ltw2q      1/1     Running   0          116s
shipyard-service-delete-project-distributor-789b6d54d9-c8nhk      1/1     Running   0          116s
wait-service-dd6956bdb-7hfr6                                      1/1     Running   0          59s
wait-service-deployment-distributor-849c546d7b-wdhvv 1/1 Running 0 58s -
To be able to connect a Dynatrace tenant to the cluster, we will need an API as well as an Platform as a Service (PaaS) token from the Dynatrace tenant. We recommend creating a temporary file and copying the following lines into an editor, fill them out and keep them as a reference for later:
Dynatrace Host Name (e.g. abc12345.live.dynatrace.com): Dynatrace API Token: Dynatrace PaaS Token: -
Login to your Dynatrace tenant and retrieve the tenant ID from the address bar of your browser. Please do copy only the characters between
https://and the first/after the .dynatrace.com. E.g., a valid tenant ID would be abc1234.live.dynatrace.comCopy it to your temporary file to keep it for later.
-
To retrieve the API and PaaS Token, login to your Dynatrace tenant and navigate in the left-hand menu to Settings -> Integration -> Dyantrace API and click on Generate token. Provide a name, e.g., keptn-token and make sure to create a token with the following permissions:
Open for permissions
- Access problem and event feed, metrics and topology
- Access logs
- Configure maintenance windows
- Read configuration
- Write configuration
- Capture request data
- Real user monitoring JavaScript tag management
Copy the value of the token into your temporary file.
-
Retrieve the PaaS Token by navigating to Settings -> Integration ->Platform as a Service and generate a new token again with a name of your choice, e.g., keptn-token. Copy the value to your temporary file to keep it as a reference.
-
Verify that the OneAgent Operator is not installed yet.
kubectl get namespacesShould give you a list without a
dynatracenamespace. If you still can see thedynatracenamespace at this point, please go ahead and remove it by executing:kubectl delete namespace dynatrace -
Create a secret for in your cluster with the Dynatrace credentials
DT_TENANT=yourtenant.dynatracelabs.com
DT_API_TOKEN=yourapitoken
DT_PAAS_TOKEN=yourpaastoken
kubectl -n keptn create secret generic dynatrace --from-literal="DT_API_TOKEN=$DT_API_TOKEN" --from-literal="DT_TENANT=$DT_TENANT" --from-literal="DT_PAAS_TOKEN=$DT_PAAS_TOKEN" -
Install the Dyntrace service:
kubectl apply -f https://raw.githubusercontent.com/keptn-contrib/dynatrace-service/0.6.0/deploy/manifests/dynatrace-service/dynatrace-service.yaml -
Once the Dynatrace service is installed, configure Dyntrace with Keptn:
keptn configure monitoring dynatrace
The Keptn’s bridge provides an easy way to browse all events that are sent within Keptn and to filter on a specific Keptn context. When you access the Keptn’s bridge, all Keptn entry points will be listed in the left column. Please note that this list only represents the start of a deployment of a new artifact. Thus, more information on the executed steps can be revealed when you click on one event.
In the default installation of Keptn, the bridge is only accessible via kubectl port-forward. To make things easier in this workshop, we will expose it by creating a public URL for this component.
-
First we update to the latest (early access!) of the Keptn's bridge by replacing the previous deployment:
kubectl -n keptn set image deployment/bridge bridge=keptn/bridge2:0.6.1.EAP.20200131.1010 --recordkubectl -n keptn-datastore set image deployment/mongodb-datastore mongodb-datastore=keptn/mongodb-datastore:0.6.1.EAP.20200131.1010 --record -
Navigate to the folder to expose the bridge.
cd bridge/expose-bridge -
Execute the following script.
./exposeBridge.sh -
It will give you the URL of your Bridge at the end of the script. Open a browser and verify the bridge is running. Please note that on the latest version of Mac OS you might not be able to access it. Please

-
Make sure you are in the correct folder of your examples directory:
cd ../../onboarding-carts -
Create a project
keptn create project sockshop --shipyard=./shipyard.yaml -
Onboard carts service
keptn onboard service carts --project=sockshop --chart=./carts -
Onboard the database needed for the carts service
keptn onboard service carts-db --project=sockshop --chart=./carts-db --deployment-strategy=direct -
Deploy the carts database
keptn send event new-artifact --project=sockshop --service=carts-db --image=mongo:4.2.2 -
Deploy the carts service by specifying the built artifact, which is stored on DockerHub and tagged with version 0.10.1:
keptn send event new-artifact --project=sockshop --service=carts --image=docker.io/keptnexamples/carts --tag=0.10.1 -
Go to Keptn's bridge and check which events have already been generated. You can access it by getting the URL with this command:
echo http://bridge.keptn.$(kubectl get cm keptn-domain -n keptn -o=jsonpath='{.data.app_domain}') -
Take a look at the service that has been deployed, by getting the URL with this command:
-
Hardening environment
echo http://carts.sockshop-hardening.$(kubectl get cm keptn-domain -n keptn -o=jsonpath='{.data.app_domain}') -
Production environment
echo http://carts.sockshop-production.$(kubectl get cm keptn-domain -n keptn -o=jsonpath='{.data.app_domain}')
-
To quickly get an Unleash server up and running with Keptn, follow these instructions:
-
Make sure you are in the correct folder of your examples directory:
cd ../unleash-server -
Create a new project
keptn create project unleash --shipyard=./shipyard.yaml -
Onboard unleash and unleash-db using the keptn onboard service command:
keptn onboard service unleash-db --project=unleash --chart=./unleash-dbkeptn onboard service unleash --project=unleash --chart=./unleash -
Send new artifacts for unleash and unleash-db using the keptn send new-artifact command:
keptn send event new-artifact --project=unleash --service=unleash-db --image=postgres:10.4keptn send event new-artifact --project=unleash --service=unleash --image=docker.io/keptnexamples/unleash:1.0.0
Get the url (unleash.unleash-production.KEPTN_DOMAIN):
echo http://unleash.unleash-production.$(kubectl get cm keptn-domain -n keptn -o=jsonpath='{.data.app_domain}')Open the url in your browser and log in using the following credentials:
username: keptn
password: keptn
Feature flag for a promotional campaign that can be enabled whenever you want to run a promotional campaign on top of your shopping cart
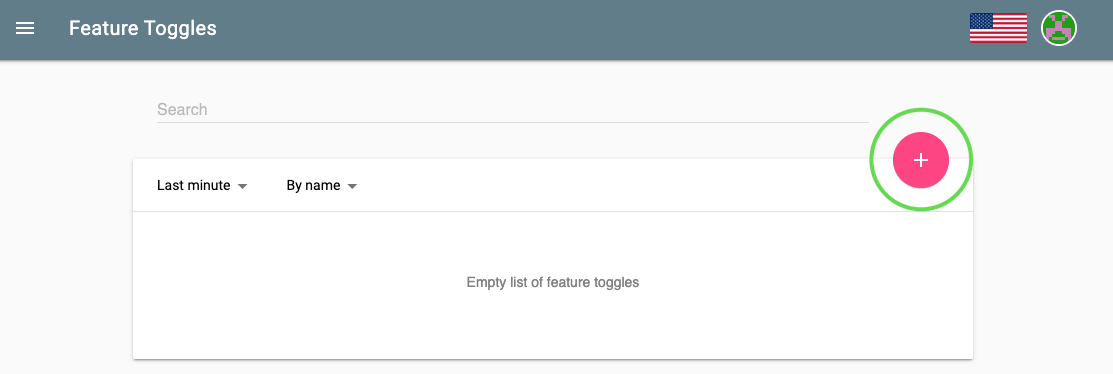
To set up the feature flag, go to your Unleash server and login with the credentials from the previous step.
-
Name the feature toggle EnablePromotion and add carts in the description field.
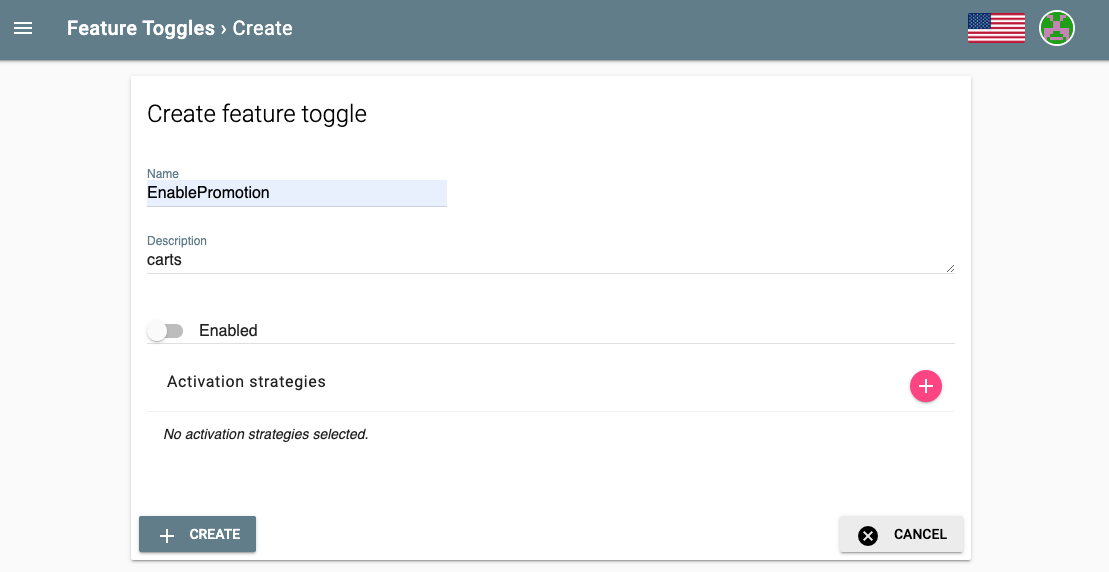
EnablePromotion
carts
Now everything is set up in the Unleash server. For Keptn to be able to connect to the Unleash server, we have to add a secret with the Unleash API URL as well as the Unleash tokens.
Execute the following command but replace $URL with the actual URL, $USER with the user and $TOKEN with the token of your Unleash server. As you have already onboarded unleash using Keptn, you can use the following command:
kubectl -n keptn create secret generic unleash --from-literal="UNLEASH_SERVER_URL=http://unleash.unleash-production/api" --from-literal="UNLEASH_USER=keptn" --from-literal="UNLEASH_TOKEN=keptn"Keptn has to be aware of the new secret and have to load it for it to connect to the Unleash server to set the feature toggles. Therefore, the remediation service must be restarted:
kubectl delete pod -l=run=remediation-service -n keptnFinally, switch to the carts example (cd examples/onboarding-carts) and add the following remediation instructions
 remediations:
 - name: "Failure rate increase"
   actions:
   - action: featuretoggle
     value: EnablePromotion:off
using the command:
cd ../onboarding-cartskeptn add-resource --project=sockshop --service=carts --stage=production --resource=remediation.yaml --resourceUri=remediation.yamlNow that everything is set up, next we are going to hit the application with some load and toggle the feature flag.
-
Move to the folder with some load generation scripts
cd ../load-generation/bin -
Start the load generator
./loadgenerator-linux "http://carts.sockshop-production.$(kubectl get cm keptn-domain -n keptn -o=jsonpath='{.data.app_domain}')"
-
Change Dynatrace default settings: In this workshop we are not having a lot of traffic on our service so we want to change the default settings in Dynatrace to enable a quicker problem notification.
- In your Dynatrace tenant, click on Dashboards in the left menu and select the Sockshop@keptn dashboard.

- In the dashboard, now click on the services: production tile in the production section.
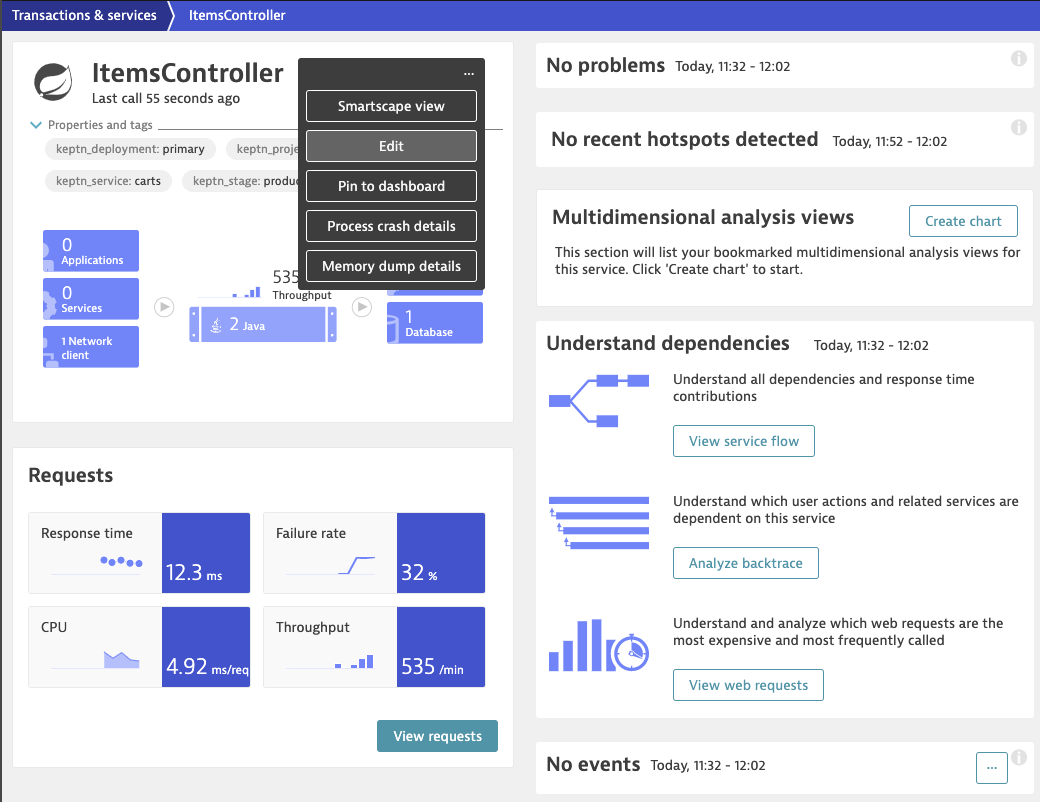
- This will lead you to the Services & Transactions overview, but already filtered to our production environment only. Click on the ItemsController.

- On this screen for the service, we are going to adjust the anomaly detection settings. Click on the ... icon and then Edit to adjust the settings as follows.
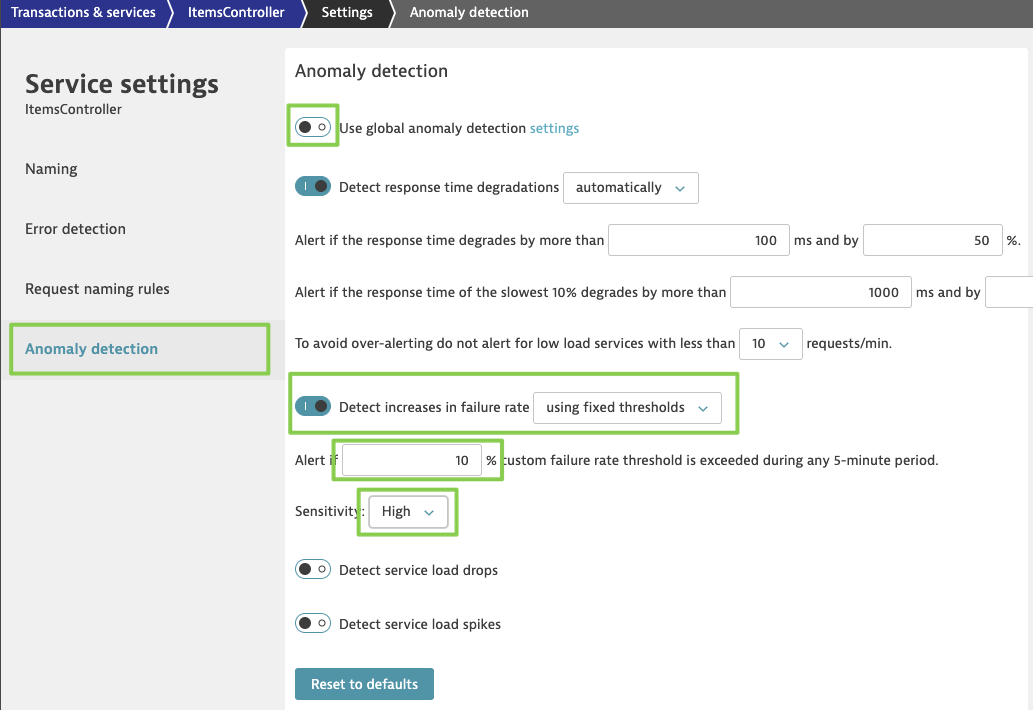
- In your Dynatrace tenant, click on Dashboards in the left menu and select the Sockshop@keptn dashboard.
-
Now, go back to your Unleash server in your browser. In this tutorial, we are going to turn on the promotional campaign, which purpose is to add promotional gifts to about 30 % of the user interactions that put items in their shopping cart.
-
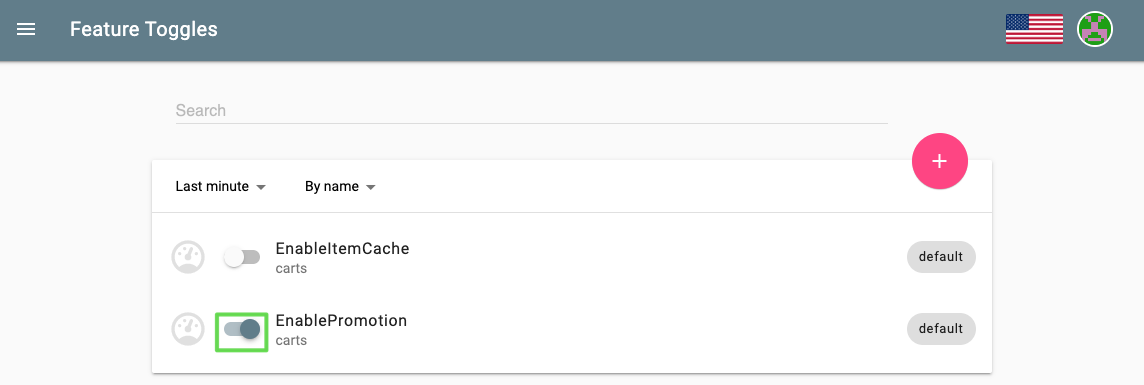
Click on the toggle next to EnablePromotion to enable this feature flag.
-
By enabling this feature flag, a not implemented function is called resulting in a NotImplementedFunction error in the source code and a failed response. After a couple of minutes, the monitoring tool will detect an increase in the failure rate and will send out a problem notification to Keptn.
-
Keptn will receive the problem notification/alert and look for a remediation action that matches this problem. Since we have added the remediation.yaml before, Keptn will find a remediation action and will trigger the corresponding action that will disable the feature flag.
Join the Keptn community!
Further information about Keptn you can find on the keptn.sh website. Keptn itself lives on GitHub.
Feel free to contribute or reach out to the Keptn team using a channel provided here.
Join our Slack channel!
The easiest way to get in contact with Keptn users and creaters is to join our Slack channel - we are happy to meet you there!
-
If you drop out of your Docker container, you can connect to it again via this command:
docker exec -it ${USER} /bin/bash -
If you want to check if there are pods running in your environments you can execute this:
kubectl get pods -n sockshop-hardening
kubectl get pods -n sockshop-production
