This post is going to walk through how to make a task list app that stores the task in Core Data.
This app will have the following features:
- Add a task
- Complete a task
- Delete a task
- Persist data if the app is closed
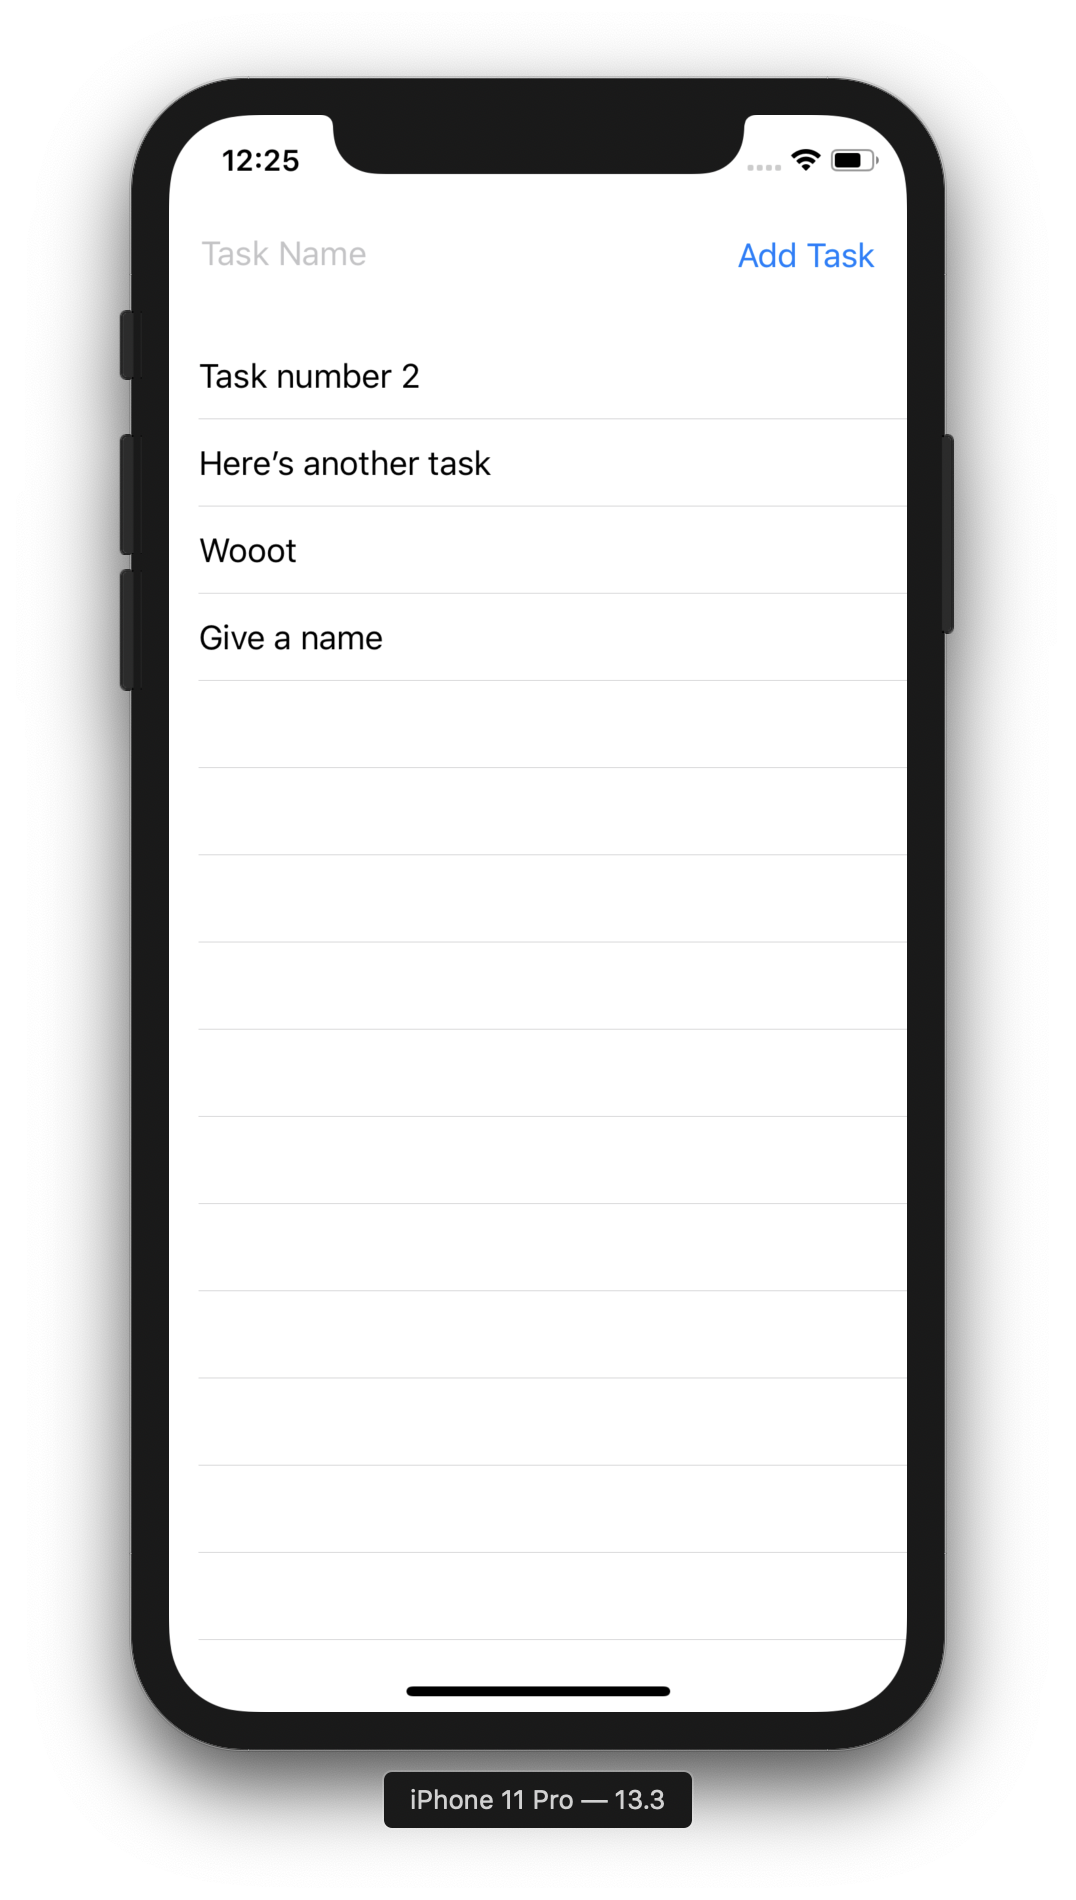
Here is what the finished app will look like
The finished app can be found in this GitHub repo:
Create a new Xcode project for a single view iOS app.
Check the boxes for SwiftUI and to use Core Data.
The first thing we need to do is add an entity to the CoreData model. To do this, open ProjectName.xcdatamodeld, where ProjectName is what you called the project in Step 1, and click on Add Entity at the bottom of the window. Name the new entity Task.
The image below highlights where to change the name in the Inspector.

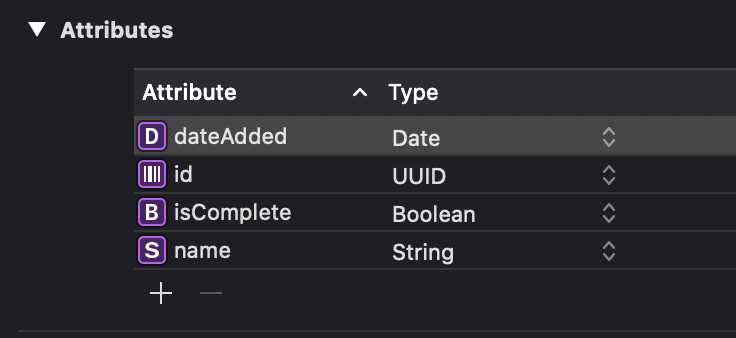
Next, we need the Task entity to have attributes to store the following information:
- id: used as a unique identifier for each task
- name: what the user will call the task
- isComplete: defines whether or not a task is completed
- dateAdded: to know when a task was added
To add attributes to Task, click the + in the Attributes section, and give the attribute a name and type. The GIF below shows how to do this.

This table describes each attribute and the type associated with the attribute.
| Attribute | Type |
|---|---|
| id | UUID |
| name | String |
| isComplete | Bool |
| dateAdded | Date |
The ProjectName.xcdatamodeld should now look like the picture below.
Now, we are adding a new swift file that will make Task identifiable making the List of tasks easier to call.
Add a new Swift file and call it Task+Extensions
In the file, add the following:
extension Task: Identifiable {
}
By adding the code above, the Task class now conforms to the Identifiable class.
We need to add a variable that accesses our Managed Object Context in ContentView.swift. To do this, open ContentView.swift and add @Environment(.\managedObjectContext) var context before the body variable. ContentView should now look like this:
struct ContentView: View {
    @Environment(\.managedObjectContext) var context

    var body: some View {
        Text("Hello world!")
    }
}

struct ContentView_Previews: PreviewProvider {
    static var previews: some View {
        ContentView()
    }
}We declared context as an environment variable, meaning that the value is going to come from the view's environment. In this case, it is going to come from SceneDelegate.swift on lines 23 through 27 where context is declared and then given to ContentView().
We are now going to work on the UI in ContentView.swift.
Let's start by adding a TextField to the app. Change the Text(HelloWorld) to TextField(title: StringProtocol, text:Binding<String>). TextField needs two properties, a StringProtocol and a Binding<String>. For the StringProtocol, give it a property of "Task Name". When the TextField is empty, Task Name will appear in light gray.
Now, we still need a Binding<String>, this isn't as easy as TextField. We need to declare a variable for it. Before the body variable declaration, add @State private var taskName: String = "", and then make the second property of TextField $taskName. ContentView.swift should now look like this:
struct ContentView: View {
    @Environment(\.managedObjectContext) var context

    // this is the variable we added
    @State private var taskName: String = ""

    var body: some View {
        // this is the TextField that we added
        TextField("Task Name", text: $taskName)
    }
}

struct ContentView_Previews: PreviewProvider {
    static var previews: some View {
        ContentView()
    }
}
Since we are using SwiftUI, if you use the canvas, you can see what the UI looks like without having to run the app in the simulator.
I'm going to explain the parts of @State private var taskName: String = "" and why we needed to do this.
First, this is declaring a State property by using the @State property wrapper so that taskName is a binding value. A State property is going to store the value in taskName and allow the view to watch and update when the value changes.
First, we need to add a button so that when the user is done typing, they can then add the task to their list.
To do this, we are going to wrap TextField in an HStack and then add a Button(). When adding the button, the action should be self.addTask() and label in the button should be Text("Add Task).
Here's what the code in body should look like now.
var body: some View {
    HStack{
        TextField("Task Name", text: $taskName)
        Button(action: {
            self.addTask()
        }){
            Text("Add Task")
        }
    }
}
Now, this causes Xcode to give the error Value of type 'ContentView' has no member 'addTask', so this means we have to add the function addTask().
After the body variable, add the following:
func addTask() {
    let newTask = Task(context: context)
    newTask.id = UUID()
    newTask.isComplete = false
    newTask.name = taskName
    newTask.dateAdded = Date()

    do {
        try context.save()
    } catch {
        print(error)
    }
}In addTask(), we made a new Task object and then gave the attributes of newTask values. Then we use the save() on context to add it to CoreData.
Here is what the UI looks like so far.

It's finally time to create the task list!
First, we need to make a fetch request to get the tasks that are added. Here's what we need to add the ContentView.
@FetchRequest(
    entity: Task.entity(),
    sortDescriptors: [NSSortDescriptor(keyPath: \Task.dateAdded, ascending: false)],
    predicate: NSPredicate(format: "isComplete == %@", NSNumber(value: false))
) var notCompletedTasks: FetchedResults<Task>
Now, I'm going to break this down a bit.
entitydeclares what Core Data entity we are retrievingsortDescriptorsdescribes how we want to sort the entitiespredicateacts as a filter
So with the code above, we are asking for all Tasks that are not completed and for those Tasks to be sorted by date newest to oldest.
Next, we need to make a list that shows the tasks. Let's embed the HStack inside a VStack. It should look like this:
VStack {
    HStack {
        // TEXTFIELD CODE HERE
    }
}
Now, we can add a list. After the HStack, add the following:
List {
    Text("Hi")
}
This adds a list underneath the TextField and makes the UI look like this.

Next, we are going to make "Hi" repeat for however many tasks we have. Embed Text("Hi") inside a ForEach like this:
ForEach(notCompletedTasks){ task in
    Text("Hi")
}
We did not have to specify the id for notCompletedTasks in the ForEach because Task conforms to Identifiable thanks to our work in step 2.3.
If you run the app, then put in a task name and hitting Add Task will make another row of "Hi".
Let's make a new struct for a TaskRow view that will take in the task in ContentView.swift. Above ContentView(), add the following:
struct TaskRow: View {
    var task: Task

    var body: some View {
        Text(task.name ?? "No name given")
    }
}
Inside the Text you will see that we have to use the nil-coalescing operator, ??, to give a default value. The reason we do this is because the value for the Task attributes are optional and might not have a value.
Now, inside the ForEach replace the Text with TaskRow(task). ContentView.swift should have the following code.
import SwiftUI

struct TaskRow: View {
    var task: Task

    var body: some View {
        Text(task.name ?? "No name given")
    }
}

struct ContentView: View {
    @Environment(\.managedObjectContext) var context

    @FetchRequest(
        entity: Task.entity(),
        sortDescriptors: [NSSortDescriptor(keyPath: \Task.dateAdded, ascending: false)],
        predicate: NSPredicate(format: "isComplete == %@", NSNumber(value: false))
    ) var notCompletedTasks: FetchedResults<Task>

    @State private var taskName: String = ""

    var body: some View {
        VStack {
            HStack{
                TextField("Task Name", text: $taskName)
                Button(action: {
                    self.addTask()
                }){
                    Text("Add Task")
                }
            }
            List {
                ForEach(notCompletedTasks){ task in
                    TaskRow(task: task)
                }
            }
        }
    }

    func addTask() {
        let newTask = Task(context: context)
        newTask.id = UUID()
        newTask.isComplete = false
        newTask.name = taskName
        newTask.dateAdded = Date()

        do {
            try context.save()
        } catch {
            print(error)
        }
    }
}

struct ContentView_Previews: PreviewProvider {
    static var previews: some View {
        ContentView()
    }
}
Here is how the app should work now.

Now, we are going to mark the task as complete, which should make the task disappear from the list.
First, we are going to embed the TaskRow into a Button and the action of the button is going to be self.updateTask(task). Now that will look like this.
Button(action: {
    self.updateTask(task)
}){
    TaskRow(task: task)
}
Next, we need to make a function called updateTask so that we can actually update the task and mark as complete.
After addTask, let's add func updateTask(_ task: task){}. Using the _ says that we can ignore the argument label when calling the function. If you want to read more about argument labels, click here to read my post about it, next, let's add the internals of the function.
let isComplete = true
let taskID = task.id! as NSUUID
let fetchRequest: NSFetchRequest<NSFetchRequestResult> = NSFetchRequest(entityName: "Task")
fetchRequest.predicate = NSPredicate(format: "id == %@", taskID as CVarArg)
fetchRequest.fetchLimit = 1
do {
    let test = try context.fetch(fetchRequest)
    let taskUpdate = test[0] as! NSManagedObject
    taskUpdate.setValue(isComplete, forKey: "isComplete")
} catch {
    print(error)
}
Let's dive into this a bit. The first thing we do is set a constant for the new value of isComplete for the task. Then, we set the id of the task to a constant to use in the predicate. Next, we need to create a fetch request that gets the specific task that we are updating. Then we perform the update.
Now, if you run the app, the app will allow you to add a task and then tap on it to mark as complete. Since we are only using the non-completed tasks in the list, the completed task disappears from the list. The gif below shows the final app.

If you enjoy my posts, please consider subscribing to my Patreon and checking out my other posts!
If you don't like having more subscriptions, consider buying me a coffee instead by clicking the image below!
