Custom Vector escape pod designed for regular production Vectors. No OSKR required.
This version is designed to be easy to setup by consumers and by people with little technical experience. If you would like a version that is more dev-friendly and customizable, check out wire-pod.
- This will require you to put your Vector on 1.8. You cannot keep him on 1.6 if you want to use these instructions.
- While it is recommended to clear user data, it is not required.
- It is recommended you use a Raspberry Pi 4, though you can use any Linux computer
- For this; you do not need to pay for the voice subscription, Escape Pod, or any DDL service.
- Please note that the phone apps (Android and iOS) will no longer be able to connect to a Vector tethered to Wire-Prod-Pod
- wire-prod-pod contains a fully-featured Vector mobile app replacement
- One of the following to use as a host:
- Raspberry Pi 4
- Any device running Linux
- Modern desktop running Windows 10 or 11
- A production Vector 1.0
- Vector 2.0 is not supported yet
- A computer with Google Chrome (or the new Microsoft Edge) and Bluetooth
- If you are using Linux, go to chrome://flags and enable
Experimental web platform features, then relaunch Chrome
- If you are using Linux, go to chrome://flags and enable
-
Put your Vector on the charger and hold the button for 15 seconds. The light will turn off after ~5 seconds, that is normal. Just keep holding until he turns back on (This is not the same as clearing user data. Do NOT clear user data).
-
He should be at a screen that shows
anki.com/v. On a computer with Bluetooth support (preferably Windows or macOS), go to https://keriganc.com/vector-epod-setup in Chrome or Edge and follow the instructions. The download may take a few minutes to start. -
Wait for that to finish. Once he has rebooted, continue on to the next set of instructions.
wire-pod can be setup either on a Raspberry Pi, pretty much any Linux desktop, or on Windows 10/11 via WSL.
Only do one of the following sets of instructions.
After you have followed one of the installation instructions, continue on to "Finish setting up the bot".
-
Download and install Raspberry Pi Imager, insert a micro-SD card into your computer/into a reader
-
Follow along with this video. This is an example of how I would set it up for my network/liking. The only things you should change are the user password (located under
pi, change it to anything you want and make sure you remember it) and the network information (you should put your network name instead ofAnkiRobits, your network password instead ofKlaatuBaradaNikto!) -
Insert the SD card into your Pi, wait a few minutes for it to boot up
-
On your computer, open up a Terminal (or Powershell on Windows) and run the following command:
ssh pi@escapepod
-
If it gives you a prompt, enter
yes. Then enter in the user password you chose in Raspberry Pi Imager (underpi) -
The terminal should show
pi@escapepod ~ $. If you are there, run the following command:
wget -O - https://keriganc.com/setup-wire-pod.sh | bash
-
After that completes, open a browser and go to http://escapepod:8080. From there, click on "Set up wire-pod" and do as it says. You do not need to do the part at the bottom where it says
Choose file, that is reserved for OSKR/dev bots. -
Voice commands should now work!
(Your distribution must have either pacman, dnf, or apt, make sure you have ports 443 and 8080 open)
- Open a terminal and run this command:
wget -O - https://keriganc.com/setup-wire-pod.sh | bash
(if it asks for a password, enter it)
- Once that has completed, go to http://escapepod:8080 in a browser and click on
Set up wire-pod (API keys, STT service, etc). From there, follow the instructions. It should then be set up.
TODO: tutorial video
-
Open up Powershell as administrator
- Open the start menu, type in Powershell, right click, click "Run as administrator"
-
Enter the following commands (this will change your computer's name to
escapepod):
Rename-Computer -NewName "escapepod"
wsl --install
-
Reboot your computer.
-
After the reboot, Ubuntu should install. Wait for it to finish.
-
The Ubuntu installer should ask for a UNIX username. Enter one. example:
wire -
It should then ask for a UNIX password. Make sure you remember this! It will not show any indication that you are typing anything, that is normal.
-
You should now be at an Ubuntu terminal. In that terminal, run the following command:
sudo apt install net-tools
-
Open up Powershell as administrator
- Open the start menu, type in Powershell, right click, click "Run as administrator"
-
In Powershell, run the following command. When it asks for a confirmation, enter
Y.
Set-ExecutionPolicy Bypass
- In Powershell, the the following commands:
cd ~
curl -o wsl-firewall.ps1 https://keriganc.com/wsl-firewall.ps1
.\wsl-firewall.ps1
- Return to the Ubuntu terminal and enter the following command:
wget -O - https://keriganc.com/setup-wire-pod.sh | bash
(if it asks for a password, enter what you entered for the UNIX password earlier)
- Once that is finished, run the following command to start the server:
cd ~/wire-prod-pod
sudo ./chipper/start.sh
- Go to http://escapepod:8080 in a browser and click on
Set up wire-pod (API keys, STT service, etc). From there, follow the instructions. It should then be set up and voice commands should now work on Vector.
(NOTE: You have to keep the Ubuntu terminal open. If you ever reboot, you will have to open Ubuntu again and enter the following commands to start the voice server, because it does not start on system startup:)
cd ~/wire-prod-pod
sudo ./chipper/start.sh
- It is recommended to clear user data before performing this, but it is not required.
-
On a device with Bluetooth (can be the same machine as what wire-prod-pod is running on), go to vector-epod-setup and follow the instructions.
-
When it gets to a button showing "ACTIVATE", click it. If it shows up again, click on it again.
-
Enter user settings and press "SUBMIT". Vector should then be fully set up!
Wire-pod auto-updates once a day. To force an update, run the following commands:
cd ~/wire-prod-pod
sudo ./update.sh
Chipper hosts a web interface at port 8080. This can be used to create custom intents and to configure specific bots.
To get to it, open a browser and go to http://serverip:8080, replacing serverip with the IP address of the machine running the chipper server. If you are running the browser on the machine running chipper, you can go to http://localhost:8080
- Set up wire-pod
- This is where you would enter your API keys for Houndify and WeatherAPI if you want to set those up.
- Configure user settings
- Custom intents
- Example: You want to create a custom intent that allows Vector to turn the lights off. The transcribed text that matches to this intent should include "lights off" and other variations like "lid off" for better detection. It will execute a python script located in your user directory called
vlight.py. It should be launched with theoffvariable because the lights are being turned off. This script turns the lights off and connects to Vector so he says "The lights are off!". You have multiple bots registered with the SDK so a serial number must be specified. After the SDK program is complete, chipper should sendintent_greeting_goodnight. The following screenshot is a correct configuration for this case. TheAdd intentbutton would be pressed after everything is put in. 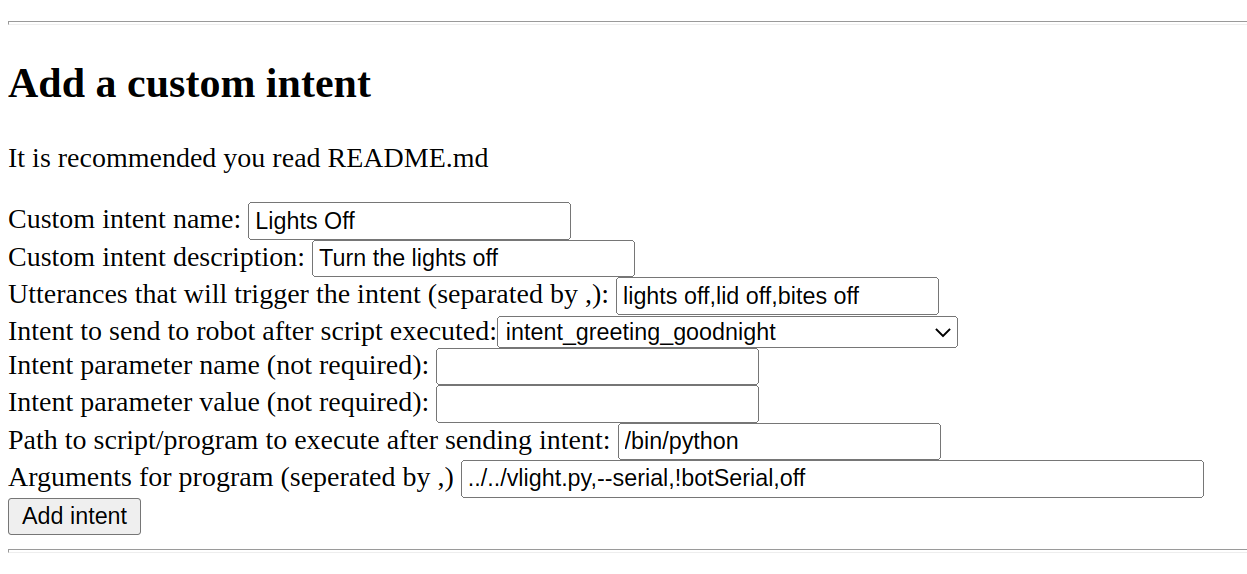
- (If
!botSerialis put into the program arguments, chipper will substitute it for the serial number of the bot that is making a request to it.)
- Example: You want to create a custom intent that allows Vector to turn the lights off. The transcribed text that matches to this intent should include "lights off" and other variations like "lid off" for better detection. It will execute a python script located in your user directory called
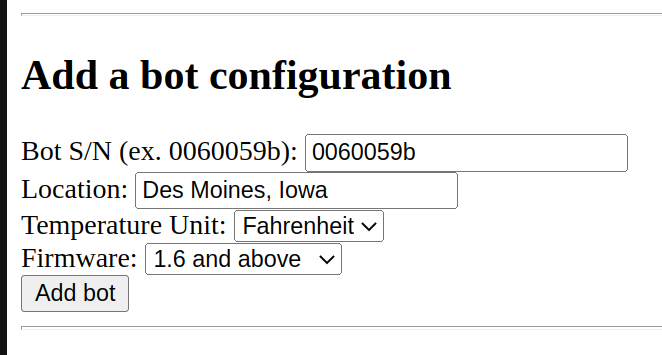
- Bot configurations
- Example: You have a bot on 1.6 with a serial number of 0060059b; located in Des Moines, Iowa; and you would like to use Fahrenheit for the temperature unit in the weather command. The following screenshot is a correct configuration for that bot. Once that is input, you would press "Add bot". It would then be registered with chipper.
- Custom intents
- See logs
- This shows the logs produced by wire-pod. Updates every 200ms, shows the last 30 lines.


OS Support:
- Arch
- Debian/Ubuntu/other APT distros
- Fedora/openSUSE
- Windows 10/11 under WSL
Architecture support:
- amd64/x86_64
- arm64/aarch64
- armv7l/arm32
Things wire-prod-pod has worked on:
- Raspberry Pi 4B+ 4GB RAM with Raspberry Pi OS
- Raspberry Pi 4B+ 4GB RAM with Manjaro 22.04
- Nintendo Switch with L4T Ubuntu
- Desktop with Ryzen 5 3600, 16 GB RAM with Ubuntu 22.04
- Laptop with mobile i7
- Desktop with Xeon X5650
General notes:
- If you get this error when running chipper, you are using a port that is being taken up by a program already:
panic: runtime error: invalid memory address or nil pointer dereference - You have to speak a little slower than normal for Coqui STT to understand you.
Current implemented actions:
- Good robot
- Bad robot
- Change your eye color
- Change your eye color to
- blue, purple, teal, green, yellow
- How old are you
- Start exploring ("deploring" works better)
- Go home (or "go to your charger")
- Go to sleep
- Good morning
- Good night
- What time is it
- Goodbye
- Happy new year
- Happy holidays
- Hello
- Sign in alexa
- Sign out alexa
- I love you
- Move forward
- Turn left
- Turn right
- Roll your cube
- Pop a wheelie
- Fistbump
- Blackjack (say yes/no instead of hit/stand)
- Yes (affirmative)
- No (negative)
- What's my name
- Take a photo
- Take a photo of me
- What's the weather
- Requires API setup
- What's the weather in
- Requires API setup
- Im sorry
- Back up
- Come here
- Volume down
- Be quiet
- Volume up
- Look at me
- Set the volume to
- High, medium high, medium, medium low, low
- Shut up
- My name is
- I have a question
- Requires API setup
- Set a timer for seconds
- Set a timer for minutes
- Check the timer
- Stop the timer
- Dance
- Pick up the cube
- Fetch the cube
- Find the cube
- Do a trick
- Record a message for
- Enable
Messagingfeature in webViz Features tab
- Enable
- Play a message for
- Enable
Messagingfeature in webViz Features tab
- Enable
- Digital Dream Labs for saving Vector and for open sourcing chipper which made this possible
- dietb for rewriting chipper and giving tips
- GitHub Copilot for being awesome
- xanathon for making the web interface look nice and for the publicity