Parallel & Distributed Computing

Parallel & Distributed Computing
This documentation will help you create a hpcc system on vmware.
Explore the docs »
Tutorial
·
Softwares
·
Issues
Project Report
Section: BSCS 7A
By
Table of contents
- 1.Introduction to HPC Cluster
- 2.Use Cases
- 3.Steps
- Creation Of Virtual Machines
- Linux Installation on nodes
- Configuring etc host file
- SSH equivalence establishment for user root
- Setup NTP Service
- Installation of PDSH
- Setup NFS
- Creation of ordinary user and also setup SSH equivalence
- Installation of prerequisites packages (GCC, G77, etc)
- Installation of MPI
- Compiling Linpack
- Benchmarking
HPC Cluster is a collection of hundreds or thousands of servers that are networked together, each server is known as a node. Each node in a cluster works in parallel with each other, boosting processing speed to deliver high-performance computing. HPC is appropriate for most small and medium-sized businesses since these nodes are tightly, this is the reason why it is called a cluster. All cluster nodes have the same components as a laptop or desktop such as the CPU, cores, memory, and storage space. The difference between a personal computers and a cluster node is in quantity, quality, and power of the components. User login to the cluster head node is done by using the ssh program.
HPC is deployed on-premises, at the edge, or in the cloud. HPC solutions are used for a variety of purposes across multiple industries. HPC is used to help scientists find sources of renewable energy, understand the evolution of our universe. Predict and track the storms, and create new materials.
HPC is used to help scientists find sources of renewable energy, understand the evolution of our universe, predict and track storms and create new materials.
HPC is used to edit feature films, render mind-blowing visual effects, and stream live events around the world.
HPC is used to more accurately identify where to drill for new oil wells and to help boost production from existing oil wells.
HPC is used to detect credit card fraud, provide self-guided technical support, self-driving vehicles, and improve cancer screening techniques.
HPC is used to track real-time stock trends and automate trading.
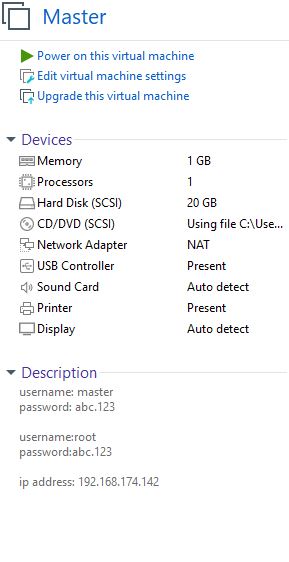
The master node is set up by the name 'HPC Master' with CentOS-5 32 bit as the main OS of the Virtual Machine and the network working on a NAT. The system configuration of our HPC masternode is presented below:
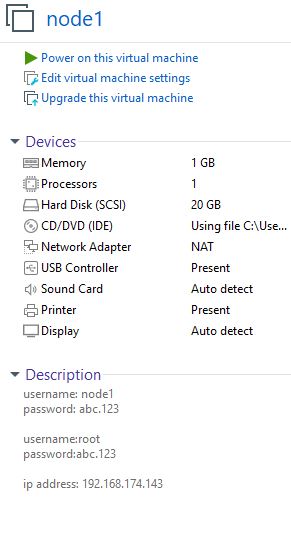
The compute node is also created by the name 'node1' with CentOS-5 32 bit as the main OS of the Virtual Machine with a standard data store and a NAT. The system configuration of the node1 are presented below:
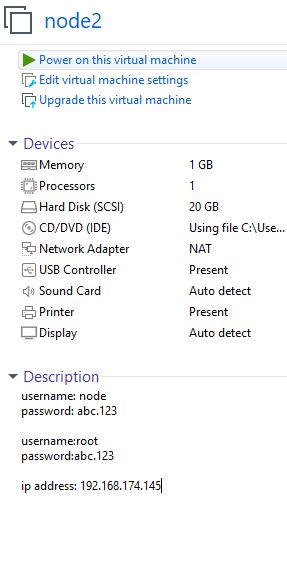
Another compute node is also created by the name 'node2' with Centos-5 32 bit as the main OS of the Virtual Machine with a standard data store and a NAT. The system configuration of the node2 are presented below:
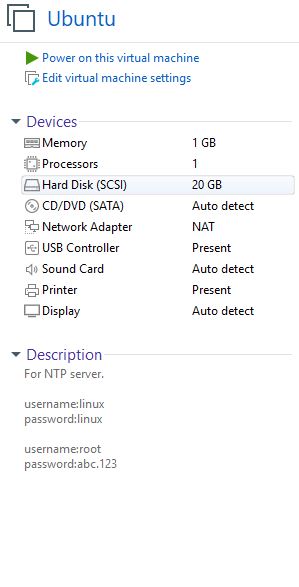
An NTP server was also created by using a node that is not part computation performed by a cluster. It was done by using Ubuntu OS 64 bit as the main OS of the Virtual Machine with a standard data store and a NAT network. System configurations are presented below:
You can download the iso image of CentOS 5.2 here:https://archive.org/details/cent-os-5.2-i-386-bin-dvd
After booting up from the image it will automatically go into the install node.
Once it asks for input, press skip for skipping the media check.
Create a custom layout then add a partition with file type swap and size of 128MB and additional size options as fixed size , then press ok.
Repeat the process one more time to create another partition with ext3 file type and size of 128MB and additional size options as fixed to maximum allowable size , then press ok.
Once we have a disk that is all you need. It's going to have the hostname manually entered as the master node, then press edit above and uncheck Enable IPv6 support. Change dynamic IP to manual IP as 192.168.174.142 and prefix/netmask as 255.255.255.0 then press okay then press next then again next then continue as We don't want any gateway no DNS and let's specify our timezone, so press next.
Specify the password as abc.123 then press next.
Uncheck desktop and just click customize now by select packages from the options. We don't requir a desktop. We want editors , development libraries, and development tools. Go to the base system, uncheck dial network support.
So that is all you will need right now. so just go to next. Press Next to start the installation and so on, we will be done.
Once the system is completely installed, select reboot.
Remember that your nodes in your HPC cluster should be of the same hardware, same processor architecture, and the same version of the operating system you're using.
Let your system boot up. So this is how you would install CentOS 5.
On a virtual machine now we've two more nodes to go on which we need to install the Linux operating system. Once we' have our desired configurations of the system, we will copy the files from the backend. This is because we have VMware Workstaion Pro 16 that does not support cloning. So what we will be doing is shutting down this server/system/VM, and now copying its file disk file. As your server is turned off, let's go to the backend.
We have used Ubuntu as for our NTP server. You can use any distribution of Linux or Windows version for this task. After powering the Ubuntu virtual machine, select an language of your understand and press Install Ubuntu Button. Select an keyboard layout, after this choose normal installation then select earse disk and install Ubuntu option. Select an timezone and setup login credentials. Press continue and wait for the installation to complete.
From our hostmachine console we modify the folders of Virtual Machines files.
You can download the nodes here:https://drive.google.com/drive/folders/1P3KzqFtmWejV8prhWgSvIFon_LInhR_g?usp=sharing
Command:
[root@hostmachine ~]# cd machinesCommand:
[root@hostmachine machines]# lsAnd we have this HPC masternode directory, which we have these files.
Let's enter into this directory by,
Command:
[root@hostmachine machines]# cd masternodeCommand:
[root@hostmachine masternode]# lsCommand:
[root@hostmachine masternode]# ls -lhAs you can see, this is your virtual machine disk file named masternode.vmdk .
So now we'll copying this file.
Command:
[root@hostmachine masternode]# ls -lh ../node1/As you can see you have four files there. Now we will copy this VMDK file from here and overwrite this VMDK file here.
Command:
[root@hostmachine masternode]# cp masternode.vmdk ../node1/node1.vmdkPress y for yes overwriting.
As you can see the file is copied so let's check the list.
Command:
[root@hostmachine masternode]# ls ../node1/ -lhLet's try starting node1 and see what happens. Click power on and go to the console window and let it boot up. It will have all settings from your masternode. That means it will also have the same hostname, same IP everything.
Once this is booted up. So let's go to the console, it will seem like a master node, but it is not it is, as you can see here, this is node1 and in the same way, we'll do the node2 as well. But first, adjust the hostnames.
Command:
[root@masternode ~]# vi /etc/sysconfig/networkThen edit hostname as node1 and the IP is going to be.
Command:
[root@masternode ~]# vi /etc/sysconfig/network-scripts/ifcfg-eth0First Ethernet network interface card or NIC in the system should not get its IP from DHCP. It's going to be a static IP address equal to 192.168.174.143 and netmask is equal to 255.255.255.0
One more thing to see hosts.
Command:
[root@masternode ~]# vi /etc/hostsRemove this master node at all from the script.
Now let's change the hostname manually.
Command:
[root@masternode ~]# hostname node1Command:
[root@masternode ~]# service syslog restartCommand:
[root@masternode ~]# less /var/log/messagesIt will make sure that the logs in the various log messages are written correctly.
Press shift G you can see as soon as you've restarted syslog the logs here it says node1 now before it was masternode.
Then reboot this system.
Command:
[root@masternode ~]# rebootNow repeat the same process for node2 as you have done for the node1.
Command:
[root@masternode ~]# vi /etc/hostsNow delete IP version 6 naming file.
Then remove a masternode from this localhost line.
Add three lines here
192.168.174.142 masternode
192.168.174.143 node1
192.168.174.145 node2
Then save the these changes and return to the console.
Command:
[root@masternode ~]# scp /etc/hosts node1:/etc/ Except for the fingerprint of node1, node1's password is abc.123.
Do the same thing for node2.
Command:
[root@masternode ~]# scp /etc/hosts node2:/etc/Except for the fingerprint of node2, node2's password is abc.123.
Now, the, etc hosts file is configured.
Now we will generate public and private keys (DSA and RSA) of all nodes.
Generate DSA keys.
Command:
[root@masternode ~]# ssh-keygen -t dsaJust press enter, no need to enter a passphrase.
Now generate the RSA keys.
Command:
[root@masternode ~]# ssh-keygen -t rsaJust press enter, no need to enter a passphrase.
Now if you want you can check these keys.
Command:
[root@masternode ~]# cd .ssh/Command:
[root@masternode .ssh]# ls -lAs you can see both DSA and RSA are visible along with the public and private keys.
Now copy all four key files for this directory
Command:
[root@masternode .ssh]# cd ..Command:
[root@masternode ~]# scp -r .ssh node1:/root/Enter the password which is redhat
As files are copied in node 1 now do the same process for node 2.
Command:
[root@masternode ~]# scp -r .ssh node2:/root/Now do one more step
Command:
[root@masternode ~]# cd .ssh/Command:
[root@masternode .ssh]# cat *.pub >> authorized\_keysCommand:
[root@masternode .ssh]# cd ..Now copy these files on both nodes again
Command:
[root@masternode ~]# scp -r .ssh node1:/root/Enter the password which is redhat
As files are copied in node 1 now do the same process for node 2.
Command:
[root@masternode ~]# scp -r .ssh node2:/root/Now We will generate RSA fingerprints,
Command:
[root@masternode ~]# ssh-keyscan -t dsa masternode node1 node2Now I'm going to put it in a special file on this log
Command:
[root@masternode ~]# ssh-keyscan -t dsa masternode node1 node2 > /etc/ssh/ssh_known_hostsYou see this file. This file is a valid one, but it does not exist by default. Now what I'm going to do is I'm going to scan the RSA keys of the same nodes and I'm going to append that to this file.
Command:
[root@masternode ~]# ssh-keyscan -t rsa masternode node1 node2 >> /etc/ssh/ssh_known_hostsNow see how the file looks like,
Command:
[root@masternode ~]# less /etc/ssh/ssh_known_hostsNow replicate this file to all nodes.
Command:
[root@masternode ~]# scp /etc/ssh/ssh_known_hosts node1:/etc/sshCommand:
[root@masternode ~]# scp /etc/ssh/ssh_known_hosts node2:/etc/sshTesting by logging it into each node
Command:
[root@masternode ~]# ssh masternodeCommand:
[root@masternode ~]# exitCommand:
[root@node1 ~]# ssh node1Command:
[root@node1 ~]# exitCommand:
[root@masternode ~]# ssh node2Command:
[root@node2 ~]# exit Testing by logging all nodes into each other node
Command:
[root@node1 ~]# ssh masternode uptimeCommand:
[root@node1 ~]# ssh node1 uptimeCommand:
[root@node1 ~]# ssh node2 uptimeSetup NTP in Ubuntu
Update our local repository
Command:
[root@linux ~]# apt-get updateInstall NTP server daemon.
Command:
[root@linux ~]# apt-get install ntpSwitch to an NTP server pool closest to your location
Command:
[root@linux ~]# vi /etc/ntp.confIn this file, you will be able to see a pool list.
Use servers from the NTP Pool Project. Approved by Ubuntu Technical Board on 2011-02-08 (LP: #104525). See http://www.pool.ntp.org/join.html for more information.
Add the following lines if not added automatically.
pool 0.ubuntu.pool.ntp.org iburst pool 1.ubuntu.pool.ntp.org iburst pool 2.ubuntu.pool.ntp.org iburst pool 3.ubuntu.pool.ntp.org iburst
Exit the file.
Restart the NTP server.
Command:
[root@linux ~]# service ntp restartCheck NTP server status.
Command:
[root@linux ~]# service ntp statusConfigure Firewall to allow nodes access to NTP server
Command:
[root@linux ~]# ufw allow from any to any port 123 proto udpCommand:
[root@linux ~]# ip aThe IP address of Ubuntu is 192.168.174.131, so NTP server IP would be same.
Install NTP service on masternode.
Command:
[root@masternode ~]# rpm –-import /etc/pki/rpm-gpg/RPM-GPG-KEY-CentOS-5Command:
[root@masternode ~]# yum -y install ntpCommand:
[root@masternode ~]# scp node1:/etc/yum.repos.d/CentOS-Base.repo .Command:
[root@masternode ~]# scp node1:/etc/yum.repos.d/CentOS-Base.repo /etc/yum.repos.d/Install NTP service on node2.
Command:
[root@node2 ~]# rpm –-import /etc/pki/rpm-gpg/RPM-GPG-KEY-CentOS-5Command:
[root@node2 ~]# scp node1:/etc/yum.repos.d/CentOS-Base.repo /etc/yum.repos.d/Command:
[root@node2 ~]# yum -y install ntpInstall NTP service on node1.
Command:
[root@nodeq ~]# rpm –-import /etc/pki/rpm-gpg/RPM-GPG-KEY-CentOS-5Command:
[root@node1 ~]# yum -y install ntpConfiguration
NTP configuration masternode,node1,node2.
Command:
[root@masternode ~]# vi /etc/ntp.confAdd server 192.168.174.131 which is our host machine.
Comment server 0, server 1, server 2
Comment server local-clock and fudge
Exit the file
Command:
[root@masternode ~]# chkconfig --level 35 ntpd onRestart service
Command:
[root@masternode ~]# service ntpd restartCommand:
[root@masternode ~]# ntpq -p -nCommand:
[root@masternode ~]# watch "ntpq -p -n"Command:
[root@masternode ~]# scp /etc/ntp.conf node1:/etc/ntp.confCommand:
[root@node1 ~]# chkconfig --level 35 ntpd onRestart service
Command:
[root@node1 ~]# service ntpd restartCommand:
[root@node1 ~]# ntpq -p -nCommand:
[root@node1 ~]# watch "ntpq -p -n"Command:
[root@node1 ~]# scp /etc/ntp.conf node2:/etc/ntp.confCommand:
[root@node2 ~]# chkconfig --level 35 ntpd onRestart service
Command:
[root@node2 ~]# service ntpd restartCommand:
[root@node2 ~]# ntpq -p -nCommand:
[root@node2 ~]# watch "ntpq -p -n"Check if pdsh is downloaded on the host machine or not.
Command:
[root@linux linux]# cdCommand:
[root@linux ~]# lsIf it is not downloaded you can download it from the SourceForge website by typing pdsh on google search.
Now copy pdsh from masternode
Command:
[root@masternode ~]# scp 192.168.174.131:/root/pdsh* .Type yes
Enter the password which is abc.123,
PDSH is now copied.
Rebuild rpm
Command:
[root@masternode ~]# rpmbuild –rebuild pdsh-2.18-1.src.rpmThis is not mandatory for all nodes other than masternode
Changing directory
Command:
[root@masternode ~]# cd /usr/src/redhat/RPMS/i386/Command:
[root@masternode i386]# rpm -ivh pdsh-*Now wait until it is debugging and installing
Now everything is installed and pdsh works.
What does pdsh do? If you want to perform a certain operation on all the nodes, or any specific nodes, one way is to manually log in through SSH to each node and perform the task and the second is you can just tell PD shell to do it at will go out and perform that task on all the nodes. It's very simple. So suppose you want to execute the date command on all the nodes or uptime command on all the nodes or whatever. So you would just tell PD shell to do it but in order for PD shell to work, it needs a machine file.
Command:
[root@masternode i386]# vi /etc/machinesAdd these three lines
masternode
node1
node2
These are the three nodes that I'm going to use or which will be used for PD shall.
Now execute the pdsh on all nodes.
What executes what let's say date, is simple.
Command:
[root@masternode i386]# pdsh -a dateIt went out on all the nodes and it brought the output back from all the notes you see it they're all 100% At the same time that's not the because of PDSH because of NTP which we just set up you Just go to masternode and enter.
Command:
[root@masternode i386]# pdsh -a ntpq -p -nNow setup nfs on masternode
Coming back to home directory
Command:
[root@masternode i386]# cdCommand:
[root@masternode ~]# vi /etc/exports/Add
/cluster *(rw,no_root_squash,sync)Save and exit
Restart NFS service
Command:
[root@masternode ~]# service nfs restartCheck Configuration
Command:
[root@masternode ~]# chkconfig -–level 35 nfs onMake a directory
Command:
[root@masternode ~]# mkdir /clusterAgain restart service
Command:
[root@masternode ~]# service nfs restartNow we have to create this directory on all nodes so we will just use pdsh to create on all nodes at once
Command:
[root@masternode ~]# pdsh -w node1,node2 mkdir /clusterNow mounting
Command:
[root@node1 yum.repos.d]# df -hTExecute this command on node1
Command:
[root@node1 yum.repos.d]# mount -t nfs masternode:/cluster /cluster/Execute this command on node2
Command:
[root@node2 ~]# mount -t nfs masternode:/cluster /cluster/Now you can see that it is written that you have mounted it from the masternode.
Now specify etc/fstab on node1
Command:
[root@node1 ~]# vi /etc/fstabAdd this line
masternode:/cluster /cluster nfs defaults 0 0Kindly disable firewall in masternode,node1 and node2.
Now specify etc/fstab on node2
Command:
[root@node2 ]# vi /etc/fstabAdd this line
masternode:/cluster /cluster nfs defaults 0 0Group: mpigroup-600
User: mpiuser-600
Member of mpigroup
The home directory will be /cluster/mpiuser
Now coming back to the masternode.
Command:
[root@masternode ~]# groupadd -g 600 mpigroupCommand:
[root@masternode ~]# useradd -u 600 -g 600 -d /cluster/mpiuser mpiuserThis directory is now created.
Now add group and users on node1 and node2
Run these commands on each node separately
Command:
[root@node1 ~]# groupadd -g 600 mpigroup[root@node1 ~]# useradd -u 600 -g 600 -d /cluster/mpiuser mpiuserCommand:
[root@node2 ~]# groupadd -g 600 mpigroup[root@node2 ~]# useradd -u 600 -g 600 -d /cluster/mpiuser mpiuserOur users and groups are now created on all nodes.
Now we are setting up SSH user equivalence for MPI to funciton properly.
Command:
[root@masternode ~]# su - mpiuserGenerate its sshkeys as well
Command:
[mpiuser@masternode ~]$ ssh-keygen -t dsaPress enter no need to enter paraphrase
Command:
[mpiuser@masternode ~]$ ssh-keygen -t rsaPress enter no need to enter paraphrase
As two key pairs are generated
Now,
Command:
[mpiuser@masternode ~]$ ls /cluster/Switch to mpiuser from node1
Command:
[root@node1 ~]# su - mpiuserCommand:
[mpiuser@node1 ~]$ ls -lCheck all the files here
Command:
[mpiuser@node1 ~]$ ls -laNow changing directory
Command:
[mpiuser@node1 ~]$ cd .ssh/Command:
[mpiuser@node1 .ssh]$ ls -laRemember /cluster directory is shared across all nodes.
Append the public keys into the authorized keys file
Command:
[mpiuser@masternode .ssh]$ cat *.pub >> authorized_keysCommand:
[mpiuser@masternode .ssh]$ cd ..Now try to command as a mpiuser on all nodes
Command:
[mpiuser@masternode ~]$ ssh masternode uptimeCommand:
[mpiuser@masternode ~]$ ssh node1 uptimeCommand:
[mpiuser@masternode ~]$ ssh node2 uptimeCheck hostname by ssh command
Command:
[mpiuser@masternode ~]$ ssh masternode hostnameCommand:
[mpiuser@masternode ~]$ ssh node1 hostnameCommand:
[mpiuser@masternode ~]$ ssh node2 hostnameHostnames of each node must be visible by these commands.
Now check hostnames by PDSH
Command:
[mpiuser@masternode ~]$ pdsh -a hostnameCheck if all nodes have GCC or not
Command:
[root@masternode ~]# rpm -q GCCThe version of GCC will be visible
Command:
[root@masternode ~]# rpm -qa | grep g77If not shown by this command you can run
Command:
[root@masternode ~]# yum list | grep g77If g77 exists this will be visible there.
Install g77 on masternode
Command:
[root@masternode ~]# yum -y install compat-gcc-34-g77Installing g77 on node1 and node2 from masternode
Command:
[root@masternode ~]# pdsh -w node1,node2 yum -y install compat-gcc-34-g77All prerequisites are now installed.
Now, we go for MPI installation.
So, MPI is basically Message Passing Interface is the language that is used to run a program specially designed program on multiple compute nodes on multiple nodes. MPI can be downloaded from various places there is open MPI this there are other MPI as well. I'm going to download it from the web.
Command:
[mpiuser@masternode ~]$ scp root@10.0.0.2:/root/mpi* .Press yes
Enter password redhat
Mpi is downloaded in the home directory
Command:
[mpiuser@masternode ~]$ ls -lhThe file is not owned by mpiuser
Command:
[root@masternode /]# chown mpiuser:mpigroup /cluster -RAccess is now given to mpiuser
Switch user to mpiuser
Command:
[root@masternode /]# su - mpiuserMoving mpi
Command:
[mpiuser@masternode ~]$ mv mpich2-1.0.8.tar.gz ..Command:
[mpiuser@masternode ~]$ lsCommand:
[mpiuser@masternode ~]$ cd ..Command:
[mpiuser@masternode cluster]$ ls -lhAs you can see it is nowhere.
Now uncompressing
Command:
[mpiuser@masternode cluster]$ tar xzf mpich2-1.0.8.tar.gzCommand:
[mpiuser@masternode cluster]$ lsCommand:
[mpiuser@masternode cluster]$ cd mpich2-1.0.8Command:
[mpiuser@masternode mpich2-1.0.8]$ lsThere are so many files we are now configuring.
This will be a new directory.
Command:
[mpiuser@masternode mpich2-1.0.8]$ ./configure –-prefix=/cluster/mpich2All the parts which were left during the installation will be installed by this command.
Command:
[mpiuser@masternode mpich2-1.0.8]$ makeNow the files will move to /cluster directory
Command:
[mpiuser@masternode mpich2-1.0.8]$ make installnext, I'm going to set up some environment variables in the MPI user's bash_profile.
First goto home directory
Command:
[mpiuser@masternode mpich2-1.0.8]$ cdCommand:
[mpiuser@masternode ~]$ vi .bash_profileAdd these lines there
PATH=$PATH:$HOME/bin:/cluster/mpich2/bin

LD\_LIBRARY\_PATH=$LD\_LIBRARY\_PATH:/cluster/mpich2/lib

export PATH

export LD\_LIBRARY\_PATH
If you don't want to logout
Command:
[mpiuser@masternode ~]$ source .bash_profileThis will load the new values
You can also verify by the echo command
Command:
[mpiuser@masternode ~]$ echo $PATHCheck if it is able to find MPD
Command:
[mpiuser@masternode ~]$ which mpdCheck if it is able to find mpiexec
Command:
[mpiuser@masternode ~]$ which mpiexecCheck if it is able to find mpirun
Command:
[mpiuser@masternode ~]$ which mpirunCreate an mpd.host file
Command:
[mpiuser@masternode ~]$ cat >> /cluster/mpiuser/mpd.hosts << EOF> masternode
> node1
> node2
> EOF
Check the names here of all nodes
Command:
[mpiuser@masternode ~]$ cat /cluster/mpiuser/mpd.hostsmasternode
node1
node2
If you don't want your masternode to take part in any kind of computation follow the command below.
Command:
[mpiuser@masternode ~]$ vi /cluster/mpiuser/mpd.hostsRemove masternode from here and exit
Now creating a secret file
Command:
[mpiuser@masternode ~]$ vi /cluster/mpiuser/.mpd.confAdd this line
secretword=redhat
Save and exit
Boot mpt on compute nodes
Command:
[mpiuser@masternode ~]$ mpd &If it has permission issue follow below command
Command:
[mpiuser@masternode ~]$ chmod 0600 /cluster/mpiuser/.mpd.confCommand:
[mpiuser@masternode ~]$ ps aux | grep mpdNow again Booting mpt on compute nodes
Command:
[mpiuser@masternode ~]$ mpd &Checking if it's running
Command:
[mpiuser@masternode ~]$ mpdtrace -lExit all
Command:
[mpiuser@masternode ~]$ mpdallexitCommand:
[mpiuser@masternode ~]$ mpdboot -n 2 --chkuponlyNow you can see 2 hosts are up
Command:
[mpiuser@masternode ~]$ ps aux | grep mpdNow edit this file
Command:
[mpiuser@masternode ~]$ vi /cluster/mpiuser/mpd.hostsAdd this line
Masternode
Save and exit
Checking how many servers are up
Command:
[mpiuser@masternode ~]$ mpdboot -n 3 --chkuponlyNow you can see 3 hosts are up
Command:
[mpiuser@masternode ~]$ mpdboot -n 3Command:
[mpiuser@masternode ~]$ mpdtraceNow exit from all
Command:
[mpiuser@masternode ~]$ mpdexitallNow check if I am traced or not
Command:
[mpiuser@masternode ~]$ mpdtraceRun each command separately and see the time difference
Command:
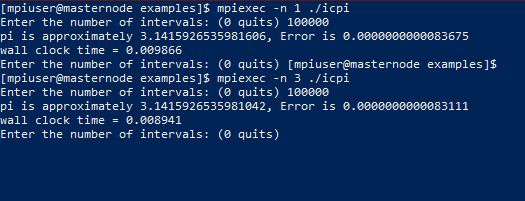
[mpiuser@masternode ~]$ cd ..[mpiuser@masternode cluster]$ cd mpich2-1.0.8/examples[mpiuser@masternode examples]$ mpiexec -n 1 ./cpiAs you can see execution time
Command:
[mpiuser@masternode examples]$ mpiexec -n 2 ./cpiCommand:
[mpiuser@masternode examples]$ mpiexec -n 3 ./cpiCompiling a program
Command:
[mpiuser@masternode examples]$ mpicc -o icpi icpic.cCommand:
[mpiuser@masternode examples]$ lsIt's compiled.
Command:
[mpiuser@masternode examples]$ mpiexec -n 1 ./icpiEnter any large random number and see the execution time.
Now run this using 2 nodes
Command:
[mpiuser@masternode examples]$ mpiexec -n 1 ./icpiEnter the same number and see the execution time difference.
On virtual machines, it might give higher time but in physical servers, it will be okay sometimes it gets problematic in VM's.
Remember real hardware clusters will give much accuracy and proficiency.
For linpack, you would need a BLAS library.
Downlad the gotoblas library from here: https://www.tacc.utexas.edu/documents/1084364/1087496/GotoBLAS2-1.13.tar.gz/b58aeb8c-9d8d-4ec2-b5f1-5a5843b4d47b
You can download in the host machine and then copy it to master node.
Command:
[root@hostmachine ~]# scp -r GotoBLAS2-1.13.tar.gz root@10.0.0.20:/masternode/Enter root's password
Now go to the master node and check it.
Command:
[root@masternode ~]# lsCopy file
Command:
[root@masternode ~]# cp GotoBLAS2-1.13.tar.gz /cluster/mpiuser/Switching user
Command:
[root@masternode ~]# su - mpiuserCommand:
[mpiuser@masternode ~]# ls -alUncompressing
Command:
[mpiuser@masternode ~]# tar xzf GotoBLAS2-1.13.tar.gzIt will create a directory here
Command:
[mpiuser@masternode ~]# cd GotoBLAS3-1.13As it is seen, a directory is created.
BLAS is a linear algebra library
Command:
[mpiuser@masternode GotoBLAS3-1.13]# lsCommand:
[mpiuser@masternode GotoBLAS3-1.13]# make BIN=32Command:
[mpiuser@masternode GotoBLAS3-1.13]# gmake TARGET=NEHALEMIt is compiled now.
Now you would need to download a high-performance linpack.
You can download it from www.netlib.org/benchmark/hpl
Now copy it from the host machine
Command:
[root@hostmachine ~]# scp -r hpl-2.3.tar.gz mpiuser@10.0.0.20:/cluster/mpiuser/Enter password:
Check now if the file is here
Command:
[mpiuser@masternode ~]# lsThe file is in the home directory of this mpiuser.
Extract or uncompress
Command:
[mpiuser@masternode ~]# tar xzf hpl.tgzCommand:
[mpiuser@masternode ~]# lsCommand:
[mpiuser@masternode ~]# cd hplCommand:
[mpiuser@masternode ~]# lsCopying setup
Command:
[mpiuser@masternode hpl]# cp setup/Make.Linux_pII_FBLAS_gm .Copying to the current location
Check your GCC version
Command:
[mpiuser@masternode hpl]# gcc -vSelect version
Command:
[mpiuser@masternode hpl]# cd /usr/lib/gcc/i386-redhat-linux/4.1.2/Check current location
Command:
[mpiuser@masternode 4.1.2]# pwdCommand:
[mpiuser@masternode hpl]# vi Make.Linux_PII_FBLAS_gmChange LA Directory in this file to
$ (HOME) / GotoBLAS
Change LA Library
$ (LAdir)/libgoto.a -lm -L/usr/lib/gcc/i386-redhad-linux/4.1.2
Change CC Flags
$ (HPL_DEFS) -03
Change Linker
$ mpicc
Save and exit
Now build this
Command:
[mpiuser@masternode hpl]# make arch=Linux_PII_FBLAS_gmMoving to this directory
Command:
[mpiuser@masternode hpl]# cd /cluster/mpiuser/hpl/bin/Linux_PII_FBLAS_gm/List here
Command:
[mpiuser@masternode Linux_PII_FBLAS_gm]# lsCopy HPL.dat
Command:
[mpiuser@masternode Linux_PII_FBLAS_gm]# cp HPL.dat HPL.dat.origCommand:
[mpiuser@masternode Linux_PII_FBLAS_gm]# vi HPL.datNow the linpack configuration file has appeared.
value from size can be found first, nothing to change.
Command:
[mpiuser@masternode Linux_PII_FBLAS_gm]# free -bGo to calculator on node2
Command:
[root@node2 ~]# bc

< Sqrt (.1\*(value of the output of your free b) \* 2)

> 5997.8 approx 6000
Now edit this file on master node
Command:
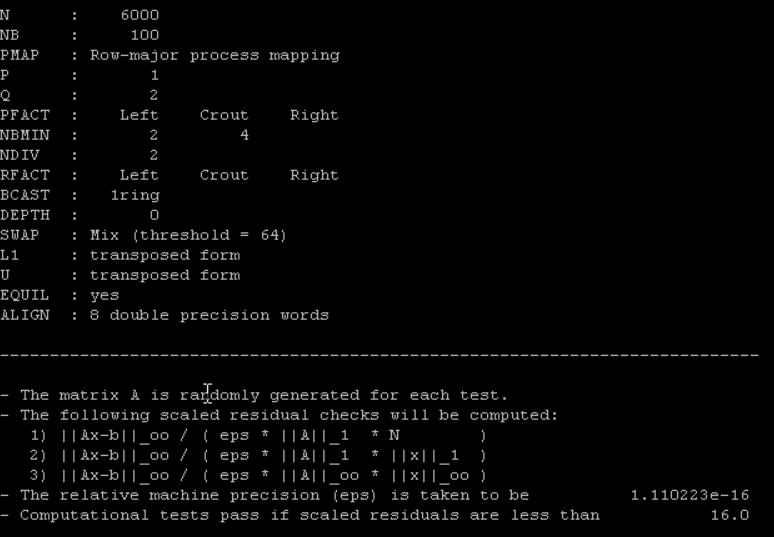
[mpiuser@masternode Linux_PII_FBLAS_gm]# vi HPL.datEdit No of problem to 1
Size 6000
No of block 1
Size of block 100
Process grid 1
The processor on each node 1
Processor quantity 2
Save and exit
First exit
Command:
[mpiuser@masternode Linux_PII_FBLAS_gm]# mpdallexitBoot again:
Command:
[mpiuser@masternode Linux_PII_FBLAS_gm]# mpdboot -n 2Now execute hpl program
Command:
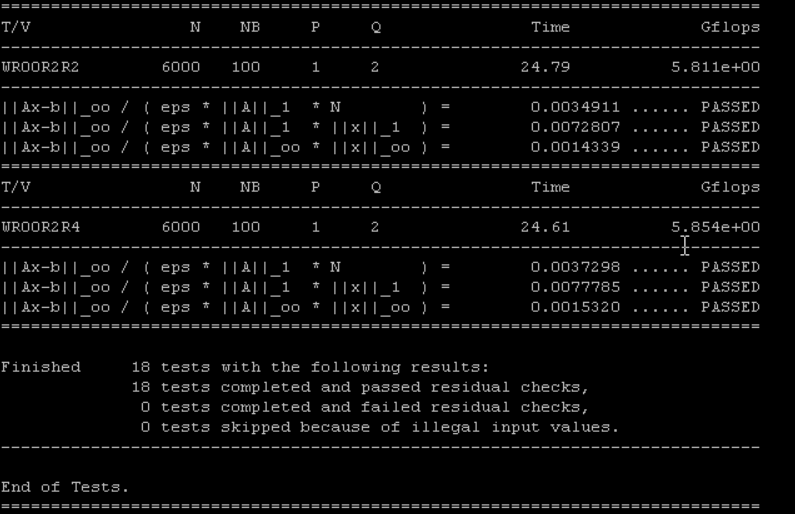
[mpiuser@masternode Linux_PII_FBLAS_gm]# mpiexec -n 2 ./xhplThis is our benchmarking being started. This might take some time.
You can see complete passing and failing reports at the end of the benchmarking process.
Now execute hpl programe and send output to textfile
Command:
[mpiuser@masternode Linux_PII_FBLAS_gm]# mpiexec -n 2 ./xhpl > performance.txt


