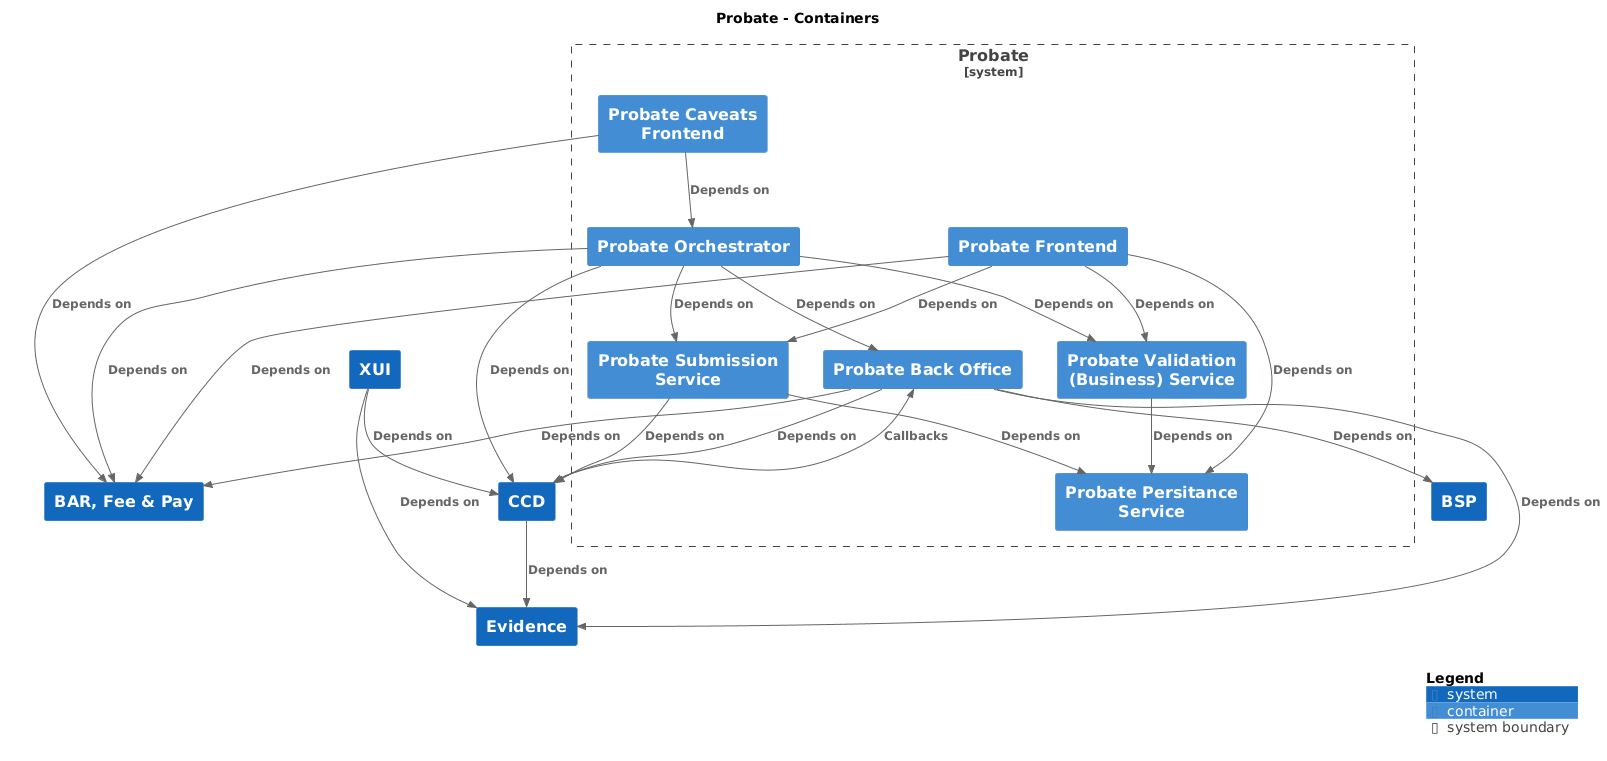
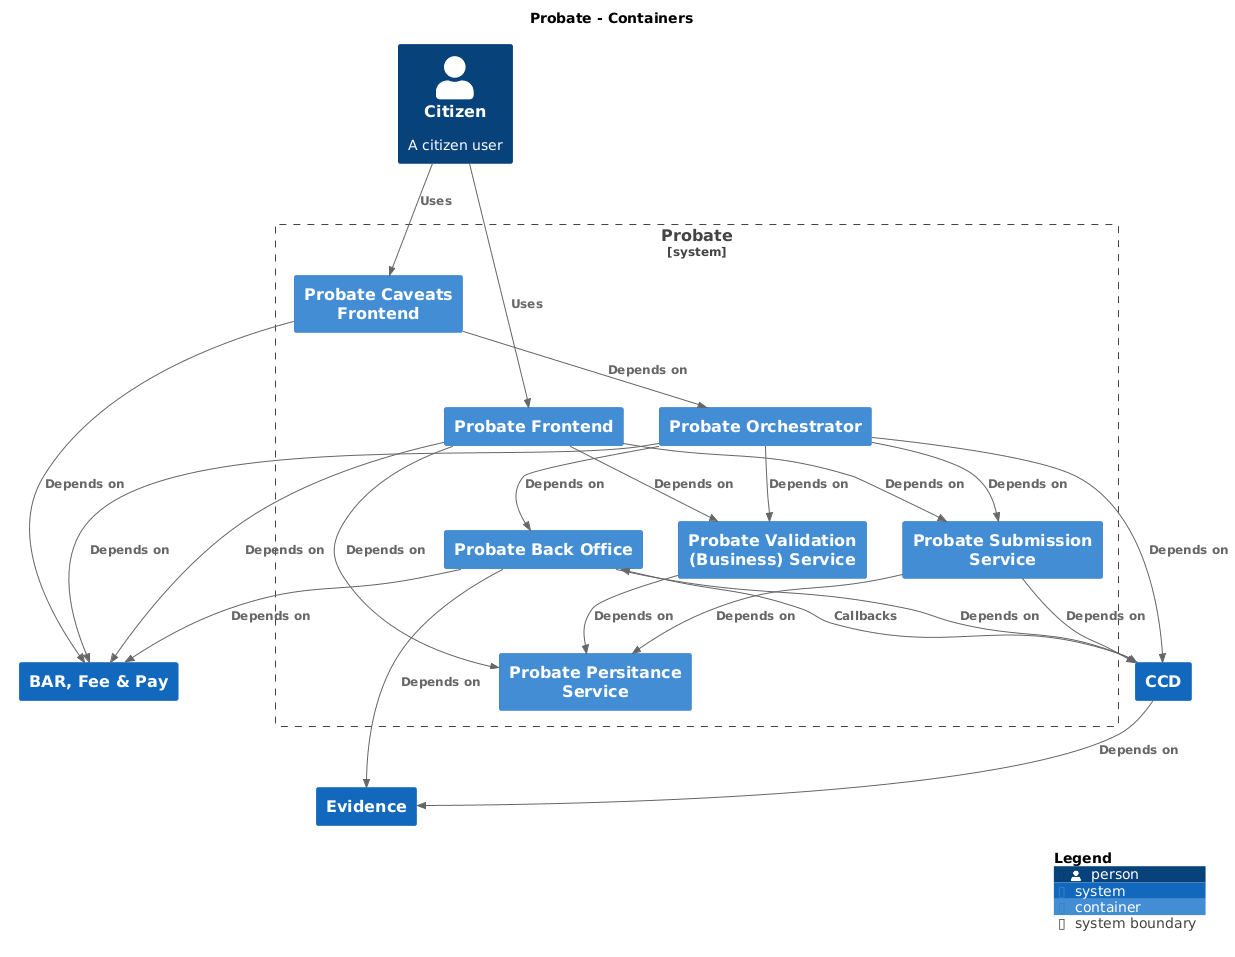
The Probate Back Office handles callbacks from the CCD data store to implement business logic for the Probate case type.
probate-frontend • probate-caveats-frontend • probate-back-office • probate-orchestrator-service • probate-business-service • probate-submit-service • probate-persistence-service
Citizen view
Caseworker view

The project uses Gradle as a build tool. It already contains
./gradlew wrapper script, so there's no need to install gradle.
To build the project execute the following command:
./gradlew buildDetails of CFT lib here: https://github.com/hmcts/rse-cft-lib/blob/main/README.md
You can run your local development environment (LDE) in two ways:
- AAT support services: You will be utilising AAT instances of support services.
- Local support services. You will be running a local dockerised instance of each of the support services.
If this is your first run, stop (or clean out) existing Docker containers.
$ unset USE_LOCAL_SUPPORT_SERVICES- Ensure your VPN is on.
- Run (you will probably not need to do this every time):
az login
az acr login --name hmctspublic --subscription DCD-CNP-Prod
az acr login --name hmctsprivate --subscription DCD-CNP-Prod- Run
$ ./gradlew bootWithCcd - Wait until tasks have stopped running in the terminal.
- Go to localhost:3000 for manage-cases and localhost:3001 for manage-org. Use the same login details you would use for AAT XUI services to login.
-
Upon running bootWithCcd, an env file (.aat-env) will be created/overwritten which contains all the AAT endpoints and secrets to call those endpoints. This file should never been push to the remote repository.
-
Running end-to-end (e2e) tests using this setup is WIP so continue to use the 'With Docker' setup if you want to run e2e tests locally. See DTSPB-3332.
Start by executing the following in your terminal:
$ export USE_LOCAL_SUPPORT_SERVICES=true
Postgres is started on port 6432 (default) and can be accessed with user postgres password postgres
The default postgres port can be overridden by setting the RSE_LIB_DB_PORT environment variable.
| Service | Database name |
|---|---|
| CCD definition store | definitionstore |
| CCD data store | datastore |
| CCD user profile | userprofile |
| AM role assignment service | am |
Services run on the following default ports:
| Service | Port |
|---|---|
| CCD definition store | 4451 |
| CCD data store | 4452 |
| CCD user profile | 4453 |
| CCD case document Access Management | 4455 |
| AM role assignment service | 4096 |
| AAC assign access to a case | 4454 |
| XUI Manage cases | 4454 |
| XUI Manage org | 4454 |
| IDAM Simulator* | 5000 |
| S2S Simulator* | 8489 |
When running AuthMode.Local
For a clean boot define the RSE_LIB_CLEAN_BOOT environment variable, which will force recreate all docker containers upon boot.
Spring boot's devtools can be used to fast-reload your application whilst leaving other CFT services running, significantly improving the edit-compile-test cycle.
dependencies {
  cftlibImplementation 'org.springframework.boot:spring-boot-devtools'
}

./gradlew bootJar
# run gradle with bootWithCCD to bring up the IDAM and CCD including cftlib Docker with elastic and database
./gradle bootWithCCD
# run in debugger with
./gradlew bootWithCCD --debug-jvm
or just click debug in intellij on probate-back-office [bootWithCCD] run/debug configuration


NOTE that the bootWithCCD brings up a prcess that just sits there, to exit either Ctrl-C
     or press stop on the run tab in intellij.

NOTE I have sometimes had issues trying to get debugger up, my solution is to stop and terminate and try again.
If there is a problem with debugging message about "JDWP Transport dt_socket failed to initialize"
Debugger might be stuck running, need to go to cmd line to kill task if it's been left hanging:
lsof -i tcp:5005
This will show the PID then can kill that PID using
kill -9 PID_JUST_FOUND

Also needs back office docker to bring up all services:
./bin/dev-cft-setup.sh
./bin/dev-cft-start.sh

Login to XUI at localhost:3000 with testCW@user.com or testAdmin@user.com leave password empty
## END: NEW ./gradlew forceBuildAllXlsx
./gradlew importAllXlsx
Reload envVars for aat to local to be sure you have the latest ones with
./gradlew reloadLocalEnvVars
This line from build.gradle should be commented out before you bootWithCCD
cftlibImplementation 'org.springframework.boot:spring-boot-devtools'
Then do
./gradlew bootWithCCD
then run FTs as any other normal test
The following can be executed when the BO server is running:
./gradlew buildAndImportAllXlsx
then sign out / sign in
######################################################################################################################## ########################################################################################################################
Because the probate back office relies on CCD callbacks it must be run inside the docker-compose environment, and must be built before bringing the environment up. You will need to recompile after any code changes.
Build the jar with:
./gradlew assemble
docker-compose build
Bring up the environment:
before you start ensure that any env vars setup on whatever terminal you are --creat-ing from
XUI_LD_ID
LD_SDK_BO_KEY
LD_BO_USER_KEY
LD_SDK_FE_KEY
LD_FE_USER_KEY
npx @hmcts/probate-dev-env --create
npx @hmcts/probate-dev-env
npx @hmcts/probate-dev-env --stop
npx @hmcts/probate-dev-env --start
Then wait upto 5 mins for the images to spin up - check the SIDAM and CCD and probate-backoffice ones have started fully
./bin/wiremock.sh
curl -X 'DELETE' 'http://localhost:8991/__admin/mappings' -H 'accept: */*'
curl -X 'GET' 'http://localhost:8991/__admin/mappings?limit=100&offset=0' -H 'accept: application/json'
docker-compose stop probate-back-office
./gradlew assemble
docker-compose up -d --build probate-back-office
##This is now the default setup
before --create make sure you have this env var setup
LD_SDK_AM_KEY (see Sanjay for the value)
npx @hmcts/probate-dev-env --create
npx @hmcts/probate-dev-env

upload new xls from local
./ccdImports/conversionScripts/createAllXLS.sh probate-back-office:4104
./ccdImports/conversionScripts/importAllXLS.sh

redeploy probate-backoffice image
docker-compose stop probate-back-office && ./gradlew assemble && docker-compose up -d --build probate-back-office

make sure probate-backoffice and manage-case-assignment docker images are running
make sure wiremock is running and populated
http://localhost:3455/
login as one of the test PP users, create a case
* probatesolicitortestorgtest1@gmail.com Probate123
* probatesolicitortestorg2test1@gmail.com Probate123
you should be able to share that case with the other PP user

if you are running low on memory you can stop probate-frontend, business-service, submit-service, orchestrtor etc
complete above
uncomment docker image from the local docker-compose.yml: xui-manage-org
docker-compose up -d xui-manage-org
create a case to share
unshare that case from everyone
go to
http://localhost:3001/
login with org user
* probatesolicitortestorgman3@gmail.com Probate123
click Unassigned cases link
see unassigned cases + assign as needed

when you want to return to manage-case
run ./bin/wiremock.sh
create cases + share per org from here
http://localhost:8991/__admin/mappings?limit=10
npx @hmcts/probate-dev-env --destroy
docker container rm $(docker container ls -a -q)
docker image rm $(docker image ls -a -q)
docker volume rm $(docker volume ls -q)
If you would like to test a new CCD config locally, you should run:
./ccdImports/conversionScripts/createAllXLS.sh probate-back-office:4104
./ccdImports/conversionScripts/importAllXLS.sh
Guidance on how to set up probate locally using the updated docker images.
1) Install https://stedolan.github.io/jq/
sudo apt-get install jqFor mac
brew install jqNB. If you download the binary version it is called 'jq-osx-amd64' and the scripts later will fail because they are looking for 'jq'.
  az login
  az acr login --name hmctspublic --subscription DCD-CNP-Prod
az acr login --name hmctsprivate --subscription DCD-CNP-Prod docker container rm $(docker container ls -a -q)
docker image rm $(docker image ls -a -q)
docker volume rm $(docker volume ls -q)NB. Docker for desktop on a mac only allocates 2GB of memory by default, this is not enough I increased mine 16GB.
./ccd loginFor linux/Mac
source ./bin/linux-set-environment-variables.shIn order to work locally on probate-frontend you will need to clone project ccd-logstash from github. Checkout the probate-conf branch and build the docker image
   git checkout probate-conf
   docker build . -t ccd-logstash:probate
In probate-back-office/compose/elasticsearch.yml replace image: hmcts/ccd-logstash:latest with image: "ccd-logstash:probate"
   docker network create compose_default
   ./ccd compose pull
   ./ccd compose build
./ccd compose upOnce docker has started run
./bin/document-management-store-create-blob-store-container.shFind id of dm-store container
docker ps | grep dm-store_1Use id to stop container
docker stop compose_dm-store_1_idStart the dm-store container
./ccd compose up -d dm-storeOn linux you may have to restart any failing containers. These often fail to start:
- dm-store
- fees-api
- payments-api
- sidam-api
Restart in that order
./bin/idam-client-setup.shTo check the IDAM data, you can log into IDAM-web http://localhost:8082/login with idamOwner@hmcts.net/Ref0rmIsFun.
./bin/ccd-add-all-roles.shYou can check the user and roles on the IDAM-web by searching for ProbateSolCW1@gmail.com on Manager Users page.
For mac
./ccdImports/conversionScripts/createAllXLS.sh docker.for.mac.localhost:4104For Windows 10
./ccdImports/conversionScripts/createAllXLS.sh host.docker.internal:4104For linux (replace ip with your own ip)
./ccdImports/conversionScripts/createAllXLS.sh probate-back-office:4104 ./ccdImports/conversionScripts/importAllXLS.shpull ccd-logstash branch probate-conf locally then
docker build . -t ccd-logstash:probate
Login to ccd on http://localhost:3451. Caseworker: ProbateSolCW1@gmail.com / Pa55word11. Solicitor ProbateSolicitor1@gmail.com / Pa55word11.
Start logstash-probateman (for legacy cases)
sudo /usr/share/logstash/bin/logstash -f logstash/legacy-case-data-local.confRun probate-back-office app.
For a solicitor use ProbateSolicitor1@gmail.com : password
Alternatively, for a caseworker use
ProbateSolCW1@gmail.com : password
You can go to a doc in dm by going to localhost:3453/documents/[**ID**]/binary .
Add keywords to fees database
./bin/fees-add-keyword.shThe tests are located at src/test/end-to-end and must be maintainend and run, as they are run as part of the nightly Jenkins CI build. Configuration is set by default to be able to run in an npx created local environment without amendment.
Config is by environment variables with defaults if not present. The .env file does not contain environment variables, and so default values will be used for local run. These can be found in src/test/config.js, and are used by codecept config file src/test/end-to-end/codecept.conf.js.
The tests are node.js and best run in vs code. A launch vs code configuration has been provided to run the yarn script test:fullfunctional (not to be confused with functional tests).
To see if it's running ok, change config value TestShowBrowserWindow in config.js from false to true and the browser will show, allowing you to see what's going on.
The default test configuration runs all end to end tests, however, often we just want to run the ones that are failing. As a step towards running an individual test, a new env var has been added for local use: process.env.E2E_TEST_PATH (see config.js).
This defaults to './paths/**/*.js', which the Jenkins nightly build will use. However you can set this to a specific .js file path in src/test/paths to narrow down to a failing area.
set following in default.yml
  useIDAM: 'true'
  requireCcdCaseId: 'true'
you shoud then be able to use a citizen user of
testusername@test.com/Pa55word11
add a dev.yaml file to the /config folder with contents
featureToggles:
  launchDarklyKey: Located in lower env keyvaults with name launchdarkly-key
emails can be monitored at:
http://localhost:8025
run FE using
yarn start:ld
You should also be able to debug on intellij by starting server.js
set the following application.yml
port: 8081
set the following application.yml
document_management:
  url: http://localhost:5006
You will need to run with payments and fees docker images if you are expecting to make non-zero payments
Create the image of the application by executing the following command:
./gradlew installDistCreate docker image:
docker-compose buildRun the distribution (created in build/install/spring-boot-template directory)
by executing the following command:
docker-compose upThis will start the API container exposing the application's port
(set to 4550 in this template app).
In order to test if the application is up, you can call its health endpoint:
curl http://localhost:4550/healthYou should get a response similar to this:
{"status":"UP","diskSpace":{"status":"UP","total":249644974080,"free":137188298752,"threshold":10485760}}
You must link a probate-frontend pr to a probate-orchestrator pr and that to your probate-backoffice pr
- Create a PR off master for probate-orchestrator-service
- Use the PR number of the BO build in values.yml. Replace:
BACK_OFFICE_API_URL: "http://probate-back-office-pr-1101.preview.platform.hmcts.net"
- upgrade the Chart.yaml version in probate-orchestrator-service
version: 1.0.1
- Create a PR off master for probate-frontend
- Use the PR number of the Orchestrator build in values.yml. Replace:
ORCHESTRATOR_SERVICE_URL : http://probate-orchestrator-service-pr-334.preview.platform.hmcts.net
- upgrade the Chart.yaml version in probate-frontend
version: 2.0.14
- Build the 2 PRs above
- For probate-frontend access, go to (use the pr number you just created for fe):
https://probate-frontend-pr-1218.preview.platform.hmcts.net/start-eligibility
#####REMEMBER ######Remove your unwanted FE/ORCH PRs when you have finished QA
Exactly the same as above, except you need to link on the probate-caveats-frontend PR
- Create a PR off master for probate-orchestrator-service
- Use the PR number of the BO build in values.yml. Replace:
BACK_OFFICE_API_URL: "http://probate-back-office-pr-1101.preview.platform.hmcts.net"
- upgrade the Chart.yaml version in probate-orchestrator-service
version: 1.0.1
- Create a PR off master for probate-caveats-frontend
- Use the PR number of the Orchestrator build in values.yml. Replace:
ORCHESTRATOR_SERVICE_URL : http://probate-orchestrator-service-pr-334.preview.platform.hmcts.net
- upgrade the Chart.yaml version in probate-caveats-frontend
version: 2.0.14
- Build the 2 PRs above
- For probate-caveats-frontend access, go to (use the pr number you just created for fe):
https://probate-caveats-fe-pr-276.preview.platform.hmcts.net/caveats/start-apply
replace pr-{NUMBER} as appropriate
https://probate-frontend-pr-1218.preview.platform.hmcts.net/health
https://probate-caveats-fe-pr-276.preview.platform.hmcts.net/caveats/health
https://probate-orchestrator-service-pr-334.preview.platform.hmcts.net/health
https://probate-submit-service-pr-334.preview.platform.hmcts.net/health
https://probate-business-service-pr-334.preview.platform.hmcts.net/health
https://probate-back-office-pr-2224.preview.platform.hmcts.net/health
When the containers are restarted, ccd data has to be reloaded The user token expires approx every 4 hours
You will need to reconfigure your docker settings to allow at least 6.5Gb
Hystrix is a library that helps you control the interactions between your application and other services by adding latency tolerance and fault tolerance logic. It does this by isolating points of access between the services, stopping cascading failures across them, and providing fallback options. We recommend you to use Hystrix in your application if it calls any services.
This template API has Hystrix Circuit Breaker
already enabled. It monitors and manages all the@HystrixCommand or HystrixObservableCommand annotated methods
inside @Component or @Service annotated classes.
When this API is running, you can monitor Hystrix metrics in real time using
Hystrix Dashboard.
In order to do this, visit http://localhost:4550/hystrix and provide http://localhost:4550/hystrix.stream
as the Hystrix event stream URL. Keep in mind that you'll only see data once some
of your Hystrix commands have been executed. Otherwise Loading ... message will be displayed
on the monitoring page.
Hystrix offers much more than Circuit Breaker pattern implementation or command monitoring. Here are some other functionalities it provides:
- Separate, per-dependency thread pools
- Semaphores, which you can use to limit the number of concurrent calls to any given dependency
- Request caching, allowing different code paths to execute Hystrix Commands without worrying about duplicating work
This project is licensed under the MIT License - see the LICENSE file for details
A sample xui url for BO testing on the deployed env is:
https://xui-probate-back-office-pr-1809.preview.platform.hmcts.net
To run Probate Practitioner tests on ExUI locally do the following: 1. Update the config.js file TestBackOfficeUrl - http://localhost:3455 TestEnvProfUser - probatesolicitortestorgtest1@gmail.com TestEnvProfPassword - Probate123
To run Caseworker tests on XUI locally do the following: 1. Update the config.js file TestBackOfficeUrl - http://localhost:3455 TestEnvUser - ProbateSolCW1@gmail.com TestEnvPassword - Pa55word11
To shutter Probate jurisdiction through pipeline, change the shutterOption in Jenkinsfile_CNP of environments to be shuttered from false to true
shutterOption = "true"
Change it back to false to unshutter
shutterOption = "false"
Generate a shuttered CCD config xlsx in local
./ccdImports/conversionScripts/createAllXLS.sh probate-back-office:4104 true
#DTSPB-3312 notes #####REMEMBER: This branch contains all the code changes from DTSPB-1172 SPIKE. You may want to discard some of that setup https://github.com/hmcts/probate-back-office/tree/DTSPB-1172-investigate-sol-case-auto-assignment-on-bulkScan ###Scenario 1: PP -> PP
- Goto https://xui-probate-back-office-pr-2347.preview.platform.hmcts.net
- Login as PP1 = as probatesolicitortestorgtest1@gmail.com
- Create/Complete a PP case
- Logout. Login as PP2 = probatesolicitortestorg2test1@gmail.com
- got to /noc pages
- enter case ref, answer challenge question, confirm
- PP2 can now see the case
- As an added check logout. Longin as CW. Progress case to Grant Issued
#Upload spreadsheet on Demo with below: ./ccdImports/conversionScripts/createAllXLS.sh probate-back-office-demo.service.core-compute-demo.internal aac-manage-case-assignment-demo.service.core-compute-demo.internal https://idam-web-public.demo.platform.hmcts.net/login/?response_type=code&client_id=ccd_admin&redirect_uri=https%3A%2F%2Fccd-admin-web.demo.platform.hmcts.net%2Foauth2redirect