Holt Skinner
University of Missouri – Computer Science 8780
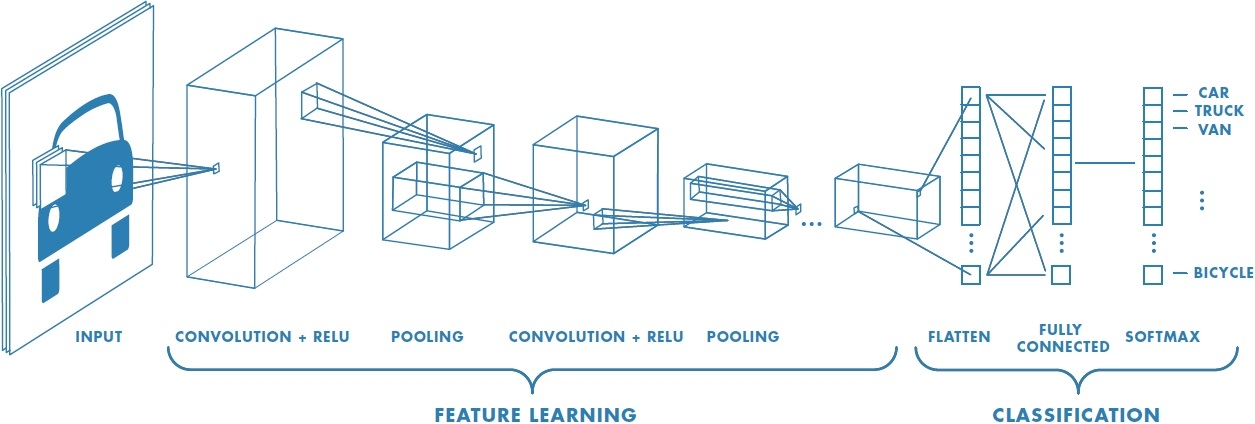
Neural Networks and Deep Learning are the biggest buzzwords in Computer Science today. One of the particular fields that shows a great deal of promise are Convolutional Neural Networks or CNNs these special neural networks use a process known as convolution to learn features in conjunction with traditional Back Propogation. CNNs were used for ImageNet classification in the paper ImageNet Classification with Deep Convolutional Neural Networks by Alex Krizhevsky et al. CNNs are particularly useful for processing images because convolution itself treats the data as a 2D matrix. Many different pre-trained models exist to process image recognition and they each provide different levels of accuracy and different specialties. There are also a number of APIs featuring pre-trained networks to allow more developers to utilize image recognition technology. For this project, these different models and APIs will be compared and contrasted to determine the best use cases.
Diagram of a Basic Convolutional Neural Network
Image Source: Mathworks
For simplicity purposes, all classifiers will be trained with a simple dataset that consists of cats and dogs. The classifiers will be analyzed based on their ability to differentiate between the two different creatures. The training set includes 8000 images, 4000 cats and 4000 dogs. The test set contains 2000 images, 1000 cats and 1000 dogs. While this dataset is simple, the purpose is to learn the process of the CNN and the basic construction, as well as comparing the models.
-
Python
-
TensorFlow
-
Keras
-
Numpy
-
Google Cloud
- All computation was performed on a Google Cloud Compute Instance running Ubuntu 18 to speed up computation.
For the first attempt at image classification, I used the Keras Library on top of Tensor Flow to create a basic image classifier. This Convolutional Neural Net contained 5 Layers: Convolution (with 32 filters 3*3 each), Max Pooling, Flattening, Fully Connected and Output (Also Fully Connected)
Training this classifier took quite a while even on a high-equipment machine. The classifier was to be trained for 25 epochs on the dataset. Each Epoch took approximately 40 minutes to complete. I first had an issue of my laptop going into sleep mode and killing the process when the ssh connection went down. To avoid this, I found and utilized the Unix command nohup which prevents the program from quitting when the shell is exited. However, I then had another issue of accidentally killing the process myself when working on another experiment, to save time, I reran the homemade algorithm with half the dataset and 5 epochs to get a proof of concept.
Below are the graphs depicting the loss (green) and the accuracy (blue) when training and testing. These values were outputted by Keras after each datapoint was plugged into the network. Notice how there is a spike at each epoch (every 4000 data points) this makes sense because the data is shuffled at each epoch to allow for more variety in training and to prevent an overfit. It is also important to note that the CNN got up to 95% accuracy according to Keras.
As great as these results seemed, it was not meant to be. When I attempted to run my own cat images through the network, it would very rarely classify them correctly. Upon further investigation, the way I attempted to limit the training data size in Keras actually only trained the network on dog images. I had to completely start over and retrain the network on the full set of images. The process went overnight and took more than 12 hours to fully train. Below is the training graph with the entire dataset and all 25 epochs. This new network got 99% Testing accuracy according to Keras's output; however, when testing on random images outside the test/training sets, results were mixed. The system had particular trouble identifying cats rather than dogs.
Resnet50 is a Deep Residual CNN which won the ImageNet Large Scale Visual Recognition Challenge (ILSVRC) in 2015. In the competition, it achieved an error rate of 3.57% on the ILSVRC Dataset, which was actually better than human-level control. The Resnet was pioneered by Kaiming He et al and presented in the paper Deep Residual Learning for Image Recognition As the name suggests, this network has 50 layers with a combination of convolution, ReLu and pooling along with fully connected layers. The Resnet's claim to fame is the fact that data passing through the network can skip through some layers in the network to avoid the vanishing gradient problem. (e.g. Layer 2 can directly connect to layer 6) Residual Networks have been becoming popular due to this phenomenon.
Diagram of ResNet50
Source: Deep Residual Learning for Image Recognition, Kaiming He et al
For the experiments of classifying dogs and cats, I used a pre-trained network on the ImageNet dataset. The advantage of using a pre-trained model is the amount of time saved from not having to train. Especially since the deep nets (including ResNet50) can take days or weeks to fully train. However, this dataset provided an interesting challenge in testing because all of the classes in ImageNet are highly specific. For example, there is no "dog" class, but rather "Siberian Husky." To make a more apples to apples comparison, each prediction had to be analyzed for the different types of classes that could be categorized as a dog or a cat. With this further analysis, the accuracy in the Dog/Cat dataset achieved an accuracy of 80% for both cats and dogs. An Unexpected issue occurred because Resnet50 in Keras expects images of 224 * 224 pixels, and the Python Error messages weren't entirely clear. This was resolved by reducing all of the images to the proper dimensions before running them through the network. Transfer Learning was also attempted for this model by creating a custom fully connected layer and to reduce the number of classes. The training time would have been over a day per epoch without further hardware, so this experiment did not run to completion.
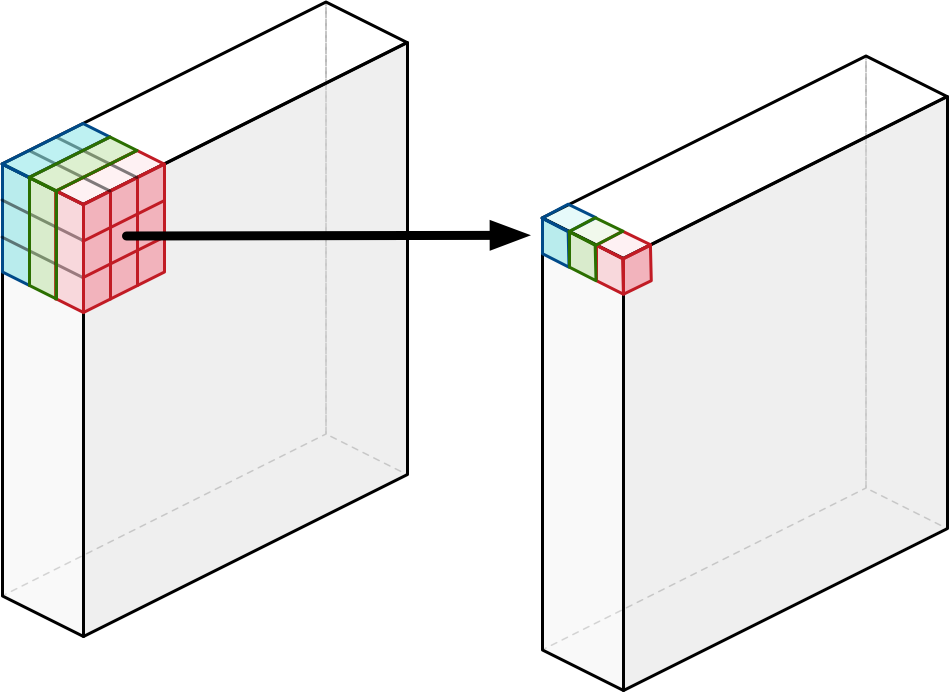
MobileNet is a Neural Network model that was designed specifically to be small, low-latency, and low power for use on mobile devices while still being close to accurate as larger networks. The MobileNet first appeared in a paper in April 2017 by a group of researchers at Google. MobileNets: Efficient Convolutional Neural Networks for Mobile Vision Applications The interesting differences between this network and standard CNNs are in the convolution steps. MobileNet does one standard convolution as the first layer, but then it does a "depthwise separable" convolution for every other convolution. The first step involves performing convolution in each channel (RGB) separately, rather than all at once.
Image Source: Machinethink.net
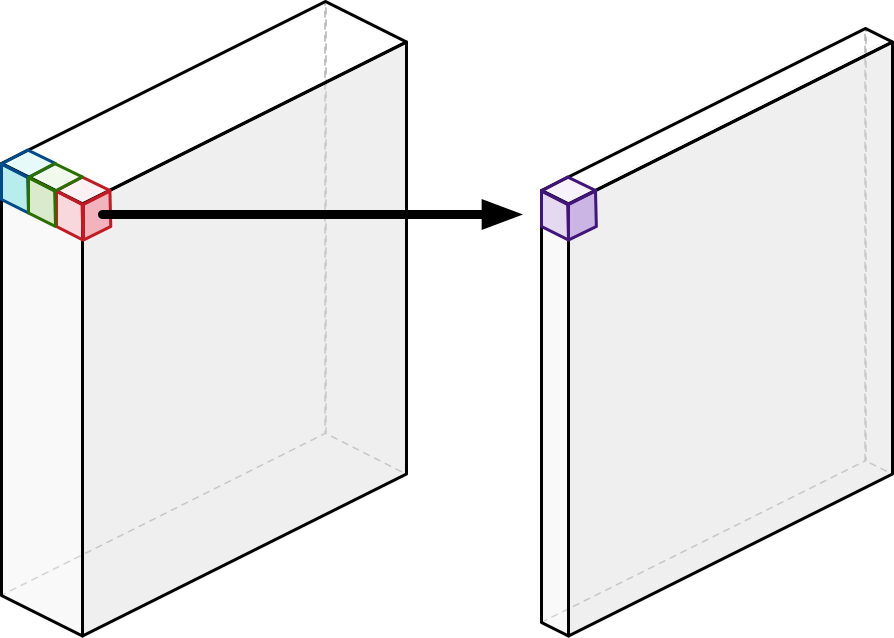
This operation is followed by a Pointwise convolution which adds up all the channels as a weighted sum.
The purpose of doing these seperate processes is that it achieves similar results to convolution, but it requires much less computation and produces fewer weights to learn in training.
When trained on the ImageNet Dataset, MobileNet provided an accuracy of approximately 75% on the test dataset for cats and 90% for dogs. I believe the cats performed worse with this Dataset because there is less variety in the the types of cats in classes than there are in dogs.
To make image recognition even simpler for developers who may not have a machine learning background, companies such as Google and Amazon have released APIs that provide an easy interface for predicting objects in images. Images can be sent either via a url or encoded in base64, which python provides natively. The API requires registering for an API key, but provides the service free for the first 1000 images every month. This limit did prevent testing on the entire dataset. On my Google Cloud Instance, the results came back almost instantaneously for an image, even though the image needed to be encoded before sending. The only bottleneck found when testing was that the service can only classify 16 images per request, so this required a queueing system be implemented to allow more images be tested at once. The Google API correctly classified 100% of the training set cats and dogs submitted (100 of each). Interestingly enough, all of the cats were classified with above 97% confidence, whereas the dogs classification confidence ranged from 90 - 99%.
Example of the API in use.
Source: https://cloud.google.com/vision/docs/drag-and-drop
Overall, the networks performed decently well at classifying basic mammals based on their images. In my tests, the Google Cloud Vision API performed the best in terms of speed and accuracy. This was most likely due to the face that Google Cloud Vision has been trained on many more images than the ImageNet Dataset. It is also possible that it performed extra quick because the code was run on a Google Cloud VM, so the Network connection to Google's own services would be optimized. They have also spent the time and resources to optimize their hardware and software for this exact task, including their Tensor Processing Units. The Homemade network did not perform well on the cat test dataset. The most likely problem was user error on the Keras Framework, or not enough training data to provide a solid backbone for the network to be built on. The ResNet and MobileNet performed similarly, most likely because they were trained on the same dataset and have similar performance metrics. The most interesting part was learning about the MobileNet and its specific flavor of convolution. It would be interesting to continue research on how the depthwise separable convolution definitivecould be applied to more types of networks, as well as how the network performs so well with so few layers. Obviously, this is not a definitive test to determine which network is superior because the problem chosen was simple due to time and equipment constraints. However, it has been an interesting exercise to learn about some of the different types of networks and their variations on the basic patterns.
Repository: https://github.com/holtwashere/NeuralNetworks
homemade.py
# Initialize Neural Network as Sequential
from keras.models import Sequential, load_model
# Perform Convolution Step on Training Images
# Use Max in Pooling Operation
# Flatten Arrays into a linear vector
# Dense is Fully Connected (Regular MLP)
from keras.layers import Conv2D, MaxPooling2D, Flatten, Dense

# Image Preprocessor to prevent overfitting
from keras.preprocessing.image import ImageDataGenerator

import numpy as np
from keras.preprocessing import image
import sys
import re
import matplotlib
matplotlib.use("Agg")
import matplotlib.pyplot as plt
import os


def create_model():

    # Instansiate Network
    classifier = Sequential()

    # Convolution Layer 32 Filters 3x3 each, each image 64*64 RGB Relu Function
    classifier.add(
        Conv2D(32, (3, 3), input_shape=(64, 64, 3), activation='relu'))

    # Pooling Layer to reduce size of image
    classifier.add(MaxPooling2D(pool_size=(2, 2)))

    classifier.add(Flatten())

    # Hidden Fully Connected Layer
    classifier.add(Dense(units=128, activation='relu'))

    # Output Layer Gives Binary Output (Cat or Dog)
    classifier.add(Dense(units=1, activation='sigmoid'))

    # Optimizer - Use Stochastic Gradient Decent, Use Cross Entropy Loss Function, Measure Accuracy
    classifier.compile(
        optimizer='adam', loss='binary_crossentropy', metrics=['accuracy'])

    return classifier


def train_classifier(classifier):

    # Creates extra training data by flipping, rotating images
    train_datagen = ImageDataGenerator(rescale=1. / 255,
                                       shear_range=0.2,
                                       zoom_range=0.2,
                                       horizontal_flip=True)

    test_datagen = ImageDataGenerator(rescale=1. / 255)

    # Pull all images from training_set directory
    training_set = train_datagen.flow_from_directory('training_set',
                                                     target_size=(64, 64),
                                                     batch_size=32,
                                                     class_mode='binary')

    test_set = test_datagen.flow_from_directory('test_set',
                                                target_size=(64, 64),
                                                batch_size=32,
                                                class_mode='binary')

    # Actual Training step
    history = classifier.fit_generator(training_set,
                                       steps_per_epoch=8000,
                                       epochs=25,
                                       validation_data=test_set,
                                       validation_steps=2000)

    return classifier, history


def predict(classifier, image_path):

    test_image = image.load_img(image_path, target_size=(64, 64))

    test_image = image.img_to_array(test_image)
    test_image = np.expand_dims(test_image, axis=0)

    result = classifier.predict(test_image)

    if result[0][0] == 1:
        prediction = 'dog'
    else:
        prediction = 'cat'

    return prediction


def graph_model():
    lines = tuple(open("nohup.out", "r"))

    loss = np.zeros(len(lines))
    acc = np.zeros(len(lines))

    for i, c in enumerate(lines):
        digs = np.array(re.findall(r"\d+\.\d+", c))
        if len(digs) == 2:
            loss[i] = digs[0]
            acc[i] = digs[1]

    acc = acc[5:]
    loss = loss[5:]

    for i in range(len(acc)):
        if acc[i] == 0 or loss[i] >= .999:
            print(i)
            acc[i] = acc[i - 1]
            loss[i] = loss[i - 1]

    plt.plot(acc, "b--", loss, "g--")
    plt.grid(True)
    plt.legend(["Accuracy", "Loss"])
    plt.savefig("training_acc.jpg")


def main():

    img_path = sys.argv[1]
    # classifier = load_model("model.h5")

    classifier = create_model()
    classifier, history_callback = train_classifier(classifier)

    classifier.save("model.h5")

    loss_history = history_callback.history["loss"]
    np.savetxt("loss_history.txt", np.array(loss_history), delimiter=",")

    acc_history = history_callback.history["acc"]
    np.savetxt("acc_history.txt", np.array(acc_history), delimiter=",")

    prediction = predict(classifier, img_path)


main()
graph_model()
resnet50.py
from keras.applications.resnet50 import ResNet50, preprocess_input, decode_predictions
from keras.preprocessing import image
import numpy as np
import sys


def main():

    img_path = sys.argv[1]

    model = ResNet50(weights="imagenet")

    test_image = image.load_img(img_path, target_size=(224, 224))

    test_image = image.img_to_array(test_image)
    test_image = np.expand_dims(test_image, axis=0)
    test_image = preprocess_input(test_image)
    result = decode_predictions(model.predict(test_image), top=3)[0]


main()
resnet50_with_transfer.py
from keras.applications.resnet50 import ResNet50, preprocess_input, decode_predictions
from keras.models import Sequential, load_model, Model
from keras.preprocessing import image
from keras.layers import Dense, GlobalAveragePooling2D
import numpy as np
import sys
from keras.preprocessing.image import ImageDataGenerator


def train_classifier(classifier):

    # Creates extra training data by flipping, rotating images
    train_datagen = ImageDataGenerator(rescale=1. / 255,
                                       shear_range=0.2,
                                       zoom_range=0.2,
                                       horizontal_flip=True)

    test_datagen = ImageDataGenerator(rescale=1. / 255)

    # Pull all images from training_set directory
    training_set = train_datagen.flow_from_directory('training_set',
                                                     target_size=(224, 224),
                                                     batch_size=32,
                                                     class_mode='binary')

    test_set = test_datagen.flow_from_directory('test_set',
                                                target_size=(224, 224),
                                                batch_size=32,
                                                class_mode='binary')

    # Actual Training step
    history = classifier.fit_generator(training_set,
                                       steps_per_epoch=8000,
                                       epochs=25,
                                       validation_data=test_set,
                                       validation_steps=2000)

    return classifier, history


def add_new_last_layer(base_model, nb_classes):
    """Add last layer to the convnet
    Args:
      base_model: keras model excluding top
      nb_classes: # of classes
    Returns:
      new keras model with last layer
    """
    x = base_model.output
    x = GlobalAveragePooling2D()(x)
    predictions = Dense(1, activation='sigmoid')(x)
    model = Model(inputs=base_model.input, outputs=predictions)
    return model


def setup_to_transfer_learn(model, base_model):
    """Freeze all layers and compile the model"""
    for layer in base_model.layers:
        layer.trainable = False
    model.compile(optimizer='adam',
                  loss='binary_crossentropy', metrics=['accuracy'])


def main():

    img_path = sys.argv[1]

    base_model = ResNet50(include_top=False, weights="imagenet")
    model = add_new_last_layer(base_model, 2)
    setup_to_transfer_learn(model, base_model)

    model, history = train_classifier(model)

    model.save("resnet.h5")

    test_image = image.load_img(img_path, target_size=(224, 224))

    test_image = image.img_to_array(test_image)
    test_image = np.expand_dims(test_image, axis=0)
    test_image = preprocess_input(test_image)
    result = decode_predictions(model.predict(test_image), top=3)[0]


main()
mobilenet.py
from keras.applications.mobilenet import MobileNet, preprocess_input, decode_predictions
from keras.preprocessing import image
import numpy as np
import sys
import os


def predict(classifier, image_path):

    test_image = image.load_img(image_path, target_size=(224, 224))

    test_image = image.img_to_array(test_image)
    test_image = np.expand_dims(test_image, axis=0)
    test_image = preprocess_input(test_image)
    result = decode_predictions(classifier.predict(test_image), top=1)[0]

    return result[0]


def main():

    img_path = sys.argv[1]

    model = MobileNet()

    correct = 0
    count = 0

    for index, f in enumerate(os.listdir(img_path)):
        if index >= 100:
            break

        p = predict(model, os.path.join(img_path, f))

        count += 1

        if "cat" in p[1] or p[1] == "tabby" or p[1] == "lynx":
            correct += 1

    print(correct / count)


main()
google.py
import requests
import sys
import base64
import json
import os


def encode_image(image_url):
    with open(image_url, "rb") as image_file:
        return base64.b64encode(image_file.read()).decode("utf-8")


def main():

    if len(sys.argv) is not 2:
        print("Insufficient Arguments")
        return

    API_KEY = "AIzaSyAnLDwwZp1VuJ8QUrMP5i9lge3XNbkX4Qo"
    API_ENDPOINT = "https://vision.googleapis.com/v1/images:annotate"

    params = {"key": API_KEY}

    data = {
        "requests": []
    }

    img_dir = sys.argv[1]
    for i, f in enumerate(os.listdir(img_dir)):

        encoded_image = encode_image(os.path.join(img_dir, f))
        data["requests"].append({
            "image": {
                "content": encoded_image
            },
            "features": [
                {
                    "type": "LABEL_DETECTION",
                    "maxResults": 1
                }
            ]
        })

        if i % 16 == 0:

            r = requests.post(url=API_ENDPOINT, params=params, json=data)

            result = json.loads(r.text)["responses"]

            for i in range(len(result)):
                r = result[i]["labelAnnotations"][0]
                descr = r["description"]
                score = r["score"]
                print(f"{descr}: {score}")

            data["requests"] = []


# main()


