A Bite of Python,也可叫作“咬一口Python”,寓意着Python的冰山一角,包含着作者这几年学Python时积累的一些知识和经验,文章中包含了许多快速简洁的例子,方便让读者了解到Python中存在的一些概念,然后去自行拓展。
Python是一门解释型的高级编程语言,由Guido van Rossum于1989年开始编写,并在1991年发布了第一版。Python的特点是代码简洁而且可读性强,使用空格缩进来划分代码块。
用浏览器访问官网的下载页面Download Python,选择合适的版本下载安装。
命令行安装:
Mac:
$ brew install python3Debian&Ubuntu:
$ sudo apt-get install python3Python的官方解释器是CPython,也就是我们通常讨论的Python的实现,它是用C编写的,负责将编写好的Python代码翻译并执行。
除此之外,Python还有许多实现版本:
- PyPy,用rPython实现的Python解释器,使用了JIT编译技术,因此执行速度通常比C实现的CPython还要快。
- Jython,一个用Java实现的Python解释器。
- IronPython,一个用.NET实现的Python解释器。
不同于一些语言使用花括号的方式来明确代码块,Python用缩进来表示代码的层级(通常是四个空格,最好不要用tab)
x = 75
if x >= 60:
    if x > 80:
        print('A')
    else:
        print('B')
else:
    print('C')
# 75| 运算 | 结果 |
|---|---|
x or y |
如果 x 是false, 就是y, 否则是 x |
x and y |
如果 x 是false, 就是x, 否则是 y |
not x |
如果 x 是false, 就是True, 否则是 False |
| 运算 | 含义 |
|---|---|
< |
小于 |
<= |
小于或等于 |
> |
大于 |
>= |
大于等于 |
== |
等于 |
!= |
不等于 |
is |
对象标识等于 |
is not |
对象标识不等于 |
| 运算 | 含义 |
|---|---|
x + y |
加法 |
x - y |
减法 |
x * y |
乘法 |
x / y |
除法 |
x // y |
整除 |
x % y |
取模 |
-x |
取反 |
+x |
取正 |
abs(x) |
绝对值 |
int(x) |
整型转换 |
float(x) |
浮点数转换 |
complex(re, im) |
复数 |
c.conjugate() |
共轭复数 |
divmod(x, y) |
返回(x // y, x % y) |
pow(x, y) |
x的y次幂 |
x ** y |
x的y次幂 |
| 运算 | 含义 |
|---|---|
| `x | y` |
x ^ y |
按位异或 |
x & y |
按位与 |
x << n |
按位左移 |
x >> n |
按位右移 |
~x |
按位反转 |
True和False分别表示Python布尔值中的真和假,当用==比较时,1与True相等,0与False相等,因此True和False还可以当作索引应用在容器操作上。
用内置的bool函数可以返回一个对象的布尔值表示,通常一个空的容器(例如一个空列表、一个空字典)的布尔值表示会返回False,反之为True,此外None的布尔值表示也是为False。
type(False), type(True)
# <class 'bool'> <class 'bool'>

0 == False, 1 == True
# True True

0 is False, 1 is True
# False False

[1,2,3][False], [1,2,3][True]
# 1 2

bool([]), bool({}), bool(set()), bool(()), bool(''), bool(None)
# False False False False False FalseNone在Python中表示空或不存在的含义,在同一个运行的程序中,None的地址只有一个。
当一个函数没有执行return语句或者执行一个没有返回对象的return语句时,默认会返回None值。
type(None)
# <class 'NoneType'>

id(None) == id(None)
# True

def f():
    a = 1

def f2():
    a = 1
    return

f()
# None
f2()
# Nonenot在Python中常用于逻辑判断,表示非或不的含义,当not应用在布尔值时,会把布尔值取反返回,否则会尝试将对象转成布尔值表示再进行逻辑操作。
not False
not True
not None
not [], not {}, not (), not set()
# True
# False
# True
# True True True Truenot一般也应用于判断一个对象是否存在于容器上:
1 not in (1, 2, 3)
# False
1 not in [1, 2, 3]
# False
'a' not in {'a': 1}
# False
'a' not in {'a', 'b'}
还有用于对象的标识判断:
a = 'None'
a is not None
# Trueis用于判断是否同一个对象:
True is True
True is not True
# True
# False

sentinel = object()
l = []
l.append(object())
l.append(sentinel)
l.append(object())
for obj in sentinel
    print('object')
    if obj is sentinel:
        break
# object
A simple life lesson:
import this
# ...
love = this
this is love
# True
love is True
# False
love is False
# False
love is not True or False
# True
love is not True or False; love is love
# Trueand表示与的关系,用在条件表达式时,表示只有两个条件同时成立的情况下,判断条件才成功。
True and False
True and True
False and False
False and True
# False
# True
# False
# False当用and来连接两个表达式时,根据短路性质,如果第一个表达式的布尔表示为False,那么不会计算后面的表达式。
def condition_true():
    print("true")
    return True

def condition_false():
    print("false")
    return False

if condition_true() and condition_false():
    pass
# true
# false

if condition_false() and condition_true():
    pass
# false

if condition_true() and condition_true():
    pass
# true
# trueor表示或的关系,用在条件表达式时,表示如果有其中一个条件成立的情况下,则判断条件成功。
True or False
True or True
False or False
False or True
# True
# True
# False
# True当用or来连接两个表达式时,根据短路性质,如果第一个表达式的布尔表示为True,那么不会计算后面的表达式。
def condition_true():
    print("true")
    return True

def condition_false():
    print("false")
    return False

if condition_true() or condition_false():
    pass
# true

if condition_false() or condition_true():
    pass
# false
# true

if condition_true() or condition_true():
    pass
# true

None or []
None or [] or {}
None or [] or {}
# []
# {}def用于定义一个函数或方法,后面跟着的是函数名,以及参数列表。
def f():
    print("f")
f()
# f

def f():
    print("f")
    def f2():
        print("f2")
    return f2
f2 = f()
f2()
# f
# f2
在定义类的实例方法时,函数参数列表的第一个参数代表着类实例本身:
class Func:
    def f(self):
        print("f")
        return self.f2

    def f2(self):
        print("f2")
f2 = Func().f()
f2()
# f
# f2pass在Python中不做任何事情,通常用pass是为了保持程序结构的完整性,例如提前定义一个稍后实现的函数,或者继承一个基类但不重写其中的方法(常见于自定义异常)等等。
def f():
    pass

class MyException(Exception):
passimport语句在Python中的作用是导入其他模块,籍此访问其他模块中的变量。
import sys
sys.version_info
# sys.version_info(major=3, minor=6, micro=1, releaselevel='final', serial=0)导入又分为绝对导入和相对导入,其中import <>属于绝对导入,相对导入一般用from <> import的方式。
from语句用来从一个模块中导入变量。
from sys import version_info
version_info
# sys.version_info(major=3, minor=6, micro=1, releaselevel='final', serial=0)相对导入一般可以用from <> import的语法来完成,在PEP 328中有一个例子,假设当前的目录结构如下:
package/
    __init__.py
    subpackage1/
        __init__.py
        moduleX.py
        moduleY.py
    subpackage2/
        __init__.py
        moduleZ.py
    moduleA.py
而当前文件是moduleX.py或者subpackage1/__init__.py,以下的相对导入的语法都是合法的:
from .moduleY import spam
from .moduleY import spam as ham
from . import moduleY
from ..subpackage1 import moduleY
from ..subpackage2.moduleZ import eggs
from ..moduleA import foo
from ...package import bar在导入模块时可以给模块起别名,而这个操作一般可以用as关键字来实现:
import abc as cba
cba
# <module 'abc' from '/usr/local/Cellar/python3/3.6.1/bin/../Frameworks/Python.framework/Versions/3.6/lib/python3.6/abc.py'>assert语句用于实现表达式的断言,如果断言没有通过,则会抛出一个AsserationError异常:
assert 1+1 == 2
assert 1+1 == 3, "1+1=2!"
# AssertionError: 1+1=2!for语句用于对一个可迭代对象执行遍历操作,需与in配合使用。
for i in range(3):
    print(i)
# 0
# 1
# 2

for i in "abc":
    print(i)
# a
# b
# c

[i for i in reversed("abc")]
# ['c', 'b', 'a']break用于中断当前循环体的执行,跳出当前循环。
while True:
    print(1)
    break
    print(2)
# 1

for i in range(5):
    if i == 3:
        break
    print(i)
# 0
# 1
# 2continue用于跳过当前的循环体的一个迭代。
for i in range(5):
    if i == 3:
        continue
    print(i)
# 0
# 1
# 2
# 4class用于类的定义。
class Counter:
    base = 0

    def __init__(self):
        self.c = self.base

    def add(self, i):
        self.c += i
        return self.c

c = Counter()
c.add(1)
c.add(1)
Counter.base = 5
c.add(1)
Counter().add(1)
# 1
# 2
# 3
# 6在类层级定义的属性或者方法都会绑定到类的__dict__属性上,而每个实例则有自身的__dict__属性,存放实例的属性。
__dict__属性是一个字典,键为变量的名称,值则是对于的变量值。
Counter.__dict__
# mappingproxy({'__dict__': <attribute '__dict__' of 'Counter' objects>,
#               '__doc__': None,
#               '__init__': <function __main__.Counter.__init__>,
#               '__module__': '__main__',
#               '__weakref__': <attribute '__weakref__' of 'Counter' objects>,
#               'add': <function __main__.Counter.add>,
#               'base': 0})
Counter().__dict__
# {'c': 0}
vars(Counter()) # 等于 Counter().__dict__
# {'c': 0}del语句用来删除一个变量的引用,也可以用于容器上的删除操作。
在这个例子中,当执行del a操作后,下面的print(a)语句就会因为无法访问到a这个变量而抛出异常了。
a = 1
del a

try:
    print(a)
except NameError:
    print("no variable named a!")
# no variable named a!除此之外,del也可以用于容器元素或对象属性的删除操作。
l = [1, 2, 3]
del l[1]
l
# [1, 3]

a = {
    "a": 1,
    "b": 2
}
del a["a"]
"a" in a
# False

class MyClass:
    def __init__(self):
        self.i = 1

my_class = MyClass()
hasattr(my_class, "i")
# True

del my_class.i
hasattr(my_class, "i")
# Falseif,elif和else关键字组成程序中的条件语句和控制流。
for i in [1, 2, 3]:
    if i == 3:
        print("if")
    elif i == 2:
        print("elif")
    else:
        print("else")
# else
# elif
# iftry,raise,except和finally关键字用于处理和控制程序的异常。
for i in [-1, 0, 1]:
    try:
        if i == -1:
            raise ValueError
        if i == 0:
            raise Exception
    except ValueError:
        print("ValueError")
    except Exception:
        print("Exception")
    finally:
        print("i=", i)
# ValueError
# i= -1
# Exception
# i= 0
# i= 1lambda语句用于定义一个匿名函数,函数内容为单个表达式,表达式的值就是lambda函数的返回值。
add = lambda a, b: a+b
add(1,2)
# 3

class ObjectFactory:
    create = lambda : object()

ObjectFactory.create()
# <object object at 0x108074100>当一个函数中出现了yield关键字时,这个函数就变成了一个生成器,调用这个函数时会返回一个generator对象,接下来可以用next函数来驱动这个生成器往下执行,直至碰到一个yield语句,这时候生成器会返回函数yield语句后面的对象,也可以调用生成器的send方法给生成器发送一个值,这个发送的值会成为yield语句的返回值,当生成器执行完最后一个yield语句后,此时继续驱动生成器就会抛出一个StopIteration的异常,生成器的return语句的返回值会赋值给这个异常实例的value属性上。
def g():
    a = yield 1
    b = yield a
    yield b
    return "done"

g = g()
g
# <generator object g at 0x101d4c990>
next(g) # equals to `g.send(None)`, variable a will become a `None`
# 1
g.send(2)
# 2
next(g)
# None
try:
    next(g)
except StopIteration as e:
    print(e.value)
# done如果函数内想对一个全局作用域的变量进行赋值时,则需要用global关键字来声明你想要接触的变量名,接下来便可以访问和修改这个变量。
a = 1

def g():
    global a
    a = 2

a
g()
a
# 1
# 2要理解nonlocal关键字,可以看以下的例子。
在这个例子中,内层函数inside想要修改外层函数变量a的值,但执行outside函数后返回的结果为1。
def outside():
    a = 1
    def inside():
        a = 2
    inside()
    return a

outside()
# 1原因是在执行inside函数时的a = 2语句时,程序认为a是inside函数中的一个局部变量,因此外层函数的变量a没有受到影响。
解决方法是在a = 2语句之前用nonlocal来声明a不是一个局部变量,这样inside在执行时就会去外层函数寻找名称为a的变量,并对这个值进行修改。
def outside():
    a = 1
    def inside():
        nonlocal a
        a = 2
    inside()
    return a
outside()
# 2with语句需要配合上下文管理器来使用,上下文管理器是一个定义了进入和离开操作的对象,当执行到with语句时,程序就会触发跟随with语句后面的上下文管理器的进入回调,当离开with包裹的区块后,程序就会触发上下文管理器的离开回调。
这常见于一些资源获取和资源释放的动作,例如下面是一个打开文件的例子,当不用with语句时,需要手动控制文件的关闭,而用with的话,即保证了代码的整洁的同时也确保了可读性。
f = open("/etc/hosts")
f.readline()
f.close()

with open("/etc/hosts") as f:
f.readline()想定义一个上下文管理器十分简单,只需要编写一个类,并定义其中的__enter__(对应进入)和__exit__(对应离开)方法就可以了。
class Context:
    def __enter__(self):
        print("__enter__")
        return self

    def __exit__(self, exc_type, exc_val, exc_tb):
        print("__exit__")

with Context() as ctx:
    ctx
# __enter__
# <__main__.Context object at 0x10dab5438>
# __exit__定义注释有两种方式,一种是以"#"开头,这种属于是单行注释,另一种是用三个引号包裹字符串,这种可以用作多行注释,也有一种用法是定义函数或类的文档字符串。
'''
multiple
lines
comment
'''
a = 1

# single line comment
b = 2

class C:
    ''' This is doc-string
    '''
    pass

print(repr(C.__doc__))
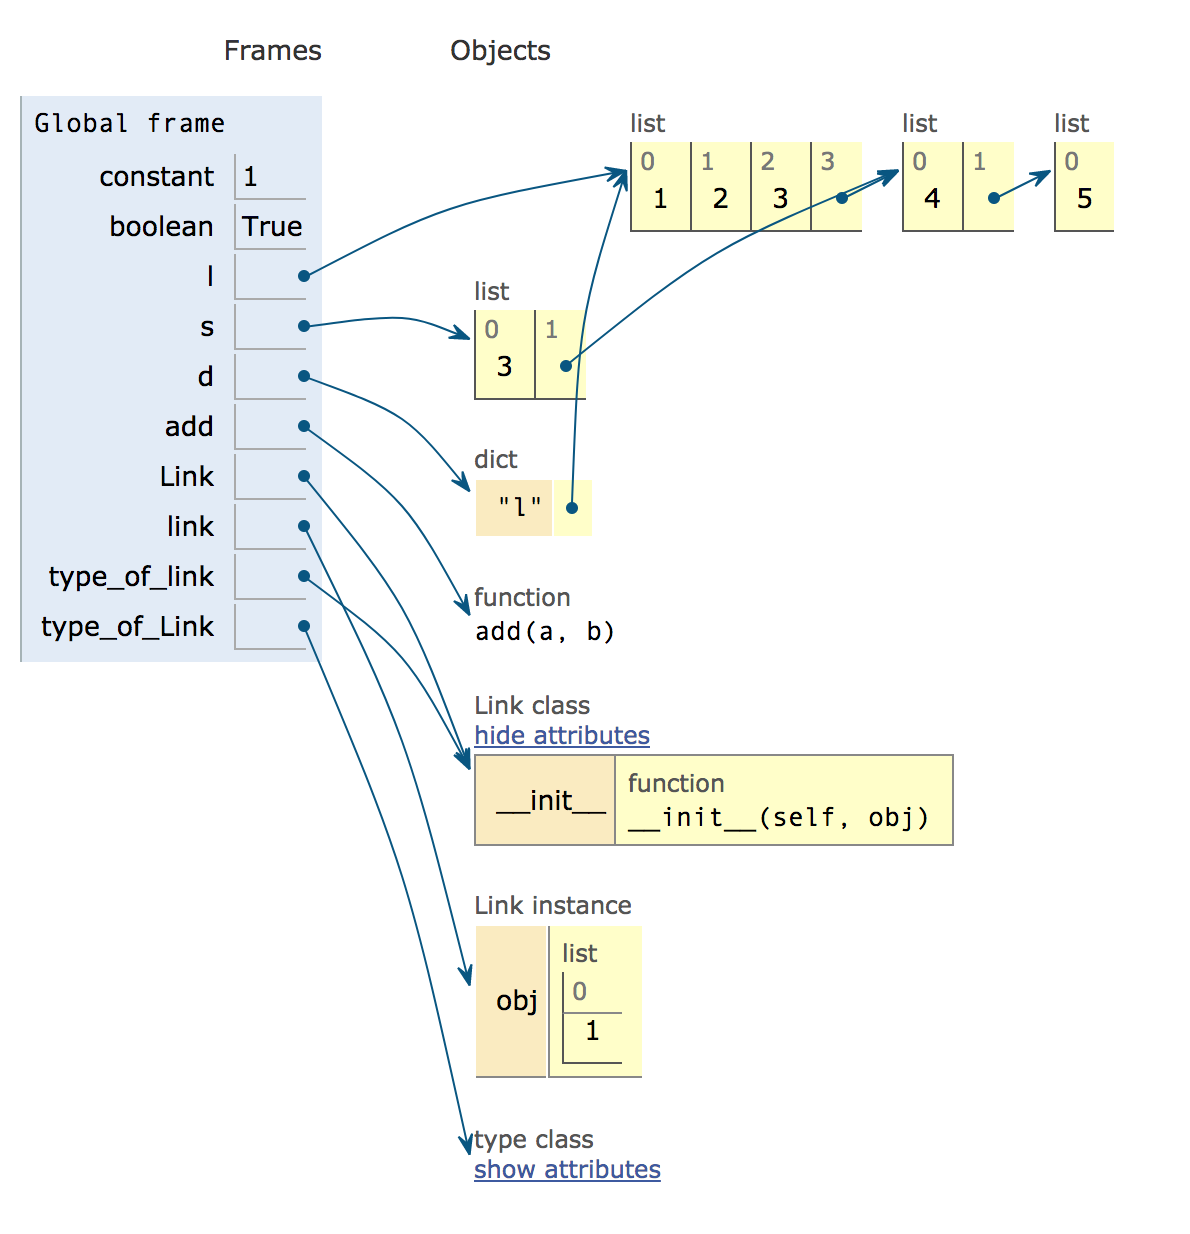
#' This is doc-string\n '要理解Python中的变量首先要明白Python中的命名空间。在Python中,命名空间本质上就是名字到对象的一个映射,因此我们平时谈论的变量也是由名字以及对象两个部分来组成,当执行a = 1这条语句时,Python会在命名空间中添加a这个名字,并把这个名字绑定到1上面,当执行print(a)这条语句时,Python则会从命名空间中查找a这个名字,再把这个名字映射的对象取出来完成后面的动作。
例如下面这个例子中就很好的展示了Python的对象是如何组织起来的:
constant = 1
boolean = True

l = [1,2,3, [4, [5]]]
s = l[2:]
d = {"l": l}

def add(a, b):
    return a + b
add(1,2)

class Link:
    def __init__(self, obj):
        self.obj = obj

link = Link([1])
type_of_link = type(link)
type_of_Link = type(Link)在Python中万物皆对象,所有的类都继承自object类。
isinstance(1, object)
# True
isinstance('1', object)
# True
isinstance([1], object)
# True
class A: pass
isinstance(A, object)
# True
isinstance(object, object)
# True
isinstance(object(), object)
# True用type函数能获取对象的类型,例如一个列表的类型是list,类A的实例的类型是__main__.A类,而这个类的类型是type,反而言之,类是type的一个实例。
type([])
# list
type(A())
# __main__.A
type(type(A()))
# type
再来看一下看似奇怪的例子:
isinstance(type, object)
# True
isinstance(object, type)
# True通过上面这个例子可以看到,type是一个object,object又是一个type,这是什么回事呢?
其实,type和object有点类似先有鸡还是先有蛋的情况,通过下面这个例子和图解,便能很好的理解type和object之间的关系。首先万物皆object,而type也是继承自object的,但object是type的一个实例,假如我们编写了一个列表,那么这个列表实际上是list的一个实例,list继承了object,而list和object都属于type的实例,这种创造类的类我们也一般称它为元类(metaclasses)。
obj = object()
cobj = C()
mylist = [1,2,3]
再来一个例子表明它们之间的关系:
issubclass(type, object) # type继承了object
# True
issubclass(object, type)
# False
isinstance(object, type) # object是type的一个实例
# True
isinstance(type, object) # 因为type继承了object,所以这里为True
# TruePython代码是如何一步步地转化成Python虚拟机所能理解的形式呢?简单地说,从Python代码转换成字节码的过程中会经过以下的几个过程:
- 把Python源码转换成解析树。
- 把解析树转换成抽象语法树(AST)。
- 生成符号表。
- 从AST中生成codeobject:
- 把AST转换为控制流
- 从控制流中提交codeobject
Python中有个内置的compile函数,可以将源代码转换成codeobject,codeobject中包含了源代码转译后的字节码。
compile(source, filename, mode, flags=0, dont_inherit=False, optimize=-1)其中flags指明了编译的特征,例如ast模块的parse函数就把flags设置为PyCF_ONLY_AST。
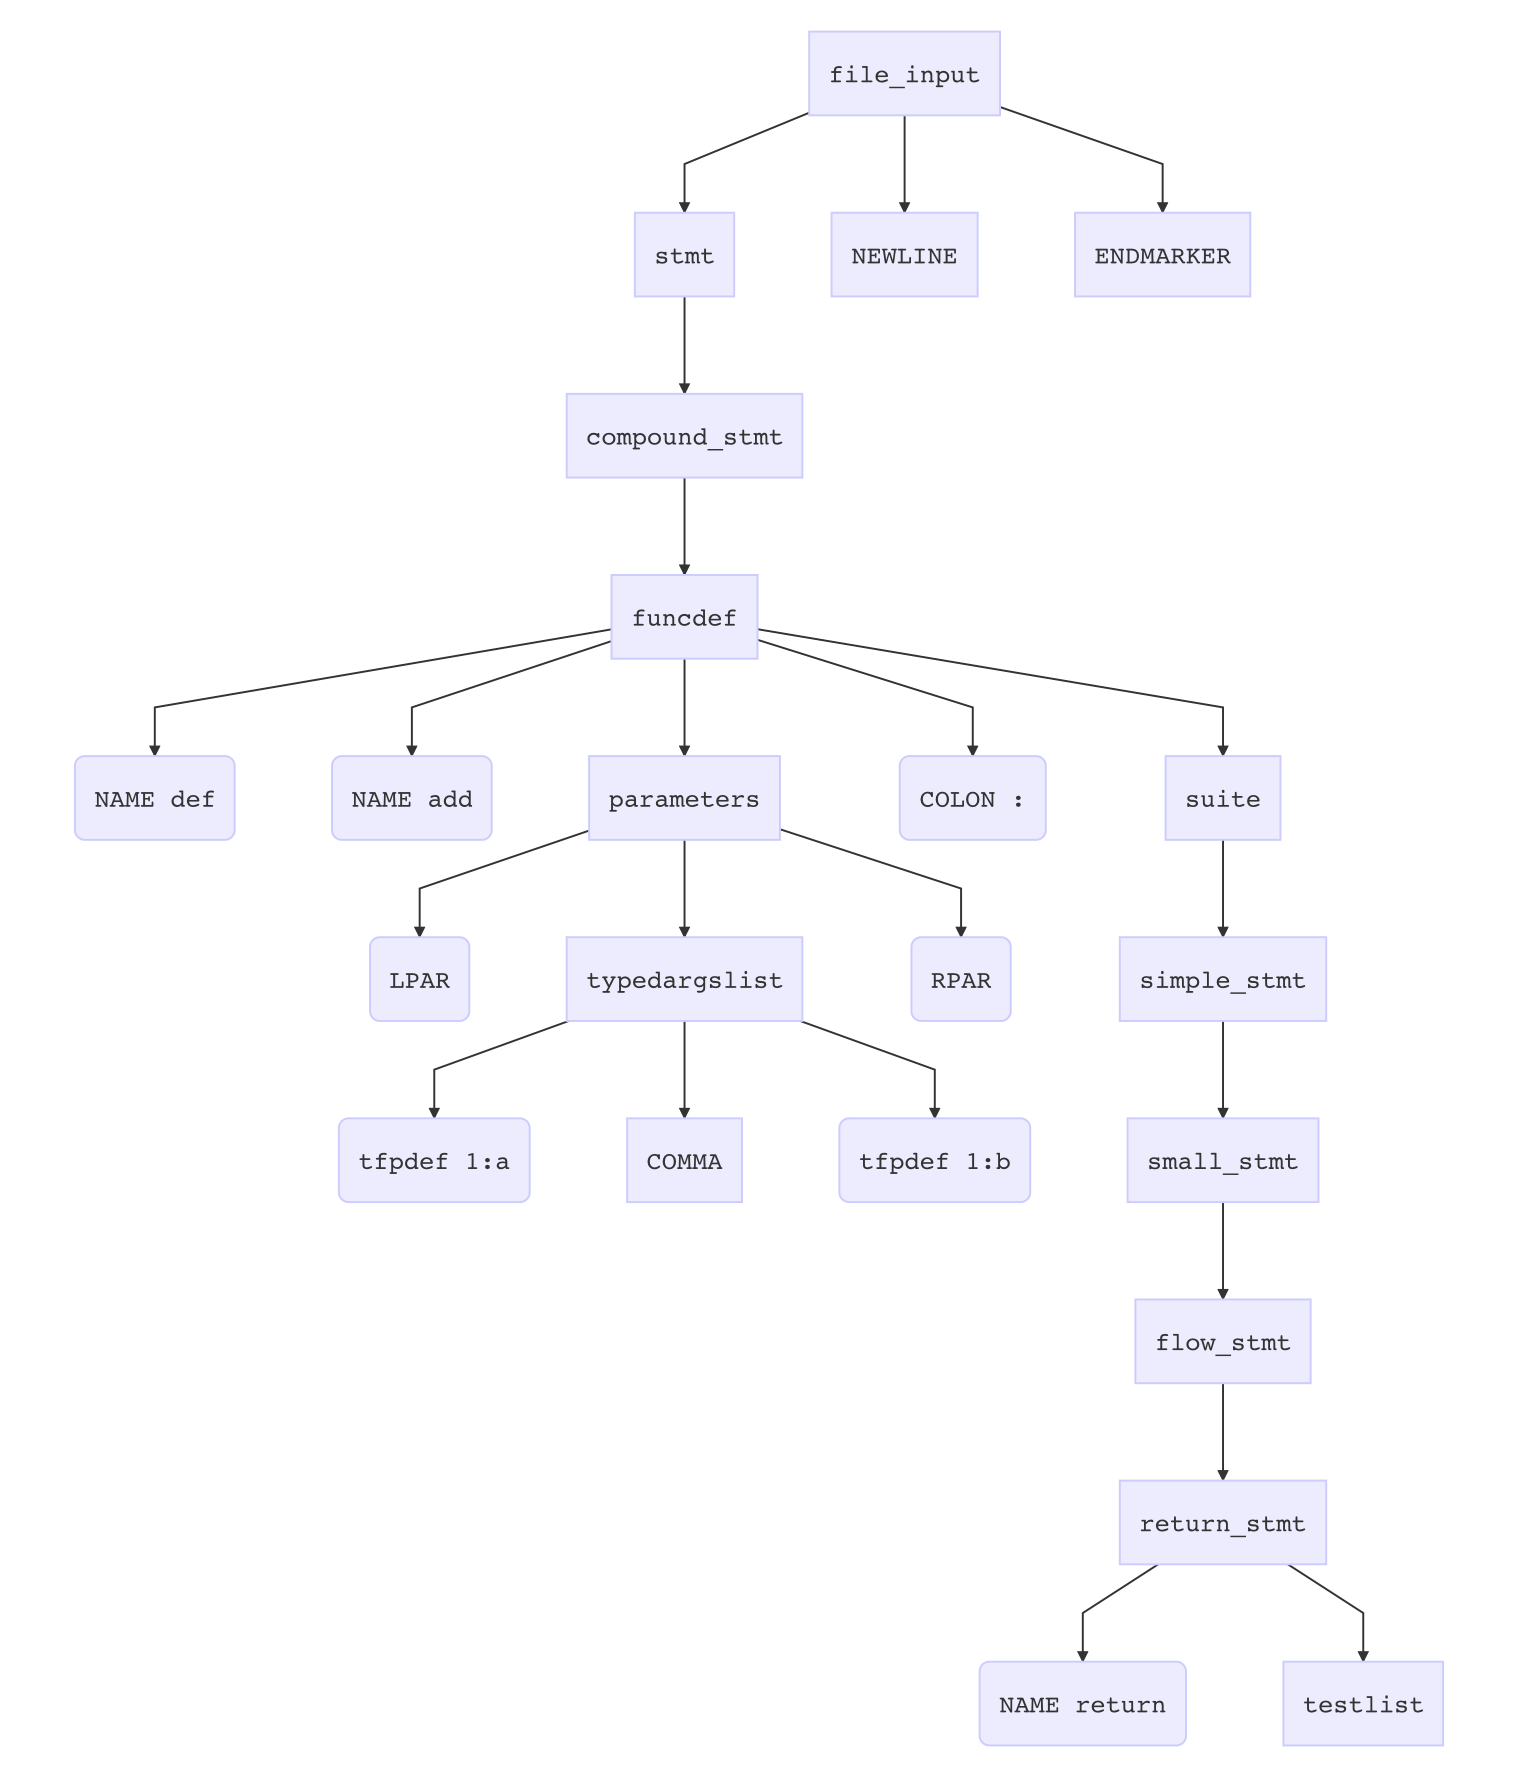
compile(source, filename, mode, PyCF_ONLY_AST)前面说了Python在执行时会把代码转化为解析树,那么解析树长什么样呢?
下面用parser模块对一个加法函数就行解析,对结果进行打印:
import parser
from pprint import pprint

code_str = 'def add(a, b):return a + b'
res = parser.suite(code_str)
pprint(res.tolist())
不难看出,这个结果列表是一个树状结构:
[257,
 [269,
  [295,
   [263,
    [1, 'def'],
    [1, 'add'],
    [264,
     [7, '('],
     [265, [266, [1, 'a']], [12, ','], [266, [1, 'b']]],
     [8, ')']],
    [11, ':'],
    [304,
     [270,
      [271,
       [278,
        [281,
         [1, 'return'],
         [331,
          [305,
           [309,
            [310,
             [311,
              [312,
               [315,
                [316,
                 [317,
                  [318,
                   [319,
                    [320, [321, [322, [323, [324, [1, 'a']]]]]],
                    [14, '+'],
                    [320, [321, [322, [323, [324, [1, 'b']]]]]]]]]]]]]]]]]]]],
      [4, '']]]]]],
 [4, ''],
 [0, '']]
但列表里面大部分都是让人看不懂的数字,其实每个数字都代表了一个符号或者令牌,分别象征着不同的含义,它们对应的含义可以在CPython源码的Include/graminit.h和Include/token.h文件中找到。
下面是对上面列表翻译后的一个树状结构,可以看到原来的代码都被翻译成一颗工整的语法树结构了。
在CPython中,Python的代码最终会被转化成字节码,再由虚拟机对它们进行解析,Python的虚拟机是一种基于栈形式的虚拟机。
在Python中有一个dis模块可以帮助把字节码转成可读的形式展示,下面这个例子对loop函数进行分析,这个函数循环对一个初始值为1的变量进行累加,直至变量的值等于5。
def loop():
    x = 1
    while x < 5:
        x += 1
        print(x)

import dis
dis.dis(loop)下面输出的字节码的指令含义都可以在library/dis中找到。
  2           0 LOAD_CONST               1 (1)
              2 STORE_FAST               0 (x)

  3           4 SETUP_LOOP              28 (to 34)
        >>    6 LOAD_FAST                0 (x)
              8 LOAD_CONST               2 (5)
             10 COMPARE_OP               0 (<)
             12 POP_JUMP_IF_FALSE       32

  4          14 LOAD_FAST                0 (x)
             16 LOAD_CONST               1 (1)
             18 INPLACE_ADD
             20 STORE_FAST               0 (x)

  5          22 LOAD_GLOBAL              0 (print)
             24 LOAD_FAST                0 (x)
             26 CALL_FUNCTION            1
             28 POP_TOP
             30 JUMP_ABSOLUTE            6
        >>   32 POP_BLOCK
        >>   34 LOAD_CONST               0 (None)
             36 RETURN_VALUE
有了上面的基础,再来看下面这个例子:
from timeit import timeit
timeit('[]')
# 0.027015632018446922
timeit('list()')
# 0.44922116107773036
timeit('{}')
# 0.041279405006207526
timeit('dict()')
# 0.44984785199631006为什么用[]定义一个列表比用list()定义一个列表要更快呢?用dis模块进行分析后便很容易得出结论了,相比于[],执行list()时需要去加载list这个名字并查找和调用对应的函数,而执行[]时的指令数量比前者更少,因此它的执行速度也更快。
dis.dis('list()')
  1           0 LOAD_NAME                0 (list)
              2 CALL_FUNCTION            0
              4 RETURN_VALUE
dis.dis('[]')
  1           0 BUILD_LIST               0
2 RETURN_VALUE访问函数的__code__属性便能获得函数的code对象,code对象包含了这个函数解析后的字节码,使用opcode模块可获取字节码对应的指令。
import opcode

def add(a, b):
    return a + b

add.__code__.co_code
# b'|\x00|\x01\x17\x00S\x00'
list(add.__code__.co_code)
# [124, 0, 124, 1, 23, 0, 83, 0]

for code in list(add.__code__.co_code):
    print(opcode.opname[code])

# LOAD_FAST
# <0>
# LOAD_FAST
# POP_TOP
# BINARY_ADD
# <0>
# RETURN_VALUE
# <0>LEGB规则定义了Python对命名空间的查找顺序。
具体如下:
- Locals 函数内的命名空间
- Enclosing 外层函数的命名空间
- Globals 所在模块命名空间
- Builtins Python内置模块的名字空间
def outside():
    v = 2
    def inside():
        print( # B
        v) # E
    inside() # L
outside() # G
globals()
返回当前作用域的全局变量空间
locals()
返回当前作用域的本地变量空间
MRO决定了Python多继承中的方法解析顺序。
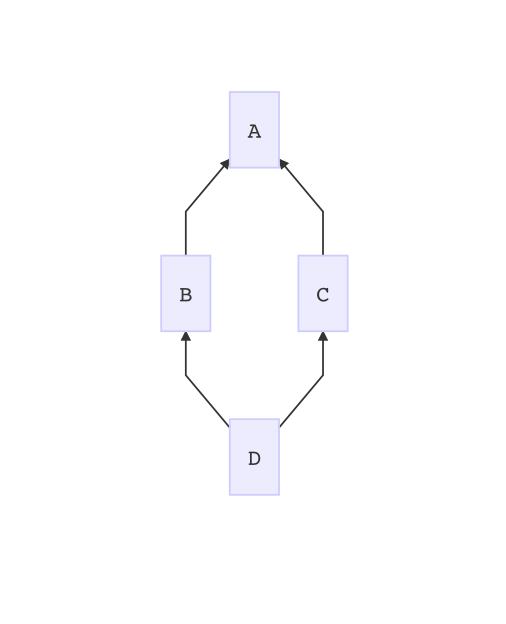
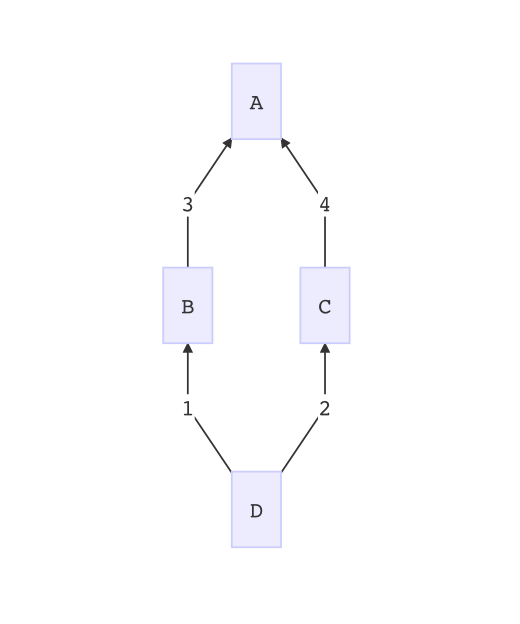
假如下面的一个类结构,D继承了B和C,B和C分别继承了A。
代码如下,其中A类和C类拥有方法f,分别打印A和C:
class A:
    def f(self):
        print('A')

class B(A): pass
class C(A):
    def f(self):
        print('C')

class D(B, C): pass

D().f()
以上的输出在Python 2.7和3.6会有不同的输出,
其中2.7输出的是:
A
而3.6输出的是:
C
导致结果的差异是因为在旧式类(old-style class)和新式类(new-style class)中,MRO的规则有所不同。
执行以下语句:
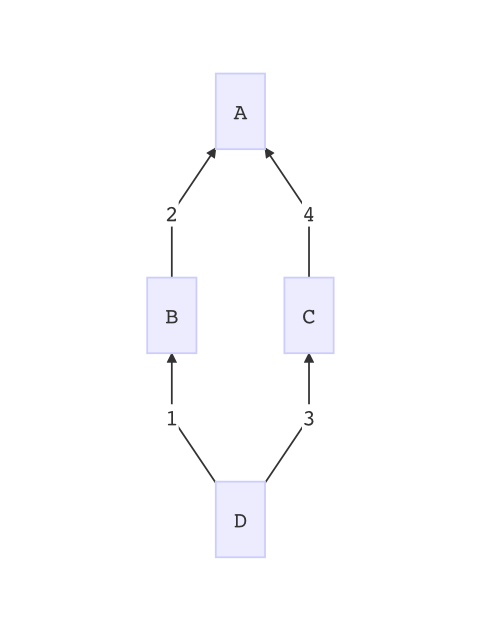
D.__mro__可以看到在旧式类中,方法的查找顺序为D->B->A->C:
而在新式类中,方法的查找顺序为D->B->C->A:
在Python 3.x出现后,就只保留新式类了,采用的MRO规则为C3算法。
dir:返回指定对象的属性列表。
a = []
dir(a)
'''
['__add__', '__class__', '__contains__', '__delattr__', '__delitem__', '__dir__', '__doc__', '__eq__', '__format__', '__ge__', '__getattribute__', '__getitem__', '__gt__', '__hash__', '__iadd__', '__imul__', '__init__', '__init_subclass__', '__iter__', '__le__', '__len__', '__lt__', '__mul__', '__ne__', '__new__', '__reduce__', '__reduce_ex__', '__repr__', '__reversed__', '__rmul__', '__setattr__', '__setitem__', '__sizeof__', '__str__', '__subclasshook__', 'append', 'clear', 'copy', 'count', 'extend', 'index', 'insert', 'pop', 'remove', 'reverse', 'sort']
'''getattr:获取一个对象中的属性,若不存在则抛出AttributeError异常,如果指定了默认值则返回默认值。
class A:
    pass
getattr(A, 'a')
# AttributeError: type object 'A' has no attribute 'a'
getattr(A, 'a', 1)
# 1hasattr:检查一个对象是否有指定的属性。
hasattr(A, 'a')
# Falsesetattr:给一个对象的设置属性名和属性名的对应值。
if not hasattr(A, 'a'):
    setattr(A, 'a', 2)
if hasattr(A, 'a'):
    getattr(A, 'a')
# 2inspect:一个非常有用的内置模块,能够非常方便的获取对象信息。
import inspect
inspect.getmembers(a)Python的垃圾回收方式主要包括引用计数法和分代回收法。
引用计数
Python的垃圾回收主要依赖基于引用计数的回收算法,当一个对象的引用数为0时,Python虚拟机就会考虑回收对象占用的内存。
但引用计数的缺点也十分明显,那就是循环引用的问题,试想有两个容器对象,分别引用了对方作为自己的一个属性,这样在删除其中一个变量后,由于其对象还保留着引用,因此它的内存无法被释放。为了解决这个问题,Python使用了mark-sweep算法,定期扫描跟踪对象的引用情况,释放无用对象的内存。
分代回收
分代回收算法基于弱代假说的**,即:相对于存活时间长的对象,GC更加频繁去处理那些年轻的对象。
Python的分代回收机制把对象按照存活时间分成三个集合,每一个集合即为一个“代”,分别对于一个链表,当垃圾回收器进行收集时,会首先考虑去检查存活时间较短的对象集合。
PEP8定义了Python代码的风格指南。
- b (single lowercase letter)
- B (single uppercase letter)
- lowercase
- lower_case_with_underscores
- UPPERCASE
- UPPER_CASE_WITH_UNDERSCORES
- CapitalizedWords (or CapWords, or CamelCase -- so named because of the bumpy look of its letters [4]). This is also sometimes known as StudlyCaps.
- 实例方法的第一个参数名用
self。 - 类方法的第一个参数名为
cls。
一行的最大行宽不能超过79个字符数量,否则需要用反斜杠""结尾将其分成多行。
导入模块时应该注意分行导入:
Yes: import os
     import sys
	 from subprocess import Popen, PIPE

No: import sys, os捕获异常时要尽量指定其异常类型,否则易导致异常被掩盖等问题。
# Yes
try:
    import platform_specific_module
except ImportError:
platform_specific_module = None布尔值比较
不要用==用于布尔值的比较。
Yes:   if greeting:
No:    if greeting == True:
Worse: if greeting is True:
None比较
# Yes
if foo is not None

## No

if foo !== None

# No
if not foo is None
类型比较
# Yes
if isinstance(obj, int):

# No
if type(obj) is type(1):
PEP 8 - Style Guide for Python Code
__name__和__main__
当Python源文件被解释器执行时,解释器会把__main__赋值给起始模块的__name__,表示这是程序的主入口模块,而当Python源文件被当作模块被其他模块导入时,__name__的赋值则是模块的名称。
例如现在定义了一个源文件a.py如下:
print(__name__)
if __name__ == '__main__':
    print('Hello')
直接执行:
python3 a.py
# __main__
# Hello可以看到这时候a.py中的__name__的值是__main__,而现在编写另一个文件b.py,并且把a作为模块导入:
import a
# a这时候看到a.py中的__name__的值已经变成了a,因此也不会输出Hello。
使用if __name__ == '__main__'这种方式可以把模块即能当作模块来使用,也能当作脚本来直接执行,在Python中有几个模块就是采用了这种方式:
python3 -m http.server
python3 -m pip install requests
cat test.json | python3 -m json.tool__init__.py和__all__
在文件夹中定义一个名为__init__.py的文件意思是告诉解释器把目录当成一个Python模块。
例如现在定义了下面的一个目录:
├── __init__.py
├── l1.py
└── sub_package
    ├── __init__.py
    └── l2.py
l1.py
from sub_package.l2 import l2_f

l2_f()

from sub_package import l2_f

l2_f()sub_package/_init_.py
from .l2 import l2_f

__all__ = ['l2_f']
sub_package/l2.py
def l2_f():
    print('l2')
执行a.py:
python3 l1.py
# l2
# l2这两种方式都能导入l2.py中的函数,而在后面的导入方式中,当l1.py试图从sub_package导入一个函数时,它会检查sub_package目录下的__init__.py,而__init__.py把l2.py的函数导入进了自身的命名空间里面,于是l2_f函数可以顺利被l1.py导入。
__all__指定了模块暴露的接口列表。
Python包括多种容器数据类型:
| 数据类型 | 可变 | 有序 |
|---|---|---|
| list | yes | yes |
| tuple | no | yes |
| str | no | yes |
| range | no | yes |
| bytes | no | yes |
| bytearray | yes | yes |
| array | yes | yes |
| set | yes | no |
| frozenset | no | no |
| dict | yes | no |
| OrderedDict | yes | yes |
首先看鸭子类型(duck typing)的定义:
当看到一只鸟走起来像鸭子、游泳起来像鸭子、叫起来也像鸭子,那么这只鸟就可以被称为鸭子。
Python的容器抽象类也有鸭子类型的体现,看下面这个例子:
from collections.abc import Sized

class A:
    def __len__(self):
        return 0

len(A())
# 0
issubclass(A, Sized) # use __instancecheck__
# True
isinstance(A(), Sized) # use __subclasscheck__
# True定义了一个类A,并定义了它的__len__方法,这个方法会在调用len函数时被调用到。
Sized是一个collections.abc模块定义的一个容器抽象类,但是A类没有继承Sized类,为什么Python却认为A是Sized的一个子类呢?
如果仔细看Sized类的定义,它实现了一个__subclasshook__的方法,这个方法会在执行issubclass函数时会被调用,Sized类会检查A是否拥有一个名为__len__的方法,如果拥有则返回True,于是issubclass的调用会返回True。
这也就体现了,如果A拥有__len__的方法,那么它就是一个Sized。
class Sized(metaclass=ABCMeta):

    __slots__ = ()

    @abstractmethod
    def __len__(self):
        return 0

    @classmethod
    def __subclasshook__(cls, C):
        if cls is Sized:
            if any("__len__" in B.__dict__ for B in C.__mro__):
                return True
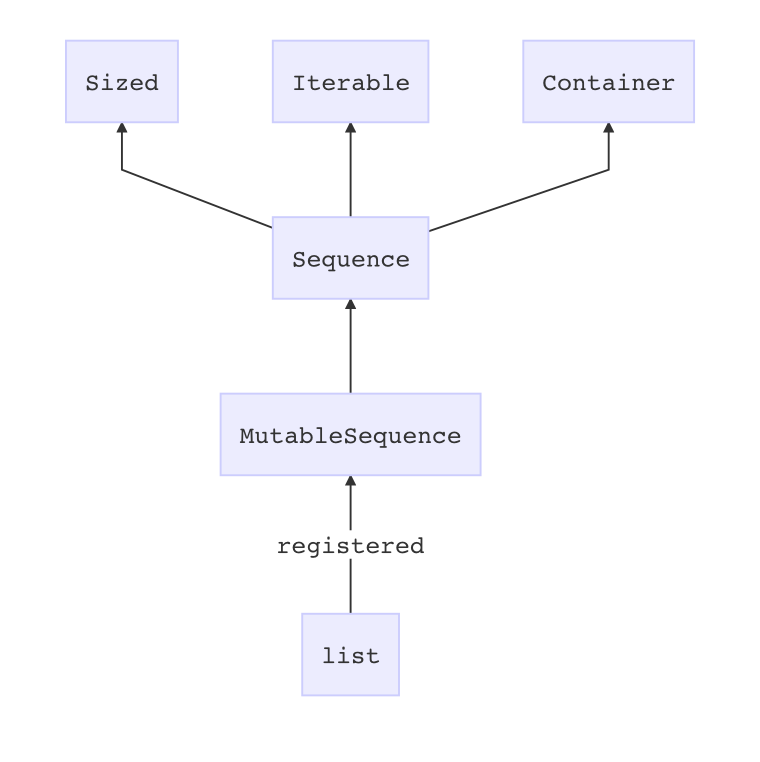
return NotImplemented下图是list与其它容器类之间的关系:
了解更多抽象容器类可查看collections.abc这个模块。
l = []
l.append(1)
# [1]
l.extend([2, 3])
# [1, 2, 3]
l.pop()
# [1, 2]
l.insert(1, 3)
# [1, 3, 2]
l.index(1)
# 0
l.sort()
# [1, 2, 3]
l.reverse()
# [3, 2, 1]
l.count(2)
# 1
l.remove(1)
# [3, 2]
l.clear()
# []t = (1, 2)
t[0]
# 1
t[1]
# 2d = {}
d['a'] = 1
# {'a': 1}
d.get('a')
# 1
d.get('b')
# None
d.get('b', 2)
# 2
d.values()
# dict_values([1])
d.keys()
# dict_keys(['a'])
d.items()
# dict_items([('a', 1)])
d.pop('a')
# 1
d
# {}s1 = set([1, 2, 3])
s2 = set([3, 4, 5])
s1 - s2
# {1, 2}
s1 & s2
# {3}
s1 | s2
# {1, 2, 3, 4, 5}
s1 ^ s2
# {1, 2, 4, 5}s = 'string'
b = b'string'
b == s
# False
b == s.encode()
# True
memoryview(b).to_list()
# [115, 116, 114, 105, 110, 103]
'-'.join(map(chr, memoryview(s.encode()).tolist()))
# 's-t-r-i-n-g'from collections import deque
queue = deque(["a", "b", "c"])
queue.append("d")
queue.append("e")
queue.popleft()
# 'a'
queue.popleft()
# 'b'
queue
# deque(['c', 'd', 'e'])from queue import Queue
q = Queue()
q.put(1)
q.get()
# 1
q.empty()
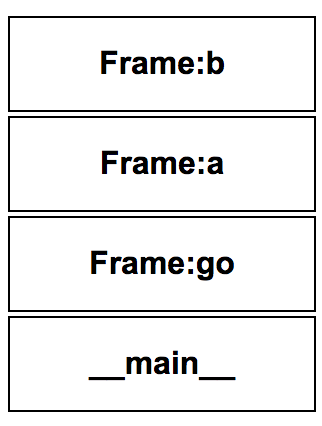
# TruePython通过栈帧来关联函数之间的调用,每次调用函数时,函数的栈帧会放在调用栈上,调用栈的深度随着函数的调用深度增长,栈帧对象包含了函数的code对象,函数的局部变量数据,前一个栈帧和行号等信息。
def c():
    pass

def b():
    pass

def a():
    b()
    c()

def go():
    a()

go()在下面这个例子中,f函数通过获取调用链中前一个栈帧的信息,拿到add函数栈帧中局部变量a与b的值,使得f函数在不接收参数的情况下完成了透明的加法:
import inspect

def f():
    current_frame = inspect.currentframe()
    back_frame = current_frame.f_back
    a = back_frame.f_locals['a']
    b = back_frame.f_locals['b']
    return a + b

def add(a, b):
    print(f())

add(1, 2)
# 3下面这个函数展示了参数的定义形式:
- a是一个普通参数,调用时必须要指定一个值,否则会报错。
- b是一个指定了默认值(None)的参数,如果调用时没有指定值,那么b的值便是None。
- args和kwargs分别是一个tuple和dict,它们封装了剩下的可变长参数,其中关键字参数会传递到kwargs上,而非关键字参数会传递到args上。
def f(a, b=None, *args, **kwargs):
    print(a)
    print(b)
    print(args)
    print(kwargs)

f(1, 2, 3, 4, keyword=5)
# 1
# 2
# (3, 4)
# {'keyword': 5}要想查看函数的参数签名信息,可使用inspect模块的signature函数,它会返回一个签名类的对象,上面包含了函数的参数名字以及注解等信息。
import inspect

def func(f, a: int, b: int):
    return f(a, b)

sig = inspect.signature(func)
type(sig)
# <class 'inspect.Signature'>
sig.parameters
# OrderedDict([('f', <Parameter "f">), ('a', <Parameter "a:int">), ('b', <Parameter "b:int">)])
sig.parameters.get('a').annotation
# <class 'int'>使用functools模块的partial可以将已知值绑定到函数的一个或多个参数上:
import operator
from functools import partial

def func(f, a: int, b: int):
    return f(a, b)

add = partial(func, operator.add)
sub = partial(func, operator.sub)

add(1, 2)
# 3
sub(1, 2)
# -1装饰器是一个函数,它用于给已有函数扩展功能,它通常接收一个函数作为参数,并返回一个新的函数。
装饰器可配合@符号十分简洁地应用在函数上。
def tag(func):
    def wrapper(*args, **kwargs):
      func_result = func(*args, **kwargs)
      return '<{tag}>{content}</{tag}>'.format(tag=func.__name__, content=func_result)
    return wrapper

@tag
def h1(text):
    return text

@tag
def p(text):
    return text

def div(text):
    return text


html = h1(p('Hello World'))
print(html)
# <h1><p>Hello World</p></h1>
html2 = tag(div)('Hello World')
print(html2)
# <div>Hello World</div>
类装饰器
class Tag:
    def __init__(self, func):
        self.func = func

    def __call__(self, *args, **kwargs):
        func_result = self.func(*args, **kwargs)
        return '<{tag}>{content}</{tag}>'.format(tag=self.func.__name__, content=func_result)

@Tag
def h1(text):
    return text

html = h1('Hello World')
print(html)yield能把一个函数变成一个generator,与return不同,yield在函数中返回值时会保存函数的状态,使下一次调用函数时会从上一次的状态继续执行,即从yield的下一条语句开始执行。
def fib(max):
    n, a, b = 0, 0, 1
    while n < max:
        yield(b)
        a, b = b, a + b
        n = n + 1

f = fib(10)
next(f)
# 1
next(f)
# 1
next(f)
# 2
f.send(None)
# 3
for num in f:
    print(num)
# 5
# 8
# 13
# 21
# 34
# 55
next(f)
# StopIteration当一个类的方法名前以单下划线或双下滑线开头时,通常表示这个方法是一个私有方法。
但这只是一种约定俗成的方式,对于外部来说,以单下划线开头的方法依然是可见的,而双下划线的方法则被改写成_类名__方法名存放在名字空间中,所以如果B继承了A,它是访问不到以双下划线开头的方法的。
class A:
    def public_method(self):
        pass

    def _private_method(self):
        pass

    def __private_method(self):
        pass

a = A()
a.public_method()
# None
a._private_method()
# None
a.__private_method()
# AttributeError: 'A' object has no attribute '__A_private_method'
a._A__private_method()
# None
A.__dict__
# mappingproxy({'_A__private_method': <function __main__.A.__private_method>,
#               '__dict__': <attribute '__dict__' of 'A' objects>,
#               '__doc__': None,
#               '__module__': '__main__',
#               '__weakref__': <attribute '__weakref__' of 'A' objects>,
#               '_private_method': <function __main__.A._private_method>,
# 'public_method': <function __main__.A.public_method>})类方法本质上是一个函数,通过绑定对象的方式依附在类上成为方法。
假如有下面一个类:
class A:
    def __init__(self):
        self.val = 1
    def f(self):
        return self.val
可以看到f是A的属性列表中的一个函数:
A.f
# <function __main__.A.f>
A.__dict__['f']
# <function __main__.A.f>而当直接用A.f()的方式调用f方法时,会抛出一个异常,异常的原因很直接,参数列表有一个self参数,调用时却没有指定这个参数。而用A().f()的方式调用f方法时同样没有指定参数,却能正常执行,这是为什么呢?
执行A().f语句可以发现,这时候的f不再是一个函数,而是一个绑定方法,而它绑定的对象则是一个A的实例对象,换句话说,这时候f参数中的self已经跟这个实例对象绑定在一起了,所以用实例调用一个普通方法时,无须人为地去指定第一个参数。
A.f()
# TypeError: f() missing 1 required positional argument: 'self'
A().f() # auto binding
# 1
A().f
# <bound method A.f of <__main__.A object at 0x121a3bac8>>通过调用f函数的__get__(函数的描述器行为)方法来为函数绑定到一个对象上:
class B:
    def __init__(self):
        self.val = 'B'

A.f.__get__(B(), B)
# <bound method A.f of <__main__.B object at 0x111f9b198>>
A.f.__get__(B(), B)()
# B通过types模块的MethodType动态把方法附加到一个实例上:
import types
def g(self):
    return self.val + 1

a.g = types.MethodType(g, a)
a.g()
# 2类方法分为普通方法,静态方法和类方法,静态方法和类方法可分别通过classmethod和staticmethod装饰器来定义。
区别于普通方法,类方法的第一个参数绑定的是类对象,因此可以不需要实例对象,直接用类调用类方法执行。
而静态方法则没有绑定参数,跟类方法一样,可以通过类或者实例直接调用。
class C:
    def instance_method(self):
        print(self)

    @classmethod
    def class_method(cls):
        print(cls)

    @staticmethod
    def static_method():
        pass

C.instance_method
# <function __main__.C.instance_method>
C.instance_method()
# TypeError: instance_method() missing 1 required positional argument: 'self'
C().instance_method()
# <__main__.C object at 0x121133b00>
C.class_method
# <bound method C.class_method of <class '__main__.C'>>
C.class_method()
# <class '__main__.C'>
C().class_method()
# <class '__main__.C'>
C.static_method
# <function __main__.C.static_method>
C.static_method()
# None
C().static_method()
# None
通过输出可以看到的一点就是,类方法是一个已经绑定类对象的方法,而普通方法和静态方法在被调用前只是一个普通函数。
property是一个内置函数,它可以将方法与属性调用绑定在一起。
看下面这个例子,Person类有个年龄属性age,现在想要在对这个属性赋值时给它加一个类型校验,借助于property函数便能在不需要修改用法的情况下为属性加上getter/setter方法:
class Person:
  def __init__(self, age):
      self._age = age

  @property
  def age(self):
      return self._age

  @age.setter
  def age(self, age):
      if not isinstance(age, int):
          raise TypeError('age must be an integer')
      self._age = age


p = Person(20)
print(p.age)
# 20
p.age = 30
print(p.age)
# 30
p.age = '40'
# Traceback (most recent call last):
#   File "test.py", line 20, in <module>
#     p.age = '40'
#   File "test.py", line 12, in age
#     raise TypeError('age must be an integer')
# TypeError: age must be an integerproperty还常用于延迟计算以及属性缓存,例如下面Circle类的area属性,只有在被访问到的情况下才进行计算,并把结果缓存到实例的属性上。
class Circle(object):
  def __init__(self, radius):
    self.radius = radius

  @property
  def area(self):
    if not hasattr(self, '_cache_area'):
        print('evalute')
        setattr(self, '_cache_area', 3.14 * self.radius ** 2)
    return getattr(self, '_cache_area')

c = Circle(4)
print(c.area)
# evalute
# 50.24
print(c.area)
# 50.24上面谈论到的property也好,classmethod和staticmethod也好,甚至是所有的函数,本质上都是实现了描述器协议的对象。
描述器是一个绑定行为的对象属性,如果一个对象定义了__set__()和__get__(),那么它就是一个数据描述器,如果只定义了__get__(),那么它就是一个非数据描述器。
下面定义了一个描述器类Integer,这个类的一个实例作为类属性赋给类C的num变量上,当C的实例访问这个属性时便会触发描述器协议,调用描述器的__get__方法,其中第一个参数是实例本身,而第二个参数是实例所归属的类(是否跟实例方法的调用有异曲同工之妙?),如果属性是以类的形式访问,那么第一个参数的值为None;相似地,当对这个属性进行赋值操作时,则会调用描述器的__set__方法,借用这个特性可以方便对属性做一些校验操作。
class Integer:
    def __init__(self, name):
        self.name = name
        self.val = None

    def __get__(self, obj, obj_type):
        print(obj, obj_type)
        return self.name

    def __set__(self, obj, val):
        if not isinstance(val, int):
            raise Exception('value must be an integer!')
        print('set value to {}'.format(val))
        self.val = val


class C:
    num = Integer('i')


c = C()
c.num
# <__main__.C object at 0x10cc735c0> <class '__main__.C'>
c.num = 5
# set value to 5
c.num = '5'
# Exception: value must be an integer!说到这里已经可以猜到property是如何实现的了,实际上Python官方已经给出了一份模拟property实现的Python代码:
class Property(object):
    "Emulate PyProperty_Type() in Objects/descrobject.c"

    def __init__(self, fget=None, fset=None, fdel=None, doc=None):
        self.fget = fget
        self.fset = fset
        self.fdel = fdel
        if doc is None and fget is not None:
            doc = fget.__doc__
        self.__doc__ = doc

    def __get__(self, obj, objtype=None):
        if obj is None:
            return self
        if self.fget is None:
            raise AttributeError("unreadable attribute")
        return self.fget(obj)

    def __set__(self, obj, value):
        if self.fset is None:
            raise AttributeError("can't set attribute")
        self.fset(obj, value)

    def __delete__(self, obj):
        if self.fdel is None:
            raise AttributeError("can't delete attribute")
        self.fdel(obj)

    def getter(self, fget):
        return type(self)(fget, self.fset, self.fdel, self.__doc__)

    def setter(self, fset):
        return type(self)(self.fget, fset, self.fdel, self.__doc__)

    def deleter(self, fdel):
return type(self)(self.fget, self.fset, fdel, self.__doc__)classmethod的实现则更为简单一些:
class ClassMethod(object):
    "Emulate PyClassMethod_Type() in Objects/funcobject.c"

    def __init__(self, f):
        self.f = f

    def __get__(self, obj, klass=None):
        if klass is None:
            klass = type(obj)
        def newfunc(*args):
            return self.f(klass, *args)
return newfuncPython的每个运算符在背后都对于着特定的方法,重写这些方法可以实现自定义操作符应用在对象时的行为。
二元运算符
| 操作 | 方法 |
|---|---|
| + | object._add_(self, other) |
| - | object._sub_(self, other) |
| * | object._mul_(self, other) |
| // | object._floordiv_(self, other) |
| / | object._truediv_(self, other) |
| % | object._mod_(self, other) |
| ** | object._pow_(self, other[, modulo]) |
| << | object._lshift_(self, other) |
| >> | object._rshift_(self, other) |
| & | object._and_(self, other) |
| ^ | object._xor_(self, other) |
| | | object._or_(self, other) |
扩展赋值运算符
| 操作 | 方法 |
|---|---|
| += | object._iadd_(self, other) |
| -= | object._isub_(self, other) |
| *= | object._imul_(self, other) |
| /= | object._idiv_(self, other) |
| //= | object._ifloordiv_(self, other) |
| %= | object._imod_(self, other) |
| **= | object._ipow_(self, other[, modulo]) |
| <<= | object._ilshift_(self, other) |
| >>= | object._irshift_(self, other) |
| &= | object._iand_(self, other) |
| ^= | object._ixor_(self, other) |
| |= | object._ior_(self, other) |
一元运算符
| 操作 | 方法 |
|---|---|
| - | object._neg_(self) |
| + | object._pos_(self) |
| abs() | object._abs_(self) |
| ~ | object._invert_(self) |
| complex() | object._complex_(self) |
| int() | object._int_(self) |
| long() | object._long_(self) |
| float() | object._float_(self) |
| oct() | object._oct_(self) |
| hex() | object._hex_(self) |
比较运算符
| 操作 | 方法 |
|---|---|
| < | object._lt_(self, other) |
| <= | object._le_(self, other) |
| == | object._eq_(self, other) |
| != | object._ne_(self, other) |
| >= | object._ge_(self, other) |
| > | object._gt_(self, other) |
覆盖操作符的行为:
class Num:
    def __init__(self, val=0):
        self.val = val
    def __add__(self, other):
        return Num(self.val - other)
    def __sub__(self, other):
        return Num(self.val + other)
    def __repr__(self):
        return str(self.val)

num = Num(1)
result = num + 1
# 0
result = num - 1
# 2对于定义了__slots__的类,无法随意添加属性到类上,而是只能对__slots__指定的属性进行操作。
而这也是一种对于存在大量简单对象时,有效降低内存占用的其中一种方式:
class MemoryCheck:
    def __enter__(self):
        tracemalloc.start()
    def __exit__(self, exc_type, exc_val, exc_tb):
        snapshot = tracemalloc.take_snapshot()
        top_stats = snapshot.statistics('lineno')
        print("[ Top 1 ]")
        for stat in top_stats[:1]:
            print(stat)

with MemoryCheck():
    class Object:
        def __init__(self, x, y):
            self.x = x
            self.y = y
    objs = []
    for i in range(1000000):
        objs.append(Object(i, i + 1))
'''
[ Top 1 ]
<ipython-input-132-47931446414b>:4: size=107 MiB, count=1999958, average=56 B
'''
with MemoryCheck():
class Object:
__slots__ = ('x', 'y')
def __init__(self, x, y):
self.x = x
self.y = y
objs = []
for i in range(1000000):
objs.append(Object(i, i + 1))
'''
[ Top 1 ]
<ipython-input-133-cc08066bfb2a>:9: size=88.4 MiB, count=1999747, average=46 B
'''元类能动态地创建类,而且也能控制类的创建行为。
import inspect

class MethodLowerCase(type):
    def __new__(mcs, name, bases, attrs):
        for name, val in attrs.items():
            if callable(val):
                if name.lower() != name:
                    print('method: {} should be lowercase'.format(name))
                else:
                    print('method: {} is valid'.format(name))
        new_cls = type.__new__(mcs, name, bases, attrs)
        return new_cls


class Test(metaclass=MethodLowerCase):
    def test_a(self):
        pass

    def testB(self):
        pass

# method: test_a is valid
# method: testB should be lowercaseimport this遍历列表
array = [1, 2, 3, 4, 5]

for i in range(len(array)):
    print (i, array[i])

# Pythonic
for i, item in enumerate(array):
    print (i, item)
对列表的操作
array = [1, 2, 3, 4, 5]

new_array = []
for item in array:
    new_array.append(str(item))

# Pythonic
new_array = [str(item) for item in array]

# Generator
new_array = (str(item) for item in array)

# 函数式
new_array = map(str, array)
列表推导
# 生成列表
[ i*i for i in range(10) if i % 2 == 0 ]
# 生成集合
{ i*i for i in range(10) if i % 2 == 0 }
# 生成字典
{ i:i for i in range(10) if i % 2 == 0 }
上下文管理器
file = open('file', 'w')
file.write(123)
file.close()

# Pythonic
with open('file', 'w') as file:
    file.write(123)
条件判断
if x is True:
    y = 1
else:
    y = -1

# Pythonic
y = 1 if x is True else -1
构造矩阵
y = [0 for _ in range(100000000)]
# Pythonic
y = [0] * 100000000
装饰器
def logic(x):
    if x < 0:
        return False
    print (x)
    return True

#Pythonic
def check_gt_zero(func):
    def wrapper(x):
        if x < 0:
            return False
        return func(x)
    return wrapper

@check_gt_zero
def logic(x):
    print (x)
    return True
变量交换
temp = y
y = x
x = temp

# Pythonic
x, y = y, x
切片
array = [1, 2, 3, 4, 5]

l = len(array)
for i in range(l/2):
    temp = array[l - i - 1]
    array[l - i - 1] = array[i]
    array[i] = temp

array = list(reversed(array))
# Pythonic
array = array[::-1]
读取文件
CHUNK_SIZE = 1024

with open('test.json') as f:
    chunk = f.read(CHUNK_SIZE)
    while chunk:
        if chunk:
            print(chunk)
        chunk = f.read(CHUNK_SIZE)

from functools import partial
# Pythonic
with open('test.json') as f:
    for piece in iter(partial(f.read, CHUNK_SIZE), ''):
        print (piece)

# Lambda
with open('test.json') as f:
    for piece in iter(lambda: f.read(CHUNK_SIZE), ''):
        print (piece)
for-else和try-else语法
is_for_finished = True

try:
    for item in array:
        print (item)
        # raise Exception
except:
    is_for_finished = False

if is_for_finished is True:
    print ('complete')

# Pythonic
for item in array:
    print (item)
    # raise Exception
else:
    print ('complete')

try:
    print ('try')
    # raise Exception
except Exception:
    print ('exception')
else:
    print ('complete')
函数参数解压
def draw_point(x, y):
    # do some magic

point_foo = (3, 4)
point_bar = {'y': 3, 'x': 2}

draw_point(*point_foo)
draw_point(**point_bar)
列表/元组解压
first, second, *rest = (1,2,3,4,5,6,7,8)"Print To"语法
print ("hello world", file=open("myfile", "w"))字典缺省值
d = {}

try:
    d['count'] = d['count'] + 1
except KeyError:
    d['count'] = 0

# Pythonic
d['count'] = d.get('count', 0) + 1
链式比较符
if x < 100 and x > 0:
    print(x)

# Pythonic
if 0 < x < 100:
    print(x)
多行字符串
s = ("longlongstringiii"
    "iiiiiiiii"
    "iiiiiii")
in表达式
if 'string'.find('ring') > 0:
    print ('find')

# Pythonic
if 'ring' in 'string':
    print ('find')

for r in ['ring', 'ring1', 'ring2']:
    if r == 'ring':
        print ('find')

# Pythonic
if 'ring' in ['ring', 'ring1', 'ring2']:
    print('find')
字符串连接
array = ['a', 'b', 'c', 'd', 'e']
s = array[0]
for char in array[1:]:
    s += ',' + char

# Pythonic
s = ','.join(array)
列表合并字典
keys = ['a', 'b', 'c']
values = [1, 2, 3]

d = {}
for key, value in zip(keys, values):
    d[key] = value

# Better
d = dict(zip(keys, values))

# Pythonic
d = {key: value for key, value in zip(keys, values)}
all和any
flag = True
for cond in conditions:
    if cond is False:
        flag = False
        break
# Pythonic
flag = all(conditions)

flag = False
for cond in conditions:
    if cond is True:
        flag = True
        break
# Pythonic
flag = any(conditions)
or
not_null_string = '' or 'string1' or 'string2'
# string1
方法提取
for item in ['b', 'c']:
    array.append(item)
# Faster
append = array.append
for item in ['b', 'c']:
    append(item)
单例模式
from [module] import [single_instance]用<>代替!=
In [1]: from __future__ import barry_as_FLUFL

In [2]: 1 == 1
Out[2]: True

In [3]: 1 != 1
  File "<ipython-input-3-1ec724d2c3b1>", line 1
    1 != 1
       ^
SyntaxError: invalid syntax


In [4]: 1 <> 1
Out[4]: False
格式化一个json文件
python -m json.tool test.json
echo '{"json":"obj"}' | python -m json.tool # 管道
开启本地目录的HTTP服务器
python3 -m http.server 8080def append_to(element, to=[]):
to.append(element)
return to
my_list = append_to(12)
print(my_list)
my_other_list = append_to(42)
print(my_other_list)
# [12]
# [12, 42]def create_multipliers():
return [lambda x : i * x for i in range(5)]
for multiplier in create_multipliers():
print multiplier(2)
# 8
# 8
# 8
# 8
# 8在下面这个例子中, 两个值相等的整形变量在两次比较地址时出现了不一样的情况,原因时因为Python会把频繁使用的小整数放在内存池中,因此在Python中使用范围在[-5,256]的数字时都会得到相同的内存地址。
a = 256
b = 256
id(a) == id(b)
# True
a = 257
b = 257
id(a) == id(b)
# False受制于GIL(Global Interpreter Lock,全局解释锁)的存在,Python进程中的多线程无法利用多核的计算资源,同一时间内只有一个线程可以持有全局解释锁,执行代码指令。
根据Python虚拟机中的执行机制,每当线程执行若干条虚拟指令后,时间片就会调度给另一个线程。这个间隔时间可以用sys模块的getswitchinterval函数看到:
sys.getswitchinterval()
# 0.005
以上输出表明,每隔0.005秒,这种调度便会发生一次。
所以可以看到,由于这种机制的存在,下面这两段代码在相同环境下,很可能是带线程的版本执行时间更长:
def count(n):
    while n > 0:
        n -= 1

count(100000000)
count(100000000)

t1 = Thread(target=count,args=(100000000,))
t1.start()
t2 = Thread(target=count,args=(100000000,))
t2.start()
t1.join();
t2.join()
在Python中多线程更适用于IO密集型的任务,比如网络任务,异步请求等,如果需要获得并行的能力,应该使用多进程模块。
在一个Python进程当中,可以有多个解释器的存在,一个解释器中保存了指向其他解释器的指针,以及一个指向线程状态表的指针,每当创建一个线程,就会往状态表中添加一条记录,线程状态(tstate)对应了真实的线程,还包含了其对应的栈帧信息。
在Python的实现里广泛使用了内存池技术来提高性能,一些相同且无特殊意义的对象也常被池化,减少了对象数量以及内存占用。
举其中一个例子,有A,B,C三个类,其中只有C定义了文档字符串,这时候用A.__doc__ is B.__doc__就能发现,它们使用的内存地址是一样的,说明类的__doc__属性默认都被池化了,而再执行A.__doc__ is C.__doc__就会看到结果是False,说明只有定义了doc-string的时候,__doc__属性才会被分配新的内存。
class A: pass

class B: pass

class C:
    '''doc-string'''
	pass

A is B
# False
A.__doc__ is B.__doc__
# True
A.__doc__ is C.__doc__
# False
对于简单字符串,Python会将其放进内存池中,当字符串的引用变为0时,再把它的内存释放。
a = 'HelloWorld'
b = 'HelloWorld'
a is b
# True但再看下面这个例子,在字符串中间插入一个空格后,虽然a和b还是相同的值,但是内存地址却是不一样的:
a = 'Hello World'
b = 'Hello World'
a is b
# False
a = ' '
b = ' '
a is b
# True
这是因为Python认为的简单字符串一般只包含字母或数字,因此对于这种带有额外字符的字符串,Python是不会将其池化的。
a = '汉字'
b = '汉字'
a is b
# False
在Python 3.x中,可以用sys模块的intern方法来给程序运行期间动态生成的字符串池化。
import sys
a = '汉字'
b = '汉字'
a = sys.intern(a)
b = sys.intern(b)
a is b
# True利用sys模块的settrace函数可以注册线程的跟踪函数,跟踪函数应具有三个参数:frame,event 和arg。
- frame:当前的堆栈帧。
- event:一个代表跟踪事件字符串,其值为'call'、 'line'、 'return'、 'exception'、 'c_call'、 'c_return'或'c_exception'。
- arg:在event不同的时候有不一样的含义。
在下面这个例子中,给全局设置了一个跟踪函数,当程序发生调用事件(例如一个函数调用了另一个函数)时,Python便会回调跟踪函数,把函数的栈帧,事件类型以及时间类型的参数传入钩子函数中。
class TreeStdout:
    """把标准输出显示出函数调用层级的关系
    """
    def __init__(self, fill_symbol="\t"):
        self.stack = []
        self.old_write = sys.stdout.write
        self.symbol = fill_symbol

    def _get_stdout_writer(self, depth):
        def _writer(data):
            if data != "\n":
                self.old_write(self.symbol * depth + data)
            else:
                self.old_write(data)
        return _writer

    def _trace_calls(self, frame, event, arg):
        if event == 'return':
            self.stack.pop()
        if event != 'call':
            return
        co = frame.f_code
        func_name = co.co_name
        if func_name == 'write':
            return
        caller = frame.f_back
        if caller is None:
            return
        caller_name = caller.f_code.co_name
        self.stack.append(caller_name)

        depth = len(self.stack) - 1
        sys.stdout.write = self._get_stdout_writer(depth)
        return self._trace_calls

    def __enter__(self):
        sys.settrace(self._trace_calls)

    def __exit__(self, exc_type, exc_val, exc_tb):
        self.stack.clear()
        sys.stdout.write = self.old_write
        sys.settrace(None)

def f():
    print('inside f()')

def d():
    print('inside d()')

def e():
    print('inside e()')
    f()

def c():
    print('inside c()')
    d()
    e()
    e()

def b():
    print('inside b()')

def a():
    print('inside a()')
    b()
    c()

with TreeStdout():
    a()

# inside a()
#         inside b()
#         inside c()
#                 inside d()
#                 inside e()
#                         inside f()
#                 inside e()
#                         inside f()
欢迎学习讨论和交流,如果觉得本文对你有帮助,欢迎点个star,谢谢。

