- Set up homework from the bot
- I realised that this is not as effective when put in a group.
- You may want to improve this by putting this into interactive buttons and calendars, increase ML settings in dialogflow or ignore the intent
- Check homework on a particular date whether there is homework
- If so, state the homework and the time to hand up
- Send Reminder from the bot to class group at 12 midnight. (Only for telegram. After 3 tireless day of searching for that dialogflow function, I gave up. Maybe it is up there?)
This interface can be used on many other chat platforms and improve on.
Areas of improvement:
- Interactive responses
- Currently, they are just words. Cards, pictures, voice recognition, ML and even more can be used on this! We can use them from "dialogflow-fulfilment" module
- More on here or here
- More functionality
- Currently, we use Google Calendar as Cloud Storage instead of Bucket(teehee!) May need to change for more flexibility
- What if prof last min changes the deadline? How would we change from the bot interface? We can use interactive tools if the bot admin(not just me!) knows how to put them in
- What if there are 10 and more homework deadlines in the day? How can we improve on the UI/UX?
- node.js 8
- Google Cloud Functions (Advised to use free subscription with your fake account. Will only last for 1 year. Tips on Cloud Programming 101.haha)
- Dialogflow
- Google Calendar APIs
- Google Scheduler
Just in case, install git, and then git clone https://github.com/huixiang01/homework_bot.git in your command prompt
Telegram
- Get Bot token from Bot Father
- Save the Bot token somewhere for the last step. Don't just copy. There will be quite a lot of copying here.
Google Cloud
-
Sign up for Google Cloud
-
Go to Console
-
In the Cloud Console, on the project selector page, select or create a Google Cloud project.
-
Make sure that billing is enabled for your Google Cloud project. Learn how to confirm billing is enabled for your project. Don't worry if you have put your credit card number. They will not bite if you have exceed the 1 year subscription
-
Enable the Cloud Functions API.
-
Enable the Cloud Calendar API.
Service Account
-
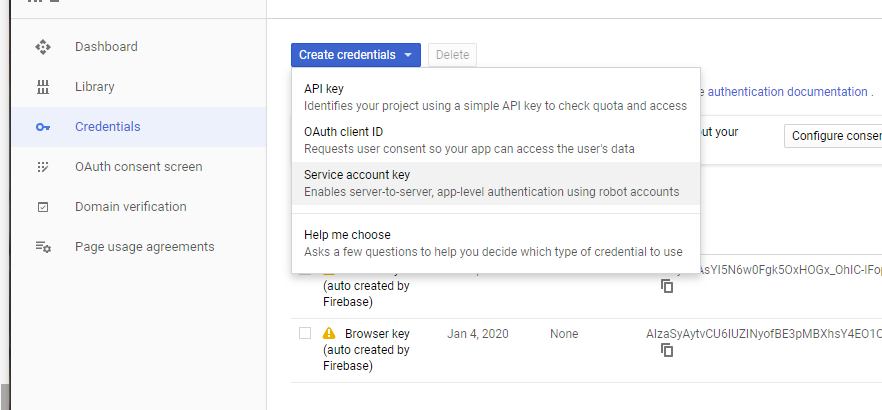
Go to API & Services from your console and click on Credentials at the left toolbar
-
Create Service Account Key through Create Credentials dropdown bar!
-
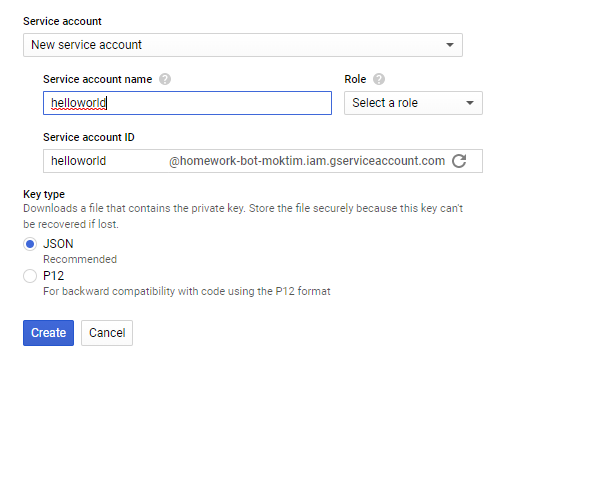
Under Service Account, choose "New service account" and name your service account name
-
Choose JSON
-
Create without role
-
Save your downloaded json in the same folder for the sake of organisation
-
Copy service account key into bot.js
Google Calander
-
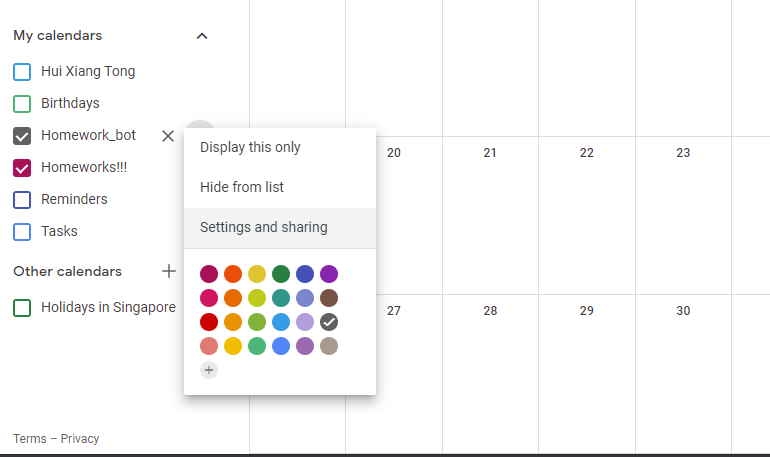
Go to Google Calendar and create new Calendar
-
Go to the new Calendar's Settings
-
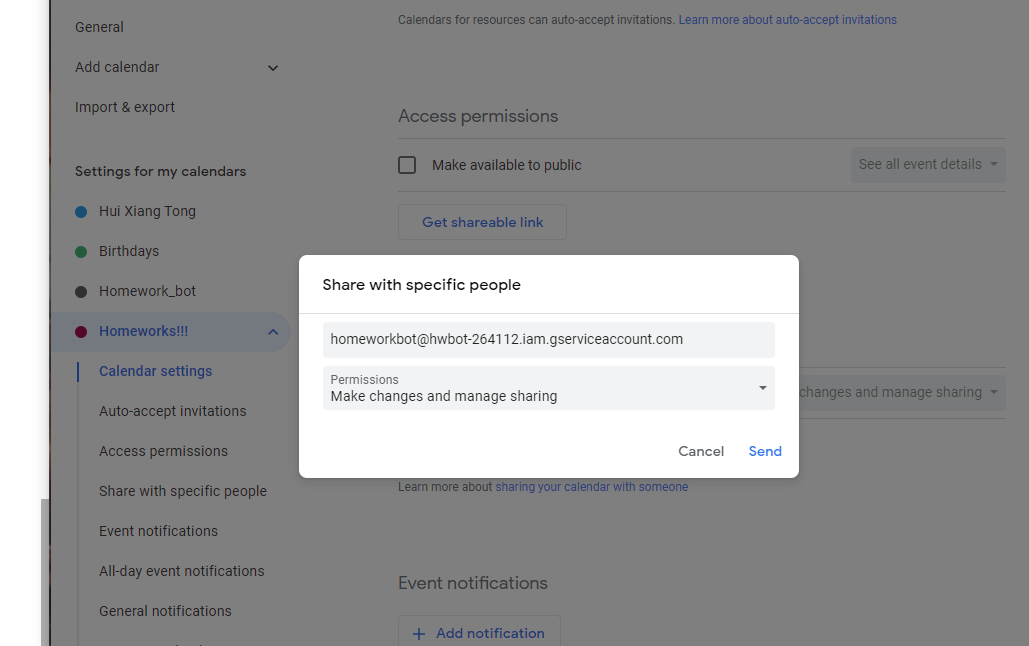
Invite your bot into the calendar using the client email from the downloaded json file and set permission to make changes and manage sharing
-
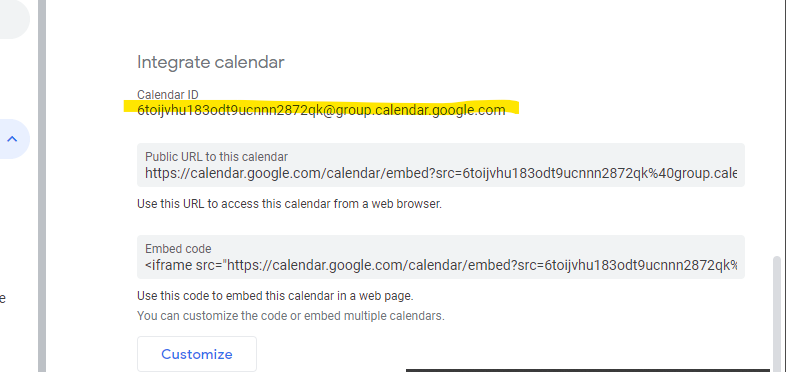
Scroll down and copy the calendar id into bot.js
-
-
Open the Functions Overview page in the Cloud Console:
GO TO THE CLOUD FUNCTIONS OVERVIEW PAGE
Make sure that the project for which you enabled Cloud Functions is selected.
-
Click Create function.
-
Name your function.
-
In the Trigger field, select HTTP Trigger.
-
In the Source code field, select Inline editor. In this exercise, you will use the default function provided in the editor. The function logs a message that you provide in a later step.
-
Use the Runtime dropdown to select a runtime.
- Choose node.js 8
-
Copy and paste bot.js and package.json accordingly from the file that you have git clone earlier
-
Type 'receiveRequest' in Function to execute, changing from 'hello_World'
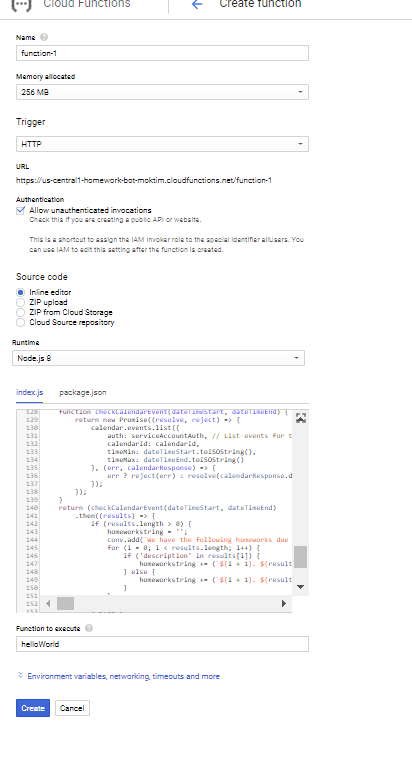
When you finish these steps, your display should resemble something like the following:
Ops!, I forgot to change the function to execute
-
At the bottom of the page, click Create.
-
After clicking Create, Cloud Console redirects to the Cloud Functions Overview page.
- While the function is being deployed, the icon next to it is a small spinner. After it finishes deploying, the spinner turns to a green check mark. You will get something like the following:
-
Click on the function, go to the trigger tab and copy and save the url somewhere. We will use it to integrate with Dialogflow. In case you don't know, this is a webhook connecting functions and Dialogflow.
---
-
Once you have gotten the token, go to console.dialogflow.com to create the contents of your bot
-
Create your bot agent
-
Refer to https://chatbotslife.com/dialogflow-restaurant-bot-tutorial-1-45ce1d3c0ab5
-
Do until step 2
-
-
Import the zip file in the folder
- The file we are importing is homework_bot.zip
- This contains the content of the bot. You can customise and start over again... but this takes too much time. haha
-
Integrate with telegram and functions
-
Click Intents in the navigation menu of Dialogflow at the left.
-
Click on homework-setup intent
-
Specify reprompt phrases to speak back to users.
Do this with fulfillment at the bottom of the page:
-
Repeat step 2 and 4 but with homework-check intent
-
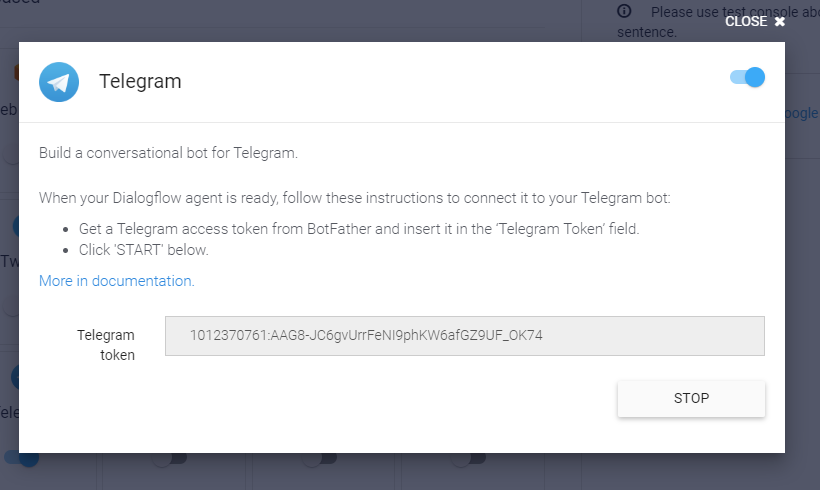
In the Dialogflow console's navigation menu, click Integration, toggle the Telegram button to ENABLED. Copy the token into the space given.
For your information, you can integrate with other chat application in this page. You will just need to find how to integrate them. Here, we will use telegram as an example.
-
Leave your tab for dialogflow open as we will be coming back here later
-
In the Dialogflow console's navigation menu, click Fulfillment, toggle the Webhook button to ENABLED , and we will to replace the url in the URL field with your Function URL. Copy the url
-
Make sure you save it at the bottom.
-
-
Create a new service token. Refer to the top on how to create a new one. Copy the new service token into reminder-server.js.
-
To find out about your chatid, test the followin url: https://api.telegram.org/bot{token}/getUpdates, replacing token with your bot token. In the chat log, put your bot where you want to be( i.e. in a telegram group, channel, etc.) Type the message for the bot In the JSON file, you will see a "chatId" parameter. Enter the chatId into reminder-server.js.
-
Create a new function in google function, and copy both reminder-server.js and package.json into the function, with all same settings as above.
Okay!. You are good to go! Finally! Enjoy Boot-ing!

