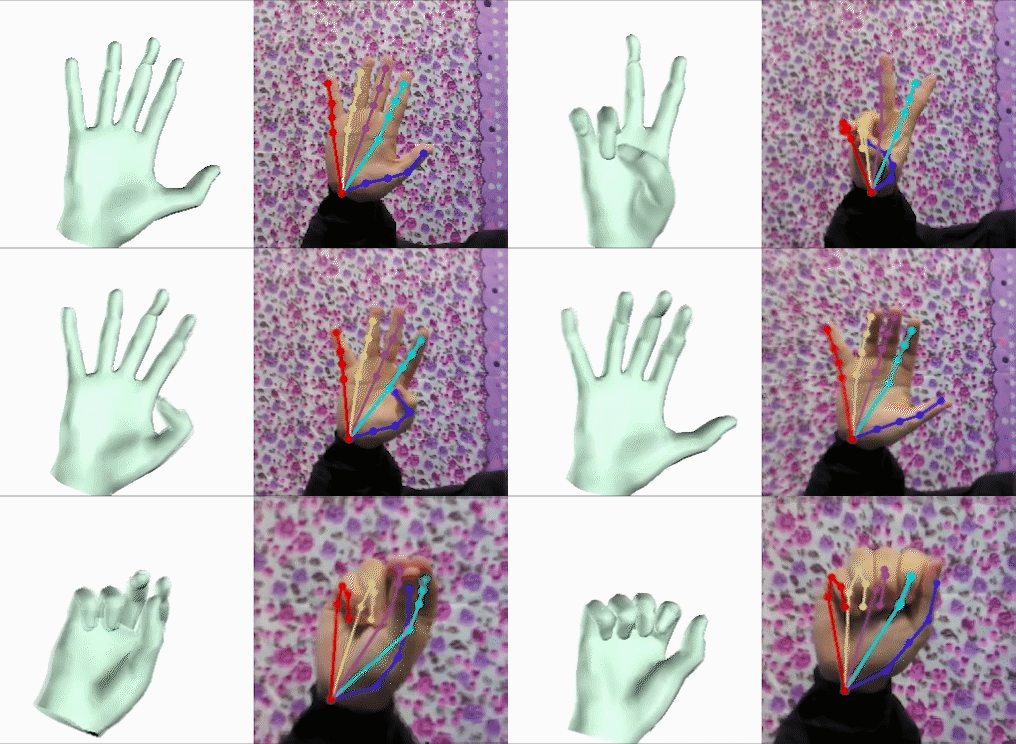
This repo contains model, demo, training codes for our paper: "BiHand: Recovering Hand Mesh with Multi-stage Bisected Hourglass Networks"(PDF) (BMVC2020)
git clone --recursive https://github.com/lixiny/bihand.git
cd bihand
Install the dependencies listed in environment.yml through conda:
- We recommend to firstly install Pytorch with cuda enabled.
- Create a new conda environment:
conda env create -f environment.yml - Or in an existing conda environment:
conda env update -f environment.yml
The above operation works well if you are lucky. However, we found that installing opendr is tricky. We solved the errors by:
sudo apt-get install libglu1-mesa-dev freeglut3-dev mesa-common-dev
sudo apt-get install libosmesa6-dev
## then reinstall opendr again
pip install opendr
-
Create a data directory:
data -
Download RHD dataset at the dataset page and extract it in
data/RHD. -
Download STB dataset at the dataset page and extract it in
data/STB -
Download
STB_suppdataset at Google Drive or Baidu Pan(v858) and merge it intodata/STB. (In STB, We generated aligned and segmented hand depthmap from the original depth image)
Now your data folder structure should like this:
data/
    RHD/
        RHD_published_v2/
            evaluation/
            training/
            view_sample.py
            ...

    STB/
        images/
            B1Counting/
                SK_color_0.png
                SK_depth_0.png
                SK_depth_seg_0.png  <-- merged from STB_supp
                ...
            ...
        labels/
            B1Counting_BB.mat
            ...
- Go to MANO website
- Create an account by clicking Sign Up and provide your information
- Download Models and Code (the downloaded file should have the format
mano_v*_*.zip). Note that all code and data from this download falls under the MANO license. - unzip and copy the
modelsfolder into themanopth/manofolder
Now Your manopth folder structure should look like this:
manopth/
  mano/
    models/
      MANO_LEFT.pkl
      MANO_RIGHT.pkl
      ...
  manopth/
    __init__.py
    ...
- Download BiHand weights
checkpoints.tar.gzfrom Google Drive | Baidu Pan(w7pq), unzip it. - Put the files in
checkpointsfolder into currentreleased_checkpointsdirctory (ln -sormkdir)
Now your bihand folder should look like this:
BiHand-test/
    bihand/
    released_checkpoints/
        ├── ckp_seednet_all.pth.tar
        ├── ckp_siknet_synth.pth.tar
        ├── rhd/
        │   ├── ckp_liftnet_rhd.pth.tar
        │   └── ckp_siknet_rhd.pth.tar
        └── stb/
            ├── ckp_liftnet_stb.pth.tar
            └── ckp_siknet_stb.pth.tar
    data/
    ...
- First, add this into current bash or
~/.bashrc:
export PYTHONPATH=/path/to/bihand:$PYTHONPATH
- to test on RHD dataset:
python run.py \
    --batch_size 8 --fine_tune rhd --checkpoint released_checkpoints --data_root data
- to test on STB dataset:
python run.py \
    --batch_size 8 --fine_tune stb --checkpoint released_checkpoints  --data_root data
- add
--visto visualize:
By adopting the multi-stage training scheme, we first train SeedNet for 100 epochs:
python training/train_seednet.py --net_modules seed --datasets stb rhd --ups_loss
and then exploit its outputs to train LiftNet for another 100 epochs:
python training/train_liftnet.py \
    --net_modules seed lift \
    --datasets stb rhd \
    --resume_seednet_pth ${path_to_your_SeedNet_checkpoints (xxx.pth.tar)} \
    --ups_loss \
    --train_batch 16
For SIKNet:
-
We firstly train SIKNet on SIK-1M dataset for <=100 epochs.
Download SIK-1M Dataset at Google Drive or Baidu Pan (
dc4g) and extract SIK-1M.zip todata/SIK-1M, then run:
python training/train_siknet_sik1m.py
- Then we fine-tune the SIKNet on the predicted 3D joints from the LiftNet. During train_siknet, the params of SeedNet and LiftNet are freezed.
python training/train_siknet.py \
    --fine_tune ${stb, rhd} \
    --frozen_seednet_pth ${path_to_your_SeedNet_checkpoints} \
    --frozen_liftnet_pth ${path_to_your_LiftNet_checkpoints} \
    --resume_siknet_pth ${path_to_your_SIKNet_SIK-1M_checkpoints}

# e.g.
python training/train_siknet.py \
    --fine_tune rhd \
    --frozen_seednet_pth released_checkpoints/ckp_seednet_all.pth.tar \
    --frozen_liftnet_pth released_checkpoints/rhd/ckp_liftnet_rhd.pth.tar \
    --resume_siknet_pth released_checkpoints/ckp_siknet_synth.pth.tar
Currently the released version of bihand requires camera intrinsics, root depth and bone length as inputs, thus cannot be applied in the wild.
If you find this work helpful, please consider citing us:
@inproceedings{yang2020bihand,
  title     = {BiHand: Recovering Hand Mesh with Multi-stage Bisected Hourglass Networks},
  author    = {Yang, Lixin and Li, Jiasen and Xu, Wenqiang and Diao, Yiqun and Lu, Cewu},
  booktitle = {BMVC},
  year      = {2020}
}
-
Code of Mano Pytorch Layer in
manopthwas adapted from manopth. -
Code for evaluating the hand PCK and AUC in
bihand/eval/zimeval.pywas adapted from hand3d. -
Code of data augmentation in
bihand/datasets/handataset.pywas adapted from obman. -
Code of STB datasets
bihand/datasets/stb.pywas adapted from hand-graph-cnn. -
Code of the original Hourglass Network
bihand/models/hourglass.pywas adapted from pytorch-pose. -
Thanks Yuxiao Zhou for helpful discussions and suggestions when solving IK problem.

