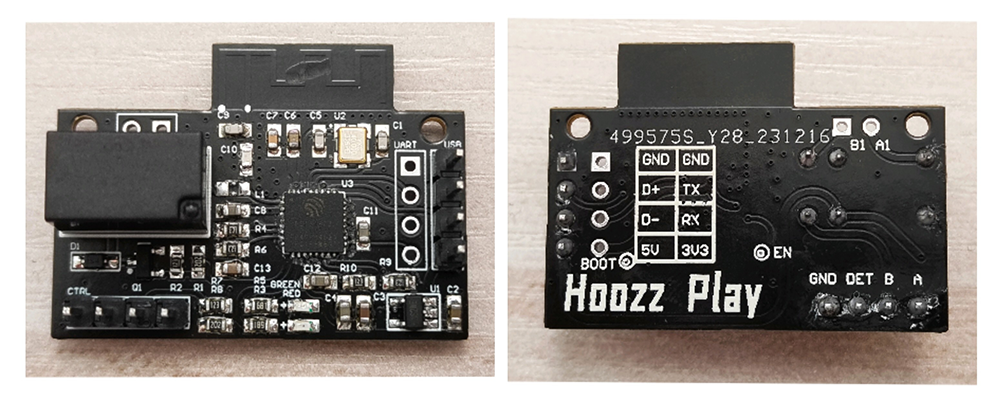
A remote switch implemented using the gitt library, used for remote booting of the computer host.
idf.py --version
ESP-IDF v4.4.6-227-g23e7fa801bgit clone https://github.com/huxiangjs/hoozz_play_esp32c3_remote_switch.git
cd hoozz_play_esp32c3_remote_switch
git submodule update --init --recursivecd MCU/
idf.py build && idf.py flash- GND: Connect to computer ground
- D+: Connect computer USB D+
- D-: Connect computer USB D-
- 5V: Connect to 5V, and ensure that this voltage can be maintained when the computer is turned off
- DET: Connect the test line to the computer. This line needs to have voltage when the computer starts and there is no voltage when the computer shuts down
- A: Connect to either end of the computer's power button
- B: Connect to the other end of the computer's power button
- If everything goes well, there will be an extra serial port on your computer. This serial port is the console of our ESP32C3. We can use
idf.py monitorcommand to connect. - The following demonstrates the configuration steps for first use:
At this point, you can start having fun :-)
  ________._________________________
 /  _____/|   \__    ___/\__    ___/
/   \  ___|   | |    |     |    |
\    \_\  \   | |    |     |    |
 \______  /___| |____|     |____|
        \/
GITT for ESP32-C3
MIT License * Copyright (c) 2023 Hoozz   <huxiangjs@foxmail.com>
Help:
  wifi                  - Modify wifi information and   reconnect
  heap                  - Show free heap space size
  privkey               - Update private key;    ESC:exit  Ctrl+S:save
  repository <URL>      - Update repository URL
  show                  - Show configuration information
  reset                 - Restart the system
  start                 - Start server
  stop                  - Stop server
  task                  - List task information
  help                  - Show help message

GITT# stop # Stop service

Server stoped

GITT# wifi # Connect to Wifi
SSID: <Your Wifi name>
PASSWORD: <Your Wifi password, If you don’t have a   password, you don’t need to fill it in.>
......
Connection succeeded

GITT# repository git@xxxx:xxxx/xxxx.git # Set repository URL
I (218225) app-spiffs: Open: /spiffs/repository
I (218235) app-spiffs: File written
Changed

GITT# privkey # Set private key

Input private key: <Paste your private key>
-----BEGIN OPENSSH PRIVATE KEY-----
......
-----END OPENSSH PRIVATE KEY-----
I (273625) app-spiffs: Open: /spiffs/privkey
I (273635) app-spiffs: File written

Saved

GITT# start # Start service
Server started, interval time: 5 second
Initialize...

GITT# Initialize result: Successful
HEAD: ...
Refs: refs/heads/main
Device name: ESP32C3 Remote Switch
Device id:   0000000000000001

GITT# show # View status
Running time  : 713295 ms
Detect state  : off
Device name   : ESP32C3 Remote Switch
Device id     : 0000000000000001
Loop interval : 5 second
Repository    : git@xxxx:xxxx/xxxx.git
Server state  : running
Private key   :
-----BEGIN OPENSSH PRIVATE KEY-----
......
-----END OPENSSH PRIVATE KEY-----
- The console does not support deletion operations. If you make an input error, please start again.
- Wifi only supports connection to the 2.4G frequency band.
- After testing, both GitHub and Gitee can be used. Currently, only the git protocol and private key access to the repository are supported, and repository creation and private key generation check this: Steps. Just read the first and second paragraphs of the Steps section.
- Download the latest release zip package from the Releases column
- Unzip the zip and you will see the following files:
$ tree . |-- bootloader | `-- bootloader.bin |-- esp32c3_remote_switch.bin |-- flash_args `-- partition_table `-- partition-table.bin 2 directories, 4 files - Open the latest official download tool
flash_download_tool(official download address: other-tools) - Use the following options: (1)
Chip Type [ESP32-C3]; (2)WorkMode [Develop]; (3)LoadMode [USB]; - According to the content of the
flash_argsfile, configure the burning file, address and flash type. Keep the default selection for places not mentioned, and finally click Start to burn
