- CONCEPT ANGULAR
- Create new project
- App Module
- Data Binding (Ràng buộc dữ liệu)
- Create new component
- String Interpolation (Nội suy chuoi)
- Property Binding
- Event Binding
- Two-way binding
- Directives
- Content Projection (ng-content)
- ng-template, ngTemplateOutlet and ng-container
- Pipes
- Sharing data parent to child and otherwise
- Lifecycle Hooks
- Services
- Dependency Injection (DI)
- Routing
- Pipes
- Observables
- Making HTTP request
- Lazy loading
- Standalone Component
- NgRx
- RxJS
- The different Between Subject vs BehaviorSubmit
-
Angular is JS Framework
-
To install new project about Angular, laptop need to
2things:- Node.js environment
- @angular/cli:
npm install -g @angular/cli
-
The steps create new project:
- S1:
ng new my-app - S2:
cd my-app=>npm start=> run web withhttp://localhost:4200
- S1:
-
How to switch install between
npmandyarn:ng config -g cli.packageManager yarn
import { NgModule } from '@angular/core'
import { FormsModule } from '@angular/forms'
import { BrowserModule } from '@angular/platform-browser'
import { AppRoutingModule } from './app-routing.module'
import { AppComponent } from './app.component'
import { BookItemComponent } from './features/book-item/book-item.component'
import { BooksComponent } from './features/books/books.component'
import { HeaderComponent } from './features/header/header.component'
import { MainComponent } from './features/main/main.component'
import { TestComponent } from './test/test.component'
import { HomeComponent } from './features/home/home.component'
import { AboutComponent } from './features/about/about.component'
import { ContactComponent } from './features/contact/contact.component'

@NgModule({
    declarations: [
        // declaration all component in my app
        AppComponent,
        BooksComponent,
        BookItemComponent,
        HeaderComponent,
        MainComponent,
        TestComponent,
        HomeComponent,
        AboutComponent,
        ContactComponent,
    ],
    imports: [BrowserModule, FormsModule, AppRoutingModule], // it allow you add some other modules
    providers: [],
    bootstrap: [AppComponent],
})
export class AppModule {}-
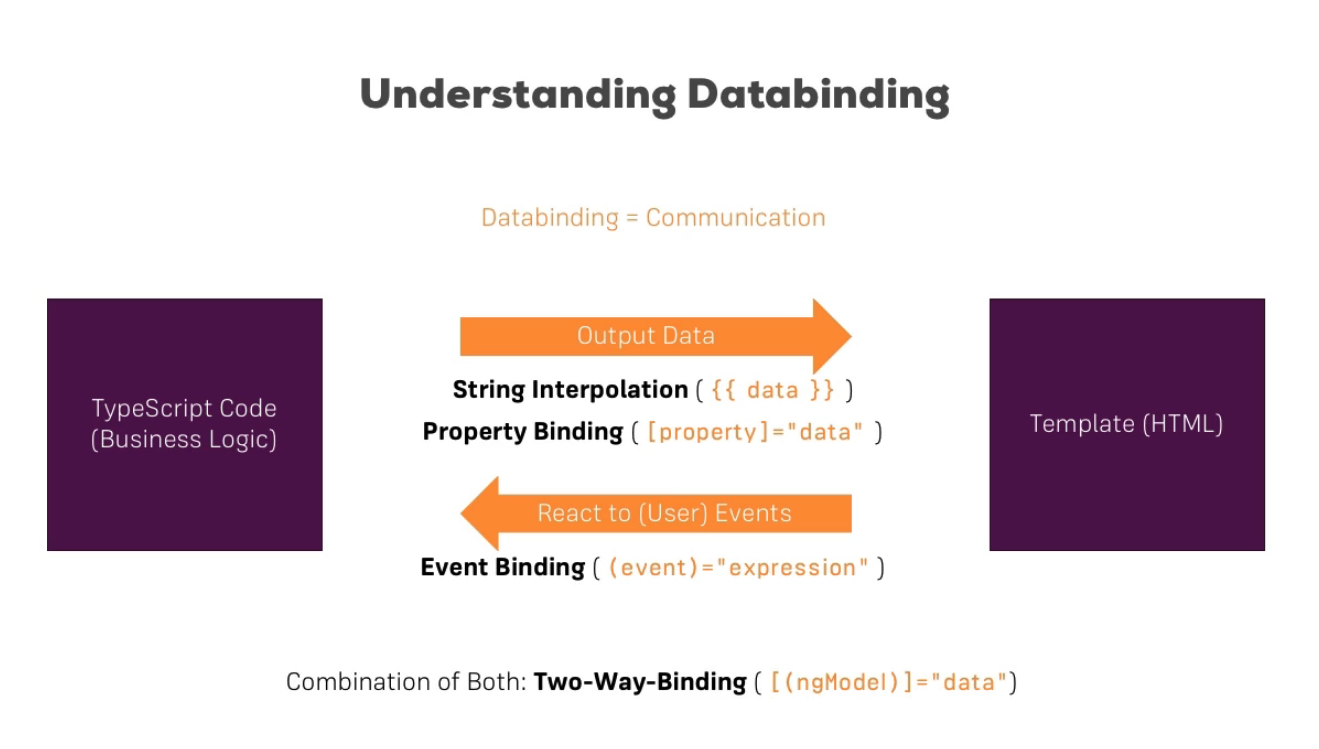
Data binding == Communication
-
Data binding is
communicationbetweenTypescript codeandTemplate HTML; when data inTypescript codechange,Template HTML(UI) also change by data inTypescript code. -
Data binding contains:
- String Interpolation
- Property Binding
- Event Binding
- Two-way Binding
-
A component contains
4:component file:<component-name>.component.tstemplate(html) file**:<component-name>.component.htmlcss file:<component-name>.component.csstesting specification file:<component-name>.component.spec.ts
-
only
app filehave module file:<component-name>.module.ts -
We can use
commandto generate a component:ng generate component name-fileorng g c name-file -
We can use generate to see command
generate:ng generate --help
Interfacemust be on top component, only afterall import
import { Component } from '@angular/core'

export interface Book {
    name: string
    author: string
}

@Component({
    selector: name-tag 'app',
    templateUrl: './app.component.html',
    stylesUrl: ['app.component.css'], // list url style

    template: '<h1>Hello world</h1>',
    styles: ['h1 { color: red }'],
})

export class AppComponent{
    bookList: Book[] = [
        {
            name: 'Clean Coding',
            author: 'Robert C Max',
        },
        {
            name: "I'm coding",
            author: 'Pham Huy Hoang',
        },
    ]
}<div class="books">
<ul class="book__list">
<li class="book__item">{{ name }}</li>
<li class="book__item">{{ name }}</li>
<li class="book__item">{{ name }}</li>
<li class="book__item">{{ name }}</li>
</ul>
</div>.book__list {
display: flex;
justify-content: center;
align-items: center;
}
.book__item {
color: #fff;
}- It use testing
a component
import { ComponentFixture, TestBed } from '@angular/core/testing'

import { HeaderComponent } from './header.component'

describe('HeaderComponent', () => {
    let component: HeaderComponent
    let fixture: ComponentFixture<HeaderComponent>

    beforeEach(async () => {
        await TestBed.configureTestingModule({
            declarations: [HeaderComponent],
        }).compileComponents()

        fixture = TestBed.createComponent(HeaderComponent)
        component = fixture.componentInstance
        fixture.detectChanges()
    })

    it('should create', () => {
        expect(component).toBeTruthy()
    })
})import { NgModule, BrowserModule } from '@angular/core'
@NgModule({
declarations: [AppComponent], // declare a list component, lets Angular know to associate this new component with this feature module.
imports: [BrowserModule],
bootstrap: [AppComponent], // this is important, it use to show UI to web browser
})
export class AppModule {}-
Interpolation refers to embedding expressions into marked up next.
-
Use
{{}}(curly brace) incomponent, Angular find this variable incomponent -
app.component.html
<p>I say {{ title }}, you too {{ sayHi() }}</p>- app.component.ts
import {Component} from '@angular/core'

@Component({
    selector: name-tag 'app',
    templateUrl: './app.component.html',
    stylesUrl: ['app.component.css'], // list url style

    template: '<h1>Hello world</h1>',
    styles: ['h1 { color: red }'],
})

export class AppComponent{
    title: string = 'Hello world'

    sayHi(): void{
        return this.title
    }
}-
Property Binding use to binding a property to element in view HTML.
-
Update value of property in view and binding it to a element.
-
[property-element]="name-variable" -
test.component.html
// it understand buttonDisabled is string, disabled is true
<button disabled="{{ buttonDisabled }}"></button>

// fixed use property binding
<button [disabled]="buttonDisabled"></button>- test.component.ts
import { Component } from '@angular/core'

@Component({
    templateUrl: 'component.html',
    selector: 'app-component',
})
export class Component {
    buttonDisabled = true
}
Tức là, nó sẽ giúp cho chúng ta thiết lập các
propertycho element trong view. Update 1 giá trị của 1propertytrong view và ràng buộc nó đến 1 element. Khi value thay đổi thìpropertycũng sẽ thay đổi dựa vào value đó và nó hiểu đó là giá trị gì (boolean, string, number,...)
-
Event Binding lets you listen and respond user actions event
such usclick, key event, mouse event, change, input,... -
<element (event)="fn(parameter1, parameter2,...)">text</element>, import function must be call now. -
app.component.html
<button (click)="handleClick()">Click</button>- app.component.ts
import { Component } from '@angular/core'

@Component({
    templateUrl: 'component.html',
    selector: 'app-component',
})
export class Component {
    handleClick(): void {
        console.log('Hello world')
    }
}
Tức là, nó cho phép chúng ta tạo event như click, mouse event, key event, change, input,....
- Two-way binding lets components share data two-way binding.
- Use two-way binding to listen event and update value between parent and child component.
- This is combine
property bindingandevent binding.
<button [(click)]="handleClick()">Click</button>- Install directives:
ng generate directive file-name
# or
ng g d file-name
- NgClass: adds and removes a set of CSS classes.
<div [ngClass]="isSpecial ? 'special' : ''">This div is special</div>
<div [ngClass]="{special: isSpecial}">This div is special</div>- NgStyle: style for template
<div [ngStyle]="backgroundColor: odd % 2 === 0 ? 'red' : ''">...</div>- NgModel: two-way binding, use display and update property
- NgIf: it use check conditional in HTML
<div *ngIf="time; else noTime">Time: {{time}}</div>
<ng-template #noTime>No time.</ng-template>- NgTemplate: It collect all element HTML need to hide or show, render in HTML code
(Nó dùng để gom code HTML khi dùng nó để ẩn hoặc hiện trên website khi kết hợp với NgIf)
<div *ngIf="isTrue; then tmplWhenTrue else tmplWhenFalse"></div>
<ng-template #tmplWhenTrue>I show-up when isTrue is true. </ng-template>
<ng-template #tmplWhenFalse> I show-up when isTrue is false </ng-template>- NgContainer: it same
NgTemplate, but it doesn't render to HTML code, tag NgContainer hidden, make layout website can't break(Tức là, nó cũng giống như NgTemplate nhưng tag của nó ko render (ẩn đi) trên HTML, giúp cho layout web ko bị vỡ ra)
Welcome <ng-container *ngIf="title">to <i>the</i> {{title}} world.</ng-container>- NgFor: loop element in iterable (array)
<ul>
    <li *ngFor="let book of books; let i=index">{{ i }} {{ book.name }}</li>
    <!-- books in component file -->
</ul>- NgSwitch: use conditional
switch case
<div [ngSwitch]="isMetric">
    <div *ngSwitchCase="true">Degree Celsius</div>
    <div *ngSwitchCase="false">Fahrenheit</div>
    <div *ngSwitchDefault>Default</div>
</div>
ngForandngIfcan't together in a tag (kHÔNG THỂ ĐẶT CHUNG VỚI NHAU ĐC :(()
<div class="products">
    <div class="product" *ngFor="let product of products" *ngIf="product.id !== 1">
        ....
    </div>
    <!-- ERROR -->
    <div></div>
</div>import { Directive, ElementRef, OnInit } from '@angular/core'
@Directive({
selector: '[appHighlightText]',
})
export class HighlightTextDirective implements OnInit {
constructor(private elementRef: ElementRef) {}
ngOnInit(): void {
this.elementRef.nativeElement.style.color = 'red'
}
}
// `elementRef` use to referent element to style or more...html file
<h3 appHighlightTextDirective>Title....</h3>
<!-- text has color red -->When the component the same but difference about content in this component (Như ta dùng children trong React để chèn nội dung riêng biệt giữa các component giống nhau)
Style code selectors:
- Tag selector:
- CSS Class selector:
- Attribute selector:
- Combine multiple selectors:
product-list.html
<div class="product-list">
    <div *ngFor="let product of productList">
        <app-product-item [product]="product">
            <h3 class="product__title">{{ product.title }}</h3>
            <button class="btn-product-click">{{ product.contentBtn }}</button>
        </app-product-item>
    </div>
</div>
product-list.component.ts
import { Component, OnInit } from '@angular/core'

export interface Product {
    title: string
    description: string
    contentBtn: string
}

@Component({
    selector: 'app-product-list',
    templateUrl: './product-list.component.html',
    styleUrls: ['./product-list.component.scss'],
})
export class ProductListComponent implements OnInit {
    constructor() {}

    ngOnInit(): void {}

    productList: Product[] = [
        {
            title: 'Title 1',
            description:
                'Lorem Ipsum is simply dummy text of the printing and typesetting industry. Lorem Ipsum has been the industry standard dummy text ever since the 1500s',
            contentBtn: 'Click 1',
        },
        {
            title: 'Title 2',
            description:
                'Lorem Ipsum is simply dummy text of the printing and typesetting industry. Lorem Ipsum has been the industry standard dummy text ever since the 1500s',
            contentBtn: 'Click 2',
        },
        {
            title: 'Title 3',
            description:
                'Lorem Ipsum is simply dummy text of the printing and typesetting industry. Lorem Ipsum has been the industry standard dummy text ever since the 1500s',
            contentBtn: 'Click 3',
        },
        {
            title: 'Title 4',
            description:
                'Lorem Ipsum is simply dummy text of the printing and typesetting industry. Lorem Ipsum has been the industry standard dummy text ever since the 1500s',
            contentBtn: 'Click 4',
        },
        {
            title: 'Title 5',
            description:
                'Lorem Ipsum is simply dummy text of the printing and typesetting industry. Lorem Ipsum has been the industry standard dummy text ever since the 1500s',
            contentBtn: 'Click 5',
        },
    ]
}
product-item.html
<div class="product">
    <ng-content select=".product__title"></ng-content>
    <p class="product__desc">{{ product.description }}</p>
    <ng-content select=".btn-product-click"></ng-content>
</div>
product-item.component.ts
import { Component, Input, OnInit } from '@angular/core'
import { Product } from '../product-list/product-list.component'

@Component({
    selector: 'app-product-item',
    templateUrl: './product-item.component.html',
    styleUrls: ['./product-item.component.scss'],
})
export class ProductItemComponent implements OnInit {
    @Input() product: Product

    constructor() {}

    ngOnInit(): void {}
}It is a object can use directives such us: ngIf, ngFor, [ngSwitch] and custom directive,...
When you use *ngIf with conditional else, we can bind template reference by syntax ex: #noPG13 to render UI
<div *ngIf="user.age >= 13; else noPG13">We can see content</div>
<ng-template #noPG13>
    <div>You can not see content</div>
</ng-template>1. Use with Structure Directive in Angular, ex *ngIf 2. When use UI element in a component being loop its this component, but component too small to detached to own component
When we aren't use ng-template
<div class="card">
    <div class="card-header">
        You have selected
        <span class="badge badge-primary">{{ counter }}</span> items.
    </div>
    <div class="card-body">
        There are <span class="badge badge-primary">{{ counter }}</span> items was
        selected.
    </div>
    <div class="card-footer">
        You have selected
        <span class="badge badge-primary">{{ counter }}</span> items.
    </div>
</div>
When we use ng-template, ngTemplateLayout
<div class="card">
    <div class="card-header">
        You have selected
        <ng-container [ngTemplateOutlet]="counterTmpl"></ng-container>.
    </div>
    <div class="card-body">
        There are <ng-container [ngTemplateOutlet]="counterTmpl"></ng-container> was
        selected.
    </div>
    <div class="card-footer">
        You have selected
        <ng-container [ngTemplateOutlet]="counterTmpl"></ng-container>.
    </div>
</div>

<ng-template #counterTmpl>
    <span class="badge badge-primary">{{ counter }}</span> items
</ng-template>
When code use
ng-template:
- If only edit UI to
counter. Instead of edit3UI, now we only edit on this position isng-templateof counter.
3. Use ng-template to pass other component. Support override template available in component
-
ngTemplateOutlet use to render a template builded by
ng-templateto UI.- *ngTemplateOutlet='templateRef'
- [ngTemplateOutlet]='templateRef'
Ex: we can reuse button with content and icon for button difference.
button.component.html
<button class="btn btn-primary">Click here</button>

<button class="btn btn-danger">
    <i class="fa fa-remove"></i>
    Delete
</button>
app.component.html
<ng-template #buttonTmpl let-label="label" let-className="className" let-icon="icon">
    <button [ngClass]="['btn', className ? className : '']">
        <i *ngIf="icon" class="fa {{icon}}"></i>
        {{ label }}
    </button>
</ng-template>

<ng-container
    [ngTemplateOutlet]="buttonTmpl"
    [ngTemplateOutletContext]="{ label: 'Click here', className: 'btn-primary', icon: null }"
>
</ng-container>

<ng-container
    [ngTemplateOutlet]="buttonTmpl"
    [ngTemplateOutletContext]="{ label: 'Remove', className: 'btn-danger', icon: 'fa-remove' }"
>
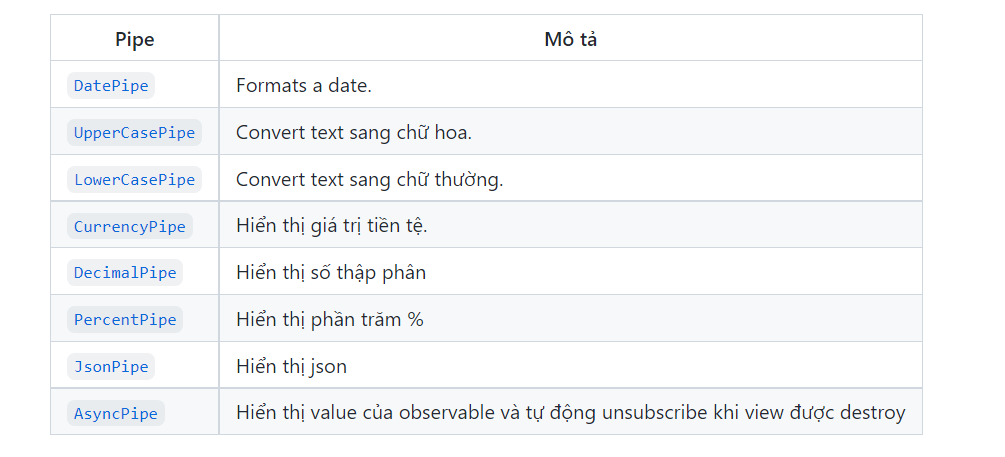
</ng-container>- Pipes use mutate output value, show to template HTML such us lowercase, titlecase, datetime, currency,...
#src / app / hero - birthday1.component.ts

import { Component } from '@angular/core'

@Component({
    selector: 'app-hero-birthday',
    template: `<p>The hero's birthday is {{ birthday | date }}</p>`, // format date
})
export class HeroBirthdayComponent {
    birthday = new Date(1988, 3, 15)
}- Parameters in Pipes: you can add parameter by use
:, ex:currency:'EUR'
<p>The hero's birthday is {{ birthday | date:"MM/dd/yy" }}</p>- String in Pipes: uppercase | lowercase | titlecase
<p>
    The chained hero's birthday is {{ birthday | date:'fullDate' | uppercase | lowercase |
    titlecase}}
</p>- Custom in Pipes:
#src / app / exponential - strength.pipe.ts

import { Pipe, PipeTransform } from '@angular/core'

@Pipe({ name: 'exponentialStrength' })
export class ExponentialStrengthPipe implements PipeTransform {
    transform(value: number, exponent?: number): number {
        return Math.pow(value, isNaN(exponent) ? 1 : exponent)
    }
}- .component.ts:
#src / app / power - booster.component.ts

import { Component } from '@angular/core'

@Component({
    selector: 'app-power-booster',
    template: `
        <h2>Power Booster</h2>
        <p>Super power boost: {{ 2 | exponentialStrength : 10 }}</p>
    `,
})
export class PowerBoosterComponent {}-
Parent to child: use
@Inputfrom@angular/core- Pass param book for book component
# books.component.html

<ul>
    <ng-container *ngFor="let book of books">
        <app-book [book]="book"></app-book>
    </ng-container>
</ul>
- Use get book from books
# book.component.ts

import { Component, EventEmitter, Input, OnInit, Output } from '@angular/core'
import { Book } from '../books/books.component'

@Component({
    selector: 'app-book-item',
    templateUrl: './book-item.component.html',
    styleUrls: ['./book-item.component.css'],
})
export class BookComponent implements OnInit {
    @Input() book: Book = {} as Book

    constructor() {}

    ngOnInit(): void {}

}- Child to parent: use
@Outputfrom@angular/core
# book.component.ts

import { Output, EventEmitter } from '@angular/core'
export class BookComponent {

    @Output() bookEmitter = new EventEmitter<Book>();

    addNewItem(book: Book) {
    this.bookEmitter.emit(book);
    }
}
# books.component.html
<ul>
<ng-container *ngFor="let book of books">
<app-book (bookEmitter)="addToCart($event)" [book]="book"></app-book>
</ng-container>
</ul># books.component.ts
import { Output, EventEmitter } from '@angular/core'
export class BookComponent {
@Output() bookEmitter = new EventEmitter<Book>();
newBookList: Book[] = []
addNewItem(book: Book) {
newBookList.push(book)
}
}export class Foo implements OnInit {
constructor(private logger: LoggerService) {}
// implement OnInit's `ngOnInit` method
ngOnInit() {
this.logIt(`OnInit`)
}
logIt(msg: string) {
this.logger.log(`#${nextId++} ${msg}`)
}
}-
Means:
- OnInit: it is a interface
- ngOnInit: it is a hook
-
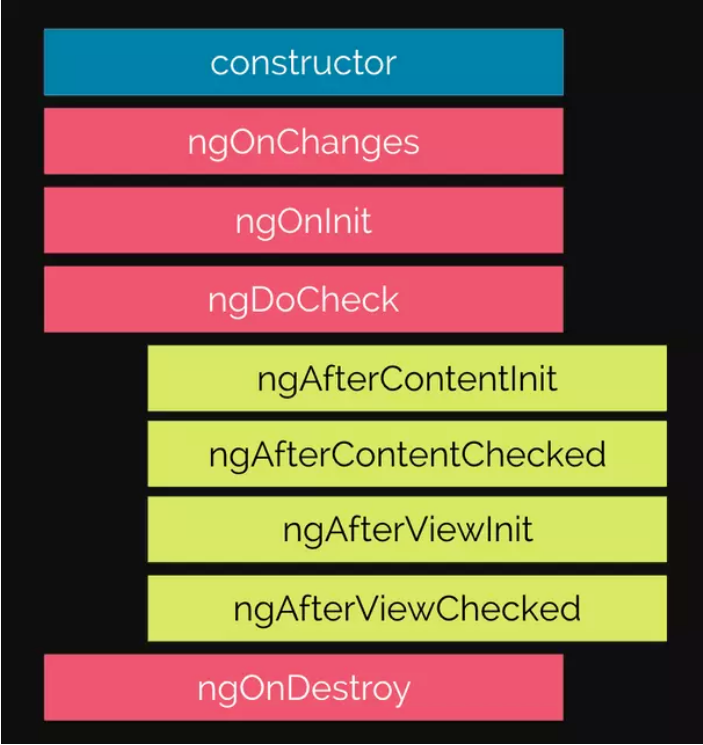
The lifecycle hooks:
- The lifecycle basic:
constructor->ngOnInit->ngOnDestroy
export class Foo implements OnInit, OnDestroy {
    constructor(private logger: LoggerService) {}

    timer: any = null
    ngOnInit() {
        this.timer = setInterval(() => console.log('Hello world'), 1000)
    }

    ngOnDestroy() {
        clearInterval(this.timer)
    }
}- Create file services:
ng g s file-nameorng generate service file-name
-
Services: is the functions code that you can reuse for many difference component. You can use it for purpose:
- The independence mission of component such us log, call api,...
- Shared code logic for many difference components to use together.
- Help your code cleaner and don't repeat your code logic in the many place difference component.
common.service.ts
import { Injectable } from '@angular/core'

@Injectable({
    providedIn: 'root',
})
export class CommonService {
    constructor() {}
}
app.component.ts
// you can import services in a another component
import { Component } from '@angular/core'
import { CommonService } from './services/common.service'

@Component({
    selector: 'app-root',
    templateUrl: './app.component.html',
    styleUrls: ['app.component.css'],
    providers: [CommonService], // this is important, if not have, it isn't working
})
export class AppComponent {
    constructor(private commonService: CommonService) {}

    handleClick(): void {
        this.commonService.sayHi('Hello world')
    }
}
Providers help you how create service.
- Install package:
npm install @angular/router - Generate file router:
app-routing.module.ts
import { NgModule } from '@angular/core'
import { RouterModule, Routes } from '@angular/router'
import { AboutComponent } from './features/about/about.component'
import { BooksComponent } from './features/books/books.component'
import { ContactComponent } from './features/contact/contact.component'
import { HomeComponent } from './features/home/home.component'

const routes: Routes = [
    {
        path: '',
        component: HomeComponent,
    },
    {
        path: 'about',
        component: AboutComponent,
    },
    {
        path: 'books',
        component: BooksComponent,
    },
    {
        path: 'contact',
        component: ContactComponent,
    },
]

@NgModule({
    imports: [RouterModule.forRoot(routes)],
    exports: [RouterModule],
})
export class AppRoutingModule {}-
Add class AppRoutingModule to file
app.module.tsimports list -
File app.component.html only use:
<router-outlet></router-outlet>to direct by router -
Setup navigate by tag :
<nav>
    <ul>
        <li>
            <a
                routerLink="/first-component"
                routerLinkActive="active"
                ariaCurrentWhenActive="page"
                >First Component</a
            >
        </li>
        <li>
            <a
                routerLink="/second-component"
                routerLinkActive="active" // class .active you style it
                ariaCurrentWhenActive="page"
                >Second Component</a
            >
        </li>
    </ul>
</nav>const routes: Routes = [
{
path: '',
component: HomeComponent,
},
{
path: 'recipes',
component: RecipesComponent,
},
{
path: 'shoppings',
component: ShoppingListComponent,
},
{
path: 'shoppings/:id', // pass parameter :id
component: ShoppingItemComponent,
},
{
path: 'accounts',
component: AccountListComponent,
},
]
@NgModule({
imports: [RouterModule.forRoot(routes)],
exports: [RouterModule],
})
export class AppRoutingModule {}- You can inject
ActivatedRouteto component to use. - Should use
snapshotfor first initialization component.
import { Component, OnInit } from '@angular/core'
import { ActivatedRoute } from '@angular/router'

@Component({
    selector: 'app-shopping-item',
    templateUrl: './shopping-item.component.html',
    styleUrls: ['./shopping-item.component.css'],
})
export class ShoppingItemComponent implements OnInit {
    id: number
    constructor(private route: ActivatedRoute) {}

    ngOnInit(): void {
        console.log(this.route) // this is a object

        // get parameter id from URL
        this.id = Number.parseInt(this.route.snapshot.params['id'])
    }
}
But when we change
paramby another:id, Angular isn't auto change data whenparamchange. Because we have already this component, Angular don't know, don't recreate and destroy the old component althoughparamof this component change You can useparamsofActivatedRouteto update data whenparamof this component change
Important Route Observables You can use
onDestroytounsubscribe()for update data byparam
export class ShoppingItemComponent implements OnInit, OnDestroy {
    id: number
    paramSubscription: Subscription

    constructor(private route: ActivatedRoute) {}

    ngOnInit(): void {
        this.id = Number.parseInt(this.route.snapshot.params['id'])
        this.paramSubscription = this.route.params.subscribe((param: Params) => {
            this.id = Number.parseInt(param['id'])
        })
    }

    ngOnDestroy(): void {
        this.paramSubscription.unsubscribe()
    }
}- HTML File: use
queryParamsto pass param,fragment
<a
    class="text-white"
    href=""
    [routerLink]="['/shoppings', 2, 'edit']"
    [queryParams]="{page: '1'}"
    fragment="loading"
    >Query Params</a
>- Navigate:
handleNav2Click(): void {
    this.router.navigate(['/shoppings', 2, 'edit'], {
        relativeTo: this.route,
        queryParams: { page: '1', limit: '10' },
        fragment: 'loading',
    })
}- Retrieving Query params and Fragment (
Truy xuất query params and fragment)
// get this.route from ActivatedRoute
this.route.snapshot.queryParams
this.route.snapshot.fragment- You can use
nested routeslike this:
import { NgModule } from '@angular/core'
import { RouterModule, Routes } from '@angular/router'
import { AccountDetailComponent } from './components/account-detail/account-detail.component'
import { AccountListComponent } from './components/account-list/account-list.component'
import { NotFoundComponent } from './components/not-found/not-found.component'
import { RecipesComponent } from './components/recipes/recipes.component'
import { ServerItemComponent } from './components/servers/server-item/server-item.component'
import { ServersComponent } from './components/servers/servers.component'
import { ShoppingItemComponent } from './components/shopping-list/shopping-item/shopping-item.component'
import { ShoppingListComponent } from './components/shopping-list/shopping-list.component'
import { HomeComponent } from './features/home/home.component'

const routes: Routes = [
    {
        path: '',
        component: HomeComponent,
    },
    {
        path: 'recipes',
        component: RecipesComponent,
    },
    {
        path: 'shoppings',
        children: [
            {
                path: '',
                component: ShoppingListComponent,
            },
            {
                path: ':id',
                component: ShoppingItemComponent,
            },
            {
                path: ':id/edit',
                component: ShoppingItemComponent,
            },
        ],
    },
    {
        path: 'accounts',
        children: [
            {
                path: '',
                component: AccountListComponent,
            },
            {
                path: ':id',
                component: AccountDetailComponent,
            },
        ],
    },
    {
        path: 'servers',
        component: ServersComponent,
        children: [
            {
                path: ':name',
                component: ServerItemComponent,
            },
        ],
    },
    { path: '**', component: NotFoundComponent },
]

@NgModule({
    imports: [RouterModule.forRoot(routes)],
    exports: [RouterModule],
})
export class AppRoutingModule {}- It has
2distinctive when use nested bychildren:- Use
componentfor parent route - Not use
componentfor parent route
- Use
Use component for parent route: Use when pages the same route live in this component parent (Dùng khi ta muốn tất cả page redirect trong component cha)
{
    path: 'servers',
    component: ServersComponent,
    children: [
        {
            path: ':name',
            component: ServerItemComponent,
        },
    ],
},
Not use component for parent route: Use when the same route, we can redirect a lot route. (Dùng khi cùng 1 route ta có nhiều page khác nhau)
{
    path: 'accounts',
    children: [
        {
            path: '',
            component: AccountListComponent,
        },
        {
            path: ':id',
            component: AccountDetailComponent,
        },
    ],
},- Sometimes we interceptor user when user isn't login, and we want to user must be login before go to home page
- We use
CanActivateofrouter
import { Injectable } from '@angular/core'
import {
    ActivatedRouteSnapshot,
    CanActivate,
    Router,
    RouterStateSnapshot,
} from '@angular/router'
import { Observable } from 'rxjs'
import { LoginService } from './login.service'

@Injectable({
    providedIn: 'root',
})
export class AuthGuardService implements CanActivate {
    constructor(private loginService: LoginService, private router: Router) {}

    canActivate(
        route: ActivatedRouteSnapshot,
        state: RouterStateSnapshot
    ): Observable<boolean> | Promise<boolean> | boolean {
        return this.loginService.isAuthenticated().then((authenticated: any) => {
            if (authenticated) {
                return true
            } else {
                return this.router.navigate(['/login'])
            }
        })
    }
}- Return
truenavigated continue, otherwise cancelled.
You can read more CanActivate
Roadmap
- Concept
pipes - How to use
pipes - How custom
pipes
- Pipes is transform old data to new data
<p>{{time | date}}</p>-
Install pipes:
ng g p name-pipe -
Code it
import { Pipe, PipeTransform } from '@angular/core'

@Pipe({
    name: 'formatDate',
})
export class FormatDatePipe implements PipeTransform {
    transform(time: Date): string {
        const date = `0${new Date(time).getDate()}`.slice(-2)
        const month = `0${new Date(time).getMonth()}`.slice(-2)
        const year = new Date(time).getFullYear()

        return `${date}/${month}/${year}`
    }
}- Use it normal
<p>{{ time | formatDate }}</p>- Custom
Pipeswith a or multiples arguments
import { Pipe, PipeTransform } from '@angular/core'

@Pipe({
    name: 'truncate',
})
export class TruncatePipe implements PipeTransform {
    transform(text: string, maxWord: number, isUppercase: boolean = false) {
        const newText: string = `${text.split(' ').slice(0, maxWord).join(' ')}...`
        if (isUppercase) return newText.toUppercase()
        return newText
    }
}
HTML
<p>{{text | truncate: 5 : true}}</p>- Pipe with async:
You can read more AsyncPipe
component.ts
appStatus: Promise<string> = new Promise((resolve, reject) => {
    setTimeout(() => {
        resolve('status')
    }, 2000)
})
HTML
<h3>App status: {{ appStatus | async }}</h3>Roadmap:
- Concept of
ObservablesandObserver. - How code
Observableswithsubscribeandunsubscribe. - How custom
Observables: next, error, complete. - How use
pipewithoperator rxjsto transform data. Subjects.
-
Observables is as
Promise, it handle a lot of value async, it isstreams, to transform to data you want. It is aFunction (Class). (Tức là, nó giống như Promise, nhưng nó sẽ ko thực thi ngay lập tức như Promise, mà phải subscribe mới thực thi đc, nó có thể thực thi được nhiều dữ liệu và biến đổi dữ liệu, có thể hủy bỏ Observable, nó nhiều operators đc dùng còn Promise thì ko) -
Observer is rally a lot of callback to listen event values (
next, error, complete) to send byObservable. (Tức là, nó là tập hợp các callbacks cho việc lắng nghe giá trị như next, error, complete,...) -
Subscription is result after implementation a
Observable, use to destroy handle of Observable.
import {interval, Subscription} from 'rxjs'

export class HomeComponent implements OnInit, OnDestroy{
    firstObservable: Subscription
    constructor(){}

    onInit():void {}

    this.firstObservable = interval(1000).subscribe((count) => {
        console.log(count)
    })

    onDestroy(): void {
        this.firstObservable.unsubscribe()
    }
}import { Observable, Subscription } from 'rxjs'
export class HomeComponent implements OnInit {
firstObservable: Subscription
constructor() {}
ngOnInit(): void {
const customObservable = new Observable((observer) => {
let count = 0
setInterval(() => {
if (count > 5) {
observer.error(new Error('Count is greater than 5'))
}
if (count === 5) {
observer.complete()
}
observer.next(count)
count++
}, 1000)
})
this.firstObservable = customObservable.subscribe({
next: (count) => {
console.log(count)
},
error: (err) => {
console.log(err)
},
complete: (count) => {
console.log('Count equal 5 successfully')
},
})
}
ngOnDestroy(): void {
this.firstObservable.unsubscribe()
}
}- Pipes to transform data you want.
import { Observable, Subscription } from 'rxjs'
import { map } from 'rxjs/operators'

export class HomeComponent implements OnInit {
    firstObservable: Subscription
    constructor() {}

    ngOnInit(): void {
        const customObservable = new Observable((observer) => {
            let count = 0
            setInterval(() => {
                if (count > 5) {
                    observer.error(new Error('Count is greater than 5'))
                }
                if (count === 5) {
                    observer.complete()
                }
                observer.next(count)
                count++
            }, 1000)
        })

        this.firstObservable = customObservable
            .pipe(
                map((data) => {
                    return data + 1
                })
            )
            .subscribe({
                next: (count) => {
                    console.log(count)
                },
                error: (err) => {
                    console.log(err)
                },
                complete: (count) => {
                    console.log('Count equal 5 successfully')
                },
            })
    }

    ngOnDestroy(): void {
        this.firstObservable.unsubscribe()
    }
}- Subjects use to send data to a lot
Observers(multicasting) - Subjects can use
next()in outside, Observables can't usenext()in outside
- Interceptor: use to intercept a
requestor aresponseto change headers, changerequestorresponse
Create a services
import { HttpHandler, HttpInterceptor, HttpRequest } from '@angular/common/http'
import { Injectable } from '@angular/core'

@Injectable({
    providedIn: 'root',
})
export class AuthInterceptorService implements HttpInterceptor {
    intercept(req: HttpRequest<any>, next: HttpHandler) {
        return next.handle(req)
    }

    constructor() {}
}
Then, we provide modules
import { HTTP_INTERCEPTORS } from '@angular/common/http'

@NgModule({
    declarations: [AppComponent],
    imports: [BrowserModule],
    providers: [
        UserService,
        {
            provide: HTTP_INTERCEPTORS,
            useClass: AuthInterceptorService,
            multi: true, // use multi interceptor
        },
    ],
    bootstrap: [AppComponent],
})
export class AppModule {}- Change Request Interceptor: use to change
requestbefore send to server
import {
    HttpHandler,
    HttpHeaders,
    HttpInterceptor,
    HttpRequest,
} from '@angular/common/http'
import { Injectable } from '@angular/core'

@Injectable({
    providedIn: 'root',
})
export class AuthInterceptorService implements HttpInterceptor {
    intercept(req: HttpRequest<any>, next: HttpHandler) {
        // we can request headers before send to server

        // create new headers
        const headers = new HttpHeaders({
            'Content-Type': 'application/json',
            Auth: 'xyz',
        })

        // clone new request
        req = req.clone({
            headers,
        })
        return next.handle(req)
    }

    constructor() {}
}- Response Interceptors: we can change
responsebefore back to data for client. We can usepipeandrxjs/operators
import {
    HttpHandler,
    HttpHeaders,
    HttpInterceptor,
    HttpRequest,
    HttpEventType,
} from '@angular/common/http'
import { Injectable } from '@angular/core'
import { map } from 'rxjs/operators'

@Injectable({
    providedIn: 'root',
})
export class AuthInterceptorService implements HttpInterceptor {
    intercept(req: HttpRequest<any>, next: HttpHandler) {
        // we can request headers before send to server

        // create new headers
        const headers = new HttpHeaders({
            'Content-Type': 'application/json',
            Auth: 'xyz',
        })

        // clone new request
        req = req.clone({
            headers,
        })
        return next.handle(req).pipe(
            map((event) => {
                if (event.type === HttpEventType.Response) {
                    console.log(event.body)
                    // event return HttpResponse object includes: headers, body, ok, status, type, url
                }
            })
        )
    }

    constructor() {}
}
HttpEventType is enum
enum HttpEventType {
  Sent // 0
  UploadProgress // 1
  ResponseHeader // 2
  DownloadProgress // 3
  Response // 4
  User // 5
}- You can use
multi interceptor - You can provide
multi interceptor
providers: [
    {
        provide: HTTP_INTERCEPTORS,
        useClass: AuthInterceptorService,
        multi: true,
    },
    {
        provide: HTTP_INTERCEPTORS,
        useClass: LoginInterceptorService,
        multi: true,
    },
], // it run from top to down, AuthInterceptorService -> LoginInterceptorService- Lazy loading is use to delay all router and only running this router match patch router.
- Lazy loading help your website load data long time, help your website load faster.
app.module.ts: 🎫🎫 Notion: Let's remove the file use for child lazy loading
import { HttpClientModule, HTTP_INTERCEPTORS } from '@angular/common/http'
import { NgModule } from '@angular/core'
import { FormsModule, ReactiveFormsModule } from '@angular/forms'
import { BrowserModule } from '@angular/platform-browser'
import { RouterModule } from '@angular/router'
import { AppRoutingModule } from './app-routing.module'
import { AppComponent } from './app.component'

@NgModule({
    declarations: [AppComponent, HeaderComponent],
    imports: [
        BrowserModule,
        FormsModule,
        AppRoutingModule,
        ReactiveFormsModule,
        HttpClientModule,
        ProductsComponent,
        RouterModule,
    ],
    providers: [
        UserService,
        {
            provide: HTTP_INTERCEPTORS,
            useClass: AuthInterceptorService,
            multi: true,
        },
        {
            provide: HTTP_INTERCEPTORS,
            useClass: LoginInterceptorService,
            multi: true,
        },
    ],
    bootstrap: [AppComponent],
})
export class AppModule {}
app-routing.module.ts
import { NgModule } from '@angular/core'
import { RouterModule, Routes } from '@angular/router'
import { HomeComponent } from './features/home/home.component'
import { AuthGuardService } from './services/auth-guard.service'
import { NotFoundComponent } from './components/not-found/not-found.component'

const routes: Routes = [
    {
        path: '',
        canActivate: [AuthGuardService],
        component: HomeComponent,
    },
    {
        path: 'products',
        canActivate: [AuthGuardService],
        loadChildren: () =>
            import('./components/product-list/product-list.module').then(
                (mod) => mod.ProductListModule
            ),
    },
    { path: '**', component: NotFoundComponent },
]

@NgModule({
    imports: [RouterModule.forRoot(routes)],
    exports: [RouterModule],
})
export class AppRoutingModule {}- We can declare:
loadChildren: () => import('./path/file.module.ts...').then((mod) => mod.FileModule)file-module.module.ts: import all the file you use in routing
import { CommonModule } from '@angular/common'
import { HttpClientModule } from '@angular/common/http'
import { NgModule } from '@angular/core'
import { FormsModule, ReactiveFormsModule } from '@angular/forms'
import { BrowserModule } from '@angular/platform-browser'
import { RouterModule } from '@angular/router'
import { ProductAddComponent } from './product-add/product-add.component'
import { ProductEditComponent } from './product-edit/product-edit.component'
import { ProductFormComponent } from './product-form/product-form.component'
import { ProductItemComponent } from './product-item/product-item.component'
import { ProductListRoutingModule } from './product-list-routing.module'
import { ProductListComponent } from './product-list.component'

@NgModule({
    declarations: [
        ProductAddComponent, // it in routing
        ProductEditComponent,
        ProductItemComponent,
        ProductFormComponent,
        ProductListComponent,
    ],
    imports: [
        CommonModule,
        FormsModule,
        ReactiveFormsModule,
        HttpClientModule,
        ProductListRoutingModule,
    ],
})
export class ProductListModule {}file-routing.module.ts: You must use forChild instead of forRoot
import { NgModule } from '@angular/core'
import { RouterModule, Routes } from '@angular/router'
import { ProductDetailComponent } from './../product-detail/product-detail.component'
import { ProductAddComponent } from './product-add/product-add.component'
import { ProductEditComponent } from './product-edit/product-edit.component'
import { ProductListComponent } from './product-list.component'

const routes: Routes = [
    {
        path: '',
        component: ProductListComponent,
        pathMatch: 'full',
    },
    {
        path: 'add',
        component: ProductAddComponent,
        pathMatch: 'full',
    },
    {
        path: ':id/edit',
        component: ProductEditComponent,
        pathMatch: 'full',
    },
    {
        path: ':id',
        component: ProductDetailComponent,
        pathMatch: 'full',
    },
]

@NgModule({
    imports: [RouterModule.forChild(routes)], // 🎫🎫 notion
    exports: [RouterModule],
})
export class ProductListRoutingModule {}- Pre-Loading: is method, load
all lazy loadingthat you aren't need to click router to load this route PreloadAllModules
import { PreloadAllModules, RouterModule, Routes } from '@angular/router'
@NgModule({
    imports: [
        RouterModule.forRoot(routes, {
            preloadingStrategy: PreloadAllModules,
        }),
    ],
    exports: [RouterModule],
})- of: use to convert arguments to an
observablesequence, instead of usenew Observable. (Dùng để convert các argument thành 1 Observables, thay dùng new Observable thủ công)
of(...args: (SchedulerLike | T)[]): Observable
Each arguments becomes to next notification and 1 complete. (
Nó sẽ emit từng argument trong of, chứ không phải log toàn bộ argument trong of và sau khi tất cả argument emit thì nó sẽ complete)
import { of } from 'rxjs'

of(1, 2, 3).subscribe((data) => {
    console.log(data)
    // 1
    // 2
    // 3
})

// or

of(1, 2, 3).subscribe({
    next: (data) => {
        console.log(data)
    },
    error: (error) => {
        console.log(`Error: ${error}`)
    },
    complete: () => {
        console.log('end')
    },
})

// 1
// 2
// 3
// end- from: use to create
an Observablewith argument:Array,Promise,an Array-like object,an iterable object,Observable-like object. (Dùng để tạo 1 Observable khi cho argument: array, promise, array-like object, iterable object, observable-like object)
from(input: ObservableInput, scheduler?: SchedulerLike): Observable
Convert almost anything to an Observable and 1 complete. (
Convert mọi thứ thành 1 Observable và 1 complete)
array
import { from } from 'rxjs'

from([1, 2, 3]).subscribe({
    next: (data) => {
        console.log(data)
    },
    error: (error) => {
        console.log(error)
    },
    complete: () => {
        console.log('Complete')
    },
})
// 1
// 2
// 3
// Complete
Promise
import { from } from 'rxjs'

const promise$ = new Promise((resolve, reject) => {
    resolve('Hello')
})

from(promise$).subscribe({
    next: (data) => {
        console.log(data)
    },
    error: (error) => {
        console.log(error)
    },
    complete: () => {
        console.log('Complete')
    },
})
// Hello
// Complete- fromEvent: Create an Observable that emits events of a specific type coming from the given event target. It like subscribe
addEventListenerand unsubscriberemoveEventListener. (Dùng để tạo 1 Observable mà emit event của 1 loại cụ thể đến từ event target. Nó subscribe như addEventListener và unsubscribe như removeEventListener)
fromEvent(target: any, eventName: string, options?: EventListenerOptions | ((...args: any[]) => T), resultSelector?: (...args: any[]) => T): Observable
Creates an Observable from DOM events, or Node.js EventEmitter events or others. fromEvent(element, event)
const btnElement = document.querySelector('button#btn-click')

// subscribe
// btnElement error: because btnElement may be null
// we can fix like this:

const btnElement = document.querySelector('button#btn-click') as HTMLButtonElement
const subscription = fromEvent<MouseEvent>(btnElement, 'click').subscribe((e) => {
    console.log(e.x, e.y)
})

// unsubscribe after 5 seconds
setTimeout(() => {
    subscription.unsubscribe()
}, 5000)
Create a fromEvent
const btnElement = document.querySelector('button#btn-click') as HTMLButtonElement

let subscription
function fromEvent$(element: Element, eventType: string) {
    return new Observable<MouseEvent>((subscriber) => {
        const handleClick = (e: MouseEvent) => {
            subscriber.next(e)
        }

        // add event
        element.addEventListener<any>(eventType, handleClick)

        // remove event
        return element.removeEventListener<any>(eventType, handleClick)
    })
}

subscription = fromEvent$(btnElement, 'click').subscribe((e) => {
    console.log(e)
})

setTimeout(() => {
    console.log('unsubscribe')
    subscription.unsubscribe()
}, 5000)- timer: use create
Observablewill wait for a specificed time period and emit the number 0.
Note: We don't need to
unsubscribe, because after the Observable completes, the Subscription ends. So there is no need tounsubscribe.
import { timer } from 'rxjs'

timer(2000).subscribe({
    next: (data) => {
        console.log(data)
    },
    complete: () => {
        console.log('Complete')
    },
})
// after 2000ms return:
// 0
// Complete
Create a timer
const timer$ = (time: number) =>
    new Observable<number>((subscriber) => {
        setTimeout(() => {
            subscriber.next(0)
            subscriber.complete()
        }, time)
    })

timer$.subscribe({
    next: (data) => {
        console.log(data)
    },
    complete: () => {
        console.log('Complete')
    },
})

// 0
// Complete- interval: create an
Observablethat emits sequential numbers every specified interval of time, on a specifiedSchedulerLike. (Tạo 1 Observable mà emit number 1 cách tuần tự trong mỗi khoảng thời gian xác định)
Emits increase numbers periodically in time. (
Emit tăng number định kỳ trong thời gian) Note:intervalnever ends, we need tounsubscribeto stop the emissions.
interval
import { interval } from 'rxjs'

interval(1000).subscribe({
    next: (data) => {
        console.log(data)
    },
    complete: () => {
        console.log('Complete')
    },
})
Create interval
function interval$(time: number) {
    let i = 0
    return new Observable<number>((subscriber) => {
        setInterval(() => {
            subscriber.next(i)
            i++
        }, time)
    })
}

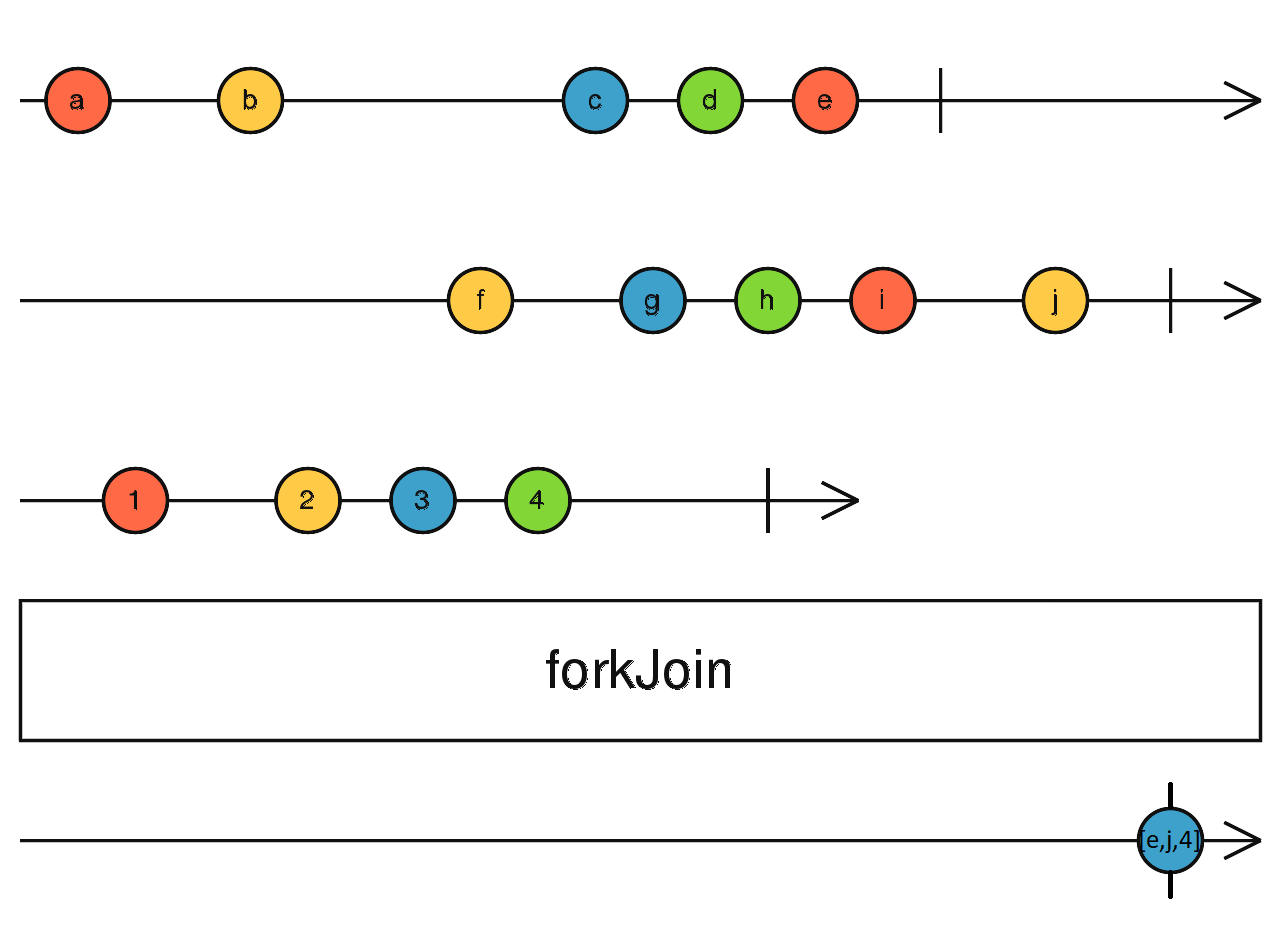
this.subscription = interval$(1000).subscribe((data) => console.log(data))- forkJoin: accepts an
Arrayor dictionaryObjectand return anOnservablethat emits either an array of values in the exact order as the passed array. (Nó sẽ nhận 1 array or 1 object và nó return 1 Observable, và nó emits 1 array value theo đúng thứ tự như khi ta truyển argument vào), asPromise.all()
Wait for Observables to complete and then combine last values they emitted; complete immediately if an empty array is passed. (
Chờ cho tất cả Observables complete thì nó sẽ combine tất cả các giá trị mới nhất mà nó emit, complete ngay lập tức nếu như đó là empty array) forkJoin(...args: any[]): ObservableNote:
forkJoin()only emit when all children Observable complete. If either of all Observable no complete,forkJoin()never emits. (Nó sẽ emit khi tất cả Observable đều hoàn thành. Nếu 1 trong các Observable ko hoàn thành, nó sẽ ko emit)forkJoin()will throw Error when either of all children Observable throw error, and the values of children Observable same this, can't emit. (Nếu 1 trong các Observable có lỗi xảy ra thì các Observable khác sẽ bị nuốt)
import { forkJoin } from 'rxjs'

const randomName = ajax('https://random-data-api.com/api/v2/users')
const randomAddress = ajax('https://random-data-api.com/api/v2/addresses')
const randomBank = ajax('https://random-data-api.com/api/v2/banks')

forkJoin([randomName, randomAddress, randomBank]).subscribe(
    ([data1, data2, data3]: any) => {
        console.log('Name:', data1.response.first_name)
        console.log('Address:', data2.response.city)
        console.log('Bank:', data3.response.bank_name)
    }
)error:
Note:
- If time A < time B that time B throw Error, time A still emit and complete. (
Time A vẫn có thể emit và complete được)- But time A > time that time B throw Error, time A has been cancel implementation, no emit and complete.
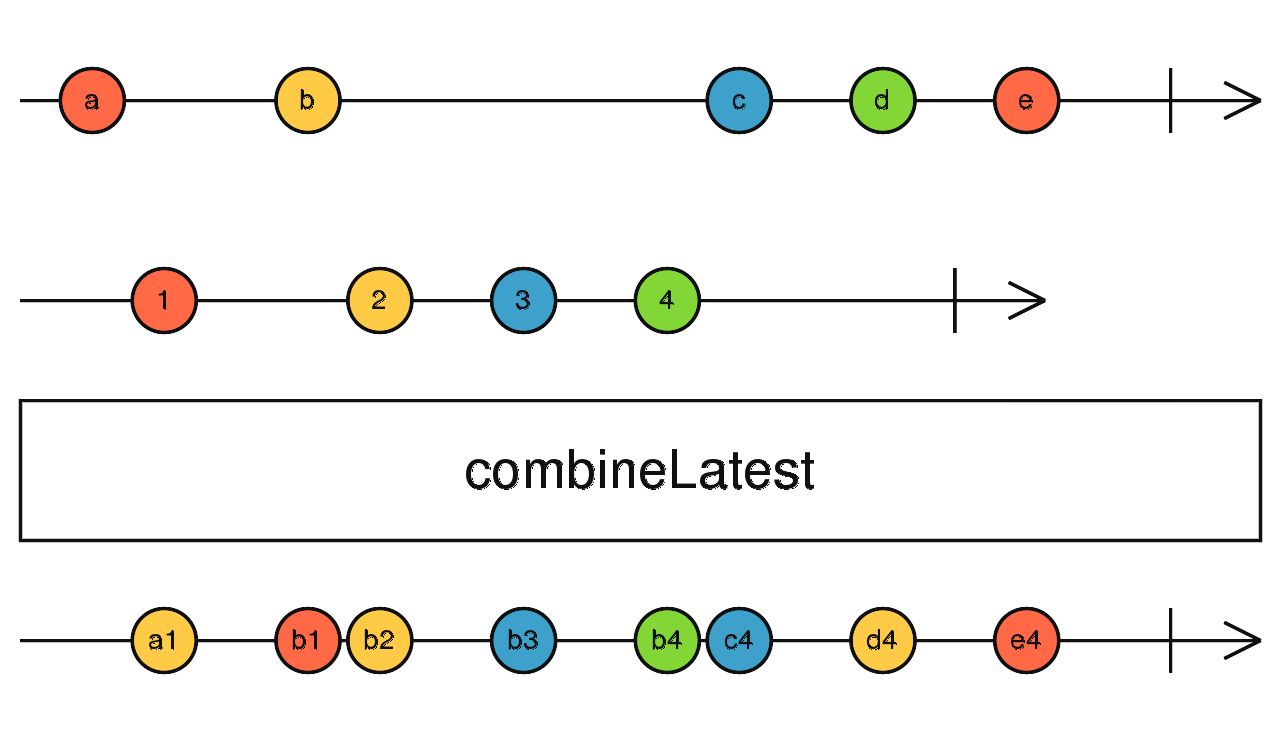
- combineLatest: like
forkJoin(), and multiple Observables, it to create anObservablewhose values are calc from lastest value of each of its inputObservable. (Giống với forkJoin, và nó nhận nhiều Observable, dùng để tạo Observable với những giá trị được tính toán từ những giá trị mới nhất của Observable Input)
combineLatest<O extends ObservableInput, R>(...args: any[]): Observable | Observable<ObservedValueOf[]>
Note:
- We doesn't need to
[..., ..]arguments, but RxJS rescommand use[...,...]to uniformity withforkJoincombineLatestemits when eachObservableemit at least once. (combineLatest emit when từng Observable emit it nhất 1 lần)- Always get emit latest value of children Observable is emitting + nearest value of children
Observableemited. (Lun lấy cái giá trị mới nhất của children Observable đang emit + giá trị gần nhất của Observable đã emit)- And it return
Observableby order. (return các Observable theo đúng thứ tự)combineLatestcomplete when allObservablecomplete and otherwise. (combineLatest complete khi các Observable complete hêt và ngược lại, nếu 1 Observable ko complete thì combineLatest ko complete)- Error like
forkJoin
import { combineLatest, of, interval } from 'rxjs'

combineLatest([of(1, 2, 3), interval(1000)]).subscribe(([numb, timeNumb]) => {
    console.log(numb, timeNumb)
})
// 3, 0
// 3, 1
// 3, 2
// 3, 3
// 3, 4
// ...
// never emits-
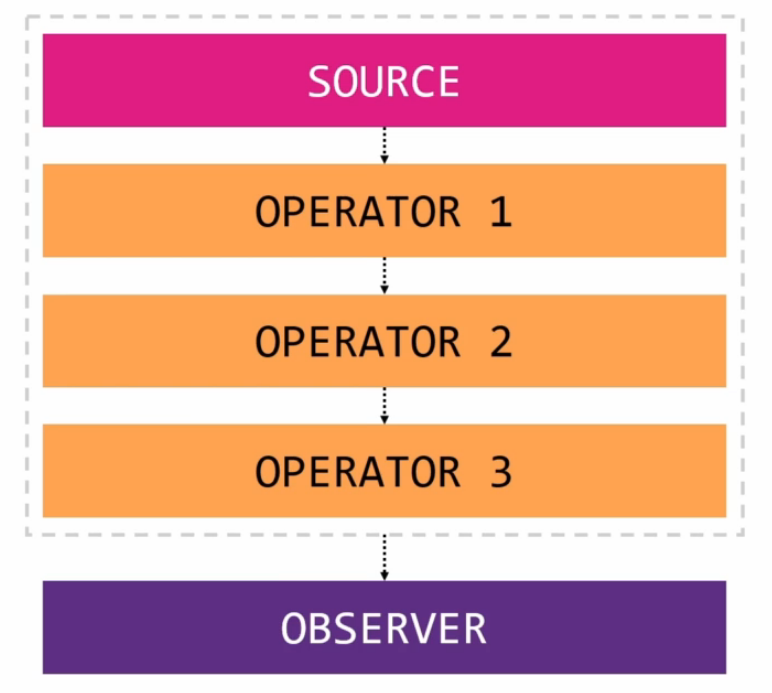
Pipeable Operators: allow us to transform data of
Observablein countless ways. Examplemap,filter, it provide a fallback for error scenario, or start newSubscriptionsto some otherObservables. (Cho phép chúng ta thay đổi data của Observable, cung cấp cho chúng ta fallback cho kịch bản bị lỗi, hoặc thậm chí bắt đầu Subscriptions mới cho 1 vài Observables) -
Operators:
filter,map,tap,debounceTime,catchError,concat/switch/mergeMap -
Operator Stacking
Applying a Pipeable Operator creates a new Observable with some additional logic. (
Applying Pipeable operator tạo 1 Observable với vài logic bổ sung)
- filter:
- filter: Filter data as
filter arrays, create new a datafilter by conditional, don't change init data.
filter((x) => x === 1)Examples:
const newFeeds = new Observable<string>((subscriber) => {
    subscriber.next('Sport')
    subscriber.next('Business')
    subscriber.next('Gaming')
    subscriber.next('Sport')
})

const filterNewFeeds = newFeeds
    .pipe(filter((data) => data === 'Sport'))
    .subscribe((data) => console.log(data))
// Sport
// Sport
// ** it is not reference

newFeeds.subscribe((data) => console.log(data))
// Sport
// Business
// Gaming
// Sport- map
- map: to transform init data to another data as
map arrays.
map((x) => x * 2)Example
const newFeeds = new Observable<string>((subscriber) => {
    subscriber.next('Sport')
    subscriber.next('Business')
    subscriber.next('Gaming')
    subscriber.next('Sport')
})

const filterNewFeeds = newFeeds
    .pipe(filter((data) => data === `Type ${data}`))
    .subscribe((data) => console.log(data))
// Type Sport
// Type Business
// Type Gaming
// Type Sport- tap
- tap: Used to perform side-effects for notifications from the source observable. (
Nó được dùng để làm side-effects để thông báo cái source observable từng cái operator, nó sẽ chạy theo từng cái operator trong pipe). - tap: To see how
pipework the between stage of the operator pipelines.
tap(data => {
    ...
})
Example
of(1, 2, 3, 9, 12)
    .pipe(
        map((data) => data * 2),
        tap((data) => console.log('type: ' + data)),
        filter((data) => data >= 5)
    )
    .subscribe((data) => console.log(data))

// type: 2
// type: 4
// type: 6
// 6
// type: 18
// 18
// type: 24
// 24Notion: It is not working when
Observablewas notsubscribeand it is not change the notifications in theObservable stream.
- debounceTime
- catchError
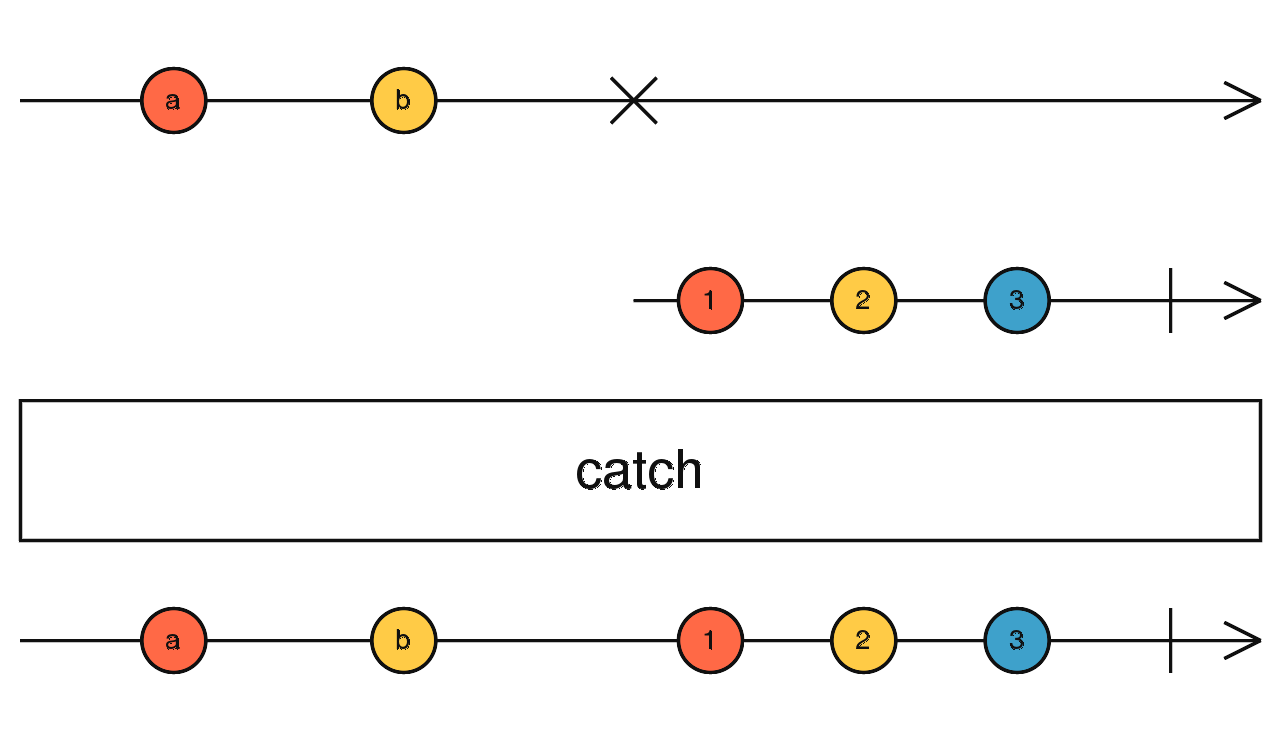
- catchError: Catches errors on the observable to be handled by returning a new observable or throwing an error. (
Nó được dùng để lấy cái error và xử lý bằng cách return 1 observable để tránh terminate stream hoặc là throw 1 error). - We can handle error to an
Observableor throw an error. If anObservable, we can get error by usesubscriber.next(), elsesubscriber.error().
catchError<T, O extends ObservableInput>(selector: (err: any, caught: Observable) => O): OperatorFunction<T, T | ObservedValueOf>
forkJoin([
    of(1),
    of(2),
    throwError(new Error('401')).pipe(catchError((err) => of(err))),
]).subscribe(observer)
// in case, it return an Observable
// result:
// [1, 2, Error 401...]
// it from subscriber.next()
Return an error
forkJoin([
    of(1),
    of(2),
    throwError(new Error('401')).pipe(
        catchError((err: any) => {
            throw new Error(err)
        })
    ),
]).subscribe({
    next: () => {},
    error: (err) => {
        console.log(err)
    },
})

// Error 401....
// it been terminate stream (chấm dứt luồng)| # | Subject | BehaviorSubject |
|---|---|---|
| Values they hold | - We can't get current value or init value | - We can get current value or init value |
| Initial value | - Don't need initial value | - Need initial value as default value |
| Subscribes | - Only receive upcoming value (Chỉ nhận value sắp tới) |
- Receive previous value and also upcoming value (Nhận value trước và cả value sắp tới) |
- We can test it in ngOnInit:
subscribe = new Subject()
ngOnInit(){
    this.subscribe.subscribe({
            next: () => console.log('a'),
    })
    this.subscribe.subscribe({
        next: () => console.log('b'),
    })
    this.subscribe.next(1)
    this.subscribe.next(2)
    this.subscribe.subscribe({
        next: () => console.log('c'),
    })
    this.subscribe.next(3)

    // a -> next 1
    // b -> next 1

    // a -> next 2
    // b -> next 2

    // a -> next 3
    // b -> next 3
    // c -> next 3
}