Emulate a conventional USB keyboard with a scriptable network capable microcontroller.
By using dedicated hardware it is possible to control systems even before the operating system is booted and without being dependent on the running software. For example this allows automatic bootloder selectios or modification of BIOS settings.
- Teensy 3,
- One of the following:
- a) USB-to-UART Adapter, for example
- b) Raspberry PI
- Flash the Teensy with the sketch in the etherkey folder. (Using Teensyduino)
- Connect the Teensy's USB-Port to the System you want to control.
You may connect directly to the Teensy, using a USB-to-UART Adapter.
Connect Ground to Teensy's GND-Pin, TX to Pin 0, RX to Pin 1.
Now you can use any tool you like to connect to the Teensy. Baudrate is 57600, device most likely /dev/ttyUSB0 on Linux/UNIX. For example: cu -l /dev/ttyUSB0 -s 57600
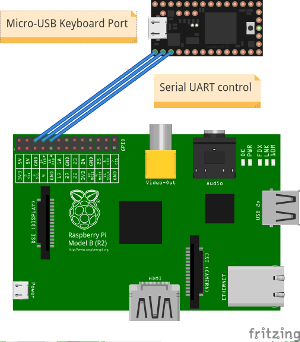
Example setup with a Raspberry PI for the ethernet connection.
Connect GND of the Raspberry to Teensy's GND-Pin, TX to Pin 0, RX to Pin 1.
When using Raspbian as operating system, the serial port must be configured for outgoing connections.
After that a serial connection can be established with cu -l /dev/ttyAMA0 -s 57600. On newer Raspberry PI or Raspbian versions you might need to use /dev/serial0 instead.
Ctrl+Q to switch between modes.
Available modes:
- Interactive mode
- Command mode
- Debug mode
Directly sends the recieved keystroke Supported Characters:
- All printable ASCII characters
- Arrow keys
- Backspace
- Enter
- Delete
- Tab
- Escape
Parses the whole line and interprets the first Word as command. Available commands:
Sends the rest of the line literally
Sends the rest of the line while interpreting special characters. This command behaves similarly to the send command of AutoHotkey
The following characters are treated as modifiers:
-
!: Send the next character with the ALT key pressed.Example:
Send text!asends the keys "This is text" and then pressesALT+a. -
+: Send the next character with the SHIFT key pressed.Example:
Send +abCsends the keys "AbC". -
^: Send the next character with the CTRL key pressed.Example:
Send ^csends aCTRL+ckeystroke. -
#: Send the next character with the WIN key pressed.Example:
Send #dsends aWIN + dkeystroke.
These modifiers can be combined, so a ^+t would send a CTRL+SHIFT+t, thus restoring the last tab in Firefox.
Non printable characters can be sent by specifying the keyname enclosed in braces:
{Enter}{Escape}{Space}{Tab}{Backspace}/{BS}{Delete}/{Del}{Insert}/{Ins}{Up}{Down}{Left}{Right}{Home}{End}{PgUp}{PgDn}{Windows}/{Win}
These keynames can also be combined with modifiers. For example Send ^!{Delete} sends the CTRL+SHIFT+Delete combination.
To send a single character literally, it can be enclosed in braces:
{x}{!}{+}{^}{#}{{}{}}
This syntax can also be used to repeat a keystroke multiple times:
Enclose the character or keyname followed by a whitespace and the number of repetitions in braces.
- For example:
{x 10}sends the x character 10 times and{Enter 5}presses the Enter key 5 times.
Arbitrary Unicode characters can be sent by specifying the 4-digit character code after the operating system specific command:
Initializes the GKT+/Qt Unicode Sequence and sends the following 4-digit hexadecimal Unicode Character.
- For example:
{UCL 00F8}
Initializes the Windows Unicode Sequence and sends the following Unicode Character. Please note: Some Windows applications require 4-digit decimal Code (e.g. Wordpad, Chrome), some other require 4-digit hexadecimal Code (e.g. Notepad++, Firefox)
You might as well need to change a Registry Setting on your Windows machine.
- For example:
{UCW 00F8}/{UCW 0248}
Displays information about the received character (ASCII code, USB keycode)
TODO
Due to the nature of the emulation on a USB keyboard layer, the list of available characters is determined by the keyboard layout on the target host.
Additionally only basic ASCII characters are transmitted correctly over the serial interface.
Thus an English keyboard layout is recommended for conventional usage. This is also configured by default in the Teensyduino development environment, but can be changed under "Tools" -> "Keyboard Layout".
To transmit other keys:
-
Sending keys by their name in command mode
-
Mixing keyboard layouts for transmission to send keystrokes defined by their position on the keyboard
By setting the desired keyboard layout on the target system while configuring an English keyboard layout on the Teensy and the controlling system, it is possible to send keystronkes independent of the possibility to transmit the associated character. This works as the pressed key is interpreted on the controlling system.
