This repository contains an advanced sample of Custom Identity Provider to be used with Mobile Client Access service for IBM Bluemix.
The Mobile Client Access service allows to create a custom identity provider and implement your own authentication logic of collecting and validating credentials. A custom identity provider is a web application that exposes a RESTful interface. You can host custom identity provider on premises or on IBM Bluemix. The only requirement is that the custom identity provider must be accessible from the public internet so that it can communicate with the Mobile Client Access service.
IMPORTANT - Please note that while being a rather advanced this sample is not intended for production use as-is. The goals of this sample is to demonstrate a complex usecase implementation and serve as a basis for real production implementations.
The following instructions assume that you're familiar with Mobile Client Access service and Custom Identity Provider interface. In order to get more information regarding these topics please use below links
- Mobile Client Access overview
- Getting Started with Mobile Client Access
- Protecting cloud resources
- Custom authentication overview
- A custom identity provider interface
This sample has three components
- REST API for administrative login and user management
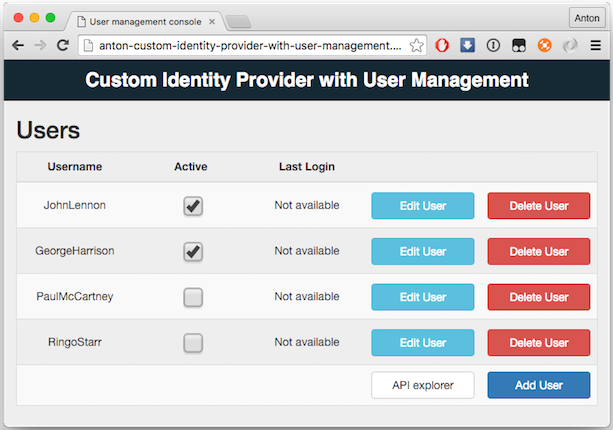
- Web based console for administrative login and user management
- REST API implementing the Custom Identity Provider interface
The sample is built as a Node.js application using technologies like Swagger, Expressjs, Passportjs etc. In order to run it on Bluemix you will need to have an IBM Bluemix account and CF toolchain installed.
-
Start by cloning this sample to your local development environment.
git clone https://github.com/ibm-bluemix-mobile-services/bms-mca-custom-identity-provider-with-user-management.gitCloudFoundry applications are stateless in their nature and do not store any data locally. This sample supports two types of user database persistence - using in-memory database, that will be cleaned up every time application is restarted, and using Cloudant NoSQL DB.
-
Update
manifest.ymlfile, change thehostandnameproperties. Thehostproperty defines your application host once it will be deployed to Bluemix, therefore it must be globally unique. Thenameproperty defines the application name in your current space. -
Update
ADMIN_USERNAMEandADMIN_PASSWORDenvironment variables inmanifest.ymlfile. These would be your login credentials to the user management console. -
The default user database persistence mode is in-memory database. It does not require any additional setup, however all the data will be erased once application is restarted. As described above, alternatively it is possible to configure Cloudant NoSQL DB to serve as a user database persistence layer. In order to use CloudantNoSQL DB uncomment four CLOUDANT environment variables in
manifest.ymlfile and set the respective values. -
Use
cf pushcommand to deploy your app to Bluemix. -
Application deploy might take couple of minutes. Once application is successfully deployed you will see the url which application can be accessed by. The url is comprised of the
hostproperty you've defined inmanifest.ymlandmybluemix.netdomain, e.g.https://my-custom-identity-provider.mybluemix.net -
Try browsing to the url of your custom identity provider in your desktop browser. You will see a login screen with username and password prompt. Use the credentials you've defined previously in
ADMIN_USERNAMEandADMIN_PASSWORDenvironment variables inmanifest.ymlfile to login. -
Use the user management console to add, update and delete users.
-
Click the
API Explorerbutton to see Swagger doc for this sample
-
To configure your Mobile Client Access service to use a newly deployed Custom Identity Provider. Open the Mobile Client Access Dashboard and enable Custom Authentication.
-
Use any alphanumerical string as
Realm name. Keep a note ofRealm name, you will need it to configure authentication in the Mobile Client Access SDK later. -
The URL of your new Custom Identity Provider that you need to set in the Mobile Client Access Dashboard is
https://{your-application-hostname}/api/custom-identity-provider/v1/, e.g.:https://johns-identity-provider.mybluemix.net/api/custom-identity-provider/v1/
For more details about configuring Mobile Client Access service and mobile apps to use Custom Identity Providers and read this documentation article.
=======================
Copyright 2016 IBM Corp.
Licensed under the Apache License, Version 2.0 (the "License"); you may not use this file except in compliance with the License.
You may obtain a copy of the License at http://www.apache.org/licenses/LICENSE-2.0
Unless required by applicable law or agreed to in writing, software distributed under the License is distributed on an "AS IS" BASIS, WITHOUT WARRANTIES OR CONDITIONS OF ANY KIND, either express or implied. See the License for the specific language governing permissions and limitations under the License.
