A wrapper around node_redis with Promise and TypeScript support.
node_redis doesn't support Promises out-of-the-box - you have to use bluebird's promisifyAll, which has the side effect of removing all TypeScript/intellisense support from the package.
This package is a wrapper around node_redis and exclusively uses Promises. It publishes TypeScript types generated from the official redis documentation and examples, so it's much easier to know what parameters a command expects, and how to use the return values.
npm install --save handy-redis
ES6/TypeScript:
import { createHandyClient } from 'handy-redis';

(async function() {
    const client = createHandyClient();
    // or, call createHandyClient(opts) using opts for https://www.npmjs.com/package/redis#rediscreateclient
    // or, call createHandyClient(oldClient) where oldClient is an existing node_redis client.

    await client.set('foo', 'bar');
    const foo = await client.get('foo');
    console.log(foo);
})();
Vanilla JS:
const handyRedis = require('handy-redis');

const client = handyRedis.createHandyClient();

client
    .set('foo', 'bar')
    .then(() => client.get('foo'))
    .then(foo => console.log(foo));
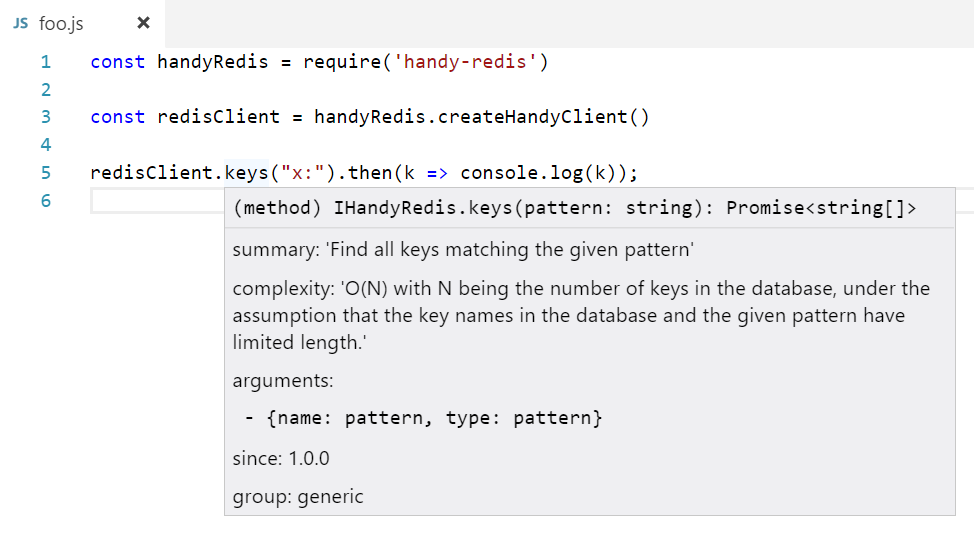
The package is published with TypeScript types, with the redis documentation and response type attached to each command:

See the snapshot tests for tons of usage examples.
Most members of node_redis's multi type don't need to be promisified, because they execute synchronously. Only exec is async. For a promisified version of that, use execMulti:
import { createHandyClient } from 'handy-redis';

(async function() {
    const client = createHandyClient();

    const multi = client.multi().set("z:foo", "987").keys("z:*").get("z:foo");

    const result = await client.execMulti(multi);

    console.log(result); // ["OK", ["z:foo"], "987"]
})();
execMulti is generic, so in TypeScript you can use something like const strings = await client.execMulti<string>(multi) if you know all results will be strings. Otherwise the type will default to {}.
Most of the package is generated by running sample commands from the redis documentation repo.
git clone https://github.com/mmkal/handy-redis --recursive
cd handy-redis
npm install
Then in a separate terminal, make sure you have docker installed and docker-compose is on your path, and start up a redis server in the background with npm run redis:up.
To fully test the package as it is on your machine, the same way travis does:
npm run ci
npm run ci runs the build, test and lint scripts. It removes all generated code before, and after checks that your git status is clean. This is to allow tracking changes to the generated client over time, to make what the published package contains more visible, and to make sure that generated code hasn't been modified without auditing first. You should not manually edit any files under a */generated/* path. If npm run ci fails for you because you deliberately changed the way the codegen works, take a look at the git changes, check them in and run npm run ci again.
The build script generates the client before using TypeScript to compile it. If you want to run the tests without rebuilding, use npm test.
There are some more scripts in package.json which can be useful for local development.
If you cloned without --recursive you'll need to run git submodule update --init to get the redis-doc repo locally.
If a snapshot test fails, it's possible it just needs to be updated. Make sure your git status is clean and run npm test -- -u.