谢语言是一门免费、开源、跨平台、跨语言、语法接近汇编语言与SHELL脚本、全栈、易嵌入、快速的解释性计算机编程语言。
Xielang is a free, open-source, cross-platform, cross-language, ASM/SHELL-like, embeddable, full-stack, fast scripting language.
- 介绍(Introduction)
- 语言特点(Features)
- 语言设计构思(Language design conception)
- 安装教程(Installation)
- 代码编辑器(Code Editor)
- 运行和查看例子代码(Run and view sample code)
- 快速入门及语言要点(Quick Tour and Language Essentials)
- - 基本语法(Basic grammar)
- - 代码注释(Comments)
- - 变量声明(定义)(Variable declaration/definition)
- - 数值与类型(Value and types)
- - 给变量赋值(Assignment)
- - 指定赋值的类型(Specify the type of assignment)
- - 字符串赋值(String assignment)
- - 各种赋值示例(Examples of various assignments)
- - 用var指令的时候赋值(Assign value when using "var" instruction)
- - 堆栈(Stack)
- - 基本的堆栈操作(Basic stack operations)
- - 与堆栈有关的特殊变量(Special variables related to stack)
- - 常见运算(Common operations)
- - 数值类型转换(Data type conversion)
- - 字符串的连接操作(String connection operation)
- - 指令的结果参数(Result parameter of instruction)
- - pl指令( the "pl" instr)
- - 内置全局变量(Predefined/built-in global variables)
- - 标号(Labels)
- - 代码缩进(Code Indent)
- - 复杂表达式分解(Complex expression decomposition)
- - 复杂表达式运算(Complex expression operation)
- - 复杂表达式做参数
- - 表达式的另一个例子(Another example of an expression)
- - goto语句(The goto instr)
- - 一般循环结构(Loop cycle structure)
- - 条件分支(Conditional branch)
- - else分支(Else branch)
- - 虚拟标号/伪标号跳转(Virtual label/pseudolabel jump)
- - for循环
- - 利用for指令进行for循环
- - 用range指令进行简单数据的遍历
- - 函数调用
- - 全局变量和局部变量
- - 快速函数
- - 取变量引用及取引用对应的变量实际值
- - 复杂数据类型-列表
- - 复杂数据类型-映射
- - 嵌套的复杂数据结构及JSON编码
- - JSON解码
- - 加载外部模块
- - 封装函数调用
- - 引用与解引用
- - 并发函数
- - 用线程锁处理并发共享冲突
- - 对象机制
- - 快速/宿主对象机制
- - 时间处理
- - 错误处理
- - 延迟执行指令 defer
- - 关系数据库访问
- - 微服务/应用服务器
- - 网络(HTTP)客户端
- - 手动编写Api服务器
- - 静态WEB服务器
- - 动态网页服务器
- - 博客系统
- - 嵌套运行谢语言代码
- 谢语言做系统服务
- 图形界面(GUI)编程
- 谢语言GUI编程的基础(WebView2)
- 谢语言GUI编程的基础(SciterJS)
- 编译运行谢语言代码(Compile and run Xielang code)
- 内置指令/命令/函数参考(Built-in instruction/command/function reference)
- 内置对象参考(Built-in object reference)
- 杂项说明(Miscellaneous description)
- 性能方面的考虑(Performance considerations)
- 嵌入式使用谢语言(以虚拟机的方式在其他语言中调用)(Embedded Xielang in other languages)
- 扩展谢语言(Extended Xielang)
- 编译谢语言(Compile Xielang)
- 代码示例(Code examples)
- 参与贡献者(Contributors)
谢语言(英文名称为:Xielang,官网 xie.topget.org)是一门开源、免费的解释型编程语言(也称作脚本语言),最大的特色包括:跨平台;跨语言(目前支持Go语言、JavaScript语言等,即将支持Java语言)可嵌入(即可在这些语言中调用);结合了汇编语言和高级语言的优点;支持全中文编程(包括提示信息),语法简单易懂;单文件无依赖;可编译成单独可执行文件发布等。
Xielang(official website xie.topget.org) is an open source and free interpretative programming language (also known as script language). Main features include: cross-platform, cross language (currently supports Go language, JavaScript language, etc., and will soon support Java language), embeddable (in other languages), combines the advantages of assembly language and high-level language, and the syntax is simple, ASM/shell-script like and easy to rewrite in any other languages; minimum dependency, a single executable main program, code can be compiled into a separate executable file and distributed.
谢语言支持各种基本的语法元素和结构,包括变量、条件分支、循环、函数、递归函数调用、多线程等,支持作为嵌入型语言在不同语言中调用,也支持独立运行(单文件的可执行程序),还支持作为后台微服务运行。同时,谢语言也提供一个命令行交互式编程环境,可用于一般的测试。
Xielang supports various basic syntax elements and structures, including variables, conditional branches, loops, functions, recursive function calls, multi-threading, etc. It supports calls in other languages as embedded languages, minimum runtime dependency (single file executable), and supports system-service mode and micro-service mode. At the same time, Xielang also provides a command-line interactive programming environment, which can be used for general testing.
谢语言的Go语言版本,单文件即可执行,包含了脚本执行功能(无需安装其他依赖环境)、交互式命令行环境和微服务器模式,支持图形界面编程(可采用多种方式,无需或仅需附加一个动态链接库文件)。
The Go language version of Xielang, which can be executed in a single file, includes script execution function (no need to install other dependent environments), interactive command-line environment and micro-service mode, and supports graphical interface programming (GUI, multiple methods can be adopted, without or only need to attach a dynamic link library file).
谢语言的JavaScript版本,使用时仅需在网页中引用两个JavaScript文件,即可使用谢语言的功能,并且可以与JavaScript良好互通,充分发挥JavaScript中既有功能以及丰富的第三方库的优势。
The JavaScript version of Xielang can use all the functions of Xielang only by referencing two JavaScript files in the web page, and it can communicate well with JavaScript, benefit of the existing functions in JavaScript and the advantages of rich third-party libraries.
谢语言特点比较鲜明:
Xielang has distinctive features:
-
语法形式追求极简,类似命令行(Shell脚本)和汇编语言,基本结构是一行一条指令,以追求解析的速度,避免繁琐的语法、语义分析;
-
The syntax form pursues minimalism, similar to command line (shell script) and assembly language. The basic structure is one instruction line by line, in order to pursue the speed of parsing and avoid tedious syntax and semantic analysis;
-
语法接近于汇编语言,包括一些语言的基础设施(例如堆栈、寄存器等)和语法结构(条件分支与无条件跳转指令等);
-
Syntax is close to assembly language, including some language infrastructure (such as stack, register, etc.) and syntax structure (conditional branch and unconditional jump instruction, etc.);
-
提供很多封装好的、功能丰富的内置指令,因而又使得语言接近于高级语言;
-
It provides many encapsulated and functional built-in instructions, thus making the language close to high-level language;
-
支持自定义函数,提供丰富的函数调用方式,包括轻量级、快速的和隔离较好的;
-
Support user-defined functions and provide rich function call methods, including lightweight, fast and well isolated;
-
支持动态加载函数;
-
Support dynamic loading function;
-
支持动态加载模块代码并执行;
-
Support dynamic loading and execution of module code;
-
支持并发编程;
-
Support concurrent programming/thread;
-
支持地址引用,类似指针但受一定的保护;
-
Support address reference, similar to pointer but protected to some extent;
-
支持编译成单独的可执行文件以便发布或者代码保护;
-
Support compilation into separate executable files for release or code protection;
-
支持以系统服务的方式运行;
-
Support running in system service mode;
-
内置网络服务器和微服务框架,可以直接以服务器模式运行;
-
Built-in network/API server mode and micro-service framework are natively supported;
-
由于极简的语法结构和超轻量级的脚本运行引擎,因此可以很方便地移植到任意语言中,目前支持的Go、Java、JavaScript就是三种特点很不相同的语言,但都可以轻松实现谢语言的支持;
-
Because of its extremely simple syntax structure and ultra-lightweight script running engine, it can be easily transplanted to any language. Currently, Go, Java and JavaScript are three languages with very different characteristics, but they can easily support Xielang;
下面是谢语言常见的欢迎程序代码:
The following is the common welcome program code of Xielang:
pln `欢迎来到谢语言的世界!`命令行上用下面的命令执行后可得结果如下: The following results can be obtained after the command line is executed with the following command:
D:\tmp>xie welcome.xie
欢迎来到谢语言的世界!

D:\tmp>
下面是常见用于性能测试的斐波那契数列生成代码(fib.xie),使用了递归函数调用: The following is the Fibonacci sequence generation code (fib. xie) commonly used for performance testing, which uses recursive function calls:
// 用递归函数计算斐波那契数列
// 计算序列上第18个数
// cal Fibonacci numbers(the 18th) by recursive function

// 压栈一个整数18,表示计算第18个数
push int 18

// 调用标号:fib出的函数代码进行计算
call $drop :fib

pln $pop

exit

// 递归运算的斐波那契计算函数
:fib
    var $n1
    pop $n1

    < $push $n1 #i2

    if $pop :label1

    :else
        dec $n1
        push int $n1
        call $drop :fib

        dec $n1
        push int $n1
        call $drop :fib

        add $push $pop $pop

        ret

    :label1
        push $n1
        ret
将计算出斐波那契数列第18位数字,如下所示: The 18th digit of Fibonacci sequence will be calculated as follows:
D:\tmp>xie fib.xie
2584

D:\tmp>
谢语言的出现,最初是因为希望有一个能够嵌入在各种语言(初期考虑的语言主要是Go、Java、JavaScript、C/C++、C#、Swift等)内的轻量级脚本语言,能够支持在后端微服务中热加载修改的代码,要求语言的语法简单而又速度相对较快,但是能够充分发挥宿主语言的丰富库函数优势。后来逐渐发现谢语言也具备可以成为一门全栈语言的潜力,希望它最终能够达到。
Xielang is expected to be a lightweight scripting language that can be embedded in various languages (the languages considered at the initial stage are mainly Go, Java, JavaScript, C/C++, C #, Swift, etc.), which can support the hot loading and modification of code in back-end micro-services. The syntax of the language is simple and relatively fast, but it can give full play to the advantages of rich library functions of the host language. It seems that Xielang has the potential to become a full-stack language, and hope it will be eventually.
借鉴汇编语言的思路,谢语言引入了堆栈和寄存器等概念,也因此在某些功能的实现上会比一般的高级语言显得复杂一些,但从速度上(包括语法解析的速度)考虑,还是值得的。但要求开发者对堆栈、寄存器等概念做一些简单的了解。 Referring to the idea of assembly language, Xielang introduces the concepts of stack and register, which makes the implementation of some functions more complex than that of general high-level languages, but it is still worth considering from the speed (including the speed of syntax parsing). However, developers are required to have a simple understanding of the concepts of stack and register.
设计的原则包括: The design principles include:
-
尽量减少语法分析的成本,因此拒绝复杂的语法结构,基本都以单行指令为主,只有多行字符串会占超过一行;
-
Try to reduce the cost of syntax analysis, so reject complex syntax structures. Basically, single-line instructions are the main instructions. Only multi-line strings will occupy more than one line;
-
不做标准库,只做内置指令集,保证语言短小精悍,功能能够支持一般而言80%以上的常见开发需求(其余功能可以从源码自行扩充);
-
Do not build a standard library, but only build a built-in instruction set to ensure that the language is short and concise, and the functions can support more than 80% of common development requirements in general (other functions can be expanded from the source code);
-
在精简指令集基础上,支持函数和外部函数,支持外部模块的引入,以保证功能扩充的可能性;
-
On the basis of the reduced instruction set, it supports functions and external functions, and supports the introduction of external modules to ensure the possibility of function expansion;
-
要支持并发编程(虽然很多脚本语言不支持并发编程);
-
Support concurrent programming (although most scripting languages do not support concurrent programming);
-
面向对象编程属于较低的优先级,甚至可以不实现;
-
Object-oriented programming belongs to a lower priority, and may not even be implemented;
谢语言还在积极开发中,欢迎提出各种建议。 Xielang is still under active development and welcome to put forward various suggestions.
- 直接在官网下载最新的谢语言可执行文件或压缩包,然后将其放在某个目录下,最好在系统路径之内,如果下载的是压缩包则先将其解压。然后即可使用;
- Download the latest Xielang executable file or compressed package from the official website, and then put it in a directory, preferably within the system path. If you download a compressed package, decompress it first. Then it is ready to use;
- 谢语言代码执行的一般方法是在命令行执行(确保谢语言的主程序在路径中,否则需要加上路径):
- The general way to execute Xielang code is to execute it on the command line (ensure that the main program of Xielang is in the path, otherwise the path needs to be added in the command-line):
xie hello.xie- 谢语言的代码文件一般以“.xie”作为扩展名,但这并不是强制的。注意,由于操作系统的限制,扩展名前的“.”只能是英文的小数点;\
- Code files in Xielang generally use ". xie" as the extension, but this is not mandatory.
- 谢语言的代码文件内部都是纯文本的格式,并且要求使用UTF-8编码;另外,为便于跨平台使用,不建议使用BOM头;
- The code files of Xielang are in plain text format, and UTF-8 encoding is required; In addition, in order to facilitate cross-platform use, BOM headers are not recommended;
- 安装后可以使用下述命令行验证是否安装成功,并且路径设置正常:
- After installation, you can use the following command line to verify whether the installation is successful and the path setting is normal:
xie -example hello.xie如果看到类似下面的输出,说明安装成功,并且开发环境准备就绪。 If you see output similar to the following, the installation is successful and the development environment is ready.
D:\tmpx>xie -example hello.xie
Hello world!

D:\tmpx>
- 直接不带任何参数运行谢语言主程序,将会进入谢语言的交互式命令行环境,在这里可以直接输入一行一行的命令,然后可以立即得到反馈结果:
- Run the main program of Xielang directly without any parameters, and you will enter the interactive command line environment of Xielang, where you can directly enter the command line by line, and then you can immediately get the feedback results:
C:\Users\Administrator# xie
> version
> pln $pop
0.0.1
>
交互式命令行程序可以用于快速测试一些语句,或进行简单的编程获取结果。 The interactive command line program can be used to quickly test some statements, or conduct simple programming to obtain results.
- 另外,可以用-version参数查看当前谢语言的版本号:
- In addition, you can use the - version parameter to view the version number of the current Xielang:
D:\tmpx>xie -version
Xielang(谢语言) Version(版本) 1.0.5

D:\tmpx>
在交互式命令行环境中,可以用version指令查看版本: In the interactive command line environment, you can use the version directive to view the version:
> version $pln
0.2.3
>
- 谢语言的代码编辑器推荐Visual Studio Code或Notepad 3,都是免费的编辑器;也可以使用任何支持UTF-8编码的文本编辑器;
- Visual Studio Code or Notepad 3 are recommended by Xielang's code editor, which are free editors; You can also use any text editor that supports UTF-8 encoding;
- 语法高亮方案建议选择Rust或Shell Script(Shell脚本即可),也可以选用Go、C语言等的语法高亮方案,目前还没有专属的;
- The syntax highlighting scheme is recommended to select Rust, Shell Script (shell script is enough), or go, C language and other syntax highlighting schemes, which are not exclusive at present;
- 谢语言也内置了简单的图形化命令行编辑器和的文本行编辑器,简单的代码也可以用它们来编写;
- Xielang also has built-in simple graphical command line editor and text line editor, and simple code can also be written with them;
谢语言提供各种例子代码,可以在命令行中加上-example参数直接运行,例如上述斐波那契数列代码就可以直接用下面的命令行运行: Xielang provides various example codes, which can be run directly with the -example parameter in the command line. For example, the Fibonacci sequence code can be run directly with the following command line:
xie -example fib.xie运行后结果类似: The results after operation are similar:
D:\tmpx>xie -example fib.xie
2584

D:\tmpx>
如果需要查看例子代码,可以再加上-view参数,就可以看到: If you need to view the example code, you can add the -view parameter to get it:
D:\tmpx>xie -example -view fib.xie
// 用递归函数计算斐波那契数列
// 计算序列上第18个数
// cal Fibonacci numbers(the 18th) by recursive function

// 压栈一个整数18,表示计算第18个数
push int 18

// 调用标号:fib出的函数代码进行计算
call $drop :fib

...

    :label1
        push $n1
        ret

D:\tmpx>
当然,也可以用“>”等转向符将其输出到其他文件中: Of course, you can also use ">" and other steering symbols to output it to other files:
xie -example -view fib.xie > d:\test\new.xie
因此,如果我们后面说道:“请参看例子代码test1.xie”,那么就意味着可以通过 Therefore, if we say later in this document, "Please see the example code test1.xie", it means that you can use the
xie -example -view test1.xie
这样的命令行来参看所述的例子代码。 for such a command line, to see the example code described.
- 作为一门脚本语言,我们设计的初衷是尽可能降低解析语法的开销,因此谢语言选用了类似命令行的语法:一般命令(或者也称作指令或语句,英文为instruction,常用简称instr)都是一行,单条指令中的元素之间用空格作为分隔,第一个元素叫做指令名,后面的都叫做指令参数。也就是说,每条指令都由一个指令名和若干个指令参数组成,当然,有些指令也可以没有任何参数。例如:
- As a script language, our original intention is to reduce the overhead of parsing syntax as much as possible, so Xielang uses a syntax similar to the command line: general commands (or also called instructions or statements, sometimes "instr") are all one line, and the elements in a single instruction are separated by spaces, the first element is called the instruction name, and the following are called the instruction parameters. In other words, each instruction consists of an instruction name and several instruction parameters. Of course, some instructions can also have no parameters. For example:
assign $a "abc"
其中的assign是指令名,后面的$a和"abc"都是指令参数。本条指令将把字符串"abc"赋值给变量a(注意不包括引号)。 Where assign is the instruction name, and the following $a and "abc" are the instruction parameters. This instruction will assign the string "abc" to variable a (note that quotation marks are not included).
- 唯一不是一行的情况是多行字符串,谢语言中用成对的反引号字符“`”来包起多行字符串(实际上也可以包起非多行的字符串,会在一定的情况下有用),例如:
- The only case that is not a single line is a multi-line string. In Xielang, a pair of backquote characters "`" are used to enclose multi-line strings (in fact, non-multi-line strings can also be enclosed, which will be useful under certain circumstances), for example:
    assign $a `abc
    123`
这将把变量a赋值为多行字符串"abc\n123"; This will assign the variable a to the multiline string "abc\n123";
- 命令头尾的空白都将被忽略,因此可以使用适当的缩进来提高代码的可读性。如果参数等值中含有不想省略的空格字符,需要用双引号或反引号括起整个字符串;
- The blank space at the beginning and end of the command will be ignored, so you can use appropriate indentation to improve the readability of the code. If the parameter equivalent contains space characters that you do not want to omit, you need to enclose the entire string with double quotation marks or back quotation marks;
- 所有代码中的指令名、变量、字符串、标号等都是大小写敏感的,也就是说如果仅有大小写不同的两个变量名,将被认为指的是不同的变量。
- Instruction names, variables, strings, labels, etc. in all codes are case-sensitive. That is to say, if only two variable names with different case are different, they will be considered to refer to different variables.
谢语言中仅支持行注释,可以用“//”或“#”来引导注释,支持“#”是为了在文本编辑器中选用“Shell脚本”的语法高亮方案时,可以使用Ctrl+/组合键来切换改行是否注释。 In Xielang, only line comments are supported. You can use "//" or "#" to guide the comments. The support of "#" is to select the syntax highlighting scheme of "shell script" in the text editor. You can use Ctrl+/key combination to switch whether the line change is commented or not.
谢语言通常使用var命令(中文命令为“声明变量”)进行变量声明: In Xielang, we usually use the var command to declare variables:
var $a这将定义一个名字为a的变量,谢语言中,变量名前都要加“$”字符以示区别。定义变量时可以加第二个参数指定变量类型,此时其中的值为该类型的空值;不指定类型时,变量默认为nil(无类型的空值)如下所示: This will define a variable named a. In Xielang, the variable name should be preceded by the "$" character to show the difference. When defining a variable, you can add a second parameter to specify the variable type. At this time, the value is the null value of the type; When no type is specified, the variable defaults to nil (null value without type) as follows:
  C:\Users\Administrator# xie
  > var $a
  > pln $a
  <nil>
  >
注意,pln命令类似于一般语言中的println函数,会将后面的变量和数值一个个输出到命令行,末尾再输出一个换行符。可以看到变量a中的值确实是nil。 Note that the pln command is similar to the println function in general languages. It outputs the following variables and values to the command line one by one, and then outputs a newline character at the end. You can see that the value in variable a is really nil.
如果变量未定义就使用,会显示“未定义”字样,例如,下面的代码: If the variable is used without definition, the word "undefined" will be displayed, for example, the following code:
  pln "a:" $a

  var $a

  pln "a:" $a
运行后会显示如下结果: The following results will be displayed after running:
  a: undefined
  a: <nil>
因为第一次输出时,变量a尚未被定义。 Because the variable a has not been defined at the time of the first output.
- 谢语言中,常用的基本类型包括:bool/布尔、int/整数、float/浮点数(即小数)、str/字符串,其中整数和浮点数均为64位,还有byte/字节、rune/如痕(用于Unicode字符)。复杂类型在后面再介绍。使用plo命令,可以看到某个变量的类型和数值:
- In Xielang, common basic types include: bool(boolean), int(integer), float(floating point number, i.e. decimal), str(string), where both integer and floating point number are 64 bits, and byte(byte), rune(for Unicode characters). Complex types will be introduced later. Use the plo command to see the type and value of a variable:
  C:\Users\Administrator# xie
  > var $a float
  > plo $a
  (float64)0
  >
可以看出,变量a被定义为float64即64位浮点数,并初始化为值0。 It can be seen that the variable a is defined as float64, which is a 64-bit floating point number, and initialized to the value 0.
谢语言中的变量的类型可以任意改变,意味着谢语言是一门“弱类型”的语言,而不像Go、C/C++、Java等“强类型”的语言那样,变量一旦声明后只能改变数值而不能改变类型。 The type of variables in Xie language can be changed at will, which means that Xielang is a "weakly typed" language. Unlike "strongly typed" languages such as Go, C/C++, Java, etc., variables can only change the value but not the type once declared.
谢语言中给变量赋值用的是assign/=(即选用assign或=都可以表示这条指令,后面都会用类似的写法)指令: In Xielang, assign/=/assignment is used to assign values to variables (that is, select assign or '=' to indicate this command(instruction), which will be written in a similar way later):
assign $a 123这条命令将把变量a赋值为123,注意,这是字符串“123”,而不是数字123,因为谢语言中默认数值都是字符串类型。 This command will assign the value of variable a to 123. Note that this is the string "123", not the number 123, because the default value in Xielang is string type.
如果想把变量a赋值为一个整数,可以选用下面两种方法之一: If you want to assign variable a to an integer, you can choose one of the following two methods:
  assign $a #i123
  assign $a int 123
第一种方法是谢语言中对数值指定类型的方法,在数值前加上“#”号开头带一个指定的英语字母,可以限定数值的类型,对于基本类型,“#i”表示整数,“#f”表示浮点数,“#b”表示布尔数值(后跟true或false),“#s”表示字符串,“#y”表示字节,“#r”表示如痕。 The first method is specifying the type of a number in Xielang. The number is preceded by a "#" sign with a specified English letter, which can limit the type of a number. For the basic type, "#i" represents an integer, "#f" represents a floating point number, "#b" represents a Boolean value (followed by true or false), "#s" represents a string, "#y" represents a byte, and "#r" represents a rune(32bit signed int).
第二种方法是在数值前再加一个指定数据类型的参数,可以是“int”、“float”、“bool”、“str”、“byte”、“rune”等。 The second method is to add a parameter of the specified data type before the numerical value, which can be "int", "float", "bool", "str", "byte", "run", etc.
看一下下面的输出,可以看到两种方法得到的结果是一样的: Looking at the following output, we can see that the results obtained by the two methods are the same:
  D:\tmpx# xie
  > assign $a #i123
  > plo $a
  (int)123
  > assign $a int 123
  > plo $a
  (int)123
  > = $变量1 整数 123
  > plo $变量1
  (int)123
  >
由于谢语言使用空格作为命令与参数之间的分隔符,因此带有空格的字符串必须做特殊处理,使用双引号、单引号或反引号括起来(不含空格的字符串可以不括起来直接使用),双引号中可以带有\n、\t、\"(表示双引号本身)等转义字符,单引号和反引号括起的字符串都不进行转义,反引号还可以括起多行字符串(含有换行符“\n”的字符串)。另外,由于使用了反引号,谢语言代码中不应出现其他用途的反引号,如果遇上确需使用的地方,需要用全局变量$backQuoteG或者转义字符“\u0096”来代替。
Because Xielang uses spaces as the separator between commands and parameters, strings with spaces must be treated specially, using double quotation marks, single quotation marks or back quotation marks (strings without spaces can be used directly without being enclosed), and double quotation marks can contain \n, \t, \"(indicating the double quotation mark itself) and other escape characters. The string enclosed by the single quotation mark and the back quotation mark cannot be escaped. The back quotation mark can also enclose multiple lines of string (containing the newline character"\n"). In addition, because the back quotation mark is used, the back quotation mark for other purposes should not appear in Xielang code. If it is really necessary to use it, it needs to be replaced by the global variable $backQuoteG or the escape character "\u0096".
  assign $s abc
  plo $s

  assign $s "abc 123"
  plo $s

  assign $s `abc 123
  and this`
  plo $s

  assign $b int 3
  plo $b

  assign $b #i3
  plo $b

  assign $b #f3
  plo $b
本段例子代码(assign.xie)执行后的结果是:
The result of the execution of this example code (assign. xie) is:
  (string)abc
  (string)abc 123
  (string)abc 123
  and this
  (int)3
  (int)3
  (float64)3
var指令在指定类型后面,也可以带有初始化赋值的数据,例如:
After the specified type, the var instruction can also carry data for initialization assignment, for example:
var $a int 10

var $b string "abc非常好"
堆栈是各种语言都会用到的数据结构,当然除了汇编语言外,一般都是“暗中”使用。但谢语言中将堆栈放开了使用,这有利于程序的性能,以及开发者灵活地操控。当然,对于对编程底层不是很了解的开发者来说,需要有一个适应的过程,容易犯错导致程序运行出乎意料。但熟悉之后,会发现这是一个很有力、很高效的编程基础设施。
Stack is a data structure used by all languages. Except for assembly language, of course, it is generally used "secretly". However, Xie language has released the use of the stack, which is conducive to the performance of the program and the flexible control of developers. Of course, for developers who don't know much about the underlying programming, there needs to be an adaptation process, which is easy to make mistakes and lead to unexpected program operation. But after getting familiar with it, you will find that it is a very powerful and efficient programming infrastructure.
堆栈实质上是一个“后进先出”的队列,我们一般将其形象地想象为一个竖立的箱子,一般的操作包括“入栈”(英语为push,将一个数值压入堆栈,即放在堆栈的顶部)、“出栈”(英语为pop,将一个数值弹出堆栈,即从堆栈顶部取出一个数值)和“看栈”(英语为peek,即取到堆栈顶部的第一个数值,但并不做出栈操作,并不改变堆栈内容)。
The stack is essentially a "last in, first out" queue. We generally imagine it as an upright box. The general operations include "push" (push a value into the stack, that is, put it on the top of the stack), "Pop" and "peek" (look at the top of the stack).
形象化地,我们有时候将入栈操作也称为“压入堆栈”,将出栈操作称为“弹出堆栈”、“弹出栈顶数值”,将看栈操作称为“查看栈顶”等。如果后面说道“弹栈值”,是指做了出栈(弹栈)操作后得到的值。另外,堆栈内的数值有可能被称为“元素”。
Visually, we sometimes call stack push operation as "push stack", stack pop operation as "pop stack", "pop stack top value", and stack view operation as "view stack top". If "pop stack value" is mentioned later, it refers to the value obtained after the pop stack operation. In addition, the values in the stack may be called "elements" or "items".
堆栈在各种数值转移、计算、函数调用等场景中都发挥着重要的作用,谢语言中将其放在了明面上,给开发者提供一种高效的工具。
Stacks play an important role in various numerical transfer, calculation, function call and other scenarios. Xielang puts them on the bright side, providing developers with an efficient tool.
下面的代码(stack.xie)演示了堆栈的各种基本操作,代码中也写有详细的注释说明每条语句的作用,我们后面将大量使用这种方式来做代码示例和语法与指令讲解:
The following code (stack.xie) demonstrates various basic operations of the stack. Detailed comments are also written in the code to explain the function of each statement. We will use this method extensively to explain code examples, syntax and instructions later:
// 将整数2压入堆栈
// push a integer value 2
push #i2

// 弹出栈顶数值到变量a中
// pop the top item of the stack to variable $a
pop $a

// 输出变量a的内容
// print the value of variable $a for reference
plo $a

// 将整数3压入堆栈
// push another integer number 3 to stack
push #i3

// 将小数2.7压入堆栈,此时栈内从下而上包含两个元素:整数的3和浮点数2.8
// push the decimal 2.7 onto the stack. At this time, the stack contains two elements from the bottom up: the integer 3 and the floating point number 2.8
push #f2.8

// 查看栈顶元素并将其赋值给变量b
// view the top element of the stack and assign it to variable b
peek $b

// 输出变量b的内容
// view the value of variable $b
plo $b

// 弹出栈顶元素到变量c中
// pop the stack top element into variable c
pop $c

// 输出变量c的内容
// view the value of variable $c
plo $c
运行这段代码将输出:
After running this code, you will get output like below:
  (int)2
  (float64)2.8
  (float64)2.8
  (bool)true
  (bool)true
可以根据代码中的注释,详细观察堆栈操作的结果与预期的是否一致。
According to the comments in the code, you can observe in detail whether the result of the stack operation is consistent with the expected.
谢语言中,有几个与堆栈操作有关特殊变量,属于系统预定义的变量,可以随时使用以便于一些灵活的数值操作。它们是“$push”、“$pop”和“$peek”,分别表示入栈值、出栈值、看栈值。下面是它们的使用例子(stackVar.xie):
In Xielang, there are several special 'global' variables related to stack operations, which are predefined variables in the system and can be used at any time to facilitate some flexible numerical operations. They are "$push", "$pop" and "$peek", which represent the stack push operation, the stack pop value and the stack peek value respectively. The following are examples of the usage (stackVar.xie):
// 将字符串压入堆栈
// push string to the stack
push "我们高兴!"

// 弹出栈顶数值,并输出
// 注意弹出的数值如果不赋值给变量将丢失
// pop up the value at the top of the stack and output
// note that the pop-up value will be lost if it is not assigned to the variable
plo $pop

// 将整数18入栈
// push an integer value 18 to the stack
push #i18

// 将出栈的数值赋值给变量a
// assign the value on the top of the stack to the variable $a, and "drop" it(from the stack)
assign $a $pop

// 输出变量a
// output variable a
plo $a

// 将浮点数3.14入栈
// put floating point number 3.14 on the stack
push #f3.14

// 将栈顶值赋值给变量a
// 此时堆栈内该数值仍将继续存在
// assign the stack top value to variable $a
// at this time(peek), the value will continue to exist in the stack
assign $a $peek

// 再次输出变量a
// output variable $a again
plo $a


// 用assign语句将整数18入栈
// $push变量表示将后面的数值压栈
// use the assign statement to put the integer 18 on the stack
// the $push variable means to push the following values on the stack
assign $push #i3

// 输出栈顶元素
// output stack top element
plo $peek
本段代码运行的结果是:
The result of running this code is:
  (string)我们高兴!
  (int)18
  (float64)3.14
  (int)3
先看看这个加法的例子(add.xie):
First, take a look at the example of addition (add.xie):
// 将整数2入栈
// push an integer value 2 to stack
push #i2

// 将整数5入栈
// push another integer value 5 to stack
push #i5

// 将栈顶两个数值取出相加后结果压入栈中
// 此处使用了预定义全局变量$push
// 此时栈中应仅有一个数值(整数5)
// add 2 values popped from the stack and add them
// since we used the global predefined variable $push,
// the result will be pushed into the (empty now) stack
// after that, there is only one value 7 in the stack
add $push $pop $pop

// 输出栈顶数值(同时该数值被弹出)
// output the top value of the stack
plo $pop

// 将浮点数1.5与2.6相加后压栈
// add float value 1.5 and 2.6, push the result
add $push #f1.5 #f2.6

// 弹栈输出
// print(and pop) the top value of the stack again
plo $pop

// 将两个字符串相加(连接)后赋值给变量c
// add 2 string value(concat them) and put the result into variable $c
add $c `abc` `123 456`

// 输出变量c
// output variable $c
plo $c

// 将变量c中的数值压栈
// push $c to the stack
push $c

// 将字符串“9.18”压栈
// push a string "9.18" to the stack
push "9.18"

// 将栈顶两个字符串相加后赋值给变量d
// Add the two strings at the top of the stack and assign the value to the variable $d
add $d $pop $pop

// 输出变量d
// output variable $d
plo $d

// 将整数18与190相加后,压入栈中
// Add the integers 18 and 190 and push them onto the stack
add $push #i18 #i190

// 弹栈输出
// pop and output the result
plo $pop
谢语言中,加法运算指令是add/+,将把结果参数之后的两个参数(可以是变量)值进行相加操作后将结果存入结果参数指明的变量中,如果没有指定结果变量,则存入全局预设变量$tmp中。本例中我们使用了预置全局变量$push表示将计算结果压入堆栈中。这段代码的运行结果是:
In Xielang, the addition operation instruction is add/+. After adding the values of the two parameters (which can be variables) after the result parameter, the result will be stored in the variable specified by the result parameter. If no result variable is specified, it will be stored in the global preset variable $tmp. In this example, we use the preset global variable $push to push the calculation result into the stack. The result of running this code is:
  (int)7
  (float64)4.1
  (string)abc123 456
  (string)abc123 4569.18
  (int)208
其他类似的运算指令还有sub/-、mul/*、div//、mod/%等,用法类似。这些都属于二元运算指令,即参与运算的数值是两个。二元运算的两个数值必须是同一类型的。如果是不同类型,例如整数和浮点数相加,则需要先进行类型转换。
Other similar operation instructions include sub/-, mul/*, div//, mod/%, etc., with similar usage. These are binary operation instructions, that is, two values are involved in the operation. The two values of a binary operation must be of the same type. If it is of different types, such as adding integer and floating point numbers, type conversion is required first.
谢语言中,使用convert指令来转换数值类型,至少需要两个参数,第一个参数是数值或变量,第二个参数是字符串,指定需要转换成为的数据类型,如果有参数有三个,那么第一个参数(即结果参数)必须是一个变量,convert指令将会把转换后的结果存入该变量,否则会存入$tmp。convert指令的使用示例(convert.xie)如下:
In Xielanguage, using the convert instruction to convert a numeric type requires at least two parameters. The first parameter is a numeric value or variable, and the second parameter is a string. Specify the data type to be converted into. If there are three parameters, the first parameter (that is, the result parameter) must be a variable, and the convert instruction will store the converted result in the variable, otherwise it will store it in $tmp. An example of the use of the convert instruction (convert.xie) is as follows:
// 将整数15赋值给变量a
// assign integer value to variable $a
assign $a #i15

// 此时如果执行指令 add $result $a #f3.6
// 将会出现运行时错误
// 应为加法运算的两个数值类型不一致
// 一个是整数,一个是浮点数
// at this time, if we execute the command "add $result $a # f3.6"
// a runtime error will occur
// the two numeric types expected for addition operation are inconsistent
// one is an integer and the other is a floating point number

// 输出变两个的数据类型和数值进行查看
// pl指令相当于其他语言中的printf函数,后面再多输出一个换行符\n
// Output the data type and value of two variables to view
// pl instruction is equivalent to the printf function in other languages, followed by an additional newline character "\n"
pl `a(%T)=%v` $a $a

// 将变量a转换为浮点数类型
// 结果将压入栈中
// convert the variable $a to float point number
// and push the result into the stack
convert $push $a float

// 输出栈顶值(不弹栈)的类型和数值查看
// output the top value of the stack(no pop) for reference
pl `a(%T)=%v` $peek $peek

// 将栈顶值与浮点数3.6相加后压栈
// pop the stack and add it with float point number 3.6
// push the result to the stack
add $push $pop #f3.6

// 输出栈顶值查看类型和结果
// 注意第一个参数使用$peek是为了不弹栈
// 以保证第二个参数$pop操作时还能取到该值
// output the stack top value to view the type and operation result
// note that $peek is used for the first parameter to avoid stack pop action
// to ensure that the value of the second parameter $pop can be obtained during operation
pl "result=(%T)%v" $peek $pop
代码中解释很详细,运行结果如下:
The explanation in the code is very detailed, and the running results are as follows:
  a(int)=15
  a(float64)=15
  result=(float64)18.6
谢语言中可以使用adds指令将多个字符串进行连接/拼接(有时候也叫字符串相加)。当然,adds指令不仅仅用于字符串的相加,也可以用于其他数据类型的相加,与add指令不同的是,adds指令可以将多个数值相加,并且可以用于不同类型的数值相加。adds指令会从左到右,将第一个数值与第二个数值相加,其结果再与第三个数值相加,依此类推直至加完所有数值。如果数值类型不同,adds指令将尽量把每次加法操作的第二个数值转换成第一个数值的类型,如果实在无法完成的加法,将返回error对象。
In Xielang, you can use the add instruction to connect/splice multiple strings (sometimes called string addition). Of course, the adds instruction is not only used for the addition of strings, but also for the addition of other data types. Unlike the add instruction, the adds instruction can add multiple values and can be used for the addition of different types of values. The add command will add the first value to the second value from left to right, and the result will be added to the third value, and so on until all the values are added. If the number types are different, the add instruction will try to convert the second number of each addition operation to the type of the first number. If the addition cannot be completed, the error object will be returned.
因此,对于相连接多个字符串的时候,或者想将包含字符串和数字等数值拼接成一个大字符串时,可以考虑使用adds指令。
Therefore, when connecting multiple strings, or when you want to splice values including strings and numbers into a large string, you can consider using the add command.
下面看一下例子(adds.xie):
Let's take a look at the following example (adds.xie):
// 本例演示adds指令的用法
// adds指令可以将多个数值相加,并且可以用于不同类型的数值相加
// adds指令会从左到右,将第一个数值与第二个数值相加,其结果再与第三个数值相加,依此类推直至加完所有数值
// 如果数值类型不同,adds指令将尽量把每次加法操作的第二个数值转换成第一个数值的类型
// 如果实在无法完成的加法,将返回error对象
// The add instruction can add multiple values and can be used to add different types of values
// The add command will add the first value to the second value from left to right, and the result will be added to the third value, and so on until all the values are added
// If the number types are different, the add instruction will try to convert the second number of each addition operation to the type of the first number
// If the addition cannot be completed, the error object will be returned

// 将多个字符串相加
// 注意其中含有一个浮点数3.8,将转换为字符串
// 另外,双引号、单引号,反引号都可以用于括起字符串,它们的区别是:
// 双引号括起的字符串可以包含转义字符,如\n、\"(表示双引号本身)等
// 单引号括起的字符串不进行转义
// 反引号支持多行字符串,括起的字符串也不进行转义
// Add multiple strings
// Note that it contains a floating point number 3.8, which will be converted to a string
// In addition, double quotation marks, single quotation marks and back quotation marks can be used to enclose strings. Their differences are:
// The string enclosed by double quotation marks can contain escape characters, such as  n,  "(indicating the double quotation marks themselves), etc
// Strings enclosed in single quotation marks are not escaped
// Backquotes support multi-line strings, and enclosed strings are not escaped
adds $result "abc" "\"123\"" #f3.8 '"递四方ds' `give it to
    them
`

plo $result

// 进行依次整数相加,因为第一个数值$a是整数类型
// 因此后面的所有参数都将转换成整数再进行计算
// Perform sequential integer addition, because the first value $a is of integer type
// Therefore, all subsequent parameters will be converted to integers and then calculated
assign $a int 15

adds $result2 $a 30 #f2.3 #btrue

plo $result2
代码的执行结果是:
(string)"abc\"123\"3.8\"递四方dsgive it to \n    them\n"
(int)48
谢语言中大多数指令会产生一个或多个结果值(类似于其他语言中的函数会有返回值),谢语言中指令的返回值多数情况下是一个(函数的返回值视情况会有0个、1个或多个),也有少数指令有多个结果值。
Most instructions in Xielang will produce one or more result values (similar to the return values of functions in other languages). The return values of instructions in Xielang are mostly one (the return values of functions may be 0, 1 or more depending on the situation), and a few instructions have multiple result values.
因此,很多指令需要的一个用于指定接收指令执行结果的参数,我们将其称作结果参数。结果参数一般都是一个变量,因此也称作结果变量。结果变量可以是$push(表示将结果压入堆栈中)、$drop(表示将结果丢弃)等预置全局变量。结果变量有时可以省略,此时表示将结果存入全局变量$tmp中(等同于显式声明为$tmp)。但当指令的参数个数可变时,结果参数不可省略,以免产生混淆。因此,为清晰起见,一般情况下建议尽量显式使用结果参数。
Therefore, many instructions need a parameter to specify the execution result of the received instruction. We call it "the result parameter"(sometime the RP). The result parameter is generally a variable, so it is also called a result variable(i.e. RV). The result variables can be preset global variables such as $push (meaning to push the result into the stack), $drop (meaning to discard the result), etc. The result variable can sometimes be omitted, which means that the result is stored in the global variable $tmp (equivalent to explicitly declared as $tmp). However, when the number of parameters of an instruction is variable, the resulting parameters cannot be omitted to avoid confusion. Therefore, for the sake of clarity, it is generally recommended to declare the result parameters explicitly as much as possible.
例如toUpper指令被用于将字符串转换为大写,toUpper "abc" 会将大写的ABC存入$tmp中, 而 toUpper $result "abc" 则会将ABC赋值给变量result。
For example, the toUpper instruction is used to convert strings to uppercase. toUpper "abc" will store uppercase ABC in $tmp, while toUpper $result "abc" will assign ABC to variable $result.
另外,如果指令应返回结果,则文档中当不提结果参数时,“第一个参数”一般指的是除结果参数外的第一个参数,余者类推。
In addition, if the instruction should return a result, when the result parameter is not mentioned in the document, the "first parameter" generally refers to the first parameter except the result parameter, and so on.
对于带有可选个数参数的指令,则一般第一个参数必须是结果变量,不可省略,这样最后才可以接可选的n个参数,否则容易产生混淆。例如getWeb指令,一个典型用法(参看httpClient.xie)是:
For instructions with optional number of parameters, generally the first parameter must be the result variable and cannot be omitted, so that the optional n parameters can be connected at the end, otherwise it is easy to cause confusion. For example, a typical use of the getWeb instruction (see httpClient.xie) is:
getWeb $resultT "http://127.0.0.1:80/xms/xmsApi" -method=POST -encoding=UTF-8 -timeout=15 -headers=`{"Content-Type": "application/json"}` $mapT因为后面的参数除了URL是必须的外,其他都是可选的,不能确定有几个参数,因此只能把结果变量放在第一个,以便存放获取到的HTTP响应的内容。
Because the following parameters are optional except the URL, and it is uncertain how many parameters there are. Therefore, the result variable can only be placed in the first place to store the content of the obtained HTTP response.
上例中用到的pl指令,类似于一般语言中的printf函数,可以用占位符来控制输出的字符串内容。参数中第一个是格式字符串,可以含有%d、%f、%s、%v等占位符表示不同的数值输出形式,具体请参考Go语言等的参考文档。pln、plo、pl等指令在调试中经常会使用到,需要熟悉。
The pl instruction used in the above example is similar to the printf function in general languages. It can use placeholders to control the output string content. The first of the parameters is a format string, which can contain placeholders such as% d,% f,% s,% v, etc. to represent different numerical output forms. For details, please refer to the reference documents of Go language. Pln, plo, pl and other instructions are often used in debugging and need to be familiar with.
我们前面已经接触到了一些谢语言中常用的内置全局变量,例如$push,$pop,$peek等,这里再列出所有的全局变量作为参考。
We have seen some built-in global variables commonly used in Xielang, such as $push, $pop, $peek, etc. Here we will list all the predefined global variables for reference.
-
$tmp 表示内置全局变量tmp,例如 add #i1 #i2,将把整数1加2的结果存入$tmp中,我们也可以像普通变量一样使用$tmp。注意:tmp中存储的值我们在后面常简称做tmp值或者直接称作$tmp。另外,使用$tmp变量的原则是尽量快,因为任何指令或者表达式的计算都可能用到$tmp,并令其发生改变。 Indicates that the built-in global variable tmp, such as 'add #i1 #i2', will store the result of integer 1+2 in $tmp. We can also use $tmp as a common variable. Note: The value stored in $tmp is often referred to as tmp value or $tmp directly. In addition, the principle of using the $tmp variable is to be as fast as possible, because any instruction or expression calculation may use $tmp and make it change.
-
$push 表示压栈,例如 "add $push #i1 #i2",将把整数1加2的结果压栈 Indicates stack pushing. For example, "add $push #i1 #i2" will push the result of integer 1 plus 2
-
$pop 表示弹栈,例如 "add $push $pop #i3",将把弹栈值加上整数3,然后结果压栈 Indicates the stack popping. For example, "add $push $pop #i3" will add the pop stack value to the integer 3, and then the result will be pushed.
-
$peek 表示看栈(不弹栈) ,用法类似$pop,但不弹出栈顶值(即保留在栈顶),而只是获取其值供使用 It means to look at the stack (without popping the stack). Its usage is similar to $pop, but it does not pop up the value at the top of the stack (that is, keep it at the top of the stack), but just gets its value for use
-
$pln 表示输出,例如:md5 $pln abc,将把字符串abc的MD5编码输出到命令行(类似于println函数的方式,结尾会输出一个回车符) Indicates the output, for example: "md5 $pln abc". The MD5 encoding of the string abc will be output to the command line (similar to the println function, with a carriage return at the end)
-
$drop 表示丢弃,通常在不关心指令执行结果时使用,例如:removeFile $drop "c:\temp\tmp.txt",将删除相应文件后,将执行结果丢弃 Indicates discarding, which is usually used when the instruction execution result is not concerned, for example: removeFile $drop "c:\temp\tmp.txt". After the corresponding file is deleted, the execution result will be discarded
-
$seq 表示一个全局的整数,每次使用都会加1,一般用于获取自增长、不重复的序号 Represents a global integer, which will be increased by 1 every time it is used. It is generally used to obtain self-growing and non-repeating serial numbers
-
$undefinedG 表示未定义的变量值,或指令应返回结果而没有返回结果的时候 Indicates an undefined variable value, or when the instruction should return a result without returning a result
-
$debug 表示获取当前的调试信息 Indicates to get the current debugging information
-
$argsG 一般是指命令行参数,字符串列表类型 It generally refers to the command line parameter, string list type
-
$inputG 一般是外部传入虚拟机的参数,可以是任意类型 Generally, it is the parameter passed into the virtual machine from the outside, which can be any type
-
$outG 一般用这个变量保存虚拟机结束执行时像外部传出的参数(即返回值),可以是任意类型 Generally, this variable is used to save the parameters (return value) that are sent out from the outside when the virtual machine ends execution, which can be of any type
-
$paraMapG 一般在HTTP请求响应模块中,表示请求参数(包括URL参数即GET/QUERY参数和POST参数) Generally, in the HTTP request response module, it represents the request parameters (including URL parameters, namely GET/QUERY parameters and POST parameters)
-
$requestG 一般在HTTP请求响应模块中,表示请求对象 Generally, in the HTTP request response module, it represents the request object
-
$responseG 一般在HTTP请求响应模块中,表示响应对象 Generally, in the HTTP request response module, it represents the response object
-
$backQuoteG 表示反引号字符 Represents a backquote character
-
$newLineG 表示换行字符(即\n) Indicates line feed character(i.e. \n)
-
$scriptPathG 表示当前执行的脚本所在路径 Indicates the path of the currently executed script
-
$guiG GUI编程中的全局引用对象 Global reference objects in GUI programming
注意,要避免自定义变量与这些变量名称冲突。 Note that you should avoid conflicts between custom variables and their names.
谢语言中,可以在任意代码行的前一行添加标号,主要用于各种循环和条件分支等跳转场景。设置标号必须单独占一行,并以冒号“:”字符开头。
In Xielang, you can add a label to the previous line of any code line, which is mainly used for jump scenarios such as loops and conditional branches. The setting label must occupy a separate line and begin with a colon ":" character.
  :lable1
  pln 123
谢语言中,每行代码的头尾空白将被忽略,因此可以适当采用代码的逐级缩进来增加代码的可读性。
In Xielang, the blank space at the beginning and end of each line of code will be ignored, so the progressive indentation of the code can be appropriately used to increase the readability of the code.
  :lable1
      pln 123
谢语言中,由于采用接近汇编语言的快捷语法,因此在一般的计算上或许要稍微复杂一些。通常情况下,建议对多步运算表达式采用分解后逐个进行的方式。例如,一个3+(9*1.5)/1.7的算式,建议用下面的代码(expression.xie)实现:
In Xielang, due to its fast syntax close to assembly language, it may be slightly more complicated in general calculation. Generally, it is recommended to decompose the multi-step operation expression one by one. For example, a 3+(9 * 1.5)/1.7 formula is suggested to be implemented with the following code (expression.xie):
// 计算3+(9*1.5)/1.7
// Calculate 3+(9 * 1.5)/1.7

// 将浮点数9压栈
// push floating point number 9 onto the stack
push #f9

// 将浮点数1.5压栈
// then push floating point number 1.5 onto the stack
push #f1.5

// 将栈顶两元素弹出相乘后结果存入预设全局变量tmp
// store the result of multiplying the two elements at the top of the stack into the preset global variable tmp
mul $pop $pop

// 将tmp中的值和浮点数1.7相除后再次存入tmp
// divide the value in tmp and floating point number 1.7 and store it in tmp again
div $tmp #f1.7

// 将浮点数3和tmp中值相加后存入$tmp
// add the floating point number 3 and the value of tmp and save it into $tmp
add #f3 $tmp

// 输出结果查看
// view output results
pl "3+(9*1.5)/1.7=%v" $tmp
运行结果如下:
The operation results are as follows:
3+(9*1.5)/1.7=10.941176470588236
可以看出,分解表达式的方法代码量比一般的高级语言多一些,但带来的好处是速度更快,因为省去了各种解析表达式的开销。后面可以看到,谢语言实际上也支持复杂的表达式运算,但显然自行分解的表达式运算效率更高。
It can be seen that the method code for decomposing expressions is a little more than that of general high-level languages, but the advantage is that it is faster because it saves the cost of various parsing expressions. As you can see later, Xielang actually supports complex expression operations, but it is obviously more efficient to decompose expressions by itself.
谢语言中,也可以进行复杂的表达式计算,这要用到eval指令,参看下面的代码(eval.xie):
In Xielang, complex expression calculation can also be performed, which requires the eval instruction. See the following code (eval. xie):
// 本例演示表达式的使用
// This example demonstrates the use of expressions

// 给变量a赋值为整数12
// Assign the value of variable a to integer 12
assign $a #i12

// 计算表达式 a+(a+12/2) 的值,结果存入tmp
// 表达式是一个字符串类型的数值或变量
// 注意,一般的表达式有可能存在空格,因此需要用反引号或双引号括起来
// Calculate the value of expression a+(a+12/2) and store the result in tmp
// Expression is a numeric value or variable of string type
// Note that common expressions may have spaces, so you need to use back quotes or double quotes
eval "$a + ( $a + #i12 / #i2 )"

// 输出tmp值查看
// Output tmp value to view
pln $tmp

// 将变量b赋值为整数-9
// Assign variable b to integer - 9
assign $b #i-9

// 计算顺序括号优先,无括号时按照一般的运算符顺序进行计算
// 结果值放入变量r
// 本例要计算的表达式的数学表达是 a+((a-8.0)*abs(b)),其中abs表示取绝对值
// 注意由于计算顺序问题,数学表达中需要把a-8.0加上括号以保证计算顺序一致
// 表达式里可以包含指令,此时应该使用花括号将其括起来
// 该指令必须通过$tmp变量返回一个结果值继续参加表达式的运算,这样可以使得表达式中实现基本运算符之外的运算功能,例如转换数值类型等
// 花括号不可以嵌套使用
//The calculation order takes precedence over parentheses. If there are no parentheses, the calculation is performed according to the general operator order
//The result value is put into the variable r
//The mathematical expression of the expression to be calculated in this example is a+((a-8.0) * abs (b)), where abs represents the absolute value
//Note that due to the calculation order problem, it is necessary to add brackets to a-8.0 in the mathematical expression to ensure the consistent calculation order
//Expressions can contain instructions, which should be enclosed by curly braces
//The instruction must return a result value through the $tmp variable to continue to participate in the operation of the expression, which can enable the expression to implement the operation functions other than the basic operator, such as converting the numeric type, etc
//Curly brackets cannot be nested
eval $r `$a + ($a - {convert #f8.0 int}) * {abs $b}`

// 输出变量r的值查看
// View the value of output variable r
pln $r

// 判断表达式 !((a-b)<10) 的计算结果值是否为布尔值true,是则跳转到标号next1处
// ifEval指令后第一个参数必须是一个字符串类型的数值或变量,表示要计算的表达式
// 第二个参数时满足条件后要跳转到的标号
// Judge expression! Whether the calculated result value of ((a-b)<10) is a boolean value true, and if yes, it will jump to the label next1
// The first parameter after the ifEval instruction must be a numeric value or variable of string type, representing the expression to be evaluated
// The second parameter is the label to jump to when the condition is met
ifEval `! (($a - $b) < #i10)` :next1

pln 条件不满足
exit

:next1
pln 条件满足
需要特别注意的是,谢语言中的表达式中,运算符是没有优先级之分的,因此一个表达式中是严格按照从左到右的顺序执行运算的,唯一的例外是括号,用圆括号可以改变运算的优先级,括号里的部分将被优先计算。另外,表达式中的值与运算符之间必须有空格分隔。也因为一般的表达式都存在空格,因此需要用反引号或双引号括起来。
Special attention should be paid to the fact that in the expressions in Xie language, operators have no priority. Therefore, an expression performs operations in strict order from left to right. The only exception is parentheses. Parentheses can change the priority of operations, and the parts in parentheses will be calculated first. In addition, the value and operator in the expression must be separated by a space. Because there are spaces in general expressions, you need to enclose them with back quotes or double quotes.
另外,如果括号里的内容以一个问号“?”开始,那么后面可以是一条指令,该指令必须通过$tmp变量返回一个结果值以便继续参加表达式的运算,这样可以使得表达式中实现基本运算符之外的运算功能,例如转换数值类型等。
In addition, if the content in the parentheses starts with a question mark "?", then it can be followed by an instruction that must return a result value through the $tmp variable to continue to participate in the operation of the expression, which can enable the expression to implement the operation functions other than the basic operator, such as converting the numeric type.
ifEval指令是专门配合表达式计算使用的条件跳转指令,它后面必须跟一个字符串类型的表达式,其计算结果必须是一个布尔类型的值,ifEval指令将根据其结果,确定是否要跳转到指定的行号。ifEval指令,简化了一般的if和ifNot质量较为复杂的条件处理语法结构。
The ifEval instruction is a conditional jump instruction specially used for expression calculation. It must be followed by an expression of string type, and its calculation result must be a Boolean value. The ifEval instruction will determine whether to jump to the specified line number according to its result. The ifEval instruction simplifies the general if and ifNot quality conditional processing syntax structure.
由于谢语言中表达式计算相对效率较低,因此对于需要反复高速计算或处理的场景,建议还是使用分解的方式更高效。
Due to the relatively low efficiency of expression calculation in Xielang, it is recommended to use decomposition method for scenes that require repeated high-speed calculation or processing.
运行后的效果:
Effect after operation:
30
48
条件满足
谢语言中,表达式可以运用在指令的参数中,此时需要以英文问号“?”字符开头,例如(exprInParam.xie):
// 本例演示指令中用表达式作为参数
// This example demonstrates using expressions as parameters in instructions

assign $a "abc"

// 表达式做参数
// 注意“@”后面再加双引号或反引号括起表达式
// Expression as parameter
// Note that the expression is enclosed by double quotation marks or back quotation marks after "@"
pl "[%v] test params: %v" @"{nowStr}" $a
将输出:
Will output:
[2022-05-17 14:30:59] test params: abc其中,pl指令的第二个参数即是以@号开头的表达式,而这个表达式用花括号括起指令的方式又运行了获取当前时间字符串的指令nowStr。注意,表达式内的指令,一定要保证将结果值存入全局变量、$tmp(不可省略结果参数的指令,要确保结果参数是$tmp)。
Among them, the second parameter of the pl instruction is the expression beginning with the @ sign, and this expression runs the instruction nowStr to obtain the current time string by enclosing the instruction with curly braces. Note that the instruction in the expression must ensure that the result value is stored in the global variable, $tmp (for the instruction that cannot omit the result parameter, ensure that the result parameter is $tmp).
下例是另一个表达式的例子,使用quickEval指令,与eval指令是等价的(quickEval.xie):
The following example is another example of an expression, using the quickEval instruction, which is equivalent to the eval instruction (quickEval.xie):
// 本例展示快速表达式
// 注意快速表达式中需要用花括号来支持内嵌指令或函数
// This example shows a fast expression
// Note that curly braces are needed in fast expressions to support embedded instructions or functions

// 将变量a赋值为浮点数15.2
// Assign variable a to floating point 15.2
= $a #f15.2

// 计算 -5.1*2.8+(23+(a-6.9))/3.3
// quickEval指令用于计算一个用字符串表示的快速表达式的值
// Calculation - 5.1 * 2.8+(23+(a-6.9))/3.3
// The quickEval instruction is used to calculate the value of a fast expression expressed as a string
quickEval `-#f5.1*#f2.8+(#f23+ ($a -#f6.9)) /#f3.3 `

pln $tmp

// 计算 3+(16-2)/3%2 并输出结果
// Calculate 3+(16-2)/3% 2 and output the result
quickEval $pln `#i3 + (#i16 -#i2) / #i3 % #i2`

= $s1 "abc 12\n3 \u0022大家好\u0022"

// 计算字符串的相加(即连接)结果
// Calculate the result of adding (connecting) strings
quickEval $pln `" -- " + $s1 + "--"`

// 将变量b赋值为整数18
// Assign variable b to integer 18
assign $b #i18

// if指令后也可以接快速表达式表示判断条件
// 快速表达式做参数时,以@符号开始,一般后面用反引号括起来,因为常有空格
// if语句后快速表达式也可以不带@符号,直接是一个字符串,会自动判断
// The if instruction can also be followed by a fast expression to express the judgment condition
// When a fast expression is used as a parameter, it starts with the @ sign and is usually followed by a back quotation mark, because there are often spaces
// The quick expression after the if statement can also be a string without the @ sign, which will be automatically determined
if @`$b > #i12` +1 +3
    pl "$a > #i12"
    goto :next1

    pl "$a <= #i12"

:next1

// 给变量s1赋值为字符串abcde
// Assign the value of variable s1 to the string abcde
= $s1 `abcde`

// 快速表达式中如果需要进行内嵌指令运算,需要用花括号括起来
// 另外内嵌指令的结果必须存入临时变量$tmp中
// If the embedded instruction operation is required in the fast expression, it needs to be enclosed in curly brackets
// In addition, the result of the embedded instruction must be stored in the temporary variable $tmp
quickEval $rs `#i15*#i3+{toInt $tmp 19}* {len $tmp $s1}`

pl "first result: %v" $rs

plv @`#i15/#i3+{toInt $tmp 19}* {len $tmp $s1}-#i3`

// 内嵌指令中不能再使用花括号,其他值中可以使用花括号
// Curly brackets can no longer be used in embedded instructions, and can be used in other values
plv @`{toStr $tmp #i123456} + " {ab 123 c}"`
条件判断指令if中,可以直接带字符串类型的快速表达式,方便代码书写。
In the conditional judgment instruction if, you can directly take a string type of fast expression, which is convenient for code writing.
goto语句在一般的高级语言中并不推荐使用,但对于具备一定经验的开发者来说,反而有可能是提高效率的手段。谢语言中提供了goto/转到指令(为保持和汇编语言的一定关联,也可写作jmp),可以用于实现代码执行中无条件跳转到某个标号处的功能。例如(goto.xie):
The goto statement is not recommended in general high-level languages, but it may be a means to improve efficiency for developers with certain experience. Xielang provides goto/go instruction (in order to maintain a certain association with assembly language, it can also be written as jmp), which can be used to realize the function of unconditional jump to a label in code execution. For example (goto.xie):
pln start...

push #f1.8

goto :label1

:label2
pop $c

pln `c =` $c

exit

:label1
    pln "label1 =" $peek

    goto :label2
由于无条件跳转的关系,这段代码执行时将先执行标号:lable1处的代码,然后再跳转到标号:label2处的代码,最后输出结果是:
Due to the unconditional jump, the code at label: lable1 will be executed first, and then jump to the code at label: label2. The final output result is:
start...
label1 = 1.8
c = 1.8
另外,goto语句中的,可以使用“:+1”、“:-3”这种伪标号,表示跳转到当前指令的后一条指令或前三条指令(注意:注释和标号等不是有效指令的行将被忽略而不被计算在内):
In addition, in the goto statement, pseudolabels such as ":+1" and ":-3" can be used to indicate jumping to the next instruction or the 3rd previous instructions of the current instruction (note: lines such as comments and labels that are not valid instructions will be ignored and not counted):
  pln abc
  goto :+3

  // 下面两条指令将被跳过
  // the next two line of code will be skipped
  pln 123
  pass

  pln "这句将被执行(this line of code will be run)"
循环结构是一般计算机语言中必然会有的基本语法结构。谢语言中,一般使用各种跳转语句来实现循环结构。goto语句是其中的一种方法,最常见的是实现无限循环。
Loop structure is the basic grammatical structure that is inevitable in general computer language. In Xie language, various jump statements are generally used to realize the loop structure. The goto statement is one of the methods. The most common method is to implement infinite loops.
// 将字符串压栈
// infinite loop
push "welcome"

// 设定标号loop1
// set label loop1
:loop1
    // 输出栈顶值
    // pop the stack top value and output it
    pln $peek

    // 休眠2.5秒
    // sleep for 2.5 seconds
    sleep #f2.5

// 跳转到标号loop1处继续往下执行
// jump to the position at label :loop1
goto :loop1
sleep指令的作用是休眠指定的秒数。本例(for1.xie)运行的结果是将每隔2.5秒输出一下“欢迎”两个字,直到按Ctrl-C等方法来终止程序的运行。
The sleep instruction sleeps for the specified number of seconds. The result of this example (for1.xie) is that the word "Welcome" will be output every 2.5 seconds until the program is terminated by pressing Ctrl-C and other methods.
谢语言中的条件分支支持一般是由比较判断指令和条件跳转指令结合来实现的。直接看下面的例子(if.xie):
The conditional branch support in Xielang is generally realized by the combination of comparison and judgment instructions and conditional jump instructions. Look directly at the following example (if.xie):
// 给变量i赋值整数11
// assign integer value 11 to variable $i
assign $i #i11

// 比较变量i是否大于整数10
// 结果放入变量a中
// compare if $i > 10(integer)
// then put the result to $a
> $a $i #i10

// 判断$a是否为布尔值true
// 如果是则跳转到标号label2
// check if $a == true(bool value)
// if true jump to :label2(label)
if $a :label2
    // 否则执行下面的语句
    // if not met, continue to run the following
    pln "else branch"

//终止程序执行
// terminate the program
exit

// 标号label2
// label named label2
:label2
    // 输出“if branch”
    // output "if branch" for reference
    pln "if branch"

    // 将局部变量b赋值为整数8
    // assign a local variable $b(since there are no variabes with this name in global context) to integer value 8
    assign $b #i8

    // 比较变量b是否小于或等于变量i
    // 由于省略了结果变量,结果将被放入$tmp中
    // check if $b <= $i
    // the result variable is omitted, so the result will be put into global variable $tmp
    <= $b $i

    // 判断否(tmp值是false)则跳转到标号label3
    // ifNot指令是判断条件为false则跳转
    // check if $tmp is not true
    // if true($tmp is false), jump to label3
    ifNot $tmp :label3
        // 否则输出
        // else branch
        pln "label3 else"

    // 终止代码执行
    // terminate
    exit

    // 标号label3
    :label3
        // 输出“label3 if”
        pln "label3 if"
其中,出现了两个比较指令:“>”和“<=”,这些比较指令所带参数都和二元运算指令类似,可以从堆栈中取两个值做比较,也可以对后面所带的两个参数进行比较,当然还可以带一个参数(放在第一个)表示将结果赋值给某个变量,否则会将结果存入$tmp。比较指令返回的结果都是布尔值true或者false。
Among them, there are two comparison instructions: ">" and "<=". The parameters of these comparison instructions are similar to the binary operation instructions. You can take two values from the stack for comparison, and you can also compare the following two parameters. Of course, you can also take a parameter (put in the first) to assign the result to a variable, otherwise the result will be stored in $tmp. The results returned by the comparison instruction are boolean values of true or false.
而条件跳转指令if和ifNot可以带1或2个参数,最后一个参数都是符合条件要跳转到的标号,如果还有第一个参数则表明要判断的变量或数值(必须是布尔值),没有的话则从堆栈取数进行判断:if指令是true则跳转,ifNot是false则跳转。
The conditional jump instructions if and ifNot can take 1 or 2 parameters. The last parameter is the label to jump to if the condition is met. If there is the first parameter, it indicates the variable or value to be judged (must be a boolean value). If there is no parameter, it will be judged from the stack fetch: if the instruction is true, it will jump, if not, it will jump.
这段代码的运行结果是:
The result of running this code is:
  if branch
  label3 else
注意观察条件分支的流转是否符合预期。
Observe whether the flow of conditional branches meets expectations.
比较指令主要包括:==(等于)、!=(不等于)、>、<、>=、<=等。
The comparison instructions mainly include: ==(equal to), !=(not equal to), >, <, >=, <=, etc.
if、ifNot等条件分支指令其实还支持第三个参数,即else分支。该参数也是一个标号,表示条件不满足时要走的分支。直接看下面的例子(else.xie):
Conditional branch instructions such as if and ifNot actually support the third parameter, namely else branch. This parameter is also a label, indicating the branch to take when the condition is not met. Look directly at the following example (else.xie):
> #i3 #i2

if $tmp :label1 :else1

:label1
    pln label1

    goto :next1

:else1
   pln else1

:next1

> $push #f1.5 #f3.6
if $pop :label2 :else2

:label2
    pln label2

    exit

:else2
   pln else2
运行输出结果为:
The program output result is:
label1
else2
注意其中是否走了else分支。
Note whether else branch is taken.
在无条件跳转指令goto和条件跳转指令if、ifNot、ifEval等语句中,不一定非要用标号表示跳转目的地,也可以使用类似“+1”,“+3”这种伪标号(更推荐写作:+1,:+3这样的形式,因为在fastCall调用的快速函数代码中,+1这种形式有可能失效,而:+1不会失效,另外:+1这种形式可以用在更广泛的地方,基本上所有用到标号的地方都可以使用),表示跳转到当前指令的后一条指令或前三条指令等。注意,注释和标号等不是有效指令的行将被忽略而不被计算在内。我们来看下面的例子(quickIf.xie):
In the unconditional jump instruction goto and conditional jump instruction if, ifNot, ifEval and other statements, it is not necessary to use a label to indicate the jump destination, but it can also use a similar "+1", "+3" is a pseudolabel (it is more recommended to write as :+1, :+3, because in the fast function code called by FastCall, +1 may be invalid, but :+1 will not be invalid. In addition, :+1 can be used in a wider range of places, and can be used in almost all places where the label is used), indicating that the next instruction or the first three instructions of the current instruction can be skipped. Note that lines that are not valid instructions such as comments and labels will be ignored and not counted. Let's look at the following example (quickIf.xie):
// 本例演示了在if和goto等指令中使用“+1”、“+3”等“伪标号”进行跳转的方法
// +1是指跳转到当前指令的下一条指令,+3指跳转到当前指令后面的第3条指令,以此类推
// 伪标号前与普通标号一样,仍需以冒号“:”开始
// 可以用“-1”代替当前指令的上一条指令,“-5”表示当前指令上面的第5条指令等
// 注意,这里的指令都是指有效指令,注释、标号等将被忽略(即不被算入)
// This example shows how to use "+1", "+3" and other "virtual-labels" or "pseudo-labels" in if and goto instructions to jump
// +1 refers to the next instruction that jumps to the current instruction,+3 refers to the third instruction after the current instruction, and so on
// The pseudolabel is the same as the ordinary label, and still needs to start with a colon ":"
// You can use "-1" instead of the last instruction of the current instruction, and "-5" means the fifth instruction above the current instruction, etc
// Note that the instructions here refer to valid instructions, and comments, labels, etc. will be ignored (that is, not counted)

// 将变量a赋值为字符串abc
// Assign variable a to string abc
assign $a "abc"

// 获取该字符串的长度,结果放入变量lenT中
// Get the length of the string and put the result into the variable lenT
len $lenT $a

// 判断lenT是否小于5,结果放入变量rsb中
// Judge whether lenT is less than 5, and put the result into the variable rsb
< $rsb $lenT #i5

// 如果rsb值为布尔值true,则跳转到下一条指令执行
// 否则跳转到下面第三条指令执行
// If the rsb value is a boolean value of true, skip to the next instruction execution
// Otherwise, skip to the third instruction below
if $rsb :+1 :+3
    pln "<5"

    // 无条件跳转到下面第二条指令
    // Unconditionally jump to the second instruction below
    goto :+2

    pln ">5"

pln a = $a
可以看出,直接使用伪标号跳转写法更简洁。不过也有不便之处,例如else分支如果用标号可能更方便,因为if分支如果要增减语句的话,else分支用数字就需要经常变化,容易遗漏出错。因此,可以结合普通标号与伪标号来使用跳转。
It can be seen that the jump writing method using pseudolabels directly is more concise. However, there are also inconveniences. For example, if the else branch is labeled, it may be more convenient, because if the if branch is to add or subtract statements, the numbers used for the else branch need to change frequently, which is easy to miss errors. Therefore, jump can be used in combination with common label and pseudolabel.
有了条件分支结构,就可以实现标准的for循环,这是一个可以具有终止条件的循环语法结构。
// 实现类似 for i = 0; i < 5; i ++ 的标准三段for循环结构

// 将变量i赋值为整数0
assign $i #i0

// 标号loop1
:loop1

  // 将i的值加上整数10
  // 结果存入tmp
  add $i #i10

  // 输出变量i中数值,和tmp值
  pln $i ":"  $tmp

  // 将变量i的值加1
  inc $i

  // 判断变量i中的数值是否小于整数5
  < $i #i5

  // 是则跳转到标号loop1(继续循环)
  if $tmp :loop1

// 否则执行下面的语句
// 也就是跳出了loop1的循环结构
// 输出字符串“end”
pln end
上面的例子代码(for.xie)实现了一个经典的三段for循环结构。其中用到了inc指令,作用是将变量值加1,如果不带参数则会弹栈值加1,结果都将压栈。inc指令实现了一般语言中 i++ 的效果。本段代码执行的结果是:
  0 : 10
  1 : 11
  2 : 12
  3 : 13
  4 : 14
  end
与inc指令对应的是dec指令,会将对应值减1。
谢语言也提供了for指令来进行常规的for循环,结合表达式可以实现灵活的循环控制,参看下面的例子(for3.xie):
  // 第一个循环开始
  // 将变量i赋值为整数0
  assign $i #i0

  // 赋值用于循环终止条件判断的变量cond
  // 赋值为布尔值true,以便第一次循环条件判断为true从而开始循环
  // 否则一次都不会执行
  assign $cond #btrue

  // 循环执行标号label1处的代码(即循环体)
  // 直至变量cond的值为布尔值false
  // 循环体中应该用continue指令继续循环或break中断循环
  for $cond :label1

  // 第二个循环开始
  // 将变量j赋值为浮点数0
  assign $j #f0.0

  // 循环执行label2处代码
  // 表达式是判断变量j小于2.8则执行label2处代码
  for ?`($j < #f2.8)` :label2

  // 循环结束输出
  pln "for end"

  // 终止程序运行,否则将继续往下执行
  exit

  :label1
      // 输出变量i的值作参考
      pl i=%v $i

      // 将变量i的值加1
      inc $i

      // 判断变量i的值是否小于整数5
      // 结果放入变量cond
      < $cond $i #i5

      // 继续执行循环(会再次判断for指令中的条件)
      continue

  :label2
      // 输出变量j的值作参考
      pl j=%v $j

      // 将变量j的值加上0.3,结果仍放回变量j中
      add $j $j #f0.3

      // 继续执行循环(会再次判断for指令中的条件)
      continue
for指令后面的第一个参数是循环条件,满足条件(即值为布尔值true)才会进行循环;第二个参数是一个标号,表示循环体代码开始的位置。循环体代码中应该用continue指令继续循环或break中断循环,exit也是可以的。代码中演示了两个for循环,第一个for循环的循环条件是一个放在一个变量中的,第二个这直接用一个表达式来表示,每次循环都会重新计算这个表达式。运行结果如下:
i=0
i=1
i=2
i=3
i=4
j=0
j=0.3
j=0.6
j=0.8999999999999999
j=1.2
j=1.5
j=1.8
j=2.1
j=2.4
j=2.6999999999999997
for end
其中有些小数位数长是因为计算机浮点数计算误差导致的,与循环无关,我们将在后面介绍如何消除这种问题。
对于整数、字符串和一些简单的数组(后面会详细说明),可以用range指令对其进行遍历,即循环执行一定次数,每次循环体内可以获得遍历序号和遍历值进行相应操作,参看下面的代码(range.xie):
  // 循环遍历整数5,每次执行标号label1处的循环体代码
  // 将循环5次,遍历值分别是0,1,2,3,4
  // 相当于其他语言中的 for i := 1, i < 5; i ++……
  range #i5 :label1

  // 第一个循环结束
  pln "end for1"

  // 跳转到标号next1处
  goto :next1

  :label1
      // 从栈中分别弹出遍历序和遍历值
      assign $i $pop
      assign $v $pop

      // 输出供参考
      pl "i: %v, v: %v" $i $v

      // 继续循环遍历
      continue

  :next1

  // 进行第二个循环
  range "abc123" :label2

  // 第二个循环结束
  pln "end for2"

  // 退出程序执行
  exit

  :label2
      // 从栈中分别弹出遍历序和遍历值
      assign $i $pop
      assign $v $pop

      // 输出供参考
      pl "i: %v, v: %v" $i $v

      // 继续循环遍历
      continue
执行结果是:
i: 0, v: 0
i: 1, v: 1
i: 2, v: 2
i: 3, v: 3
i: 4, v: 4
end for1
i: 0, v: a
i: 1, v: b
i: 2, v: c
i: 3, v: 1
i: 4, v: 2
i: 5, v: 3
end for2
注意遍历整数和字符串的区别。
最新版的谢语言中,range指令也支持切片(数组)和映射(字典)的遍历。
另外请注意,range指令可以嵌套,但多层嵌套的range指令中的break不能用标号跳出至超出本级之上的循环遍历;
谢语言中的函数调用分为快速函数调用、一般函数调用和封装函数调用,先介绍一般函数调用,一般函数调用的标准结构如下(func.xie):
// 将变量s赋值为一个多行字符串
assign $s ` ab c123 天然
森林 `

// 输出变量s中的值
// plv会用内部表达形式输出后面变量中的值
// 例如会将其中的换行符等转义
plv $s

// 将变量s中的值压栈
push $s

// 调用函数func1
// 即跳转到标号func1处
// 而ret命令将返回到call语句的下一行有效代码处
call :func1

// 弹栈到变量s中
pop $s

// 再次输出变量s中的值
plv $s

// 终止代码执行
exit

// 标号func1
// 也是函数的入口
// 一般称作函数func1
:func1
  // 弹栈到变量v中
  pop $v

  // 将变量v中字符串做trim操作
  // 即去掉首尾的空白字符
  // 结果压入栈中
  trim $push $v

  // 函数返回
  // 从相应call指令的下一条指令开始继续执行
  ret
上面代码中,plv指令会输出后面值的内部形式,主要为了调试时便于看出其中值的类型。call标号加ret指令是谢语言实现函数的基本方法,call语句将保存当前程序所处的代码位置,然后调用指定标号处的代码,直至ret语句时将返回到call时代码位置的下一条指令继续执行。这就实现了一个基本函数调用的逻辑。
如果要给函数传递参数,则一般通过堆栈来进行。同样地,函数返回值也通过堆栈来传递。trim指令实际上是对后面的变量进行去字符串首尾空白的操作,然后通过预置全局变量$push进行压栈操作。
一般函数中会具有自己的局部变量空间,在函数中定义的变量(使用var指令),只能在函数内部使用,函数返回后将不复存在。而对变量值取值使用的情况,函数会先从局部变量寻找,如果有则使用之,如果没有该名字的变量则会到上一级函数(如果有的话,因为函数可以层层嵌套)中寻找,直至寻找到全局变量为止仍未找到才会返回“未定义”。对变量进行赋值操作的情况(对变量),如果在进入函数前没有定义过,则也会层层向上寻找,如果全没有找到,则会在本函数的空间内创建一个新的局部变量。如果要在函数中创建全局变量,则需要使用global指令。global指令与var指令用法一致,唯一的区别就是global指令将声明一个全局变量。看下面的例子(local.xie)来了解全局变量和局部变量的使用:
  // 给全局变量a和b赋值为浮点数
  assign $a #f1.6
  assign $b #f2.8

  // 调用函数func1
  call :func1

  // 输出调用函数后a、b、c、d四个变量的值
  pln $a $b $c $d

  // 退出程序执行
  exit

  // 函数func1
  :func1
      // 输出进入函数时a、b、c、d四个变量的值
      pln $a $b $c $d

      // 将变量a与0.9相加后将结果再放入变量a中
      add $a $a #f0.9

      // 声明一个局部变量b(与全局变量b是两个变量)
      var $b

      // 给局部变量b赋值为整数9
      assign $b #i9

      // 将局部变量b中的值加1
      inc $b

      // 将变量c赋值为字符串
      = $c `abc`

      // 声明一个全局变量d
      global $d

      // 给变量d赋值为布尔值true
      = $d #btrue

      // 退出函数时输出a、b、c、d四个变量的值
      pln $a $b $c $d

      ret
注意其中的“=”是assign指令的另一种简便写法,另外assign指令前如果没有用global或var指令生命变量,相当于先用var命令声明一个变量然后给其赋值。这段代码的运行结果是:
  1.6 2.8 未定义 未定义
  2.5 10 abc true
  2.5 2.8 未定义 true
注意其中4个变量a、b、c、d的区别,可以看出:变量a是在主代码中定义的全局变量,在函数func1中对其进行了计算(将a与0.9相加后的结果又放入a中)后,最后出了函数体之后的输出仍然是计算后的值,说明函数中操作的是全局变量;变量b则是在函数中定义了一个同名的局部变量,因此在函数中虽然有所变化,但退出函数后其值会变回原来的值,其实是局部变量b已经被销毁,此时的b是全局变量b;变量c完全是函数内的局部变量,因此入函数前和出了函数后都是“未定义”;变量c则是在函数中用global指令新建的全局变量,因此退出函数后任然有效。
快速函数与一般函数的区别是:快速函数不会有自己的独立变量空间。快速函数与主函数(指不属于任何函数的代码所处的环境)共享同一个变量空间,在其中定义和使用的变量都将是全局变量。使用快速函数的好处是,速度比一般函数更快,因为减少了分配函数局部空间的开销。对一些实现简单功能的函数来说,有时候这是很好的选择。
快速函数类似call与ret的配对指令,使用fastCall与fastRet两个指令来控制函数调用与返回。下面是例子(fastCall.xie):
  // 将两个整数压栈
  push #i108
  push #i16

  // 快速调用函数func1
  // 而fastRet命令将返回到fastCall语句的下一行有效代码处
  fastCall :func1

  // 输出弹栈值(为函数func1压栈的返回结果)
  plv $pop

  // 终止代码执行
  exit

  // 函数func1
  // 功能是将两个数相加
  :func1
      // 弹栈两个数值
      pop $v2
      pop $v1

      // 将两个数值相加后压栈
      add $push $v1 $v2

      // 函数返回
      // 从相应fastCall指令的下一条指令开始继续执行
      fastRet
运行结果为:
124
这里的“引用”可以理解成一般语言中的取变量地址的操作。使用引用的目的是为了直接修改其中的值,尤其是对一些复杂数据类型来说。这里先给出一个对基础数据类型的取引用与解引用操作的例子(ref.xie):
// 给全局变量a和b赋值为浮点数
assign $a #f16

// 获取变量a的引用并入栈
ref $push $a

// 调用函数func1
call :func1

// 输出调用函数func1后的变量a值
plo $a

// 退出程序执行
exit

// 函数func1
:func1

    // 出栈到变量p
    pop $p

    // 输出变量p
    plo $p

    // 将引用变量p中的对应的数值放入变量v中
    unref $v $p

    // 输出变量v
    plo $v

    // 将引用变量p中的值重新置为整数9
    assignRef $p #i9

    // 函数返回
    ret
代码中有详细的注释,运行结果为:
  (*interface {})0xc00014e150
  (float64)16
  (int)9
其中,ref指令用于取变量的引用,unref指令用于获取引用变量指向的值(解引用),assignRef指令则直接将引用变量指向的值赋以新值。可以看出,使用变量引用,成功将全局变量中的数值进行了改变。
列表在其他语言中有时候也称作“数组”、“切片”等。在谢语言中,列表可以理解为可变长的数组,其中可以存放任意类型的值。列表的操作包括创建、增加项、删除项、切片(截取其中一部分)、合并(与其他列表合并)、遍历(逐个对列表中所有的数据项进行操作)等。下面的代码演示了这些操作的方法(list.xie):
// 定义一个列表变量list1
var $list1 list

// 查看列表对象,此时应为空的列表
plo $list1

// 给列表list1中添加一项整数8
addItem $list1 #i8

// 给列表list1中添加一项浮点数12.7
addItem $list1 #f12.7

// 再次查看列表list1中内容,此时应有两项
plo $list1

// 用赋值的方法直接将一个数组赋值给列表变量list2
// #号后带大写的L表示后接JSON格式表达的数组
assign $list2 #L`["abc", 2, 1.3, true]`

// 输出list2进行查看
plo $list2

// 查看list2的长度(即其中元素的个数)
len $list2

pln length= $tmp

// 获取列表list1中序号为0的项(列表序号从零开始,即第1项)
// 结果将入栈
getItem $push $list1 #i0

// 获取list2中的序号为1的项,结果放入变量a中
getItem $a $list2 #i1

// 将变量a转换为整数(原来是浮点数)并存回a中
convert $a $a int

// 查看变量a中的值
plo $a

// 将弹栈值(此时栈顶值是列表list1中序号为0的项)与变量a相加
// 结果压栈
add $push $pop $a

// 查看弹栈值
plo $pop

// 将列表list1与列表list2进行合并
// 结果放入新的列表变量list3中
// 注意,如果没有指定结果参数(省略第一个,此时应共有2个参数),将把结果存回list1
// 相当于把list1加上了list2中所有的项
addItems $list3 $list1 $list2

// 查看列表list3的内容
plo $list3

// 将list3进行切片,截取序号1(包含)至序号5(不包含)之间的项
// 形成一个新的列表,放入变量list4中
slice $list4 $list3 #i1 #i5

// 查看列表list3的内容
plo $list4

// 循环遍历列表list4中所有的项,对其调用标号range1开始的代码块
// 该代码块必须使用continue指令继续循环遍历
// 或者break指令跳出循环遍历
// 遍历完毕或者break跳出遍历后,代码将继续从rangeList指令的下一条指令继续执行
// 遍历每项时,rangeList会先将当前遍历项和当前序号值(从0开始)先后压栈
rangeList $list4 :range1

// 删除list4中序号为2的项(此时该项为整数2)
deleteItem $list4 #i2

// 再次删除list4中序号为2的项(此时该项为浮点数1.3)
deleteItem $list4 #i2

// 修改list4中序号为1的项为字符串“烙红尘”
setItem $list4 #i1 烙红尘

// 再次删除list4中序号为0的项(此时该项为浮点数12.7)
deleteItem $list4 #i0

// 再次查看列表list4的内容
// 此时应只剩1项字符串“烙红尘”
plo $list4

// 结束程序的运行
exit

// 标号range1的代码段,用于遍历列表list4
:range1
    // 弹栈获得遍历序号值放入变量i中
    pop $i

    // 弹栈获得遍历项放入变量v中
    pop $v

    // 判断i值是否小于3,结果压栈
    < $i #i3

    // 如果是则跳转到next1(继续执行遍历代码)
    if $tmp :next1

        // 否则跳出循环遍历
        break

    // 标号next1
    :next1

    // 输出提示信息
    pl `第%v项是%v` $i $v

    // 继续循环遍历,如欲跳出循环遍历,可以使用break指令
    continue
代码中有详细注释,运行的结果是:
  ([]interface {})[]
  ([]interface {})[8 12.7]
  ([]interface {})[abc 2 1.3 true]
  length= 4
  (int)2
  (int)10
  ([]interface {})[8 12.7 abc 2 1.3 true]
  ([]interface {})[12.7 abc 2 1.3]
  第0项是12.7
  第1项是abc
  第2项是2
  ([]interface {})[烙红尘]
谢语言还有其他类型的列表,包括字节列表(byteList)和如痕列表(runeList)等,用法类似。
映射在其他语言中也称作字典、哈希表等,其中存储的是一对对“键(key)”与“值(value)”,也称为键值对(key-value pair)。谢语言中运用映射各种基本操作的例子如下(map.xie):
// 定义一个映射变量map1
var $map1 map

// 查看映射对象,此时应为空的映射
plo $map1

// 给映射map1中添加一个键值对 “"Name": "李白"”
// setItem也可用于修改
setMapItem $map1 Name "李白"

// 再给映射map1中添加一个键值对 “"Age": 23”
// 此处23为整数
setMapItem $map1 Age #i23

// 再次查看映射map1中内容,此时应有两个键值对
plo $map1

// 用赋值的方法直接将一个数组赋值给映射变量map2
// #号后带大写的M表示后接JSON格式表达的映射
assign $map2 #M`{"日期": "2022年4月23日","气温": 23.3, "空气质量": "良"}`

// 输出map2进行查看
plo $map2

// 查看map2的长度(即其中元素的个数)
len $map2

pln length= $tmp

// 获取映射map1中键名为“Name”的项
// 结果入栈
getMapItem $push $map1 Name

// 获取map2中的键名为“空气质量”的项,结果放入变量a中
getMapItem $a $map2 空气质量

// 将弹栈值(此时栈顶值是映射map1中键名为“Name”的项)与变量a相加
// 结果压栈
add $push $pop $a

// 查看弹栈值
plo $pop

// 循环遍映射map2中所有的项,对其调用标号range1开始的代码块
// 该代码块必须使用continue指令继续循环遍历
// 或者break指令跳出循环遍历
// 遍历完毕或者break跳出遍历后,代码将继续从rangeMap指令的下一条指令继续执行
// 遍历每项时,rangeMap会先将当前键值和当前键名先后压栈
rangeMap $map2 :range1

// 删除map2中键名为“气温”的项(此时该项为浮点数23.3)
deleteMapItem $map2 "气温"

// 再次查看映射map2的内容
plo $map2

// 结束程序的运行
exit

// 标号range1的代码段,用于遍历映射
:range1
    // 弹栈获得遍历序号值放入变量i中
    pop $k

    // 弹栈获得遍历项放入变量v中
    pop $v

    // 输出提示信息
    pl `键名为 %v 项的键值是 %v` $k $v

    // 继续循环遍历,如欲跳出循环遍历,可以使用break指令
    continue
其中详细介绍了映射类型的主要操作,代码的运行结果是:
(map[string]interface {})map[]
(map[string]interface {})map[Age:23 Name:李白]
(map[string]interface {})map[日期:2022年4月23日 气温:23.3 空气质量:良]
length= 3
(string)李白良
键名为 日期 项的键值是 2022年4月23日
键名为 气温 项的键值是 23.3
键名为 空气质量 项的键值是 良
(map[string]interface {})map[日期:2022年4月23日 空气质量:良]
谢语言中,复杂数据结构也是可以嵌套的,例如列表中的数据项可以是一个映射或列表,映射中的键值也可以是列表或映射。看下面的例子(toJson.xie):
var $map1 map

setMapItem $map1 "姓名" 张三

setMapItem $map1 "年龄" #i39

var $map2 map

setMapItem $map2 "姓名" 张胜利

setMapItem $map2 "年龄" #i5

var $list1 list

addItem $list1 $map2

setMapItem $map1 "子女" $list1

plo $map1

toJson $push $map1 -indent -sort

pln $pop
例子中建议了一个简单的父子关系的数据结构,父亲张三,孩子张胜利,父亲这个数据对象本身是用映射来表示的,而其子女是用列表来表示,列表中的数据项——他的孩子张胜利本身又是用一个映射来表示的。另外,为了展示更清楚,我们使用了toJson指令,这个指令可以将数据结构转换为JSON格式的字符串,第一个参数是结果放入的变量,这里用内置变量$push表示将结果压栈。目前,toJson函数支持两个可选参数,-indent表示将JSON字符串用缩进的方式表达,-sort表示将映射内的键值对按键名排序。代码运行结果如下:
(map[string]interface {})map[姓名:张三 子女:[map[姓名:张胜利 年龄:5]] 年龄:39]
{
  "姓名": "张三",
  "子女": [
  {
    "姓名": "张胜利",
    "年龄": 5
  }
],
  "年龄": 39
}
注意对比谢语言对该数据的表达形式与JSON形式的区别。
我们对JSON编码的反操作就是将JSON格式的字符串转换为内部的数据。这可以通过定义参数时加上“#L”或“#M”形式来进行,也可以通过fromJson指令来执行。使用“#L”或“#M”的方式我们前面已经介绍过了,这里是使用fromJson关键字的例子,我们就直接用上面生成的JSON来反向操作试一下(fromJson.xie):
// 将变量s赋值为一个多行字符串
// 即所需解码的JSON文本
assign $s `
{
  "姓名": "张三",
  "子女": [
  {
    "姓名": "张胜利",
    "年龄": 5
  }
],
  "年龄": 39
}
`

// 用fromJson指令将s中的文本解码到变量map1中
fromJson $map1 $s

// 获取map1的数据类型
// 可用于以后根据不同类型进行不同处理
// 结果入栈
typeOf $push $map1

// 输出类型名称
pln 类型是: $pop

// 输出map1的内容
plo $map1

// 获取map1中的键名为子女的项
// 结果放入变量list1中
getMapItem $list1 $map1 子女

// 获取list1中序号为0的项
// 结果放入变量map2中
getItem $map2 $list1 #i0

// 获取map2中键名为姓名的项
// 结果压栈
getMapItem $push $map2 姓名

// 输出弹栈值
pln 姓名: $pop
运行后得到:
类型是: map[string]interface {}
(map[string]interface {})map[姓名:张三 子女:[map[姓名:张胜利 年龄:5]] 年龄:39]
姓名: 张胜利
注意,typeOf指令可用于获取任意变量的数据类型名称,这在很多需要根据类型进行处理的场景下非常有用。typeOf获取到的值类型与宿主语言Go语言的一致,可参考Go语言的文档。
谢语言可以动态加载外部的代码文件并执行,这是一个很方便也很重要的功能。一般来说,我们可以把一些常用的、复用程度高的功能写成快速函数或一般函数放在单独的谢语言源代码文件中,然后在需要使用的代码中动态加载它们并使用其中的函数。可以构建自己的公共代码库,或者形成功能模块。
下面的例子演示的是在一个代码文件中先后载入两个外部模块文件并调用其中的函数。
首先编写1个模块文件module1.xie,其中包含两个快速函数add1和sub1,功能很简单,就是两个数进行相加和相减。
注意,由于快速函数与主函数共享全局变量空间,为避免冲突,建议变量名以大写的“L”结尾,以示只用于局部。另外还建议全局变量以大写的“G”结尾,一般的局部变量以大写的“T”结尾。这些不是强制要求,但也许能够起到一些避免混乱的效果。
:add1
    pop $v2L
    pop $v1L

    add $push $v1L $v2L

    fastRet

:sub1
    pop $v2L
    pop $v1L

    sub $push $v1L $v2L

    fastRet
然后再编写第二个模块文件module2.xie,其中包含一个普通函数mul1,作用是两个数相乘。
:mul1
    pop $v2L
    pop $v1L

    mul $push $v1L $v2L

    ret
最后编写动态加载上面两个模块的例子代码(loadModule.xie):
// 载入第1个代码文件module1.xie并压栈
loadText $push `scripts/module1.xie`

// 输出代码文件内容查看
pln 加载的代码: "\n" $peek "\n"

// 弹栈加载代码
// 并将结果值返回,成功将返回加载代码的第1行行号(注意是字符串类型)
// 失败将返回TXERROR:开头的错误信息
loadCode $push $pop

// 查看加载结果
plo $pop

// 压栈两个整数
push #i11
push #i12

// 调用module1.xie文件中定义的快速函数add1
fastCall :add1

// 查看函数返回结果(不弹栈)
plo $peek

// 再压入一个整数5
push #i5

// 调用module1.xie文件中定义的快速函数sub1
fastCall :sub1

// 查看函数返回结果(不弹栈)
plo $peek

// 载入第2个代码文件module2.xie并置于变量code1中
loadText $code1 `scripts/module2.xie`

// 加载code1中的代码
// 由于不需要loadCode指令返回的行号,因此用$drop变量将其丢弃
loadCode $drop $code1

// 再入栈一个整数99
// 此时栈中还有一个整数18
push #i99

// 调用module2.xie文件中定义的一般函数mul1
call :mul1

// 查看函数返回结果(弹栈)
plo $pop

// 退出程序执行
// 注意:如果不加exit指令,程序会继续向下执行module1.xie和module2.xie中的代码
exit
代码中的重点是loadText指令和loadCode指令。loadText从指定路径读取纯文本格式的模块代码文件内容。loadCode文件则从字符串变量中读取代码并加载到当前代码的后面,如果成功,会返回这段代码的起始位置(注意是字符串格式),有些情况下会用到这个返回值。对于以函数为主的模块,在动态加载包含这些函数的文件后,就可以用call或fastCall指令来调用相应的函数了。
代码运行的结果是:
加载的代码:
 :add1
    pop $v2L
    pop $v1L

    add $push $v1L $v2L

    fastRet

:sub1
    pop $v2L
    pop $v1L

    sub $push $v1L $v2L

    fastRet

(string)17
(int)23
(int)18
(int)1782
封装函数与一般函数与快速函数的区别是:封装函数直接采用源代码形式调用,实际上会新启动一个谢语言虚拟机去执行函数代码,封闭性更好(相当于沙盒执行),也更灵活,参数和返回值通过堆栈传递;缺点是性能稍慢(因为要启动虚拟机并解析代码)。下面是封装函数调用的例子(callFunc.xie):
# 压栈准备传入的两个函数参数
push #f1.6
push #f2.3

# callFunc指令将代码块看做封装函数进行调用
# 第1个参数表示函数需要的参数,如果函数无须参数,第一个参数可以省略
callFunc 2 `
    # 依次弹栈两个参数,特别注意,这里弹出的顺序不是逆序,而是与压栈顺序相同
    pop $arg1
    pop $arg2

    # 输出两个参数检查
    pln arg1= $arg1
    pln arg2= $arg2

    // 将两个参数相加,结果压栈
    add $push $arg1 $arg2

    // 输出栈顶值检查
    pln $peek

    # 需要在全局变量outG中返回函数返回值(压栈的)的个数(字符串形式)
    # 这里只有1个压栈值需要返回,即两个数相加的结果
    assign $outG 1
`

# 输出函数返回值(弹栈值)
# 注意如果有多个返回值,也是按封装函数入栈顺序出栈的,不是顺序
pln 函数返回值: $pop
代码中,封装函数直接用反引号扩起了多行的代码。callFunc指定需要一个参数指定要压入新虚拟机作为调用函数的参数,注意顺序不是逆序而是顺序压入栈中的。如果没有参数则可以省略这个参数。第二个参数是字符串类型的变量或值,这里传入了一个多行字符串,既是这个封装函数的代码,封装函数如果要返回值,需要在全局变量outG中返回一个字符串类型的数字,表示返回值的个数,这些返回值是以压栈的形式返回的,注意也是按封装函数入栈顺序返回而不是逆序。
注意,封装函数是以字符串形式的代码加载并执行的,这意味着封装函数也可以动态加载,例如从文件中读取代码后执行,这带来了很大的灵活性。另外,封装函数在单独的虚拟机中运行,和主函数的变量和堆栈空间都不冲突,因此可以编写更通用的函数。
上面代码的执行结果是:
arg1= 1.6
arg2= 2.3
3.9
函数返回值: 3.9
callFunc指令如果有第三个以上的参数,将从第三个开始合并为数组传入新虚拟机中的inputG全局变量。
谢语言中支持对变量取引用和对引用解引用以取值,具体用法参看下面并发函数的例子。
谢语言中的并发是用类似于封装函数的并发函数来实现的。下面是并发函数调用的例子(goFunc.xie):
// 给变量a赋值浮点数3.6
// 变量a将在线程中运行的并发函数中被修改
assign $a #f3.6

// 输出当前变量a的值作参考
pln a= $a

// 获取变量a的引用,结果入栈
// 将被传入并发函数中以修改a中的值
ref $push $a

// 再入栈一个准备传入并发函数中的值
push `前缀`

// 调用并发函数
// 第一个参数表示需要压入并发函数所使用的堆栈中的值的数量
// 如果不需要传递参数,第一个参数可以省略
// 第二个参数是字符串形式的并发函数代码
goFunc 2 `
    // 弹栈两个传入的参数,注意也不是逆序弹出的而是顺序弹出的
    pop $arg1
    pop $arg2

    // 查看两个参数值
    pln arg1= $arg1
    pln arg2= $arg2

    // 解引用第一个参数(即主函数中的变量a的应用)
    unref $aNew $arg1

    // 输出变量a的值以供参考
    pln 外部的变量a的值为 $aNew

    // 无限循环演示不停输出时间
    // loop1是用于循环的标号
    :loop1
        // 输出sub和变量arg2中的值
        pln sub $arg2

        // 获取当前时间并存入tmp
        now

        // 将弹栈值(当前时间)赋值给变量arg1指向的变量
        // assignRef的第一个参数必须是一个引用
        assignRef $arg1 $tmp

        // 休眠2秒
        sleep #f2

        // 跳转到标号loop1(实现无限循环)
        goto :loop1
`

// 主线程中输出变量a的值
// 此时刚开始启动并发函数,变量a中的值有可能还未改变
pln main $a

// 注意,这里的标号loop1虽然与并发函数中的同名,但由于运行在不同的虚拟机中,因此不会冲突,可以看做是两个标号
:loop1

    // 休眠1秒
    sleep #f1.0

    // 输出变量a中的值查看
    // 每隔一秒应该会变成新的时间
    pln a= $a

    // 跳转到标号loop1(实现无限循环)
    goto :loop1
代码中有详细的注释,主线程中启动了一个子线程,也就是调用了并发函数,看看运行效果:
a= 3.6
main 3.6
arg1= 0xc00017e350
arg2= 前缀
外部的变量a的值为 3.6
sub 前缀
a= 2022-04-28 14:58:50.6204045 +0800 CST m=+0.014610101
sub 前缀
a= 2022-04-28 14:58:52.6308323 +0800 CST m=+2.025024001
a= 2022-04-28 14:58:52.6308323 +0800 CST m=+2.025024001
sub 前缀
a= 2022-04-28 14:58:54.6329674 +0800 CST m=+4.027145301
a= 2022-04-28 14:58:54.6329674 +0800 CST m=+4.027145301
sub 前缀
a= 2022-04-28 14:58:56.636559 +0800 CST m=+6.030723101
a= 2022-04-28 14:58:56.636559 +0800 CST m=+6.030723101
sub 前缀
a= 2022-04-28 14:58:58.6391475 +0800 CST m=+8.033297801
a= 2022-04-28 14:58:58.6391475 +0800 CST m=+8.033297801
exit status 0xc000013a
仔细观察程序的输出,可以看出并发函数中的输出每两秒1次,主线程中的输出每2秒一次,变量a中的值确实从最初的浮点数3.6到后来被并发函数变成了当前时间。
这个例子中也演示了对变量取引用与对引用解引用后取变量值的方法。
谢语言中,对于同时运行的几个线程间共享某个变量,对其进行读取和修改时可能产生的并发冲突问题,可以使用线程锁来控制解决。参看下面的例子(lock.xie):
// 给变量a赋值整数0
// 变量a将在线程中运行的并发函数中被修改
assign $a #i0

// 创建一个线程锁对象放入变量lock1中
// 指令new用于创建谢语言中一些基础数据类型或宿主语言支持的对象
// 除结果变量外第一个参数为字符串类型的对象名称
new $lock1 lock

// 定义一个并发函数体func1(用字符串形式定义)
// 并发函数使用新的虚拟机运行,因此其中的变量名称不会与主程序冲突
// 双方只能通过堆栈进行交互,例如可以传入某变量的引用
// 以便在并发函数中对其进行修改
assign $func1 `
    // 弹栈两个传入的参数,注意不是逆序弹出的而是顺序弹出的
    pop $arg1
    pop $arg2

    // 创建一个循环变量i并赋以初值0
    assign $i #i0

    // 无限循环演示不停将外部传入的变量a值加1
    // loop1是用于循环的标号
    :loop1
        // 调用传入的线程锁变量的加锁方法(lock)
        // 此处变量arg2即为外部压栈传入的线程锁对象
        // 由于lock方法没有有意义的返回值,因此用内置变量drop将其丢弃
        method $drop $arg2 lock

        // 解引用变量a的引用,以便取得a中当前的值
        unref $aNew $arg1

        // 将其加1,结果放入变量result中
        add $result $aNew #i1

        // 将变量arg1指向的变量(即a)中的值赋为result中的值
        // assignRef的第一个参数必须是一个引用
        assignRef $arg1 $result

        // 调用线程锁的unlock方法将其解锁,以便其他线程可以访问
        method $drop $arg2 unlock

        // 循环变量加1
        inc $i

        // 判断循环变量i的值是否大于或等于5000
        // 即循环5000次
        // 判断结果值(布尔类型)放入变量r中
        >= $r $i #i5000


        // 如果r值为真(true),则转到标号beforeReturn处
        if $r :beforeReturn

        // 跳转到标号loop1(实现无限循环)
        goto :loop1

    :beforeReturn
        // pass指令不进行任何操作,由于标号处必须至少有一条指令
        // 因此放置一条pass指令,实际上beforeReturn这里作用是结束线程的运行
        // 因为没有后续指令了
        pass
`

// 获取变量a的引用,结果入栈
// 将被传入并发函数中以修改a中的值
ref $push $a

// 再入栈线程锁对象,以便线程中用于控制并发冲突
push $lock1

// 调用并发函数
// 第一个参数表示需要压入并发函数所使用的堆栈中的值的数量(可以是用字符串表示的数字)
// 如果不需要传递参数,第一个参数可以省略
// 第二个参数是字符串形式的并发函数代码
goFunc 2 $func1

// 再启动一个相同的线程
ref $push $a
push $lock1
goFunc 2 $func1

// 主线程中输出变量a的值
// 此时刚开始启动并发函数,变量a中的值有可能还未改变
pln main $a

// 注意,这里的标号loop1虽然与并发函数中的同名,但由于运行在不同的虚拟机中,因此不会冲突,可以看做是两个标号
:loop1

    // 休眠1秒
    sleep #f1.0

    // 输出变量a中的值查看
    // 每隔一秒应该会变成新的时间
    pln main a= $a

    // 跳转到标号loop1(实现无限循环)
    goto :loop1
method指令用于调用对象的某个方法,这里是调用了线程锁的lock和unlock方法。method指令可以简写为mt。
如果没有对线程锁对象加锁、解锁的操作(可以注释上其中method $drop $arg2 lock与unlock这两条语句尝试),程序运行的结果将是不确定的数字,每次都有可能结果不同,这是因为两个线程各自存取变量a中的值产生的冲突所致。例如,当第一个线程取到了a的值为10,在将其加1但还没有来得及把值(11)赋回给a的时候,第二个线程获取了当时的a值10,也将其加1后赋回给a,然后线程1再把11赋给a,这样虽然两个线程各执行了一个a=a+1的操作,但其实效果相当于只执行了1次。这样,最后程序结果应该是a的值小于理论值10000。
加上线程锁后,结果每次都将是准确的10000,如下所示。
main 0
main a= 10000
main a= 10000
main a= 10000
main a= 10000
main a= 10000
谢语言提供一个通用的可扩展的对象机制,来提供集成宿主语言基本能力和库函数优势的方法,对象可以自行编写,可以使用宿主语言也可以使用谢语言本身编写(建设中),同时,谢语言也已经提供了一些内置的对象供直接使用。
下面是使用内部对象string的一个例子(object.xie),这个对象非常简单,仅仅封装了一个字符串,但提供了一些成员方法来对其进行操作。
注意,谢语言的对象一般包含本体值(例如string对象就是其包含的字符串)及可以调用的成员方法,还可能包含成员变量。
// 新建一个string对象,赋以初值字符串“abc 123”,放入变量s中
newObj $s string `abc 123`

// 获取对象本体值,结果压栈
getObjValue $push $s

// 将弹栈值加上字符串“天气很好”,结果存入tmp
add $pop "天气很好"

// 输出tmp值供参考
pln $tmp

// 设置变量s中string对象的本体值为字符串“very”
setObjValue $s "very"

// 输出对象值供参考
pln $s

// 调用该对象的add方法,并传入参数字符串“ nice”
// 该方法将把该string对象的本体值加上传入的字符串
callObj $s add " nice"

// 再次输出对象值供参考
pln $s

// 调用该对象的trimSet方法,并传入参数字符串“ve”
// 该方法将把该string对象的本体值去掉头尾的字符v和e
// 直至头尾不是这两个字符任意之一
callObj $s trimSet "ve"

// 再次输出对象值供参考
pln $s
代码运行的结果是:
abc 123天气很好
very
very nice
ry nic
谢语言也提供另一个new指令来实现快速的对象机制,也可以提供集成宿主语言基本能力和库函数优势的方法,对象使用上更简单。下面是一个例子(stringBuffer.xie),封装了一般语言中的可动态增长的字符串的功能。
// strBuf即Go语言中的strings.Builder
// 是一个可以动态向其中添加字符串的缓冲区
// 最后可以一次性获取所有写入的字符串为一个大字符串
new $bufT strBuf

// 调用bufT的append方法往其中写入字符串abc
// method(可以简写为mt)指令是调用对象的某个方法
// append/writeString/write方法实际上是一样的,都是向其中追加写入字符串
// 结果参数是$drop,因为一般用不到
method $drop $bufT append abc


// 使用双引号括起的字符串中间的转义符会被转义
method $drop $bufT writeString "\n"

mt $drop $bufT write 123

// 使用反引号括起的字符串中的转义符不会被转义
mt $drop $bufT append `\n`

// 用两种方式输出bufT中的内容供参考

// 调用bufT的str方法(也可以写作string、getStr等)获取其中的字符串
mt $rsT $bufT str

plo $rsT

// 直接用表达式来输出
pln ?`(?mt $tmp $bufT str)`
运行输出:
(string)abc
123\n
abc
123\n
谢语言中的时间处理的主要方式,直接参看下面的代码(time.xie):
// 将变量t1赋值为当前时间
// #t后带空字符串或now都表示当前时间值
assign $t1 #t

// 输出t1中的值查看
plo $t1

// 用字符串表示时间
// “=”是指令assign的简写写法
= $t2 #t`2022-08-06 11:22:00`

pln t2= $t2

// 简化的字符串表示形式
= $t3 #t`20220807112200`

pl t3=%v $t3

// 带毫秒时间的表示方法
= $t4 #t`2022-08-06 11:22:00.019`

pl t4=%v $t4

// 时间的加减操作
// 与时间的计算,如果有数字参与运算(除了除法之外),一般都是以毫秒为单位
pl t2-3000毫秒=%v ?`$t2 - 3000`

pl t2+50000毫秒=%v ?`$t2 + 50000`

pl 当前时间+50000毫秒=%v ?`(?now) + 50000`

pl t3-t2=%v(毫秒) ?`$t3 - $t2`

// 注意,如果不用括号,表达式计算将严格从左到右,没有运算符的优先级
pl t3-t2=%v(小时) ?`$t3 - $t2 / #i1000 / #i60 / #i60`

// 时间的比较
pl `t2 < t3 ? %v` ?`$t2 < $t3`

pl `t2 >= t3 ? %v` ?`$t2 >= $t3`

pl `t4 == t3 ? %v` ?`$t4 == $t3`

pl `t1 != t3 ? %v` ?`$t1 != $t3`

// 用convert指令转换时间
convert $tr `2021-08-06 11:22:00` time

pln tr= $tr

// 用convert指令将时间转换为普通字符串
convert $s1 $tr str

pln s1= $s1

// 用convert指令将时间转换为特定格式的时间字符串
convert $s2 $tr timeStr `2006/01/02_15.04.05`

pln s2= $s2

// 用convert指令将时间转换为UNIX时间戳格式
convert $s3 $tr tick

pln s3= $s3

// 用convert指令将UNIX格式时间戳转换为时间
convert $t5 `1628220120000` time

pln t5= $t5

// UTC相关
// 用convert指令转换时间为UTC时区
convert $trUTC `2021-08-06 11:22:00` time -global

pln trUTC= $trUTC

nowUTC $t6

pln t6= $t6

timeToLocal $t7 $t6

pln t7= $t7

timeToGlobal $t8 $t7

pln t8= $t8

// 用var指令也可以定义一个时间类型变量
// 默认值是当前时间
var $t9 time

// 调用时间类型变量的addDate方法将其加上1个月
// 三个参数分别表示要加的年、月、日,可以是负数
// 结果还放回t9
mt $t9 $t9 addDate 0 1 0

// 调用时间类型变量的format函数将其格式化为字符串
// 格式参数参考[这里](https://pkg.go.dev/time#pkg-constants)
mt $result $t9 format "20060102"

// 应输出 t9: 20220825
pl "t9: %v" $result
运行后输出为:
(time.Time)2022-07-25 09:22:03.918723645 +0800 CST m=+0.014649799
t2= 2022-08-06 11:22:00 +0800 CST
t3=2022-08-07 11:22:00 +0800 CST
t4=2022-08-06 11:22:00.019 +0800 CST
t2-3000毫秒=2022-08-06 11:21:57 +0800 CST
t2+50000毫秒=2022-08-06 11:22:50 +0800 CST
当前时间+50000毫秒=2022-07-25 09:22:53.919167824 +0800 CST m=+50.015093974
t3-t2=86400000(毫秒)
t3-t2=24(小时)
t2 < t3 ? true
t2 >= t3 ? false
t4 == t3 ? false
t1 != t3 ? true
tr= 2021-08-06 11:22:00 +0800 CST
s1= 2021-08-06 11:22:00 +0800 CST
s2= 2021/08/06_11.22.00
s3= 1628220120000
t5= 2021-08-06 11:22:00 +0800 CST
trUTC= 2021-08-06 11:22:00 +0000 UTC
t6= 2022-07-25 01:22:03.919574126 +0000 UTC
t7= 2022-07-25 09:22:03.919574126 +0800 CST
t8= 2022-07-25 01:22:03.919574126 +0000 UTC
t9: 20220825
谢语言使用一个简化的错误处理模式,参看下面的代码(onError.xie):
// 设置错误处理代码块为标号handler1处开始的代码块
// onError指令后如果不带参数,表示清空错误处理代码块
onError :handler1

// 故意计算1除以0的结果,将产生运行时异常
div #i1 #i0

// 此处代码正常情况应执行不到
// 但错误处理代码块将演示如何返回此处继续执行
:next1

// 输出一个提示信息
pln 计算完毕(错误处理完毕)

// 退出程序
exit

// 错误处理代码块
:handler1
    // 发生异常时,谢语言将会依次入栈出错时详细代码运行栈信息、错误提示信息和出错代码的行号
    // 错误处理代码块应该将这几个值弹栈后处理(或丢弃),注意顺序
    pop $lastLine
    pop $errMsg
    pop $detailG

    // 输出错误信息
    pl "代码运行到第%v行时发现错误:%v,详细信息:%v" $lastLine $errMsg $detailG

    // 跳转到指定代码位置继续执行
    goto :next1
关键点是使用onError指令,它带有一个参数,一般是如果代码运行发生异常时将要跳转到的错误处理代码块的标号。onError指令既是指定代码运行错误时,用于处理错误的代码块。这样,如果代码运行发生任何运行时错误,谢语言将会依次将出错时详细代码运行栈信息、错误提示信息和出错代码的行号压入堆栈,然后从该标号处开始执行。错误处理代码块一般需要先将几个压栈值出栈(注意要反序),然后进行相应的错误处理,最后可以选择跳转到指定位置执行,或者终止程序运行等操作。还有一种常用的处理方式是跳转到出错行号的下一个行号处继续执行。
本段代码的运行结果是:
代码运行到第1行时发现错误:runtime error: integer divide by zero
计算完毕(错误处理完毕)
与Go语言类似,谢语言也支持用defer指令延迟执行另一条指令,即如果在一条指令前加上defer指令,则该条指令不会立即执行,执行的时机是主程序退出前或函数执行退出前,参看下面的代码(defer.xie):
// 延迟执行指令1
defer pl "main defer: %v" test1

// 延迟执行指令2
// defer指令遵循“后进先出”的规则,即后指定的defer指令将先被执行
defer pl "main defer: %v" test2

pln 1

// 函数中的延迟执行
call :func1

pln func1 return

exit

:func1
    defer pl "sub defer: %v" test1

    pln sub1

    // 故意做一个会出现错误的指令,这里是除零操作
    quickEval $r1 `#i10 / #i0`

    // 检查出错则中断程序,此时应执行本函数内的defer和主函数内的defer
    checkErrX $r1

    pln "10/0=" $r1

    ret
可以看出,defer指令也可以被用在异常/错误处理的场景下。
谢语言主程序支持常见的关系型数据库的访问与操作,直接参看下面访问SQLite3数据库的代码例子(sqlite.xie):
// 判断是否存在该库(SQLite库是放在单一的文件中的)
// 注意请确保c:\tmp文件夹已存在
// 结果放入变量b中
fileExists $b `c:\tmpx\test.db`

// 如果否则跳到下一步继续执行
// 如果存在则删除该文件
// removeFile指令的运行结果将被丢弃(因为使用了内置全局变量drop)
ifNot $b :next
	removeFile $drop `c:\tmpx\test.db`

:next1
// 创建新库
// dbConnect用于连接数据库
// 除结果参数外第一个参数是数据库驱动名称,支持sqlite3、mysql、godror(即Oracle)、mssql(即MS SQLServer)等
// 第二个参数是连接字符串,类似 server=129.0.3.99;port=1433;portNumber=1433;user id=sa;password=pass123;database=hr 或 user/pass@129.0.9.11:1521/testdb 等
// SQLite3的驱动将基于文件创建或连接数据库
// 所以第二个参数直接给出数据库文件路径即可
dbConnect $db "sqlite3" `c:\tmpx\test.db`

// 判断创建(或连接)数据库是否失败
// rs中是布尔类型表示变量db是否是错误对象
// 如果是错误对象,errMsg中将是错误原因描述字符串
isErr $rs $db $errMsg

// 如果为否则继续执行,否则输出错误信息并退出
ifNot $rs :next2
	pl "创建数据库文件时发生错误:%v" $errMsg
	exit

:next2

// 将变量sqlStmt中放入要执行的建表SQL语句
assign $sqlStmt = `create table TEST (ID integer not null primary key, CODE text);`

// 执行SQL语句,dbExec用于执行insert、delete、update等SQL语句
dbExec $rs $db $sqlStmt

// 判断是否SQL执行出错,方式与前面连接数据库时类似
isErr $errStatus $rs $errMsg

ifNot $errStatus :next3
	pl "执行SQL语句建表时发生错误:%v" $errMsg

	// 出现错误时,因为数据库连接已打开,因此需要关闭
	dbClose $drop $db

	exit

:next3

// 进行循环,在库中插入5条记录
// i是循环变量
assign $i #i0

:loop1
assign $sql `insert into TEST(ID, CODE) values(?, ?)`

// genRandomStr指令用于产生随机字符串
genRandomStr $str1

dbExec $rs $db $sql $i $str1

isErr $errStatus $rs $errMsg

ifNot $errStatus :next4
	pl "执行SQL语句新增记录时发生错误:%v" $errMsg
	dbClose $drop $db

	exit

:next4
inc $i
< $i #i5
if $tmp :loop1

// 进行数据库查询,验证查看刚刚新增的记录
assign $sql `select ID, CODE from TEST`

// dbQuery指令用于执行一条查询(select)语句
// 结果将是一个数组,数组中每一项代表查询结果集中的一条记录
// 每条记录是一个映射,键名对应于数据库中的字段名,键值是相应的字段值,但均转换成字符串类型
dbQuery $rs $db $sql

// dbClose指令用于关闭数据库连接
dbClose $drop $db

pln $rs

// 用toJson指令将结果集转换为JSON格式以便输出查看
toJson $jsonStr $rs -indent -sort

pln $jsonStr
执行结果是(确保c:\tmpx目录已经存在):
[map[CODE:YRKOEt ID:0] map[CODE:moODkc ID:1] map[CODE:we7Ey9 ID:2] map[CODE:fF7dRd ID:3] map[CODE:9X6KAu ID:4]]
[
  {
    "CODE": "YRKOEt",
    "ID": "0"
  },
  {
    "CODE": "moODkc",
    "ID": "1"
  },
  {
    "CODE": "we7Ey9",
    "ID": "2"
  },
  {
    "CODE": "fF7dRd",
    "ID": "3"
  },
  {
    "CODE": "9X6KAu",
    "ID": "4"
  }
]
可以看到,数据库中被新增了5条记录,并查询成功。
谢语言主程序自带一个服务器模式,支持一个轻量级的WEB/应用/API三合一服务器。可以用下面的命令行启动:
D:\tmp>xie -server -dir=scripts
[2022/04/30 17:18:11] 谢语言微服务框架 版本0.0.6 -port=:80 -sslPort=:443 -dir=scripts -webDir=scripts -certDir=.
[2022/04/30 17:18:11] 在端口:443上启动https服务...
在端口:80上启动http服务 ...
[2022/04/30 17:18:11] 启动https服务失败:open server.crt: The system cannot find the file specified.
可以看到,谢语言的服务器模式可以用-server参数启动,并可以用-port参数指定HTTP服务端口(注意加冒号),用-sslPort指定SSL端口,-certDir用于指定SSL服务的证书文件目录(应为server.crt和server.key两个文件),用-dir指定服务的根目录,-webDir用于指定静态页面和资源的WEB服务。这些参数均有默认值,不输入任何参数可以看到。
输出信息中的错误是因为没有提供SSL整数,SSL服务将启动不了,加上证书就可以了。
此时,用浏览器访问本机的http://127.0.0.1:80就可以访问一个谢语言编写的网页服务了。
假设在指定的目录下包含xmsIndex.xie、xmsTmpl.html、xmsApi.xie三个文件,可以展示出谢语言建立的应用服务器支持的各种模式。
首先浏览器访问 http://127.0.0.1/xmsTmpl.html ,这将是访问一般的WEB服务,因为WEB目录默认与服务器根目录相同,所以将展示根目录下的xmsTmpl.html这个静态文件,也就是一个例子网页。
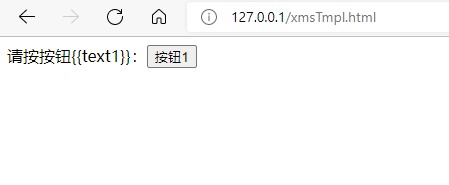
可以看到,该网页文件中文字“请按按钮”后的“{{text1}}”标记,这是我们后面展示动态网页功能时所需要替换的标记。xmsTmpl.html文件的内容如下:
<html>
<body>
<script>
function test() {
let xhr = new XMLHttpRequest();
xhr.open('POST', 'http://127.0.0.1:80/xms/xmsApi', true);
xhr.setRequestHeader("Content-Type", "application/x-www-form-urlencoded")
xhr.onload = function(){
alert(xhr.responseText);
}
xhr.send("param1=abc¶m2=123");
}
</script>
<div>
<span>请按按钮{{text1}}:</span><button onclick="javascript:test();">按钮1</button>
</div>
</body>
</html>然后我们尝试进行动态网页输出,也就是类似PHP、ASP或其他类似的架构支持的后台动态渲染网页的方式。访问 http://127.0.0.1/xms/xmsIndex ,URL中加上xms路径,这是一个虚拟路径,表示服务器将去根目录下寻找xmsIndex.xie文件来执行,该代码将输出网页内容。我们来看下xmsIndex.xie文件的内部。
// 设定默认的全局返回值变量outG为字符串TX_END_RESPONSE_XT
// 默认谢语言服务器如果收到处理请求的函数返回结果是TX_END_RESPONSE_XT
// 将会终止处理,否则将把返回值作为字符串输出到网页上
assign $outG "TX_END_RESPONSE_XT"

// 获得相应的网页模板
// joinPath指令将把多个文件路径合并成一个完整的文件路径
// 第一个参数表示结果将要放入的变量,这里的$push表示压栈
// basePathG是内置全局变量,表示服务的根目录
joinPath $push $basePathG `xmsTmpl.html`

pln $basePathG
pln $peek

// 将该文件作为文本字符串载入,结果压栈
loadText $push $pop

// 替换其中的{{text1}}标记为字母A
strReplace $push $pop "{{text1}}" "A"

// 将弹栈值写网页输出
// responseG也是内置的全局变量,表示要写入的网页输出对象
writeResp $responseG $pop

// 终止请求响应处理微服务
exit
谢语言服务器模式中,每一个http请求都将单开一个虚拟机进行处理,可以看做一个微服务的概念。例子中的微服务仅仅是将载入的网页模板中的指定标记替换掉然后输出到网页,虽然简单,但已经展现出了动态网页的基本原理,即能够在输出网页前进行必要的、可控的渲染。
我们访问 http://127.0.0.1/xms/xmsIndex 这个网址(或者叫URL路径),将会看到如下结果:
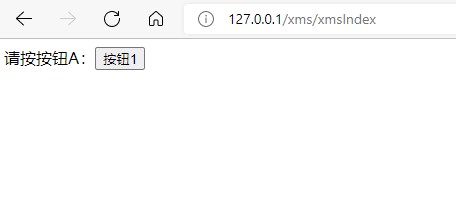
可以发现原来的标记确实被替换成了大写的字母A,验证了动态网页的效果。
再看上面的网页模板文件xmsTmpl.html,其中的按钮点击后将执行JavaScript函数test,其中进行了一个AJAX请求,然后将请求的结果用alert函数输出出来。这是一个典型的客户端访问后台API服务的例子,我们来看看如何实现这个后台API服务。下面是也在服务器根目录下的xmsApi.xie文件中的内容:
// 获取当前时间放入变量t
nowStr $t

// 输出参考信息
// 其中reqNameG是内置全局变量,表示服务名,也就是访问URL中最后的部分
// argsG也是全局变量,表示HTTP请求包含的URL参数或Form参数(可以是GET请求或POST请求中的)
pl `[%v] %v args: %v` $t $reqNameG $argsG

// 设置输出响应头信息(JSON格式)
setRespHeader $responseG "Content-Type" "text/json; charset=utf-8"

// 写响应状态为整数200(HTTP_OK),表示是成功的请求响应
writeRespHeader $responseG #i200

// 用spr指令拼装响应字符串
spr $push "请求是:%v,参数是:%v" $reqNameG $argsG

// 用genJsonResp生成封装的JSON响应,也可以自行输出其他格式的字符串
genJsonResp $push $requestG "success" $pop

// 将响应字符串写输出(到网页)
writeResp $responseG $pop

// 结束处理函数,并返回TX_END_RESPONSE_XT以终止响应流的继续输出
exit TX_END_RESPONSE_XT
这样,我们如果点击网页中的按钮1,会得到如下的alert弹框:
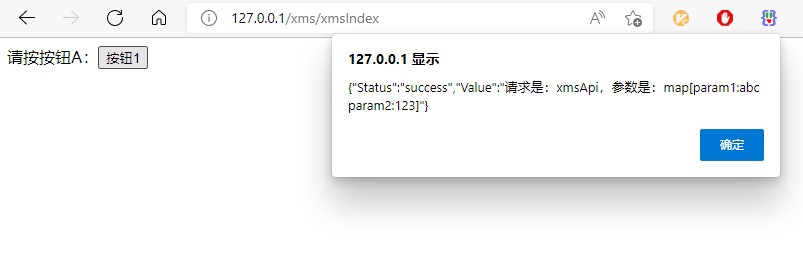
这是因为网页xmsTmpl.html中,通过AJAX访问了 http://127.0.0.1:80/xms/xmsApi 这个服务,而我们的谢语言服务器会寻找到xmsApi.xie(自动加上了.xie文件名后缀)并执行,因此会输出我们希望的内容。
至此,一个麻雀虽小五脏俱全的WEB/应用/API多合一服务器的例子就完整展现出来了,已经足够一般小型的应用服务,并且基本无外部依赖,部署也很方便,只需一个主程序以及拷贝相应目录即可。
用谢语言实现一个网络客户端也非常容易,以上面的网络服务端为例,访问这些服务的客户端代码(httpClient.xie)如下:
// getWeb指令可以用于各种基于HTTP的网络请求,
// 此处是获取某URL处的网页内容
// 第一个参数pageT用于存放访问的结果内容
// -timeout参数用于指定超时时间,单位是秒
getWeb $pageT "http://127.0.0.1/xms/xmsIndex" -timeout=15

// 输出获取到的内容参考
pln $pageT

// 定义一个映射类型的变量mapT
// 用于存放准备POST的参数
var $mapT map

// 设置示例的POST参数
setMapItem $mapT param1 value1
setMapItem $mapT param2 value2

// 输出映射内容参考
pln $mapT

// 以POST的方式来访问WEB API
// getWeb指令除了第一个参数必须是返回结果的变量,
// 第二个参数是访问的URL,其他所有参数都是可选的
// method还可以是GET等
// encoding用于指定返回信息的编码形式,例如GB2312、GBK、UTF-8等
// headers是一个JSON格式的字符串,表示需要加上的自定义的请求头内容键值对
// 参数中可以有一个映射类型的变量或值,表示需要POST到服务器的参数
getWeb $resultT "http://127.0.0.1:80/xms/xmsApi" -method=POST -encoding=UTF-8 -timeout=15 -headers=`{"Content-Type": "application/json"}` $mapT

// 查看结果
pln $resultT
示例中演示了直接获取网页和用POST形式访问API服务的方法,运行效果如下:
<html>
<body>
<script>
function test() {
let xhr = new XMLHttpRequest();
xhr.open('POST', 'http://127.0.0.1:80/xms/xmsApi', true);
xhr.setRequestHeader("Content-Type", "application/x-www-form-urlencoded")
xhr.onload = function(){
alert(xhr.responseText);
}
xhr.send("param1=abc¶m2=123");
}
</script>
<div>
<span>请按按钮A:</span><button onclick="javascript:test();">按钮1</button>
</div>
</body>
</html>
map[param1:value1 param2:value2]
{"Status":"success","Value":"请求是:xmsApi,参数是:map[param1:value1 param2:value2]"}可以看到,程序顺利获得到了所需的服务器响应。
谢语言也支持自己手动编写各种基于HTTP的服务器,下面是一个API服务器的例子(apiServer.xie):
// 新建一个路由处理器
newMux $muxT

// 设置处理路由“/test”的处理函数
// 第4个参数是字符串类型的处理函数代码
// 将以新的虚拟机运行
// 虚拟机内将默认有4个全局变量:
// requestG 表示http请求对象
// responseG 表示http响应对象
// paraMapG 表示http请求传入的query参数或post参数
// inputG 是调用setMuxHandler指令传入的第3个参数的值
setMuxHandler $muxT "/test" #i123 `

// 输出参考信息
pln "/test" $paraMapG

// 拼装输出的信息字符串
// spr类似于其他语言中的sprintf函数
spr $strT "[%v] 请求名: test,请求参数: %v,inputG:%v" ?(?nowStr) $paraMapG $inputG

// 设置输出的http响应头中的键值对
setRespHeader $responseG "Content-Type" "text/json; charset=utf-8"

// 设置输出http响应的状态值为200(表示成功,即HTTP_OK)
writeRespHeader $responseG 200

// 准备一个映射对象用于拼装返回结果的JSON字符串
var $resMapT map

setMapItem $resMapT "Status" "success"
setMapItem $resMapT "Value" $strT

toJson $jsonStrT $resMapT

// 写http响应内容,即前面拼装并转换的变量jsonStrT中的JSON字符串
writeResp $responseG $jsonStrT

// 设置函数返回值为TX_END_RESPONSE_XT
// 此时响应将中止输出,否则将会把该返回值输出到响应中
assign $outG  "TX_END_RESPONSE_XT"

`

pln 启动服务器……

// 在端口8080上启动http服务器
// 指定路由处理器为muxT
// 结果放入变量resultT中
// 由于startHttpServer如果执行成功是阻塞的
// 因此resultT只有失败或被Ctrl-C中断时才会有值
startHttpServer $resultT ":8080" $muxT
运行后,用浏览器访问下面的网址进行测试:
http://127.0.0.1:8080/test?param1=abc¶m2=123
可以看到网页中会显示类似下面的JSON格式的输出:
{
  "Status": "success",
  "Value": "[2022-05-17 15:11:57] 请求名: test,请求参数: map[param1:abc param2:123],inputG:123"
}
当然,一般API服务都是用编程的形式而非浏览器访问,用浏览器比较适合做简单的测试。
谢语言实现静态WEB服务器则更为简单,见下例(webServer.xie):
// 新建一个路由处理器
newMux $muxT

// 设置处理路由“/static/”后的URL为静态资源服务
// 第3个参数是对应的本地文件路径
// 例如:访问 http://127.0.0.1:8080/static/basic.xie
// 而当前目录是c:\tmp,那么实际上将获得c:\scripts\basic.xie
setMuxStaticDir $muxT "/static/" "./scripts"

pln 启动服务器……

// 在端口8080上启动http服务器
// 指定路由处理器为muxT
// 结果放入变量resultT中
// 由于startHttpServer如果执行成功是阻塞的
// 因此resultT只有失败或被Ctrl-C中断时才会有值
startHttpServer $resultT ":8080" $muxT运行后,访问http://127.0.0.1:8080/static/basic.xie,将获得类似下面的结果:
// 本例演示做简单的加法操作

// 将变量x赋值为浮点数1.8
assign $x #f1.8

// 将变量x中的值加上浮点数2
// 结果压入堆栈
add $push $x #f2

// 将堆栈顶部的值弹出到变量y
pop $y

// 将变量x与变量y中的值相加,结果压栈
add $push $x $y

// 弹出栈顶值并将其输出查看
// pln指令相当于其他语言中的println函数
pln $pop
实际上读取了当前目录的scripts子目录下的basic.xie文件展示。
如果想要实现动态网页服务器,类似PHP、JSP、ASP等,可以参考之前的微服务/应用服务器和手动编写API服务器等例子,很容易实现。
谢语言内置已经具备能力实现一个简单的博客系统。博客系统对比一般的网站服务器,主要需要增加下面几个功能:
- 支持注册、登录与鉴权
- 支持编辑文章
- 支持将特定格式的文章渲染成网页以便展示
下面我们就举例说明谢语言实现一个最简单博客系统的方法。
首先,我们先建立一个登录服务(登录页面此处略去,有了登录服务接口,登录网页很容易就可以实现)。登录服务的目的是在用户成功登录以后获取一个令牌(token),此后在需要令牌鉴权的时候(例如编辑文章)会需要将该令牌传入。例子如下:
goto :main

:fail1

    spr $tmps "empty %v" $fail1Reason

    genResp $result $requestG "fail" $tmps

    writeResp $responseG $result

    exit

:fail2

    spr $tmps "require SSL"

    genResp $result $requestG "fail" $tmps

    writeResp $responseG $result

    exit

:fail3

    spr $tmps "%v" $fail1Reason

    genResp $result $requestG "fail" $tmps

    writeResp $responseG $result

    exit

:handler1
    pop $lastLine
    pop $errMsg
    pop $detail

    pl "代码运行到第%v行时发现错误:%v(%v)" $lastLine $errMsg $detail

    spr $failMsg "internal error(line %v): %v(%v)" $lastLine $errMsg $detail

    genResp $result $requestG "fail" $failMsg

    writeResp $responseG $result

    exit

:main

onError :handler1

= $outG "TX_END_RESPONSE_XT"

setRespHeader $responseG "Content-Type" "text/json; charset=utf-8"

writeRespHeader $responseG #i200

pl "[%v] %v params: %v" ?(?nowStr) $reqNameG $paraMapG

mb $urlT $requestG URL

# pl urlT:%#v $urlT

mb $schemeT $requestG Scheme

# pln schemeT $schemeT

mb $protoT $requestG Proto

# pln protoT $protoT

mb $tlsT $requestG TLS

isNil $tlsT

if $tmp :fail2

# plv $requestG

getMapItem $appCode $paraMapG app

# plv $appCode

= $fail1Reason appCode

if ?`($appCode == $undefined)` :fail1

getMapItem $user $paraMapG u

= $fail1Reason user

if ?`(?isUndef $push $user)` :fail1

getMapItem $password $paraMapG p ""

= $fail1Reason password

if ?`($password == "")` :fail1

= $fail1Reason "password not match"

// 此处控制密码的校验
if ?`($password != "abc123")` :fail3

getMapItem $secret $paraMapG secret ""
# pln ?`("-secret=" + $secret)`

genToken $result $appCode $user admin ?`(? ifThenElse (? == $secret "") "" ("-secret=" + $secret))`

genResp $result $requestG "success" $result debug ?`(? ifThenElse (? == $secret "") "" ("-secret=" + $secret))`

writeResp $responseG $result

exit
获取令牌的方法如下(为了安全起见,代码限制了必须用https访问,另外参数最好使用POST方式传递,这里为了演示方便,采用了GET方式):
https://auth.example.com/xms/xlogin?app=app1&u=userName&p=password&secret=sdf789
其中,app是应用名称,可以自己设定,u是用户名,p是密码,secret是令牌加密秘钥(可以省略)。返回信息类似下面:
{
  "Status": "success",
  "Value": "9DCA7F736D56758385877E8A6E628D92727F848B7D81534E4B554F614943595E56635867",
  "debug": ""
}
Value字段中是后面可用的令牌。
然后,我们来架设博客服务。以Linux服务器为例,假定我们在/mnt/xms实现我们的博客服务,我们以下面的命令启动谢语言服务器:
xie -server -port=:80 -sslPort=:443 -dir=/mnt/xms -webDir=/mnt/web -certDir=/mnt/cert -verbose此时/mnt/web下为我们的静态网页文件,/mnt/xms下为我们的动态网页文件,SSL证书放在/mnt/cert(因为server.crt和server.key两个文件)。一个特殊的约定是,/mnt/xms目录下的doxc.xie文件默认为博客处理的代码文件,访问http://blog.example.com/xc/test这样的请求时,将被交给doxc.xie来处理。因此我们根据自己需要修改该文件即可,一个典型例子如下:
// 设置默认返回值为TX_END_RESPONSE_XT以避免多余的网页输出
= $outG "TX_END_RESPONSE_XT"

pl "[%v] %v params: %v" ?(?nowStr) $reqNameG $paraMapG

// 设定错误和提示页面的HTML,其中的TX_main_XT等标记将被替换为有意义的内容
= $infoTmpl `
<!DOCTYPE html>
<html>
<head>
<meta charset="utf-8">
<meta http-equiv="content-type" content="text/html; charset=UTF-8" />
<meta name="viewport" content="width=device-width, initial-scale=1.0, maximum-scale=1.0, user-scalable=no">
<title></title>
</head>
<body>
    <div style="text-align: center;">
        <div id="main" style="witdth: 60%; margin-top: 3.0em; font-weight: bold; font-size: 2.0em; color: TX_mainColor_XT;">
            TX_main_XT
        </div>
        <div id="info" style="witdth: 90%; margin-top: 3.0em; font-size: 1.5em;">
            TX_info_XT
        </div>
    </div>
</body>
</html>
`

// 下面放置一些快速调用的函数,因此直接跳转到main标号执行主程序代码
goto :main

// 用于输出错误提示页面的函数
:fatalReturn

    strReplace $result $infoTmpl TX_info_XT $pop

    strReplace $result $result TX_main_XT $pop

    strReplace $result $result TX_mainColor_XT "#FF1111"

    writeResp $responseG $result

    exit

    fastRet

// 用于输出信息提示页面的函数
:infoReturn

    strReplace $result $infoTmpl TX_info_XT $pop

    strReplace $result $result TX_main_XT $pop

    strReplace $result $result TX_mainColor_XT "#32CD32"

    writeResp $responseG $result

    exit

    fastRet

// 主函数代码入口
:main

// 新建一个字符串缓冲区(即可变长字符串)用于输出调试信息
new $debuf strBuf

// reqNameG预设全局变量中存放的是请求路由
// 例如,访问http://example.com/xms/h/test/a1
// 则reqNameG为h/test/a1
// 将其分割为h和test/a1两段
strSplit $listT $reqNameG "/" 2

// 加入调试信息
mt $drop $debuf append $listT

// 获取子请求的第一部分(本例中为h)
getItem $subReqT $listT 0

// 获取子请求的第二部分(本例中为test/a1)
getItem $subReqArgsT $listT 1

pln subReqT: `'` $subReqT `'`

// 如果子请求(第一部分)为edit则表示编辑该页面
ifEval `$subReqT == "edit"` +1 :next1
    # fastCall :infoReturn $subReqT $basePathG
    # exit

    setRespHeader $responseG "Content-Type" "text/html; charset=utf-8"

    writeRespHeader $responseG #i200

    // 检查token
    getMapItem $tokenT $paraMapG txtoken

    checkToken $r0 $tokenT -sercret=sdf789

    isErrX $r1 $r0 $msgT

    if $r1 +1 +2
        fastCall :fatalReturn 鉴权失败 $msgT

    pln token: $r0

    strSplit $list1T $r0 "|"

    getItem $userNameT $list1T 1

    // 只允许用户名为admin的用户操作
    == $userNameT "admin"

    if $tmp :inext2
        fastCall :fatalReturn 鉴权失败 用户不存在

    // 获取文件绝对路径
    :inext2
    strTrim $relDirT $subReqArgsT

    joinPath $absPathT $basePathG wk $relDirT

    pln absPathT: $absPathT

    // 获取post参数ta1,如果存在则表示是保存

    getMapItem $ta1T $paraMapG ta1

    isUndef $push $ta1T

    if $pop :inext4
        // 保存文件

        extractFileDir $push $absPathT

        ensureMakeDirs $push $pop

        isErrX $errT $pop $msgT

        if $errT +1 +2
            fastCall :fatalReturn 创建目录失败 $msgT

        saveText $push $ta1T  $absPathT

        isErrX $errT $pop $msgT

        if $errT +1 +2
            fastCall :fatalReturn 保存文件失败 $msgT

    // 读取原有文件并展示
    :inext4
    ifFileExists $b1 $absPathT

    = $fcT ""

    ifNot $b1 +2
        loadText $fcT $absPathT

    // 编辑页面模板
    = $editTmplT `
    <!DOCTYPE html>
<html>
<head>
<meta charset="utf-8">
<meta http-equiv="content-type" content="text/html; charset=UTF-8" />
<meta name="viewport" content="width=device-width, initial-scale=1.0, maximum-scale=1.0, user-scalable=no">
<title></title>
<script type="text/javascript" src="/js/jquery.min.js"></script>
<script>
	$().ready(function() {
        $("textarea").on(
            'keydown',
            function(e) {
                if (e.keyCode == 9) {
                    e.preventDefault();
                    var indent = "\t";
                    var start = this.selectionStart;
                    var end = this.selectionEnd;
                    var selected = window.getSelection().toString();
                    selected = indent + selected.replace(/\n/g, '\n' + indent);
                    this.value = this.value.substring(0, start) + selected
                            + this.value.substring(end);
                    this.setSelectionRange(start + indent.length, start
                            + selected.length);
                }
            });
	});
</script>
</head>
<body>
<div id="div1" style="text-align: center; width: 100%; height: 100%;">
    <div style="width: 60%; margin: 0 auto; font-weight: bold; font-size: 2.0em;">
        <p>TX_filePath_XT</p>
    </div>
    <form method="POST">
        <div id="main" style="width: 80%; margin: 0 auto; height: 100%;">
            <textarea id="ta1" name="ta1" style="width: 100%; height: 30em; font-size: 1.5em;">TX_textAreaValue_XT</textarea>
        </div>
        <div style="width: 60%; margin: 0 auto; font-weight: bold; font-size: 2.0em;">
            <button type="submit">保存</button>
        </div>
    </form>
</div>
</body>
</html>
    `

    htmlEncode $rs1 $fcT

    strReplace $rs2 $editTmplT TX_textAreaValue_XT $rs1
    strReplace $rs2 $rs2 TX_filePath_XT $relDirT

    writeResp $responseG $rs2

    exit
    # fastCall :infoReturn $absPathT $fcT

:next1
# dumpf labels

// 如果子请求为h,则表示以网页形式输出页面
ifEval `$subReqT == "h"` +1 :next2

    setRespHeader $responseG "Content-Type" "text/html; charset=utf-8"

    writeRespHeader $responseG #i200

    // 获取文件绝对路径
    strTrim $relDirT $subReqArgsT

    joinPath $absPathT $basePathG wk $relDirT

    pln absPathT: $absPathT

    strEndsWith $b2T $absPathT ".html" ".htm"

    if $b2T :inext5
        + $absPathT $absPathT ".html"

    :inext5
    loadText $fcT $absPathT

    isErrX $errT $fcT $msgT

    if $errT +1 +2
        fastCall :fatalReturn 操作失败 $msgT

    writeResp $responseG $fcT
    exit

:next2

// 如果子请求为t,则表示以纯文本形式输出页面
ifEval `$subReqT == "t"` +1 :next3

    // 获取文件绝对路径
    strTrim $relDirT $subReqArgsT

    joinPath $absPathT $basePathG wk $relDirT

    pln absPathT: $absPathT

    loadText $fcT $absPathT

    isErrX $errT $fcT $msgT

    if $errT +1 +2
        fastCall :fatalReturn 操作失败 $msgT

    setRespHeader $responseG "Content-Type" "text/plain; charset=utf-8"

    writeRespHeader $responseG #i200

    writeResp $responseG $fcT
    exit

:next3

// 如果子请求为md,则表示以markdown形式渲染后输出页面
ifEval `$subReqT == "md"` +1 :next4

    // 获取文件绝对路径
    strTrim $relDirT $subReqArgsT

    joinPath $absPathT $basePathG wk $relDirT

    pln absPathT: $absPathT

    strEndsWith $b2T $absPathT ".md"

    if $b2T :inext3
        + $absPathT $absPathT ".md"

    :inext3
    loadText $fcT $absPathT

    isErrX $errT $fcT $msgT

    if $errT +1 +2
        fastCall :fatalReturn 操作失败 $msgT

    renderMarkdown $fcT $fcT

    setRespHeader $responseG "Content-Type" "text/html; charset=utf-8"

    writeRespHeader $responseG #i200

    writeResp $responseG $fcT
    exit

:next4

// 如果子请求为editxms,则表示以编辑谢语言代码
ifEval `$subReqT == "editxms"` +1 :next5

    setRespHeader $responseG "Content-Type" "text/html; charset=utf-8"

    writeRespHeader $responseG #i200

    // 检查token
    getMapItem $tokenT $paraMapG txtoken

    checkToken $r0 $tokenT

    isErrX $r1 $r0 $msgT

    if $r1 +1 +2
        fastCall :fatalReturn 鉴权失败 $msgT

    pln token: $r0

    strSplit $list1T $r0 "|"

    getItem $userNameT $list1T 1

    == $userNameT "admin"

    if $tmp :inext6
        fastCall :fatalReturn 鉴权失败 用户不存在

    // 获取文件绝对路径
    :inext6
    strTrim $relDirT $subReqArgsT

    joinPath $absPathT $basePathG x $relDirT

    pln absPathT: $absPathT

    // 获取post参数ta1,如果存在则表示是保存

    getMapItem $ta1T $paraMapG ta1

    isUndef $push $ta1T

    if $pop :inext7
        // 保存文件

        extractFileDir $push $absPathT

        ensureMakeDirs $push $pop

        isErrX $errT $pop $msgT

        if $errT +1 +2
            fastCall :fatalReturn 创建目录失败 $msgT

        saveText $push $ta1T  $absPathT

        isErrX $errT $pop $msgT

        if $errT +1 +2
            fastCall :fatalReturn 保存文件失败 $msgT

    // 读取原有文件并展示
    :inext7
    ifFileExists $b1 $absPathT

    = $fcT ""

    ifNot $b1 +2
        loadText $fcT $absPathT

    = $editTmplT `
    <!DOCTYPE html>
<html>
<head>
<meta charset="utf-8">
<meta http-equiv="content-type" content="text/html; charset=UTF-8" />
<meta name="viewport" content="width=device-width, initial-scale=1.0, maximum-scale=1.0, user-scalable=no">
<title></title>
<script type="text/javascript" src="/js/jquery.min.js"></script>
<script>
	$().ready(function() {
        $("textarea").on(
            'keydown',
            function(e) {
                if (e.keyCode == 9) {
                    e.preventDefault();
                    var indent = "\t";
                    var start = this.selectionStart;
                    var end = this.selectionEnd;
                    var selected = window.getSelection().toString();
                    selected = indent + selected.replace(/\n/g, '\n' + indent);
                    this.value = this.value.substring(0, start) + selected
                            + this.value.substring(end);
                    this.setSelectionRange(start + indent.length, start
                            + selected.length);
                }
            });
	});
</script>
</head>
<body>
<div id="div1" style="text-align: center; width: 100%; height: 100%;">
    <div style="width: 60%; margin: 0 auto; font-weight: bold; font-size: 2.0em;">
        <p>TX_filePath_XT</p>
    </div>
    <form method="POST">
        <div id="main" style="width: 80%; margin: 0 auto; height: 100%;">
            <textarea id="ta1" name="ta1" style="width: 100%; height: 30em; font-size: 1.5em;">TX_textAreaValue_XT</textarea>
        </div>
        <div style="width: 60%; margin: 0 auto; font-weight: bold; font-size: 2.0em;">
            <button type="submit">保存</button>
        </div>
    </form>
</div>
</body>
</html>
    `

    htmlEncode $rs1 $fcT

    strReplace $rs2 $editTmplT TX_textAreaValue_XT $rs1
    strReplace $rs2 $rs2 TX_filePath_XT $relDirT

    writeResp $responseG $rs2

    exit

:next5

# push 测试
# push 详细信息

fastCall :infoReturn 未知请求 $subReqT

exit
运行后,先登录xlogin网页获得token,然后访问类似(域名替换成自己的) http://blog.example.com/xc/edit/abc.md (注意要带上URL参数txtoken=自己刚刚登录获得的token),即可编辑Markdown格式的文件内容,位置在服务器/mnt/xms/wk目录下的abd.md文件。编辑后保存。然后访问 http://blog.example.com/xc/md/abc 即可访问渲染后的网页,同理 http://blog.example.com/xc/t/abc 可访问纯文本格式的abc.txt文件, http://blog.example.com/xc/h/abc 可访问网页格式的abc.html文件。 http://blog.example.com/xc/editxms/abc.xie 则是编辑一个谢语言代码文件,该文件保存后位于/mnt/xms/x目录下,之后可以用 http://blog.example.com/xms/x/abc 来访问该服务。一个例子文件如下,
= $outG "TX_END_RESPONSE_XT"

setRespHeader $responseG "Content-Type" "text/json; charset=utf-8"

writeRespHeader $responseG #i200

pl "[%v] %v params: %v" ?(?nowStr) $reqNameG $paraMapG

genResp $rs $requestG success test

writeResp $responseG $rs

exit
还可以进一步扩展功能,但一个简单的博客系统或者叫CMS(内容管理系统)已经搭建成了。
谢语言中也可以另起一个虚拟机执行一段谢语言代码(即嵌套执行),某些情况下,这会是个很方便的功能。示例如下(runCode.xie):
// 设定传入参数inputT,在虚拟机中通过全局变量inputG访问
assign $inputT #L`[{"name": "tom", "age": 25}, 15]`

// 用runCode指令运行代码
// 代码将在新的虚拟机中执行
// 除结果参数(不可省略)外,第一个参数是字符串类型的代码(必选,后面参数都是可选)
// 第二个参数为任意类型的传入虚拟机的参数(虚拟机内通过inputG全局变量来获取该参数)
// 再后面的参数可以是一个字符串数组类型的变量或者多个字符串类型的变量,虚拟机内通过argsG(字符串数组)来对其进行访问
runCode $result `

// 输出inputG供参考
pln "inputG=" $inputG

// 获取inputG中的第二项(序号为1,值为数字15)
getItem $item2 $inputG 1

plo $item2

// 由于数字可能被JSON解析为浮点数,因此将其转换为整数
toInt $item2 $item2

// 从argsG中获取第一项(序号为0)
getItem $v3 $argsG 0

// 由于argsG中每一项都是字符串,因此将其转换为整数
toInt $v3 $v3

// 从argsG中获取第二项(序号为1)
getItem $v4 $argsG 1

toInt $v4 $v4

// 定义一个变量a并赋值为整数6
assign $a #i6

// 用eval指令计算几个数相加的值,结果入栈
// 由于虚拟机已经用了反引号括起代码
// 因此可以用双引号括起表达式以免冲突
eval "$a + $item2 + $v3 + $v4"

// 设置虚拟机的返回值
assign $outG $tmp

` $inputT 22 9

// 最后结果应为52
pln result= $result
需要注意的是输入参数和输出参数的运用方法,以及在嵌入代码中尽量避免使用反引号。
运行结果如下:
inputG= [map[age:25 name:tom] 15]
(float64)15
result= 52
谢语言可以作为系统服务启动,支持Windows和Linux等操作系统。只要加命令行参数-reinstallService运行谢语言主程序,即可在系统中安装一个名为xieService的系统服务(在Windows下可以用计算机管理中的服务管理模块看到)。注意,操作系统中安装服务,一般需要管理员权限才可以进行,Windows下需要以管理员身份打开CMD窗口执行该命令,Linux下需要以root用户或用sudo命令来执行。
服务启动后会在服务根目录(Windows下为c:\xie,Linux下为/xie)下的文件中xieService.log记录日志。服务初次启动时,会在服务根目录下寻找所有名称类似taskXXX.xie的文件(例如task001.xie、taskAbc.xie等)逐个运行,并将其执行结果(通过全局变量outG返回)输出到日志。这种代码文件称为一次性运行任务文件,一般用于需要开机运行一次的情况,也可以通过手动执行xie -restartService命令来重启服务达到再次执行的目的。
另外,xieService服务在运行中,每隔5秒钟会检查服务根目录,如果其中有名称类似autoRemoveTaskXXX.xie的文件(例如autoRemoveTask001.xie、autoRemoveTaskAbc.xie等),将会立即执行这些文件中的代码,然后将这些文件删除。这种机制类似任务队列,允许我们随时将任务加入队列(放入服务根目录),谢语言服务会随时执行这些任务。并且由于执行后会立即删除,因此该任务不会被反复执行。
与服务安装、移除、启动、停止、重新启动有关的谢语言主程序命令行参数还包括-installService、-removeService、-startService、-stopService、-restartService等。
任务代码可以参考例子中的task001.xie、autoRemoveTask001.xie等。
谢语言支持方便的图形界面(GUI)编程,包含多种实现方式,各有各的优势和使用场景。
其中,Windows下使用WebView2系统控件是比较推荐的GUI编程方式,WebView2功能强大并且随时更新,在Windows 10及以上系统中已经内置,Windows 7等系统中也可以单独安装,谢语言无需附加任何文件即可用这种方式编写和分发图形界面应用。
第二种方式是通过 SciterJS 这个第三方库实现,Windows下只需要一个动态链接库文件(sciter.dll),Linux下的配置请参考这里。
第三种方式是使用一个外部的浏览器来访问谢语言启动的WEB服务器或API服务器,这样前端可以完全使用标准的HTML/CSS/JavaScript技术进行图形界面编程,通过Ajax方式访问谢语言编写的Web服务来使用谢语言的能力。这种方式的缺点是,一般的浏览器为安全考虑一般不允许通过代码调整浏览器的标题、大小和位置。
第四种方式是在第三种方式的基础上,调用谢语言配套的浏览器,即可解决调整浏览器标题、大小和位置等问题。目前谢语言配套的浏览器包括一个基于IE11内核的浏览器和基于Chromium内核的浏览器,前者比较轻量级但IE11对新版JavaScript的支持有缺陷,后者较重(体积较大,初次使用初始化图形界面环境时下载慢)但功能更完善。
谢语言中的图形界面编程通过下面的基本说明和几个例子可以快速地了解掌握。
谢语言GUI图形编程的WebView2方式,主要通过Windows自带的WebView2组件来支持GUI编程,仅适用于Windows系统,分发时无需附加文件(如果低版本Windows系统,可以自行下载安装WebView2)。WebView2使用标准的HTML、CSS以及JavaScript的进行编程,来实现图形界面的展示和操控,谢语言则负责后台逻辑的处理,两者之间可以互通,JavaScript中通过特定的接口方式可以调用谢语言中的函数传递数据并进行操作,反之亦然,谢语言也可以调用JavaScript中的特定函数。基本熟悉网页编程的开发者都可以很方便地上手。
谢语言中有一个预置全局变量$guiG,用于作为调用GUI功能的接口对象。
下面我们通过一些例子逐步说明谢语言中基于WebView2方式的GUI编程方法。
我们直接通过一个代码例子(webGui1.xie)来了解:、
// 本例演示使用Windows下的WebView2(Windows 10以上自带,Win 7等可以单独安装)来制作图形化界面程序
// WebView2在Windows 10以上系统自带,Win 7等可以单独安装
// 也因此本例只在Windows下有效

// 新建一个窗口,放入变量w中
// guiG是全局预置变量,表示图形界面主控对象
// 它的newWindow方法根据指定参数创建一个新窗口
// width参数表示窗口的宽度,缺省为800
// height参数表示窗口的高度,缺省为600
// 如果带有-debug参数,表示是否允许调试(鼠标右键菜单带有“检查”等选项)
// -fix参数表示窗口不允许调整大小
// -center参数表示窗口居中
// 还有-max、-min分别表示以最大或最小化的状态展示窗口

mt $w $guiG newWindow "-title=Test WebView2" -width=1024 -height=768 -center

plo $w

// 新建一个用于窗口事件处理的快速代理函数
// 代码在标号dele1处开始
// 快速代理函数必须以fastRet指令返回
new $deleT quickDelegate :dele1

// 调用窗口对象的setQuickDelegate方法来指定代理函数
mt $rs $w setQuickDelegate $deleT

plo $rs

// 如果从网络加载网页,那么可以用下面的navigate方法
// mt $rs $w navigate http://xie.topget.org

// 本例中使用从本地加载的网页代码
// 设置准备在窗口中载入的HTML代码
// 本例中HTML页面中引入的JavaScript和CSS代码均直接用网址形式加载
= $htmlT `
<!DOCTYPE html>
<html>
<head>
<meta charset="utf-8">
<meta http-equiv="content-type" content="text/html; charset=UTF-8" />
<meta name="viewport" content="width=device-width, initial-scale=1.0, maximum-scale=1.0, user-scalable=no">
<script src="http://xie.topget.org/js/jquery.min.js"></script>
<link rel="stylesheet"  type="text/css" href="http://xie.topget.org/css/tabulator.min.css">
<script src="http://xie.topget.org/js/tabulator.min.js"></script>
<title></title>
<script>
	// 页面加载完毕后,将用alert展示一个值,然后准备数据并显示一个报表
	window.onload = function() {
		var s1 = "a信b";

		var s2 = "1\x602";
		alert(s2);

		console.log(s1.charCodeAt(0), s1.charCodeAt(1), s1.charCodeAt(2), s2, JSON.stringify(s2));

		var tabledata = [
            {id:1, name:"Oli Bob", age:"12", col:"red", dob:""},
            {id:2, name:"Mary May", age:"1", col:"blue", dob:"14/05/1982"},
            {id:3, name:"Christine Lobowski", age:"42", col:"green", dob:"22/05/1982"},
            {id:4, name:"Brendon Philips", age:"125", col:"orange", dob:"01/08/1980"},
            {id:5, name:"Margret Marmajuke", age:"16", col:"yellow", dob:"31/01/1999"},
        ];

		var table = new Tabulator("#div3", {
			height:205, // set height of table (in CSS or here), this enables the Virtual DOM and improves render speed dramatically (can be any valid css height value)
			data:tabledata, //assign data to table
			layout:"fitColumns", //fit columns to width of table (optional)
			columns:[ //Define Table Columns
				{title:"Name", field:"name", width:150},
				{title:"Age", field:"age", hozAlign:"left", formatter:"progress"},
				{title:"Favourite Color", field:"col"},
				{title:"Date Of Birth", field:"dob", sorter:"date", hozAlign:"center"},
			],
			rowClick:function(e, row){ //trigger an alert message when the row is clicked
				alert("Row " + row.getData().id + " Clicked!!!!");
			},
		});

	}

	// 点击test1按钮后,将调用quickDelegateDo函数来调用谢语言中定义的快速代理函数,并传入需要的函数
	function test1() {
		quickDelegateDo("pl", "time: %v, navigator: %v", new Date(), navigator.userAgent);
	}

	// 点击test2按钮后,将调用quickDelegateDo函数来调用谢语言中定义的快速代理函数,并alert返回的值
	function test2() {
		var rs = quickDelegateDo("showNav", "userAgent", navigator.userAgent);

		// 返回的结果是一个Promise,因此要用相应的方式获取
		rs.then(res => {
			alert("test2: "+res);
		});
	}

	// 点击test按钮后,将用Ajax方式访问一个网络API,获取结果并显示
	function test() {
		$.ajax({
			url: "http://topget.org/xms/test",
			dataType: 'text',
			type: 'POST',
			data: {
				req: "test",
				name: 'Tom'
			},
			success: function (data) {
				alert(data);
			},
			error: function (response) {
				console.log(JSON.stringify(response));
			}
		});

	}
</script>
</head>
<body>
<div id="div1">
	<button onclick="javascript:test();">test</button>
	<button onclick="javascript:test1();">test1</button>
	<button onclick="javascript:test2();">test2</button>
</div>
<div id="div3">
</div>
</body>
</html>
`

// 调用窗口对象的setHtml方法来设置其内容
mt $rs $w setHtml $htmlT

plo $rs

// 调用窗口对象的setHtml方法来展示窗口
// 此时窗口才真正显示
// 并且直至窗口关闭都将阻塞(即等待窗口关闭后才往下继续执行后面的代码)
mt $rs $w show

plo $rs

// 调用窗口对象的close方法关闭窗口
mt $rs $w close

plo $rs

// 结束程序的执行
// 也是为了避免如果继续往下执行将误入后面的快速代理代码
exit

// 用于网页中的快速代理函数
// 网页中的JavaScript代码中可以用quickDelegateDo函数来调用本函数
// quickDelegateDo函数中所带的参数将被封装成一个列表(数组)压入堆栈
// 快速代理函数需要将其弹栈后进行处理
:dele1
	// 弹栈出参数数组
    pop $argsT

    # pl "%#v" $argsT

	// 本例中,第一个参数被约定为传递一个命令
	// 后面的参数为该命令所需的参数,参数个数视该命令的需要而定
	// 因此这里从参数数组中取出第一个参数放入变量cmdT中
    getArrayItem $cmdT $argsT 0

	// 如果命令为showNav,则取后两个参数并输出其内容
    ifEqual $cmdT "showNav" :+1 :inext1
        getArrayItem $arg1 $argsT 1
        getArrayItem $arg2 $argsT 2

        pl "name: %v, value: %v" $arg1 $arg2

		// 快速处理函数最后必须返回一个值,无论是否需要
        push "showNav result"

		// 快速处理函数最后必须用fastRet指令返回
        fastRet

    :inext1
	// 如果命令为pl,则类似pl指令(其他语言中的或printf)
	// 取出后面第一个参数为格式化字串
	// 再后面都是格式化字串中所需的填充值
	// 然后输出输出
    ifEqual $cmdT "pl" :+1 :inext2
        getArrayItem $formatT $argsT 1

        slice $list1 $argsT 2 -

        pl $formatT $list1...

        push ""

        fastRet

    :inext2
	// 不支持的命令将输出错误信息
    pl "unknown command: %v" $cmdT

    push ""

    fastRet
代码运行后,将看到类似下面的界面:
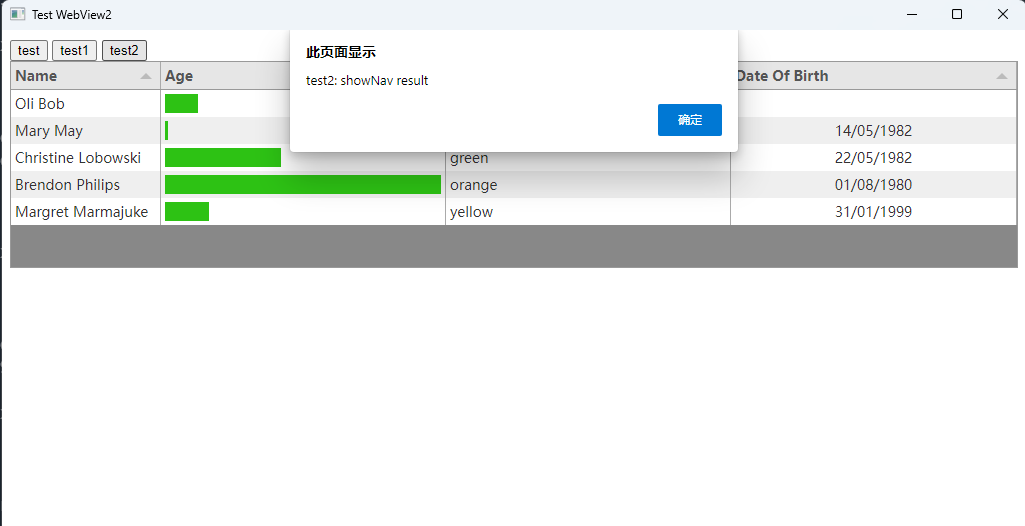
代码中有详尽注释,我们可以看到,代码中展示了如何载入一个HTML页面作为窗口并显示出来,点击几个test按钮可以进行不同的操作,其中test1和test2都是与谢语言的后台逻辑进行互动,其中test2还从谢语言处理函数中获取了返回值并显示。test按钮则演示了如何通过Ajax方式获取一个网络API请求的结果并进行处理。
下面的这个代码例子(webGui2.xie)与上面类似,但使用了内置嵌入JavaScript或CSS文本的方式,避免了网络访问或者从附带文件中读取的麻烦。另外,本例中还演示了如何设置更安全的代理(回调)函数来进行前台界面与谢语言后台的互动。
// 本例演示使用WebView2做图形界面时
// 获取内置的JavaScript或CSS文本嵌入HTML中
// 这样可以避免网络访问或者从附带文件中读取的麻烦
// 另外,本例也演示了如何设置普通代理函数来更安全地进行网页与谢语言后台逻辑之间的互动

// guiNewWindow是内置指令,与下面命令等效
// mt $w $guiG newWindow "-title=Test WebView2a" -width=1024 -height=768 -center -debug
// -debug参数表示打开调试功能
guiNewWindow $w "-title=Test WebView2a" -width=1024 -height=768 -center -debug

// 如果出错则停止执行
checkErrX $w

// 调用窗口对象的setDelegate方法来指定代理函数
// 之前的例子中使用的快速代理函数直接在当前虚拟机中运行,存在一定的并发冲突可能性
// 因此为安全起见,更建议使用普通代理函数
// 普通代理函数通过字符串来定义其代码
// 普通代理函数将在单独新建的虚拟机中运行
// 传入的参数通过全局变量inputG传入,是一个参数数组
// 传出的参数则应放于全局outG中返回
// 与快速代理函数不同,普通代理函数不用fastRet指令来退出,而是直接用exit指令
mt $rs $w setDelegate `

    getArrayItem $cmdT $inputG 0

    ifEqual $cmdT "showNav" :+1 :inext1
        getArrayItem $arg1 $inputG 1
        getArrayItem $arg2 $inputG 2

        pl "name: %v, value: %v" $arg1 $arg2

        = $outG "showNav result"

        exit

    :inext1
    ifEqual $cmdT "pl" :+1 :inext2
        getArrayItem $formatT $inputG 1

        slice $list1 $inputG 2 -

        pl $formatT $list1...

        = $outG ""

        exit

    :inext2
    pl "unknown command: %v" $cmdT

    spr $outG "unknown command: %v" $cmdT

    exit
`

= $htmlT `
<!DOCTYPE html>
<html>
<head>
<meta charset="utf-8">
<meta http-equiv="content-type" content="text/html; charset=UTF-8" />
<meta name="viewport" content="width=device-width, initial-scale=1.0, maximum-scale=1.0, user-scalable=no">
<script>TX_jquery.min.js_XT</script>
<style>TX_tabulator.min.css_XT</style>
<script>TX_tabulator.min.js_XT</script>
<title></title>
<script>
	$().ready(function (){
		var tabledata = [
            {id:1, name:"Oli Bob", age:"12", col:"red", dob:""},
            {id:2, name:"Mary May", age:"1", col:"blue", dob:"14/05/1982"},
            {id:3, name:"Christine Lobowski", age:"42", col:"green", dob:"22/05/1982"},
            {id:4, name:"Brendon Philips", age:"125", col:"orange", dob:"01/08/1980"},
            {id:5, name:"Margret Marmajuke", age:"16", col:"yellow", dob:"31/01/1999"},
        ];

		var table = new Tabulator("#div3", {
			height:205, // set height of table (in CSS or here), this enables the Virtual DOM and improves render speed dramatically (can be any valid css height value)
			data:tabledata, //assign data to table
			layout:"fitColumns", //fit columns to width of table (optional)
			columns:[ //Define Table Columns
				{title:"Name", field:"name", width:150},
				{title:"Age", field:"age", hozAlign:"left", formatter:"progress"},
				{title:"Favourite Color", field:"col"},
				{title:"Date Of Birth", field:"dob", sorter:"date", hozAlign:"center"},
			],
			rowClick:function(e, row){ //trigger an alert message when the row is clicked
				alert("Row " + row.getData().id + " Clicked!!!!");
			},
		});

	});

	function test1() {
		delegateDo("pl", "time: %v, navigator: %v", new Date(), navigator.userAgent);
	}

	function test2() {
		var rs = delegateDo("showNav", "userAgent", navigator.userAgent);

		// 返回的结果是一个Promise,因此要用相应的方式获取
		rs.then(res => {
			alert("test2: "+res);
		});
	}
</script>
</head>
<body>
<div id="div1">
	<button onclick="javascript:test1();">test1</button>
	<button onclick="javascript:test2();">test2</button>
</div>
<div id="div3" style="margin-top: 1.0em;">
</div>
</body>
</html>
`

// 提示:使用getResourceList指令可以看到所有内置的资源
getResource $t1 "js/jquery.min.js"

strReplace $htmlT $htmlT "TX_jquery.min.js_XT" $t1

getResource $t2 "css/tabulator.min.css"

strReplace $htmlT $htmlT "TX_tabulator.min.css_XT" $t2

getResource $t3 "js/tabulator.min.js"

strReplace $htmlT $htmlT "TX_tabulator.min.js_XT" $t3

mt $rs $w setHtml $htmlT

checkErrX $rs

mt $rs $w show

checkErrX $rs

mt $rs $w close

exit
下面的这个代码例子(webGui3.xie)与前两个也是类似,但前后台并非采用回调函数来进行互动,而是谢语言后台用线程在本机的随机端口上启动了一个WEB与API混合服务器来提供网页与接口服务,前台WebView2通过HTTP协议来访问后台接口实现互动,这也是常见的一种方式。
// 本例演示使用WebView2做图形界面时
// 启动一个谢语言WEB服务器和API服务器来自行提供网页资源与API数据服务
// 这样可以避免网络访问或者从附带文件中读取的麻烦,实现前后台的互通
// 唯一的缺点是需要占用一个本机端口

guiNewWindow $w "-title=Test WebView2b" -width=1024 -height=768 -center -debug

checkErrX $w

// 设置路由处理器
newMux $muxT

// 设置静态内容的处理函数
// 用于网页中嵌入JS和CSS时获取内置资源中的这些内容
// 这样,如果主页的网址是 http://127.0.0.1:8721
// 那么,网页中可以用嵌入的 /static/js/jquery.min.js 来获取内置的内容
setMuxHandler $muxT "/static/" "" `
	// 去掉请求路由的前缀 /static/
	trimPrefix $shortNameT $reqNameG "/static/"

	// 获取形如 js/jquery.min.js 形式的内置资源内容
	getResource $textT $shortNameT

	// 根据内置资源的后缀名,获取其MIME类型,例如:text/javascript
	getMimeType $mimeTypeT $shortNameT

	// 拼装完整的mime类型字符串
	spr $mimeTypeT "%v; charset=utf-8" $mimeTypeT

	setRespHeader $responseG "Content-Type" $mimeTypeT
	writeRespHeader $responseG 200

	writeResp $responseG $textT

	assign $outG "TX_END_RESPONSE_XT"

`

// 设置/test路由处理函数,用于测试WEB API
// 返回内容是JSON格式
setMuxHandler $muxT "/test" 0 `
	setRespHeader $responseG "Content-Type" "text/json; charset=utf-8"
	writeRespHeader $responseG 200

	spr $strT "[%v] 请求名: test,请求参数: %v,inputG:%v" ?(?nowStr) $paraMapG $inputG

	var $resMapT map

	setMapItem $resMapT "Status" "success"
	setMapItem $resMapT "Value" $strT

	toJson $jsonStrT $resMapT

	writeResp $responseG $jsonStrT

	assign $outG  "TX_END_RESPONSE_XT"
`

// htmlT中即为准备用于根路由访问时的网页
// 其中 test、test1和test2函数分别演示了使用异步Ajax、fetch和同步Ajax方式来调用本地接口的例子
= $htmlT `
<!DOCTYPE html>
<html>
<head>
<meta charset="utf-8">
<meta http-equiv="content-type" content="text/html; charset=UTF-8" />
<meta name="viewport" content="width=device-width, initial-scale=1.0, maximum-scale=1.0, user-scalable=no">
<script src="/static/js/jquery.min.js"></script>
<link rel="stylesheet" type="text/css" href="/static/css/tabulator.min.css">
<script src="/static/js/tabulator.min.js"></script>
<script>
	$().ready(function (){
		var tabledata = [
            {id:1, name:"Oli Bob", age:"12", col:"red", dob:""},
            {id:2, name:"Mary May", age:"1", col:"blue", dob:"14/05/1982"},
            {id:3, name:"Christine Lobowski", age:"42", col:"green", dob:"22/05/1982"},
            {id:4, name:"Brendon Philips", age:"125", col:"orange", dob:"01/08/1980"},
            {id:5, name:"Margret Marmajuke", age:"16", col:"yellow", dob:"31/01/1999"},
        ];

		var table = new Tabulator("#div3", {
			height:205,
			data:tabledata,
			layout:"fitColumns",
			columns:[
				{title:"Name", field:"name", width:150},
				{title:"Age", field:"age", hozAlign:"left", formatter:"progress"},
				{title:"Favourite Color", field:"col"},
				{title:"Date Of Birth", field:"dob", sorter:"date", hozAlign:"center"},
			],
			rowClick:function(e, row){
				alert("Row " + row.getData().id + " Clicked!!!!");
			},
		});

	});

	function test1() {
		fetch('/test', {
			method: 'POST',
			body: JSON.stringify({
				time: new Date(),
				navigator: navigator.userAgent
			})
		}).then(function(res) {
			res.json().then(function(res1){
				alert(JSON.stringify(res1));
			});
		});
	}

	function test2() {
		var rs = $.ajax({
			url: "/test",
			type: "POST",
			async: false,
			dataType: "text",
			data: {
				req: "test",
				name: 'Jerry'
			}
		});

		var objT = JSON.parse(rs.responseText);

		if (objT.Status == "success") {
			alert("success: " + objT.Value);
		} else {
			alert("fail: " + objT.Value);
		}
	}

	function test() {
		$.ajax({
			url: "/test",
			dataType: 'text',
			type: 'POST',
			data: {
				req: "test",
				name: 'Tom'
			},
			success: function (data) {
				alert(data);
			},
			error: function (response) {
				console.log(JSON.stringify(response));
			}
		});

	}

</script>
</head>
<body>
<div id="div1">
	<button onclick="javascript:test();">test</button>
	<button onclick="javascript:test1();">test1</button>
	<button onclick="javascript:test2();">test2</button>
</div>
<div id="div3" style="margin-top: 1.0em;">
</div>
</body>
</html>
`

// 设置根路径访问时的返回内容
// 即htmlT中存放的网页HTML
// setMuxHandler中的第三个参数传入处理函数中即为可通过全局变量inputG访问的值
setMuxHandler $muxT "/" $htmlT `
	setRespHeader $responseG "Content-Type" "text/html; charset=utf-8"
	writeRespHeader $responseG 200

	writeResp $responseG $inputG

	assign $outG "TX_END_RESPONSE_XT"
`


// 获取一个随机的可用端口用于命令服务器与图形界面通信
getRandomPort $portT

// 启动一个线程来运行HTTP服务器
startHttpServer $resultT $portT $muxT -go

spr $urlT "http://127.0.0.1:%v" $portT

// 让WebView2窗口访问本机的这个端口
// URL地址类似http://127.0.0.1:8721
mt $rs $w navigate $urlT

checkErrX $rs

mt $rs $w show

checkErrX $rs

mt $rs $w close

exit
谢语言GUI图形编程的SciterJS方式,主要通过第三方图形界面库SciterJS来支持跨平台的GUI编程。以Windows系统下为例,除谢语言主程序文件外,只需要一个动态链接库文件(sciter.dll),即可完美支持图形界面编程。Sciter使用标准的HTML、CSS以及类似JavaScript的TiScript脚本语言,来实现图形界面的展示和操控,谢语言则负责后台逻辑的处理,两者之间可以互通,谢语言通过特定的接口方式可以调用TiScript中的函数传递数据并进行操作,反之亦然,TiScript也可以调用谢语言中的特定函数。基本熟悉网页编程的开发者都可以很方便地上手。
谢语言使用GUI功能时,均需使用initGui命令来初始化环境,如果此时系统中没有Sciter的动态链接库文件,将会自动下载到主程序相同的路径下(也可以自行在谢语言官网下载后放到该位置)。谢语言中还有一个预置全局变量$guiG,用于作为调用GUI功能的接口对象。
下面我们通过一些例子逐步说明谢语言中GUI编程的方法。
我们直接通过一个代码例子(calculator.xie)来了解:
// $guiG是预置的全局变量,作为GUI编程的接口对象
// 一般的图形界面操作,都通过调用该对象的各种方法来实现
// 所有GUI程序,都应该先调用guiG变量的init方法来进行图形界面环境的初始化
// 此时,如果在Windows下,如果系统中没有安装图形界面库,
// init方法将自动下载所需的动态链接库文件到主程序路径下
// 然后再进行环境初始化
mt $rs $guiG init

// 定义用于界面展示的HTML网页代码,放在htmlT变量中
// HTML和CSS代码都是标准的,脚本语言是TiScript,类似JavaScript
// 本例中定义了一个文本输入框用于输入表达式算式
// 以及“计算”和“关闭”两个按钮
// 并定义了两个按钮对应的处理脚本函数
// “确定”按钮将调用TiScript的eval函数来进行表达式计算
// 然后将计算结果传递给谢语言代码(通过调用谢语言预定义的delegateDo函数)
// “关闭”按钮将关闭整个窗口
assign $htmlT `
<!DOCTYPE html>
<html>
<head>
	<meta charset="utf-8">
	<meta http-equiv="Content-Type" content="text/html; charset=utf-8"/>
    <title>计算器</title>
</head>
<body>
	<div style="margin-top: 10px; margin-bottom: 10px;">
		<span>请输入算式:</span>
	</div>
	<div style="margin-top: 10px; margin-bottom: 10px;">
		<input id="mainInputID" type=text />
	</div>
	<div>
		<button id="btnCal">计算</button>
		<button id="btnClose">关闭</button>
	</div>

    <script type="text/tiscript">
        $(#btnCal).on("click", function() {
			var result = eval($(#mainInputID).value);

			view.delegateDo(String.printf("%v", result));

            $(#mainInputID).value = result;
        });

        $(#btnClose).on("click", function() {
            view.close();
        });

    </script>
</body>
</html>
`

// 调用guiG的newWindow方法创建一个窗口
// newWindow方法需要有三个参数,第一个是窗口标题
// 第二个是字符串形式的值用于指定窗口大小,空字符串表示按默认区域
// 如果使用类似“[200,300,600,400]”的字符串,则表明窗口位于屏幕坐标(200,300)处,宽高位600*400
// 第三个参数为用于界面展示的字符串
// 结果放入变量windowT中,这是一个特殊类型的对象(后面暂称为window对象)
// 后面我们还将调用该对象的一些方法进行进一步的界面控制
mt $windowT $guiG newWindow 计算器 "" $htmlT

plo $windowT

// 用new指令创建一个快速代理函数(quickDelegate)对象dele1
// 谢语言中quickDelegate是最常用的代理函数对象
// 它创建时需要指定一个快速函数,本例中通过标号deleFast1指明
// 这样,当Sciter的网页中调用view对象的delegateDo函数时
// 就将调用deleFast1标号处的快速函数代码
new $dele1 quickDelegate :deleFast1

// 调用window对象的setDelegate方法将其接口代理指定为dele1
mt $rs $windowT setDelegate $dele1

// 调用window对象的show方法,此时才会真正显示界面窗口
// 并开始响应用户的操作
mt $rs $windowT show

plo $rs

// 退出程序
exit

// 用于界面事件处理的快速函数
// 约定该函数必须通过堆栈获取一个参数,并返回一个参数
// 参数均为字符串类型
// 如果传递复杂数据,常见的方法是传递JSON字符串
// 此处该函数仅仅是将输入参数输出
:deleFast1

    pop $inputT

    pl "计算结果为:%v" $inputT

    // 函数返回前必须要压栈一个输出参数
    // 此处因为实际上无需返回参数,因此随便压入一个无用的数值
    push $inputT

    fastRet
代码展示了如何用谢语言实现一个简单的图形界面计算器,代码中有详细的解释,可以仔细阅读理解。TiScript整体接近于包含JQuery的JavaScript但略有不同(例如DOM对象的id可以不带引号括起等),具体的用法,可以去Sciter网站或者从谢语言官网下载“Windows版界面工具包”,其中含有详细的帮助文档;也可以通过看我们的示例快速了解。
代码运行后,将得到类似下面的界面:
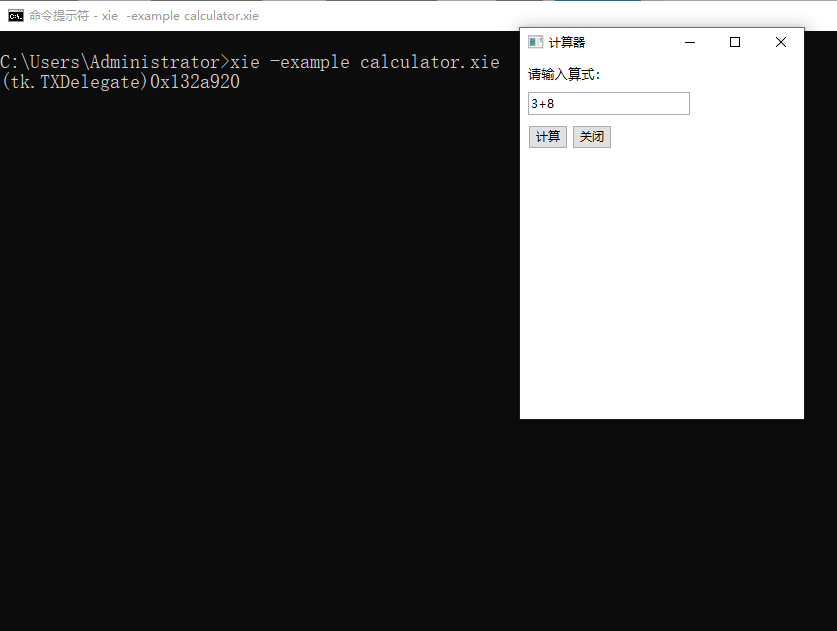
在输入框中输入算式,然后点击“计算”按钮,框中就会计算出结果,并且后台也得到了计算结果并将其输出。点击“关闭”按钮则窗口将关闭并执行后续代码(此例中是用exit指令退出了程序运行)。
谢语言的图形界面编程支持跨平台,上例中的图形界面计算器代码,无需改动就可以在Linux下运行,下面以Ubuntu为例进行说明:
- 首先在谢语言官网下载Ubuntu下的谢语言压缩包(xie.tar.gz),解压后获得谢语言主程序xie,将其权限设置为可执行后将其放置在某个执行路径(PATH变量指明的)中;
- 如果Ubuntu还没有安装GTK3图形环境,则通过 apt install libgtk-3-dev 命令安装该依赖项;
- 此时应该可以运行谢语言主程序,可通过 xie -version 命令查看版本号,并验证谢语言已可顺利运行;
- 到Sciter官网下载4.4.6.6版本的SDK压缩包,或在谢语言官网页面下载“界面工具包”中也有,解压后,将其中bin.lnx\x64中的所有文件复制出来拷贝到某个目录下,例如放到/tools目录下;
- 然后进入到/tools目录下依次执行下面的命令:
export LIBRARY_PATH=$PWD
echo $PWD >> libsciter.conf
sudo cp libsciter.conf /etc/ld.so.conf.d/
sudo ldconfig
ldconfig -p | grep sciter
至此,谢语言语言所需的图形界面环境已经配置好,可以用下面的命令行:
xie -example calculator.xie即可运行在线的计算器例子程序。运行效果类似下图:
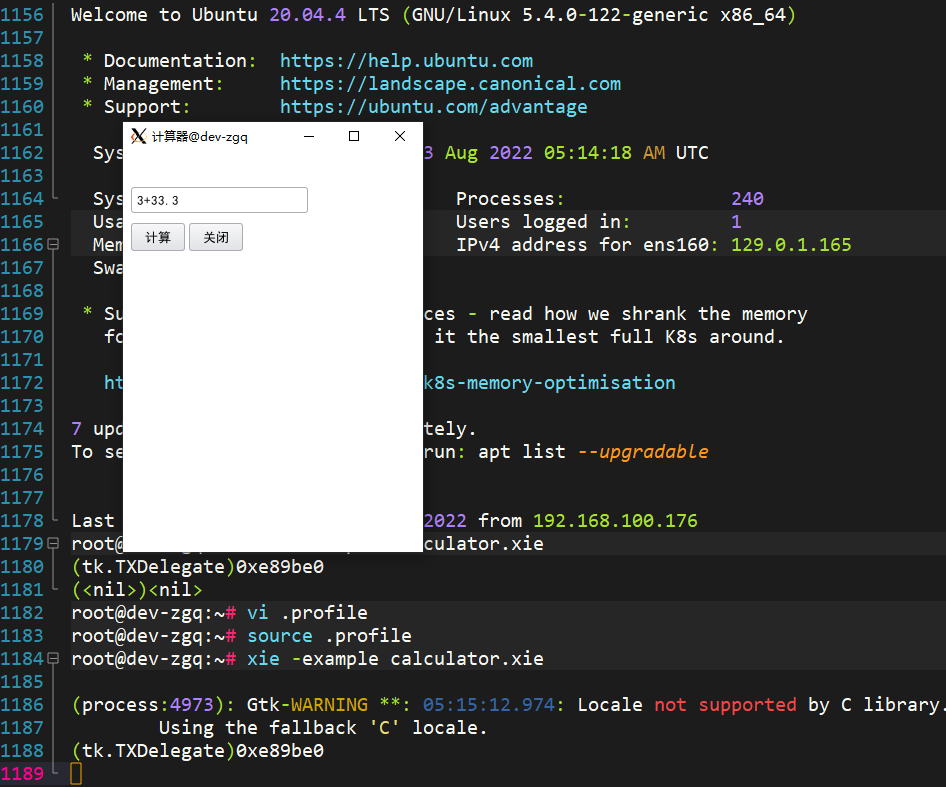
注意,如果中文显示有问题,请自行搜索如何在Ubuntu系统下安装中文字体,也有可能是环境变量LANG等的设置问题(应为en_US.UTF-8)。
如果按上述步骤仍然无法运行,请确保Linux系统安装好了X11图形界面环境。另外,如果在云服务器或者虚拟机上运行,客户端如果在Windows上,建议在Windows下安装Xming,并运行起来,然后使用支持X11 Forwarding的SSH客户端(如Terminus或Bitvise SSH Client,两者均免费),并打开X11 Forwarding选项后,即可在Windows下运行Gox图形界面程序了,没有什么多余的配置,非常简单。也可以使用内置支持X11的终端软件(如WindTerm等)。
用谢语言在Windows系统下进行图形界面编程时,如果程序运行时不希望显示命令窗口(CMD),可以在编译谢语言源码(Go语言版)时加上-ldflags="-H windowsgui"的编译参数即可。
如果谢语言主程序是加了-ldflags="-H windowsgui"的编译参数编译出来的,则通过其编译谢语言代码后的可执行程序,也将没有命令行窗口,结合GUI编程,完全可以制作出标准的图形界面程序。如何编译谢语言代码,可以参见后面文档中说明。
本例继续介绍GUI编程,将实现一个常见的登录框,包含用户名和密码的输入框以及登录和关闭按钮,之间参看下面的代码(loginDialog.xie):
// 初始化GUI环境
mt $rs $guiG init

// 设定界面的HTML
// 其中的moveToCenter函数,用于将窗口移动到屏幕正中并调整大小
// 所有在TiScript与谢语言互通的函数都必须和moveToCenter函数这样
// 接收一个字符串类型的输入参数,并输出一个字符串类型的输出参数
// 如果想传递多于一个的数据,可以用JSON进行数据的封装
// moveToCenter函数就接收一个包含两个参数(宽与高)的JSON字符串
// 并输出一个表示屏幕宽高的字符串
assign $htmlT `
<!DOCTYPE html>
<html>
<head>
	<meta charset="utf-8">
	<meta http-equiv="Content-Type" content="text/html; charset=utf-8"/>
    <title>请登录……</title>
</head>
<body >
	<div style="margin-top: 10px; margin-bottom: 10px;">
		<span>请输入用户名和密码登录……</span>
	</div>
	<div style="margin-top: 10px; margin-bottom: 10px;">
		<label for="userNameID" >用户名: </label><input id="userNameID" type=text />
	</div>
	<div style="margin-top: 10px; margin-bottom: 10px;">
		<label for="userNameID" >密码: </label><input id="passwordID" type=password />
	</div>
	<div>
		<button id="btnLoginID">登录</button>
		<button id="btnClose">关闭</button>
	</div>

    <script type="text/tiscript">
        function moveToCenter(jsonA) {
            var (w, h) = view.screenBox(#frame, #dimension);

            var obj = JSON.parse(jsonA);

            var w1n = obj.Width;
            var h1n = obj.Height;

            view.move((w-w1n)/2, (h-h1n)/2, w1n, h1n);

            return String.printf("%v|%v", w, h);
        }

        $(#btnLoginID).on("click", function() {
			var userNameT = $(#userNameID).value.trim();
			var passwordT = $(#passwordID).value.trim();

			view.delegateDo(JSON.stringify({"userName": userNameT, "password": passwordT}));
			//view.close();
        });

        $(#btnClose).on("click", function() {
            view.close();
        });
    </script>
</body>
</html>
`

// 新建窗口,第二个参数传入了JSON格式的表示左、上、宽、高的窗口位置与大小的字符串
// 但实际上由于下面调用了TiScript中的moveToCenter函数,因此将会使这里定义的宽和高无效
mt $windowT $guiG newWindow 测试 `[300,200,600,400]` $htmlT

// 调用前面HTML代码中TiScript脚本内定义的moveToCenter函数,并传入表示宽与高的JSON字符串
mt $rs $windowT call moveToCenter `{"Width":800, "Height":600}`

// 输出moveToCenter函数的返回值
plo $rs

// 创建并设定与界面之间的快速代理对象
new $dele1 quickDelegate :deleFast1
mt $rs $windowT setDelegate $dele1

// 运行图形界面
mt $rs $windowT show

plo $rs

exit

// 快速代理对象的代码
:deleFast1

    pop $inputT

    pl "inputT: %v" $inputT

    push "output1"

    fastRet
运行效果如下图所示:
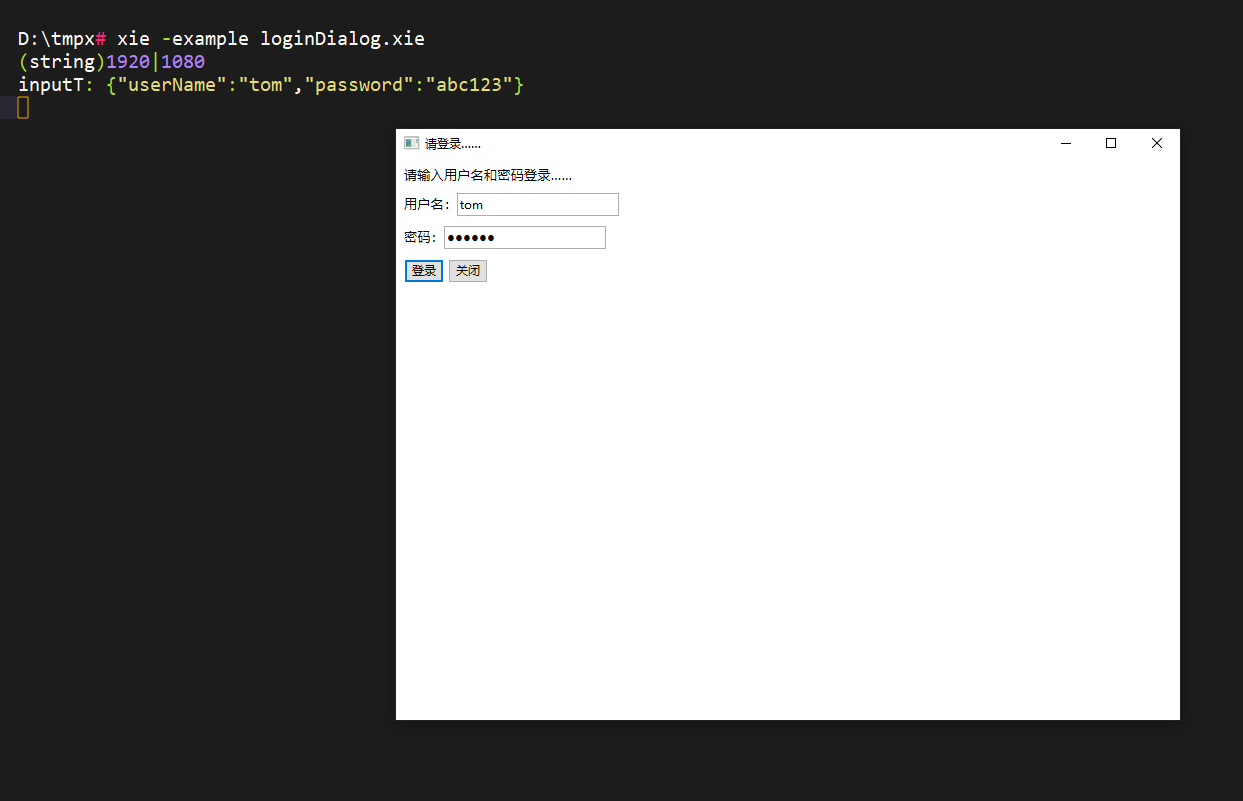
可以看出,moveToCenter函数返回的是一个非JSON格式的字符串,表示屏幕的宽与高的像素数,而点击登录按钮后,接口代理函数deleFast1将输出一个JSON格式的包含输入的用户名和密码的字符串,可以用于后续处理。
谢语言支持简单的编译运行,但仅相当于将主程序和代码打包成一个可执行文件,方便分发并起到简单加密代码的作用。例如要编译一个名为hello.xie的文件,用下面的命令:
Xielang supports simple compilation and operation, but it is only equivalent to packaging the main program and code into an executable file to facilitate distribution and play the role of simple encryption code. For example, to compile a file named hello.xie, use the following command:
xie -compile hello.xie -output=hello.exe执行后将在当前目录下生成hello.exe的可执行文件(Linux类似),如果不指定output参数,则默认生成可执行文件名为output.exe。
After execution, the executable file of hello.exe will be generated in the current directory (similar to Linux). If the output parameter is not specified, the default executable file name is output.exe.
如果谢语言主程序是加了-ldflags="-H windowsgui"的编译参数编译出来的,则通过其编译后的可执行程序,也将没有命令行窗口,结合GUI编程,完全可以制作出标准的图形界面程序。
If the main program of Xielang is compiled with the compilation parameter of -ldflags="-H windowsgui", the compiled executable program will also have no command line window. In combination with GUI programming, standard graphical interface programs can be produced.
目前暂时请参看代码中的InstrNameSet数据结构的代码注释,后面文档会慢慢补齐。
For the moment, please refer to the code comments of the InstrNameSet data structure in the code, and the following documents will be supplemented slowly.
目前暂时请参看代码中的各个Xie...对象(如XieString)的代码内文档说明。
For now, please refer to each Xie... object in the in-code document description of object (such as XieString).
谢语言中的指令,可以没有任何参数(0个参数),即不需要输出也不需要输入参数,例如pass。也有可能只有一个结果参数,例如getNowStr,此时可以省略结果参数以表示将结果存入全局变量$tmp。当然,也有可能既有结果参数,也有其他一个或多个输入参数。当输入参数是可变个数的时候,结果参数是不可省略的。输入参数固定的情况下,一般结果参数也可以省略来表示压栈。一般情况下,为了避免混淆,对于有结果参数的指令,建议总是写上结果参数。
- 注:少数指令可以带有多个结果参数,例如getIter。
*Note: A few instructions can have multiple result parameters, such as getIter.
Instructions in Xielang can have no parameters (0 parameters), that is, no output or input parameters are required, such as pass. It is also possible that there is only one result parameter, such as getNowStr. At this time, the result parameter can be omitted to indicate that the result will be saved to the global variable $tmp. Of course, it is also possible to have both result parameters and one or more other input parameters. When the input parameters are variable, the result parameters cannot be omitted. When the input parameter is fixed, the general result parameter can also be omitted to indicate the stack pressing. In general, in order to avoid confusion, it is recommended to always write the result parameters for instructions with result parameters.
谢语言中的注释是不支持行内注释的,只能单独写在一行中。但在参数个数固定的指令中,如果显式写出了结果参数,此时可以利用该指令将忽略后面的其他参数的特性,来写上该行的注释。
Xielanguage do not support inline comments and comments can only be written in a single line. However, in an instruction with a fixed number of parameters, if the result parameter is explicitly written, you can use the feature that the instruction will ignore other parameters later to write a comment on the line.
谢语言中主程序运行时,如果不指定要执行的脚本文件,同时当前目录下含有名字类似auto*.xie(例如auto.xie、auto01.xie等)的脚本文件时,将按文件名顺序依次执行这些脚本文件。这在分发程序时会比较有用,使用者可以直接鼠标双击谢语言主程序即可执行开发者编写的脚本,只要这些脚本与谢语言主程序在相同目录下并符合上述命名规则。
When the main program of Xielang(i.e. xie.exe in Windows, or xie in Linux) is running, if the script file to be executed is not specified, and the current directory contains script files with names similar to auto*.xie (such as auto.xie, auto01.xie, etc.), these script files will be executed in order of file names. This will be useful when distributing programs. Users can directly double-click the main program of Xielang to execute scripts written by developers, as long as these scripts are in the same directory as the main program of Xielang and conform to the above naming rules.
谢语言主程序执行时,如果加上-clip参数,将从剪贴板读取代码然后执行。
When the main program of Xielang is executed, if the "-clip" parameter is added, the code will be read from the clipboard and then executed.
- fastCall指令调用的快速函数代码中使用+1等虚拟标号(The "+1" virtual label used in the fast function code called by the fastCall instruction)
谢语言中fastCall指令调用的快速函数代码中,应避免使用+1、+3等虚拟标号,尽量使用:next1这种标准标号,但可以使用:+1,:+3这样形式的虚拟标号。
In the fast function code called by the fastCall instruction in Xielang, virtual labels such as +1 and +3 should be avoided, and the standard labels such as :next1 should be used as much as possible, but virtual labels such as :+1, :+3 can be used.
谢语言的目标是使用简单的语法结构减少脚本语言的语法解析开销以便提升速度,并且通过广泛使用内置指令避免使用速度很慢的反射。具体速度评估可以参考例子代码中的斐波那契数列产生的两个例子(递归方式fix.xie和循环方式fibFlat.xie)。
The goal of Xielang is to use simple syntax structure to reduce the syntax parsing cost of script language in order to improve the speed, and avoid the use of slow reflection through extensive use of built-in instructions. For specific speed evaluation, please refer to the two examples generated by Fibonacci sequence in the example code (the recursive method fix.xie and the circular method fibFlat.xie).
- 在Go语言(Golang)中如何嵌入:请参看cmd目录下的main.go,这是谢语言的主程序,里面既是以嵌入式的方法创建谢语言虚拟机并执行代码的。
- How to embed Xielang in Go language (Golang): please refer to main.go under cmd directory, which is the main program of Xielang. It is used to create Xielang virtual machine and execute code in an embedded way.
扩展谢语言一般来说有两个方法:
Generally, there are two ways to extend Xielang:
-
增加内置指令:请fork本库,参考xie.go中的源代码,参看各个指令的写法编写自己的新指令,然后编译出可执行代码即可。
-
Add built-in instructions: Please fork this library, refer to the source code in xie.go, and write your own new instructions according to the writing method of each instruction, and then compile the executable code.
-
增加内置对象:请fork本库,参考xie.go中的源代码,各个Xie...对象(如XieString)的代码内文档说明,重点是实现XieObject接口,然后编译出可执行代码即可。
-
Add built-in objects: Please fork this library, refer to the source code in xie.go, and the in-code documentation of each XieObject object (such as XieString). The key point is to implement the XieObject interface, and then compile the executable code.
-
在Linux下如果出现类似“package gl was not found in the pkg-config search path.”的错误:请执行 apt install libgl1-mesa-dev 命令安装依赖库。
-
出现类似“github.com/AllenDang/imgui-go@v1.12.1: replacement directory ../../../../../github.com/AllenDang/imgui-go does not exist”的错误:由于Linux下使用github.com/AllenDang/imgui-go在Github上的库有小问题,因此需要本地git clone该库,并在作少许修改后使用(Windows下无需改动)。
-
在Linux下如果出现类似“/usr/include/x86_64-linux-gnu/bits/stdio2.h:34:43: note: ‘__builtin___sprintf_chk’ output between 6 and 15 bytes into a destination of size 8”的错误:删除本地github.com/AllenDang/imgui-go库中的implot_demo.cpp文件,或将其重命名为非程序文件,例如mv implot_demo.cpp implot_demo.cpp.bac,然后在编译即可。
注:更多示例请参考cmd/scripts目录
Note: For more examples, please refer to the cmd/scripts directory of source repository
- 三元操作符 ?
- MD5编码
- 命令行获取用户输入及密码输入
- 文本加解密
- 二进制数据或文件加解密
- 复制目录结构
- 查找重复文件
- 字节列表/数组的操作与16进制编解码
- 按二进制位计算
- 随机落点法计算圆周率π(Pi)
- 数据库操作(SQLite3为例)
- 获取屏幕分辨率
- 屏幕截图
- 启动WEB服务分享文本文件供编辑
- 通过SSH直接编辑远程服务器上的文件
- TopXeQ
- Topget
- 陆满庭