This script will power up your new server with the nginx-proxy, where you will be able to host multiple sites, auto renewing Let´s Encrypt certificates! ❤️
Something like:

We strongly recommend you (please do! 🙏) to read all documentation before starting in production as well as the nginx-proxy docs.
To access the previous version of this project please access version 0.4.
If you are upgrading from the previous version please follow the guide below carefully:
https://github.com/evertramos/nginx-proxy-automation/blob/master/docs/upgrade-guide.md
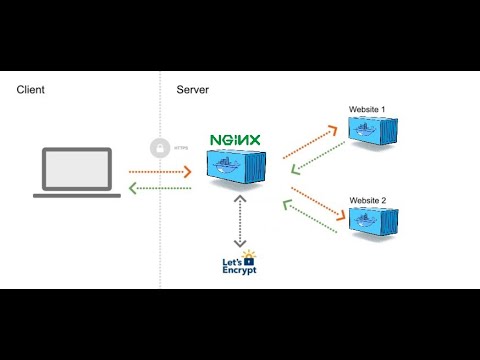
I made a 5 minutes tutorial video to walk you through this project:
Click here to access the video or click the image below:
- 🐧 Linux! (just in case...)
Please check all requirements at requirements.
In order to use this compose file (docker-compose.yml) you must have:
-
🐋 Docker installed (https://docs.docker.com/engine/installation/)
-
Docker-compose installed (https://docs.docker.com/compose/install/)
I have an easy-server for myself which I use to install docker and docker-compose in new servers and some aliases and other stuff. Feel free to use it, but it is not related to this repo and maintainance it's for my own use only. Check './install/docker' folder.
Also, you will need to make sure you have:
-
Port 80 and 443 available for binding - which means apache/nginx or other web services should not be running in your server
-
Server must be accessible by a public IP address
- Clone this repository using the option --recurse-submodules:
$ git clone --recurse-submodules https://github.com/evertramos/nginx-proxy-automation.git proxy Make sure you use the option '--recurse-submodules' once we use an external module in this project, please check basescript
Please note we use 'proxy' as folder at the end. But you can change it to whatever fits you better
- 🚀 Run the script 'fresh_start.sh'
$ cd proxy/bin
$ ./fresh-start.sh
This script will walk you through all config process.
When it finishes you are good to go! 🏁
✈️ If you are in a 'hurry' just run$ ./fresh-start.sh --yes -e your_email@domain --skip-docker-image-check
⚠️ You can check all available options to run the script$ ./fresh-start.sh --help
🗒️ From version v0.3 the script will output logs to /var/log/basescript.log
- Fire your new site with the following options:
  VIRTUAL_HOST=your.domain.com
  LETSENCRYPT_HOST=your.domain.com
  LETSENCRYPT_EMAIL=your.email@your.domain.com
  NETWORK=proxy
The fresh start script asked you for the proxy network name if you changed set a name differente from the default please update the option 'NETWORK' in the examples below before running it.
- Simple site without Let's Encrypt certificate
$ docker run -d -e VIRTUAL_HOST=your.domain.com \
              --network=proxy \
              --name my_app \
httpd:alpine- To have SSL in your web/app you must add the option
-e LETSENCRYPT_HOST=your.domain.com, as follow:
$ docker run -d -e VIRTUAL_HOST=your.domain.com \
              -e LETSENCRYPT_HOST=your.domain.com \
              -e LETSENCRYPT_EMAIL=your.email@your.domain.com \
              --network=proxy \
              --name my_app \
              httpd:alpine
You don´t need to open port 443 in your container, the certificate validation is managed by the web proxy
Please note that when running a new container to generate certificates with Let's Encrypt (
-e LETSENCRYPT_HOST=your.domain.com), it may take a few minutes
- Basic Authentication Support
In order to be able to secure your virtual host with basic authentication, you must create a htpasswd file
within ${NGINX_FILES_PATH}/htpasswd/${VIRTUAL_HOST} via:
$ sudo sh -c "echo -n '[username]:' >> ${NGINX_FILES_PATH}/htpasswd/${VIRTUAL_HOST}"
$ sudo sh -c "openssl passwd -apr1 >> ${NGINX_FILES_PATH}/htpasswd/${VIRTUAL_HOST}"
Please replace the
${NGINX_FILES_PATH}with real path to information, replace[username]with your username and${VIRTUAL_HOST}with your host's domain. You will be prompted for a password.
- Using different networks
If you want to use more than one network to better organize your environment you could set the option SERVICE_NETWORK in our .env.sample or you can just create your own network and attach all your containers as of:
docker network create myownnetwork
docker network connect myownnetwork nginx-web
docker network connect myownnetwork nginx-gen
docker network connect myownnetwork nginx-letsencrypt- Ports
If your service container runs on port 8545 you probably will need to add the VIRTUAL_PORT environment variable to your container,
in the docker-compose.yml, so it can be proxied, as of:
parity
    image: parity/parity:v1.8.9
    [...]
    environment:
      [...]
      VIRTUAL_PORT: 8545
Or as of below:
docker run [...] -e VIRTUAL_PORT=8545 [...]- Restarting proxy container
In some cases you will need to restart the proxy in order to read, as an example, the Basic Auth, if you set it after your service container is already up and running. So, the way I use to restart the proxy (NGINX) is as following, which has no downtime:
docker exec -it ${NGINX_WEB} nginx -s reloadWhere ${NGINX_WEB} is your proxy container name, which in the original .env file is set as nginx-web.
- Run the script
test.shinforming your domain already configured in your DNS to point out to your server as follow:
./test.sh your.domain.comor simply run:
docker run -dit -e VIRTUAL_HOST=your.domain.com --network=webproxy --name test-web httpd:alpineIf you want to test the Let's Encrypt certificate as well use
ssl_test.sh your.domain.com
Access your browser with your domain!
To stop and remove your test container run our stop.sh script:
./stop.shOr simply run:
docker stop test-web && docker rm test-webIf you are using this project in production enviroment, check all license involved and consider the following recomendation:
Following are links to docker containers using this web proxy:
- docker-wordpress-letsencrypt
- docker-portainer-letsencrypt
- docker-nextcloud-letsencrypt
- docker-registry-letsencrypt
- gitlab-docker-letsencrypt
- docker-webtrees-letsencrypt
Please checkout this howto.
Without the projects below this proxy would be impossible:
In case you are willing to support this project, check:
Please access the page Supporters.