Users
- API version: 0.1.0
- Build date: 2019-12-20T11:49:25.649Z[GMT]
API to register user device
Building the API client library requires:
- Java 1.7+
- Maven/Gradle
To install the API client library to your local Maven repository, simply execute:
mvn clean installTo deploy it to a remote Maven repository instead, configure the settings of the repository and execute:
mvn clean deployRefer to the OSSRH Guide for more information.
Add this dependency to your project's POM:
<dependency>
  <groupId>io.swagger</groupId>
  <artifactId>swagger-java-client</artifactId>
  <version>1.0.0</version>
  <scope>compile</scope>
</dependency>Add this dependency to your project's build file:
compile "io.swagger:swagger-java-client:1.0.0"At first generate the JAR by executing:
mvn clean packageThen manually install the following JARs:
target/swagger-java-client-1.0.0.jartarget/lib/*.jar
Please follow the installation instruction and execute the following Java code:
import io.swagger.client.*;
import io.swagger.client.auth.*;
import io.swagger.client.model.*;
import io.swagger.client.api.UserApi;

import java.io.File;
import java.util.*;

public class UserApiExample {

    public static void main(String[] args) {

        UserApi apiInstance = new UserApi();
        Body2 body = new Body2(); // Body2 |
        try {
            InlineResponse2002 result = apiInstance.registerDeviceToken(body);
            System.out.println(result);
        } catch (ApiException e) {
            System.err.println("Exception when calling UserApi#registerDeviceToken");
            e.printStackTrace();
        }
    }
}
import io.swagger.client.*;
import io.swagger.client.auth.*;
import io.swagger.client.model.*;
import io.swagger.client.api.UserApi;

import java.io.File;
import java.util.*;

public class UserApiExample {

    public static void main(String[] args) {

        UserApi apiInstance = new UserApi();
        Body1 body = new Body1(); // Body1 |
        try {
            InlineResponse2001 result = apiInstance.updateDeviceToken(body);
            System.out.println(result);
        } catch (ApiException e) {
            System.err.println("Exception when calling UserApi#updateDeviceToken");
            e.printStackTrace();
        }
    }
}Add following code to your firebase messaging service class and overide the onNewToken method
import com.google.firebase.iid.FirebaseInstanceId;
import io.swagger.client.ApiException;
import io.swagger.client.api.UserApi;
import io.swagger.client.model.Body2;
import io.swagger.client.model.InlineResponse2002;

    @Override
    public void onNewToken(String token) {
        sendRegistrationToServer(token);
    }
Implement the sendRegistrationToServer()
private void sendRegistrationToServer(String token) {
        UserApi userInstance = new UserApi();
        Body2 newUserBody = new Body2();
        newUserBody.setToken(token);
        newUserBody.setDeviceId(FirebaseInstanceId.getInstance().getId());

        try {
            InlineResponse2002 res = userInstance.registerDeviceToken(newUserBody);

        } catch (ApiException e) {
            System.err.println("");
            e.printStackTrace();
        }

    }
All URIs are relative to https://sdk-test.marax.ai/sdk/v1
| Class | Method | HTTP request | Description |
|---|---|---|---|
| UserApi | registerDeviceToken | POST /user/firebase/android | Register a new device |
| UserApi | updateDeviceToken | PUT /user/firebase/android | Update the firebase token for a device |
| UserOffersApi | fetchOffer | GET /user-offer/{offerId}/{userId} | Fetch a single offer for user by offer id |
| UserOffersApi | paintOffer | GET /user-offer/template/{templateId}/{userId} | |
| UserOffersApi | updateOffer | PUT /user-offer/{offerId}/{userId} | Update the offer details for the user |
- Body
- Body1
- Body2
- InlineResponse200
- InlineResponse2001
- InlineResponse2002
- InlineResponse2002Data
- User
- UserAttributes
- UserCompliances
- UserCompliancesGdpr
- UserOfferObject
- UserSdk
- UserSdkAndroid
- UserSdkFirebase
All endpoints do not require authorization. Authentication schemes defined for the API:
Mars SDK is dependent on following SDKs
-
Firebase SDK
-
Rudder SDK
- Integrate Firebase
- Following steps assumes that an active Firebase project is available. If not, follow these steps steps to create a new firebase project
Configuring Cloud Messaging in Firebase
- Create a new project from firebase console

- Select ADD APP after entering the name.

-
Add Firebase to your app
When prompted, enter your application’s Package Name. This can be found in your AndroidManifest.xml file.
<!--The package name is the string equal to "package" below-->
<manifest xmlns:android="http://schemas.android.com/apk/res/android"
          package="ai.marax.sampleapp">

  ...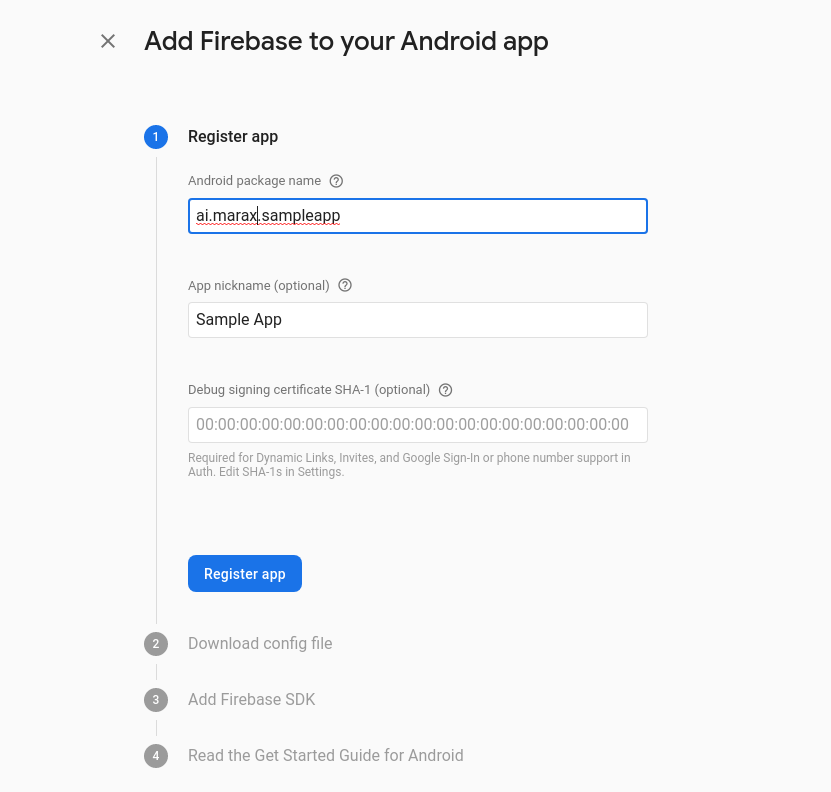
-
Follow instructions to add Firebase SDK to app
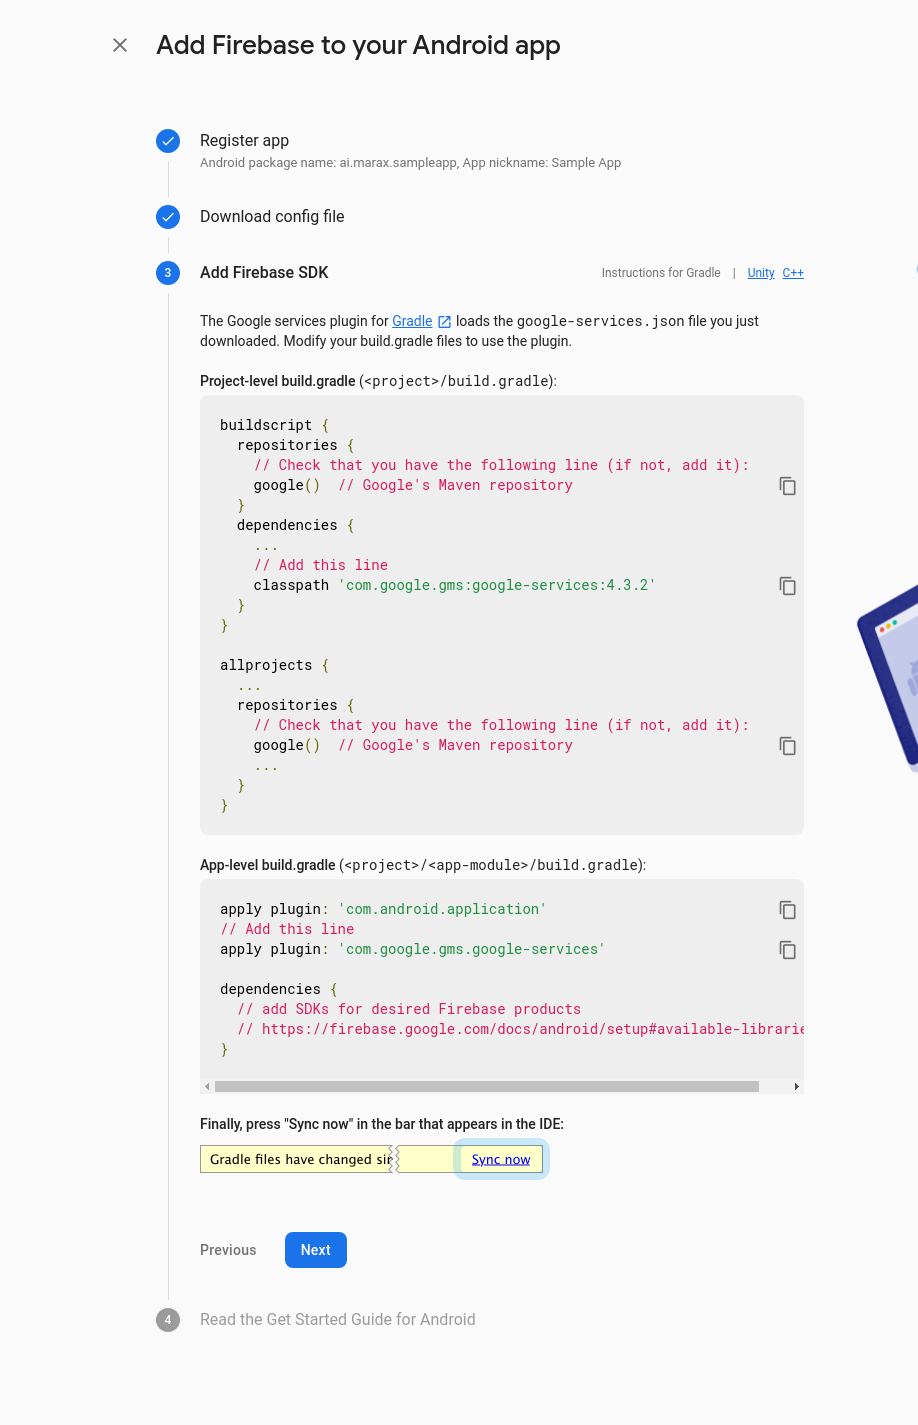
-
Firebase will then generate a google-services.json file that you must add to your application’s “app” directory.
[


Select the Cloud Messaging tab in your Settings. Here, you can find your Server Key to upload to Mars Dashboard

Integrating the Mars SDK with Firebase
Find the firebaseMessagingService in your application and override onNewToken()
/**
     * Called if InstanceID token is updated. This may occur if the security of
     * the previous token had been compromised. Note that this is called when the InstanceID token
     * is initially generated so this is where you would retrieve the token.
     */
    @Override
    public void onNewToken(String token) {

        // If you want to send messages to this application instance or
        // manage this apps subscriptions on the server side, send the
        // Instance ID token to your app server.
        sendRegistrationToServer(token); // add this line of code
    }
and implement the following function
import com.google.firebase.iid.FirebaseInstanceId;
import io.swagger.client.ApiException;
import io.swagger.client.api.UserApi;
import io.swagger.client.model.Body2;
import io.swagger.client.model.InlineResponse2002;

    private void sendRegistrationToServer(String token) {

        UserApi userInstance = new UserApi();
        Body2 newUserBody = new Body2();
        newUserBody.setToken(token);
        newUserBody.setDeviceId(FirebaseInstanceId.getInstance().getId());


        try {
            InlineResponse2002 res = userInstance.registerDeviceToken(newUserBody);
        } catch (ApiException e) {
            System.err.println("");
            e.printStackTrace();
        }

    }
2. Integrate Rudder SDK
Dependencies
- Open your app/build.gradle (Module: app) file, add the following
repositories {
    maven {
        url  "https://dl.bintray.com/rudderstack/rudderstack"
    }
}
implementation 'com.rudderlabs.android.sdk:rudder-sdk-core:0.1.4'
// if you don't have Gson included already
implementation 'com.google.code.gson:gson:2.8.6'
- It is recommended to have an Application class for Rudder SDK. To create one, add a class like so
import android.app.Application;

import com.rudderlabs.android.sdk.core.RudderClient;
import com.rudderlabs.android.sdk.core.RudderConfig;
import com.rudderlabs.android.sdk.core.RudderLogger;

public class MainApplication extends Application {

	private static MainApplication instance;
    private static RudderClient rudderClient;
    private static final String writeKey = "YOUR-SDK-CLIENT_KEY";
    private static final String endPointUrl = "https://sdk-events.marax.ai";

    @Override
    public void onCreate() {
        super.onCreate();

        RudderConfig config = new RudderConfig.Builder()
                .withEndPointUri(endPointUrl)
                .withLogLevel(RudderLogger.RudderLogLevel.VERBOSE)
                .build();

        instance = this;

        rudderClient = new RudderClient.Builder(this, writeKey)
                .withRudderConfig(config)
                .build();

        RudderClient.with(this).onIntegrationReady(writeKey, new RudderClient.Callback() {
            @Override
            public void onReady(Object instance) {
                Log.i("Status", "Rudder Integration is ready");
            }
        });

        RudderClient.setSingletonInstance(rudderClient);
    }
     public static RudderClient getRudderClient() {
        return rudderClient;
    }

    public static MainApplication getInstance() {
        return instance;
    }
}
Add following in your manifest
<application
    android:name=".MainApplication" // relative path to this class
    <!-- ... -->
</application>
Track Events:
To track an event add following code, call getRudderClient().track("EVENTNAME", "RUDDER_PROPERTIES")
Eg:
Map<String,Object> properties = new HashMap<>();
properties.put("view_name", "HOME");
getRudderClient().track("HOME_OPENED", new RudderProperty().putValue(properties));
It's recommended to create an instance of ApiClient per thread in a multithreaded environment to avoid any potential issues.