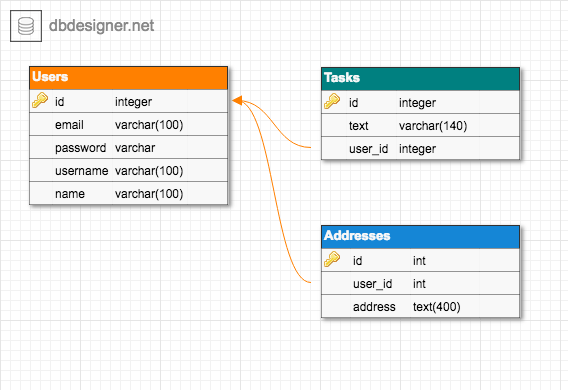
Code example to build a REST API with ORM and SQL Database.
Technologies:
We recommend using mariadb instead of mysql.
Although the node adapter can be using mysql2 adapter.
macOS:
brew install mariadb
brew services start mariadb
Ubuntu:
- Install MariaDB 10.3 on Ubuntu 18.04 and CentOS 7 - Computingforgeeks
- How To Install MySQL on Ubuntu 18.04 | DigitalOcean
In local.
# for development
CREATE DATABASE yourdatabasename
In remote server.
# for test
CREATE DATABASE yourdatabasename_test

# for production
CREATE DATABASE yourdatabasenameInstall dependencies.
yarnThis will also run the setup script automatically.
yarn setup
# this will copy .env.schema to .env if not exist yet
Then edit .env contents in your editor. Refer to .env.defaults for the default values.
DEVELOPMENT_DB_USERNAME=yourusername
DEVELOPMENT_DB_PASSWORD=yourpassword
DEVELOPMENT_DB_NAME=yourdatabasename
DEVELOPMENT_DB_HOST=localhost
DEVELOPMENT_DB_PORT=3306
DEVELOPMENT_DB_DIALECT=mysql

TEST_DB_USERNAME=yourusername
TEST_DB_PASSWORD=yourpassword
TEST_DB_NAME=yourdatabasename-test
TEST_DB_HOST=localhost
TEST_DB_PORT=3306
TEST_DB_DIALECT=mysql

PRODUCTION_DB_USERNAME=yourusername
PRODUCTION_DB_PASSWORD=yourpassword
PRODUCTION_DB_NAME=yourdatabasename
PRODUCTION_DB_HOST=0.0.0.0
PRODUCTION_DB_PORT=3306
PRODUCTION_DB_DIALECT=mysql
Create that yourdatabase (change this) database to your own database server.
You can use CLI or GUI application.
Run migrate script only once to run the migration files, create the tables into the database.
yarn migrate
# this will run all migrations/*.js
You can run seed script only once also to run the seeder files, insert demo data into the database.
yarn seed
# this will run all seeders/*.jsOnly run after the preparation, installation, and configuration are finished.
yarn devyarn start| Endpoint | HTTP | Description |
|---|---|---|
/ |
GET | Get root API |
/users |
GET | Get all users |
/users/:id |
GET | Get one user by id |
/users |
POST | Create new user |
/users/:id |
PUT | Update one user by id |
/users/:id |
DELETE | Delete one user by id |
/users |
DELETE | Delete all users |
Request body example
{
  "email": "yourname@yourdomain.com",
  "password": "yourpassword",
  "username": "yourusername",
  "name": "Your Full Name"
}Users
{
  "id": 0,
  "email": "",
  "password": "",
  "salt": "",
  "username": "",
  "name": ""
}
Tasks
{
  "id": 0,
  "user_id": 0,
  "text": ""
}Follow this official guide: http://docs.sequelizejs.com/manual/tutorial/migrations.html
Install sequelize dependencies in your project.
yarn add sequelize mysql2Use sequelize-cli to initialize and configure the project.
# install sequelize-cli globally
yarn global add sequelize-cli sequelize mysql2

# so you can use it anywhere
sequelize init

# change config.json to config.js

# change '/../config/config.js' in models/index.js

# configure config.js based on your database settings
# change database name, username, password, host, port, dialect

# generate model via cli
sequelize model:generate --name User --attributes username:string,email:string

# edit migrations file
# migrations/20180000000000-create-user.js

# edit models file
# models/user.js

# do the migration from the configuration to the actual database
sequelize db:migrate

# generate seeder via cli
sequelize seed:generate --name demo-users

# edit seeders file
# seeders/20180000000000-demo-users.js

# do the seeding from the configuration to the actual database
sequelize db:seed:allChange the server.listen code block.
server.listen(port, function() {
  console.log('Express server listening on port ' + server.address().port)
})
server.on('error', onError)
server.on('listening', onListening)
Into this, to be wrapped with models.sequelize.
const models = require('./models')

// ...

models.sequelize.sync().then(function() {
  server.listen(port, function() {
    console.log('Express server listening on port ' + server.address().port)
    debug('Express server listening on port ' + server.address().port)
  })
  server.on('error', onError)
  server.on('listening', onListening)
})
Use the model from anywhere. For instance, in your controller functions.
const models = require('../../models')

// ...

models.User.findAll()
  .then(users => {
    res.send({
      users
    })
  })
  .catch(error => {
    res.status(400).send({
      error
    })
  })
Run express server as usual.
How to backup/export & restore/import database from/to a file.
Export:
mysqldump yourdatabase --single-transaction --user=yourusername -p > yourfile.sqlImport:
mysql yourdatabase --user=yourusername -p < yourfile.sqlYou can also follow the official guides or community articles:
- Node.js | Heroku Dev Center
- Getting Started on Heroku with Node.js
- Deploying Node.js Apps on Heroku
- Best Practices for Node.js Development | Heroku Dev Center
- How to Deploy a Node.js App to Heroku ― Scotch (published in 2014)
Create and login to your account on Heroku.
On Heroku Dashboard
Create the app on Heroku.
Setup your "Config Vars": https://dashboard.heroku.com/apps/yourappname/settings, then "Reveal Config Vars".
Put your KEY and VALUE respectively.
PRODUCTION_DB_USERNAME = yourusername
PRODUCTION_DB_PASSWORD = yourpassword
PRODUCTION_DB_NAME = yourdatabasename
PRODUCTION_DB_HOST = 0.0.0.0
PRODUCTION_DB_PORT = 3306
PRODUCTION_DB_DIALECT = mysql
Make sure it's set correctly.
You can also make it auto deploy in "Deployment Method" by connecting with GitHub: https://dashboard.heroku.com/apps/yourappname/deploy/github, then "Enable Automatic deploys".
On Your Local Computer
Install Heroku toolbelt CLI.
# on linux
sudo apt install heroku

# on mac
brew install heroku
Login in CLI.
heroku loginCreate Procfile and add this line.
It will be used for Heroku on how to start the app.
Procfile itself is defined by [node-foreman](https://github.com/strongloop/node-foreman.
web: yarn startCreate app.json and add these lines.
It will be used for Heroku to identify the app.
{
  "name": "yourappname",
  "description": "Your App Description",
  "repository": "https://github.com/yourusername/yourappname",
  "keywords": ["your", "key", "words"],
  "image": "heroku/nodejs"
}
You can also install Heroku in your development dependencies.
Please note that devDependencies will not be installed on production.
yarn add --dev herokuTest your local app as if run using Heroku.
heroku local webTest your local app as if run using Heroku on PRODUCTION mode/environment.
yarn start:production
# this will run
# NODE_ENV=production heroku local web
Go to your repo, then add heroku remote.
heroku git:remote -a yourappname
# set git remote heroku to https://git.heroku.com/yourappname.git
Push to Heroku through Git.
git push heroku masterOn Heroku server, the Heroku platform will in order:
- Be cloned fresh either from push or GitHub new commit trigger.
- Detect the repo if it's a Node.js app.
- Create runtime environment, especially set
NODE_ENV=production. - Install Node.js, npm, and yarn binaries.
- Restore cache.
- Build dependencies.
- Install node modules.
- Run
installscript. In this case, runnpm run setupandnpm run migratescripts.
- Run the dependency installation based on
package.json'sdependencies. - Run
Procfile'swebscript. In this case, runyarn start.
You can see those in details in "Activity" panel: https://dashboard.heroku.com/apps/yourappname/activity.
If there's something wrong with your database, connect to its server and resolve the issue.
