China’s top messaging app WeChat rolled out something quite radical: mini-programs. Embedded apps which require no download, no install. Open, use, share, done!
There is large debate – and many clickbaits – about how practical these apps are... Indeed the framework provided to developers is only at infancy stage, still limited, and honestly a bit frustrating. Nevertheless Tencent is investing unprecedented resources into the adoption of this channel, building momentum, and opening opportunities to the first-movers. We believe that these hackers may find quick-wins if they dare to give it a try.
Got ideas of services you would like to deploy in WeChat asap? Have basic knowledge of Javascript and want to experiment with this framework? Got lost in the Google translation of the doc? Need a small boost to decrypt what is possible or not? Hello and welcome.
Finding your way through the official doc is not easy. In fact, it requires a lot of trial/errors, some research on open-source code and many assumptions to get something done. You have been banging your head on the wall. We get it.
Our mission is to help creative entrepreneurs build great tech products. We will help you take the small steps.
The content below is not a translation of the documentation and will surely be outdated fast. It is simply our contribution to help any one get started and build a cool WeChat Mini-program fast. Do it now.
Are you working on a mini-program? Do reach out to us if you’d like to share your work, meet our crew, ask for help!
If you want to contribute, you can send a Pull Request here or give us a shout on shanghai(at)lewagon.com for suggestions!
This original piece was written by Le Wagon alumni: Adrien Pelegri (Batch #30) with the support of Thibault Genaitay (Driver China) and Stephane Delgado (Batch #61).
- Registration process
- WeChat IDE
- Dig into the "quickstart" project
- The life cycle of your MP
- Core setup of your MP
- Create dynamic pages
- WXML - HTML, what's the deal?
- Data binding
- List loop rendering: wx:for
- Conditional rendering: wx:if, wx:elif, wx:else
- Template
- Import a template
- Define a template
- Events
- Event handler
- Event binding
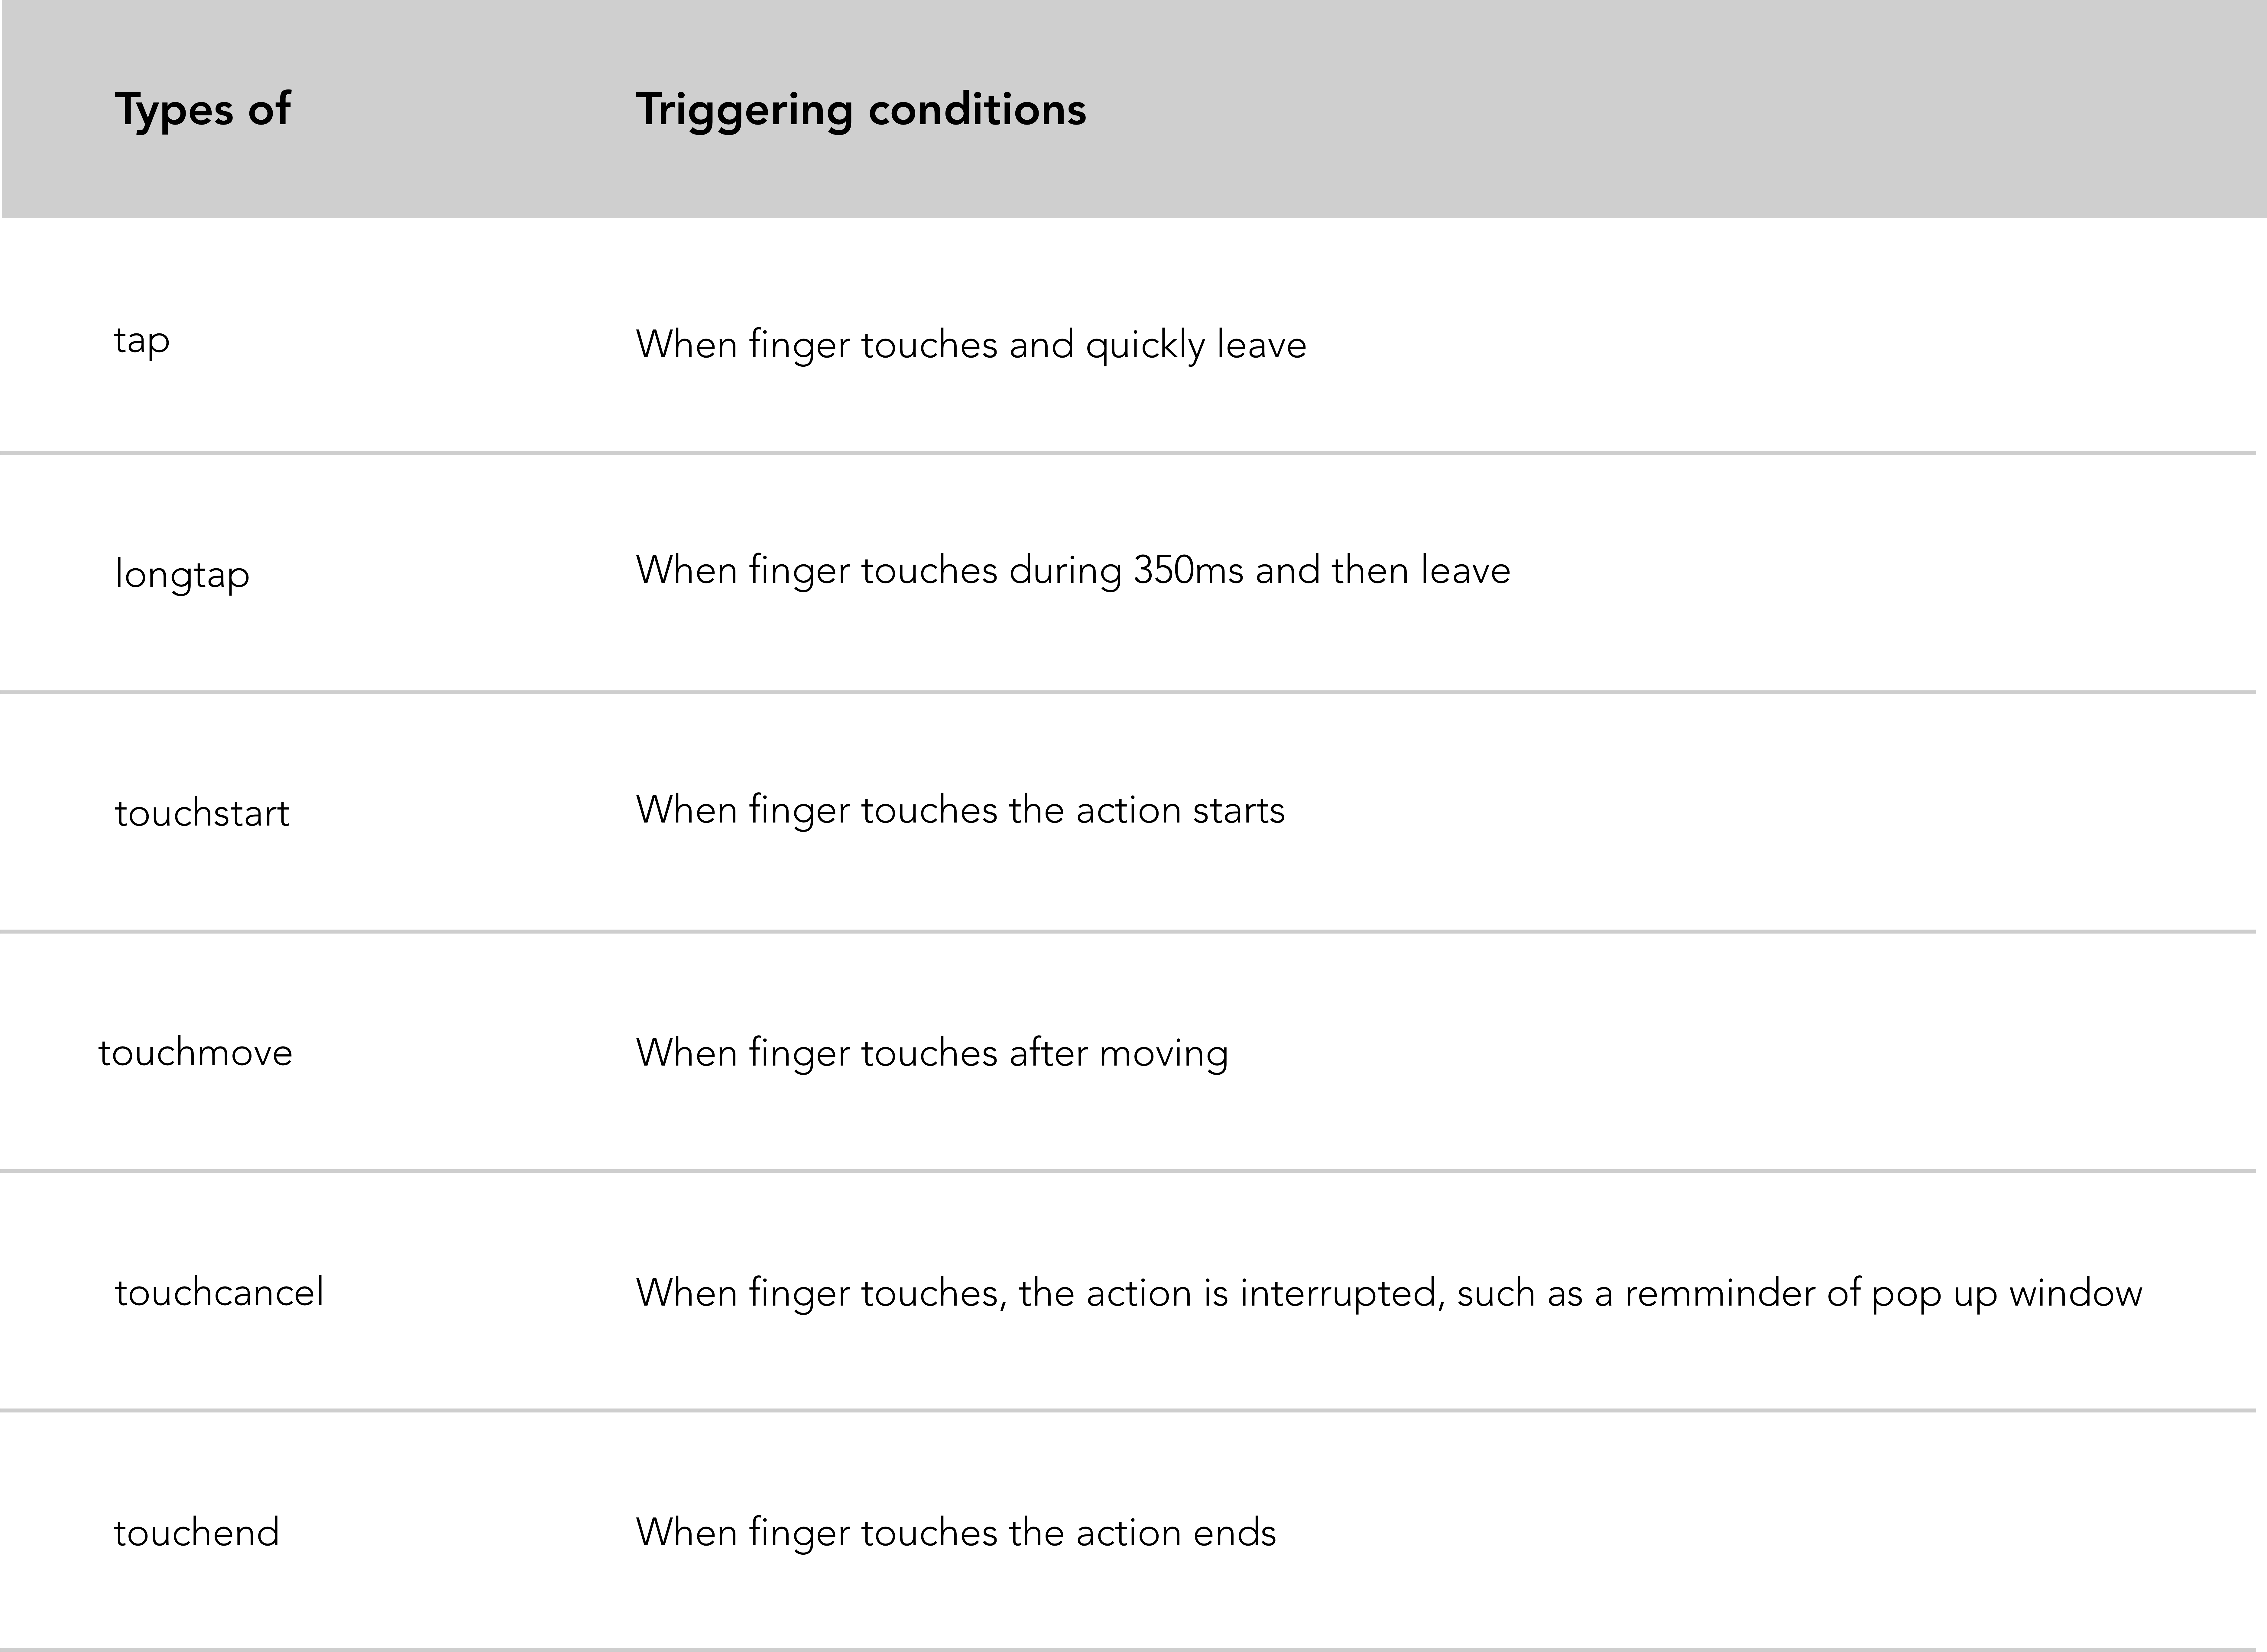
- Event types classification
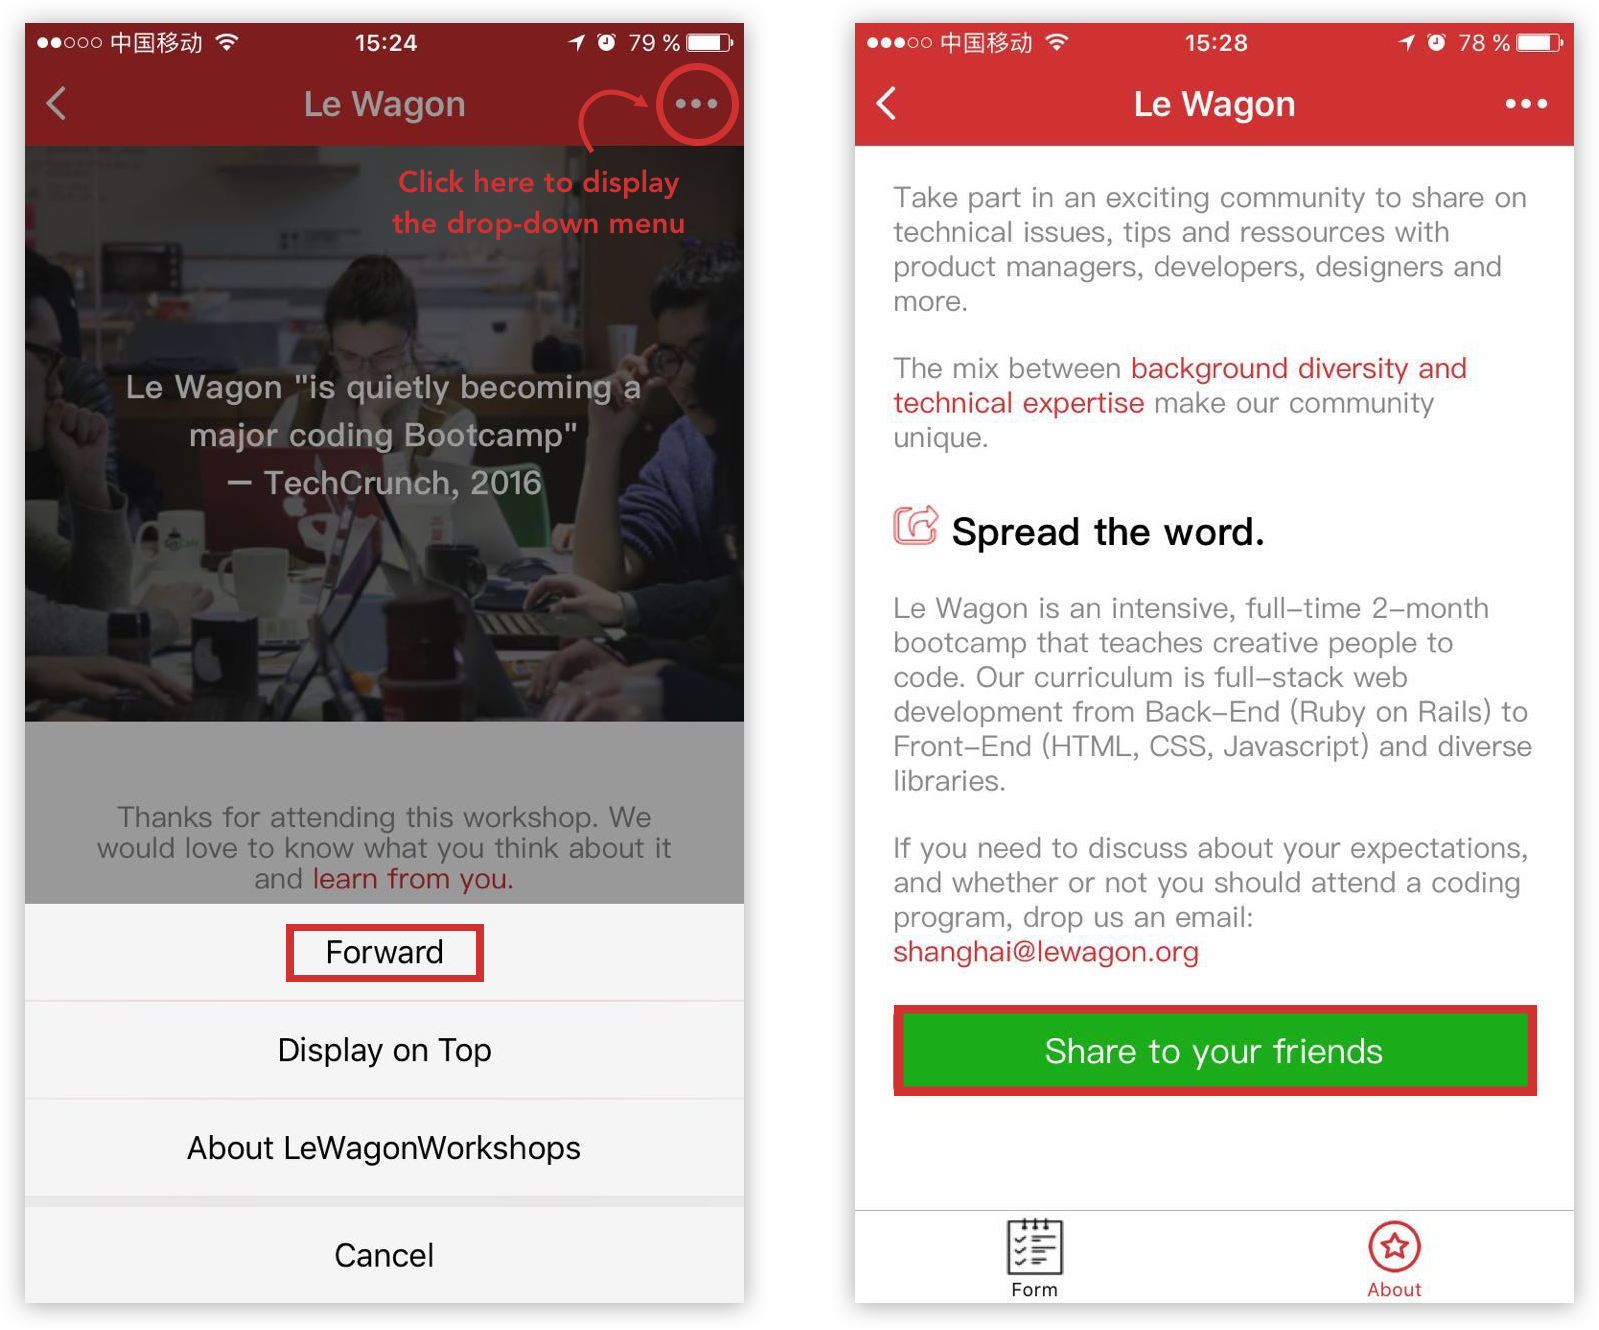
- Mini-program sharing
- Enable the forward button of the drop-down menu
- Create a forward button within the current page
- WeChat design guidelines
- Built-in components
- Leancloud DB
- WeChat API
- FAQ
The registration process is really tough, especially if you don’t have any experience with the fantastic Chinese administrative world. The WeChat verification process will be long. Keep your calm.
From the WeChat mini-program registration, until the development release, you basically need to go through these steps:
- Create an account on WeChat back-end.
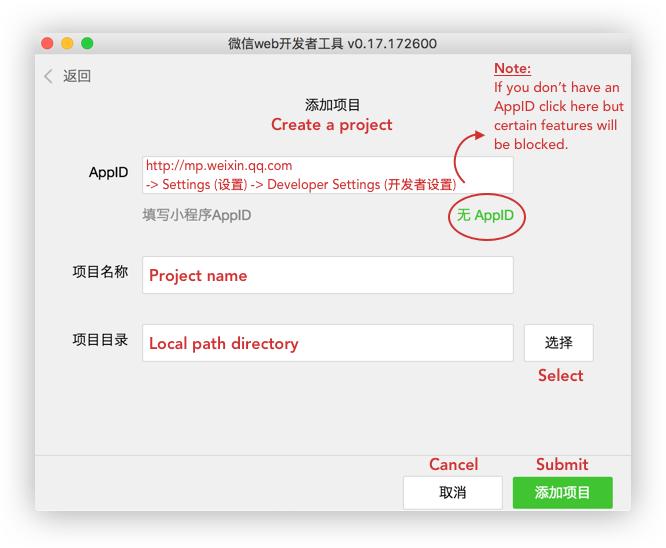
- Pick the right type of application and go through the registration process.
- Complete the mini-program certification process.
- Fill in your mini-program information.
Here is a list of materials you will need to register a mini-program as a company:
- Email, to create your Wechat account.
- Chinese ID. This person will own the account and scan QR codes a lot.
- Phone number, to certify your identity during the verification process.
- Chinese business license, to register as an enterprise.
- Company documents: organisation code, certificate and enterprise bank account.
- Fill in the official letter Tencent provides, sign it (by the admin) and stamp it with the enterprise stamp. Upload it.
We recommend you follow this comprehensive English manual on how to register and create a mini-program project: Medium article or check this official WeChat documentation (Last Updated: 08/02/2017).
An IDE (integrated development environment) is a set of programming tools for writing an application. It consists of a code editor, a compiler and a debugger, accessible through a single graphical user interface.
Download the WeChat IDE here: Mac, Windows 64, Windows 32
Here is a quick tutorial to master the WeChat IDE and take the most from it.
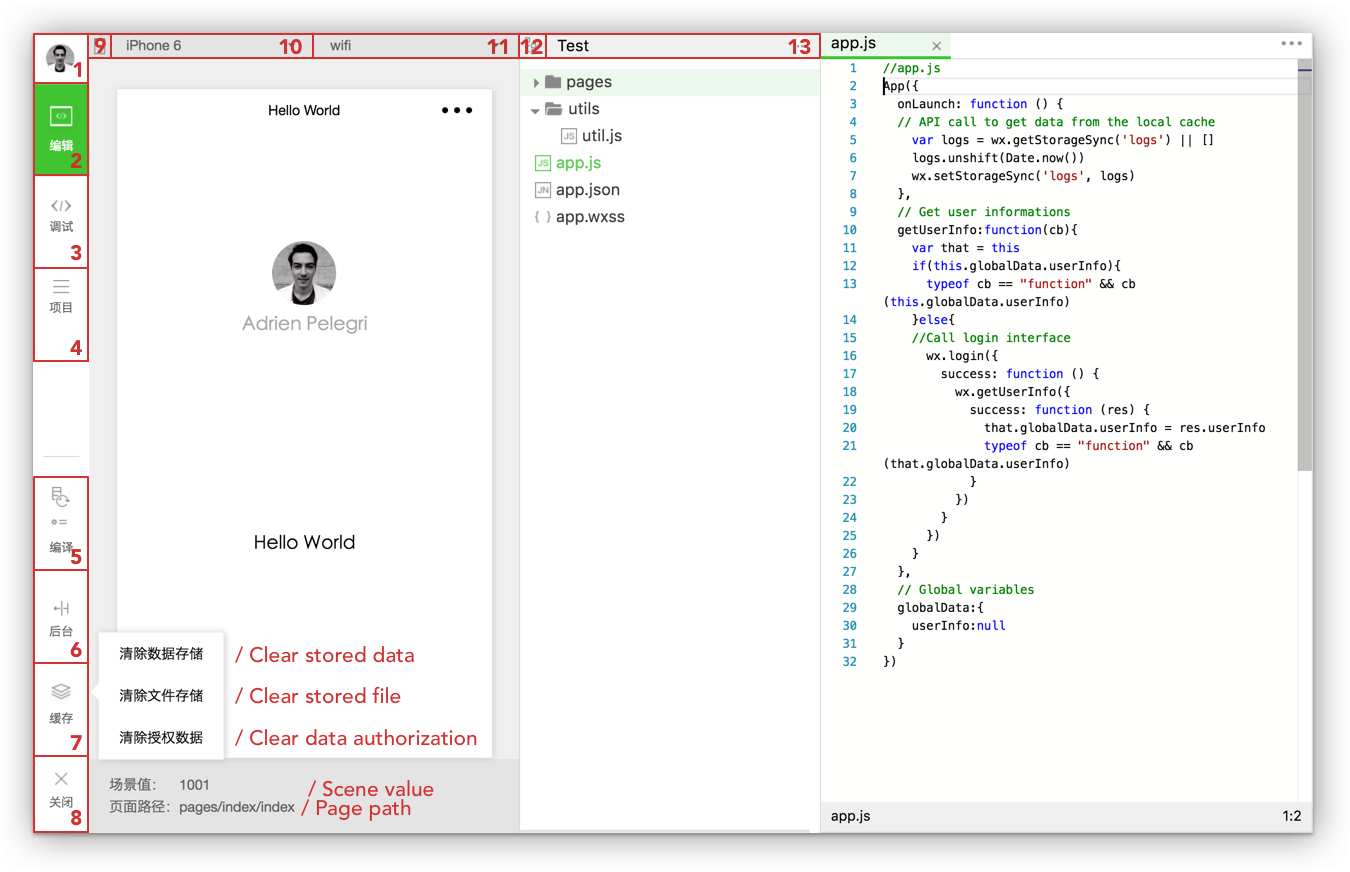
A Code editor with the tree of your files on the side and a Simulator on the left, which displays the preview of your app.
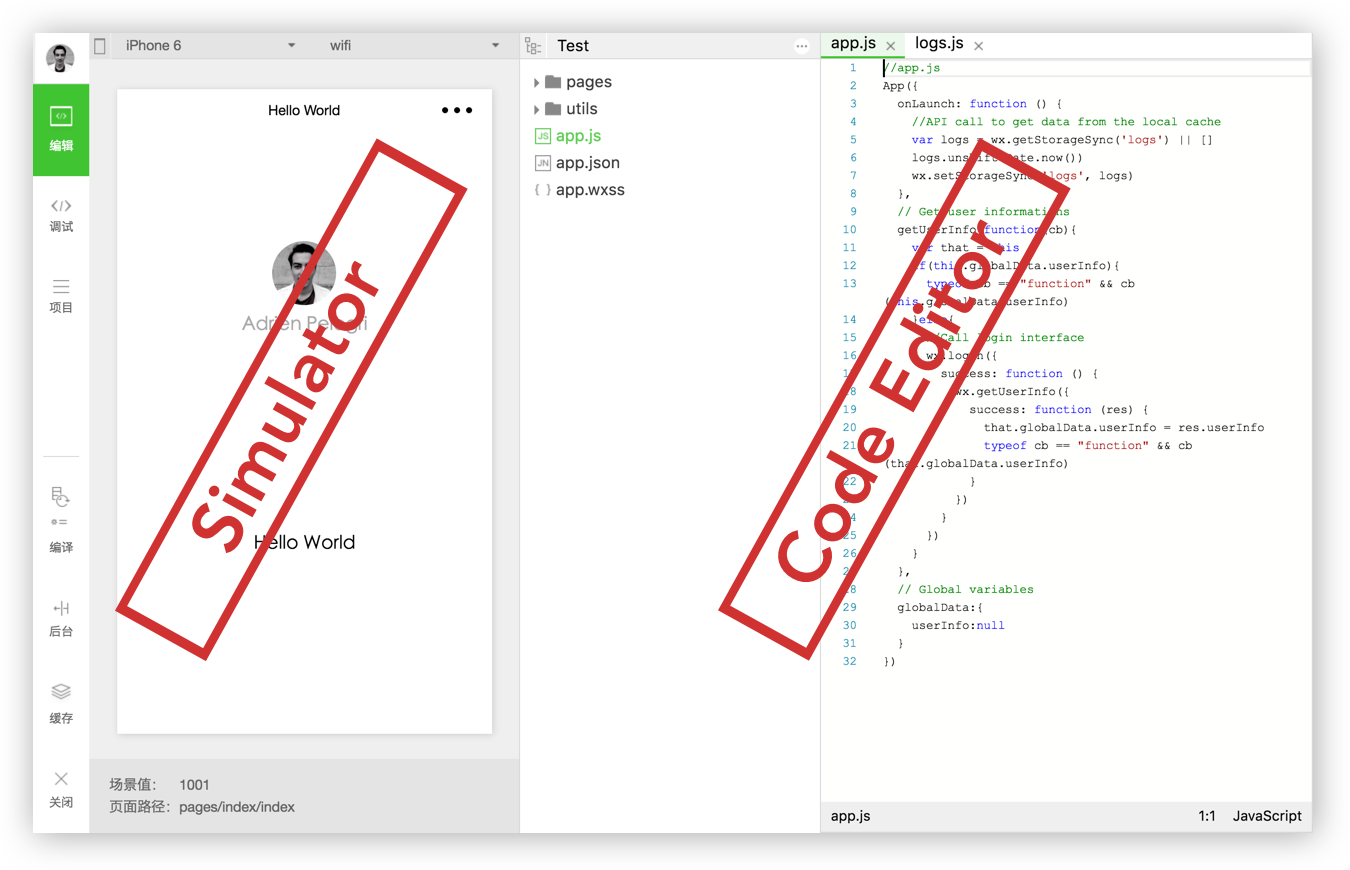
Here is a complete list of buttons to perform tasks when you are in development:
1. Profile: click on it to log out from the IDE.
2. Code Editing
3. Debug / Inspect: see below.
4. Project information: see below.
5. Compiler: Can be usefull to compile the app when the auto-refresh of the view is not working.
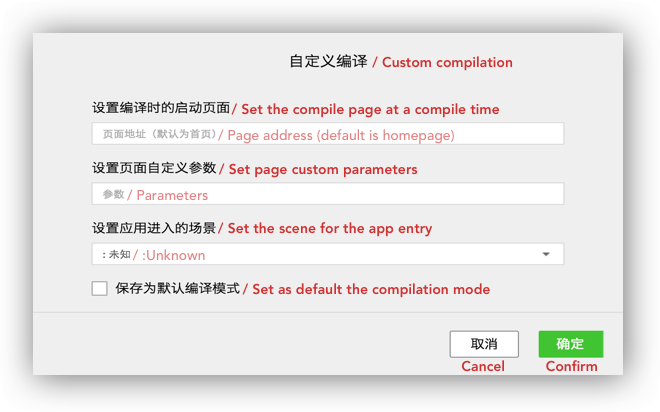
6. Scene value 7. Cache 8. Shut down: Quit the project you are on and move toward another one. 9. Hide the simulator 10. Devices: It gives a list of devices to test mini-program responsivness. 11. You can work on: wifi, 4G, 3G, 2G. 12. Hide arborescence 13. Manage your files: Search, add and delete a folder or a file.
Debugger / Inspector:
This tool is an important part of the IDE, it looks like the good old Chrome DevTools.

1. Top bar Network: This panel is to debug request and socket issues or page load performance. Storage: allows to access all the data you have in your cache. AppData: is used to display the current project data. You can directly edit the data in the panel and preview it. Wxml: let you inspect and edit on the fly every elements of your page. Sensor: you can simulate location and the performance of the mobile device to debug gravity sensing.
2. Sources panel Sources panel displays the current project script files.
3. Console The console will let you know what errors you have in your code by logging diagnostic information and interact with javascript in the page as your console.log() you have placed and more.
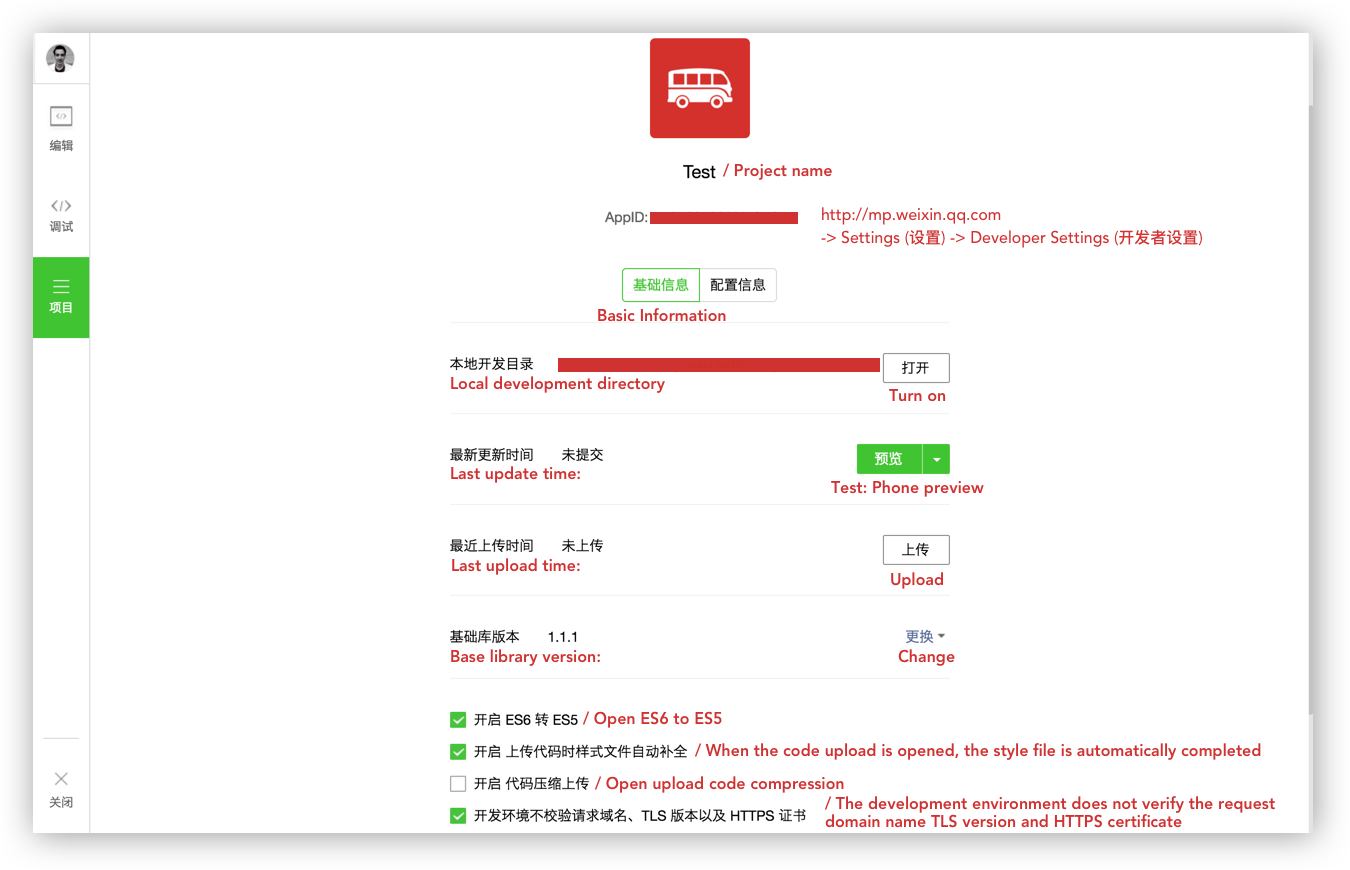
Project information: This page is where you will find the current project details as your AppID, directory information and more. By clicking on the preview option you will be able to test the mini-program directly on your phone after scanning a QR code.
Note: While you are testing your mini-program on your phone, you can enable the debugger tool directly on your device.
This section will introduce the structure of the "quickstart" provided by WeChat (boilerplate) and the fundamentals you need to comply with this framework.
Download WeChat quickstart.zip.
Quickstart arborescence:
.
├── app.js
├── app.json
├── app.wxss
├── pages
│   ├── index
│   │   ├── index.js
│   │   ├── index.json
│   │   ├── index.wxml
│   │   └── index.wxss
│   └── logs
│       ├── logs.js
│       ├── logs.json
│       ├── logs.wxml
│       └── logs.wxss
└── utils
    └── util.js
The index page of this boilerplate displays a welcome page with the current user profile's information. A click on your avatar will redirect to a new page displaying your current mini-program logs.
WeChat mini-programs start with "app" files (see the screenshot below). These files are the mini-program root directory therefore the entrance of your mini-program. (Here is the official WeChat documentation).
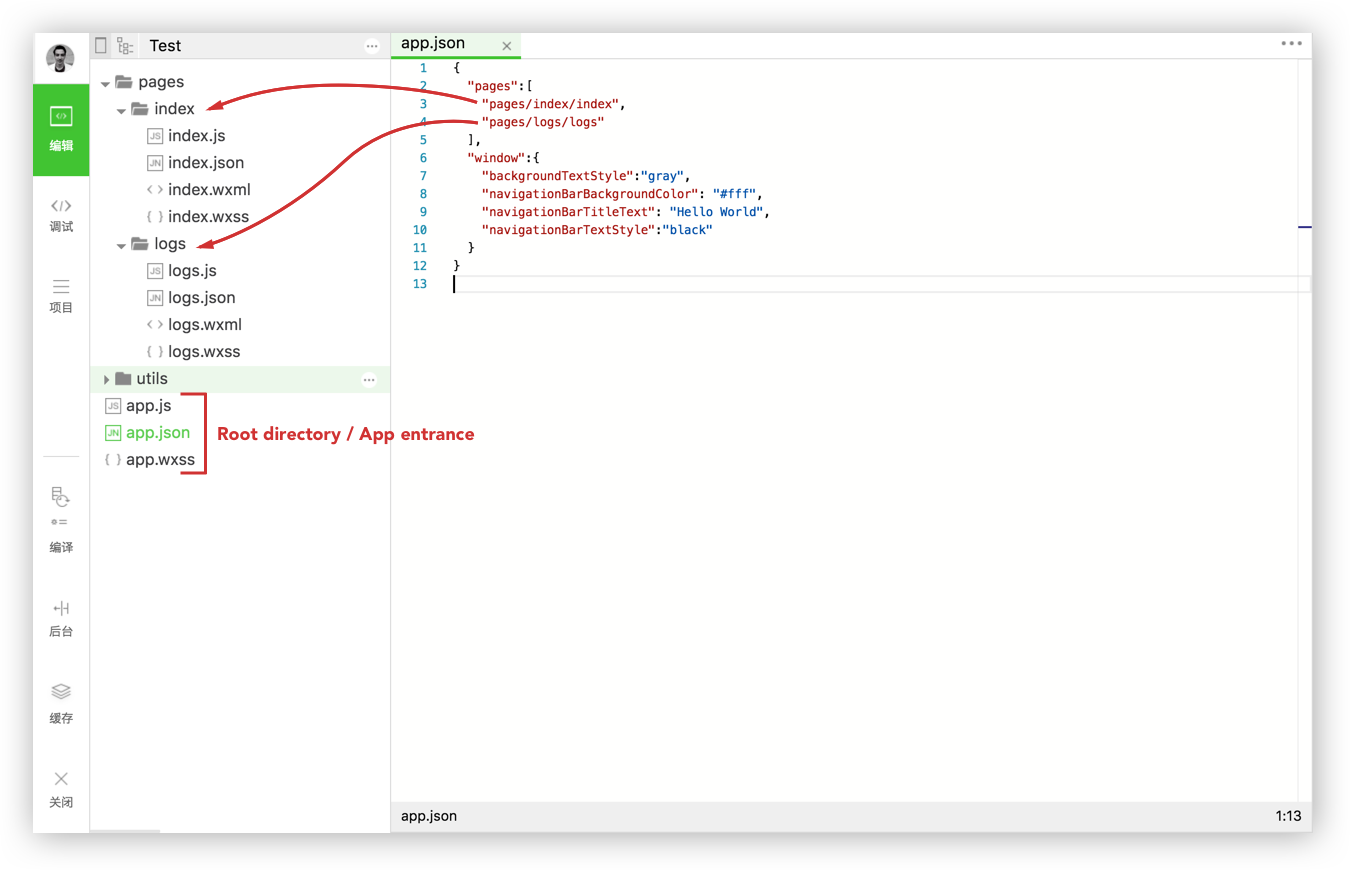 app.js is the script code, the global logic of your mini-program. You can setup and manipulate the life cycle functions of your MP, declare global variables or call an API.
Code snippet of the "app.js" file.
// app.js
App({
  onLaunch: function () {
  // API call to get data from the local cache
    var logs = wx.getStorageSync('logs') || []
    logs.unshift(Date.now())
    wx.setStorageSync('logs', logs)
  },
  // Get user information
  getUserInfo:function(cb){
    var that = this
    if(this.globalData.userInfo){
      typeof cb == "function" && cb(this.globalData.userInfo)
    }else{
    // Call login interface
      wx.login({
        success: function () {
          wx.getUserInfo({
            success: function (res) {
              that.globalData.userInfo = res.userInfo
              typeof cb == "function" && cb(that.globalData.userInfo)
            }
          })
        }
      })
    }
  },
  // Global variable
  globalData:{
    userInfo:null
  }
})
app.json is the global configuration of the overall mini-program. You can configure, MP (mini-program) page’s path, the MP window style, set the network timeout and debug configuration.
Code snippet of the "app.json" file.
{
  "pages":[
    "pages/index/index",
    "pages/logs/logs"
  ],
  "window":{
    "backgroundTextStyle":"gray",
    "navigationBarBackgroundColor": "#fff",
    "navigationBarTitleText": "Hello World",
    "navigationBarTextStyle":"black"
  }
}
Note: Comments are not allowed in the app.json file.
app.wxss is the global style sheet of the mini-program. You should declare common style rules here.
The two pages of WeChat quickstart are:
- index page which is the welcome page.
- logs page which displays current user mini-program logs.
Pages folder is where you have or create your mini-program pages. Each page you create is required to contain two files:
- .js file for the logic of your interface.
- .wxml file for the interface layout.
You can add two more files in each page you create:
-
.json file for page configuration.
-
.wxss file for the style sheet of your interface.
Rule: Each page of your mini-program can be composed of four different file extensions (js ; json ; wxml ; wxss) but should have the same name.
Further details: A new page will always contain a .js file and a .wxml file minimum. The .json file extension is used just in case you want to override the window configuration in this particular page. Add .wxss if you want to add a style sheet to your page.
Let's see what happens in each page of the quickstart project.
Code snippet of the "index.js" file.
// index.js
// Get application instance
var app = getApp()
Page({
  data: {
    motto: 'Hello World',
    userInfo: {}
  },
  // Event that redirect user to logs page
  Tapped: function() {
    console.log("tapped");
    wx.navigateTo({
     url: '../logs/logs'
    })
  },
  onLoad: function () {
    console.log('onLoad')
    var that = this
    // Call the application instance to get data
    app.getUserInfo(function(userInfo){
      // Updates userInfo data
      that.setData({
        userInfo:userInfo
      })
    })
  }
})
Snippet comments:
- The snippet above assigns the app instance to a variable. This app instance will be called in
Page()function later on to collect user information. - Next it registers a
Page()function and setsdata:to dynamically bind data into the view. Tappedfunction redirects the current user to his logs page.onLoadfunction gets user information and updatesuserinfodata.
Code snippet of the "logs.js" file.
// logs.js
var util = require('../../utils/util.js')
Page({
  data: {
    logs: []
  },
  onLoad: function () {
    console.log(wx.getStorageSync('logs'))
    this.setData({
      logs: (wx.getStorageSync('logs') || []).map(function (log) {
        return util.formatTime(new Date(log))
      })
    })
  }
})
Snippet comments:
- First it requires util.js in the purpose of calling
formatTimelater on. - It registers
Page()function and setsdata:. onLoadfunction retrieves current user logs from the cachewx.getStorageSync('logs'). Then render logs informatTimewhich is provided by the require of util.js.
Code snippet of the "utils.js" file.
function formatTime(date) {
  var year = date.getFullYear()
  var month = date.getMonth() + 1
  var day = date.getDate()

  var hour = date.getHours()
  var minute = date.getMinutes()
  var second = date.getSeconds()


  return [year, month, day].map(formatNumber).join('/') + ' ' + [hour, minute, second].map(formatNumber).join(':')
}

function formatNumber(n) {
  n = n.toString()
  return n[1] ? n : '0' + n
}

module.exports = {
  formatTime: formatTime
}
Note:
In Utils are stored imported libraries that you may require elsewhere (in our example, util.js is required in log.js). In the code snippet above, the formatTime function is defined in util.js to properly display the date of your logs.
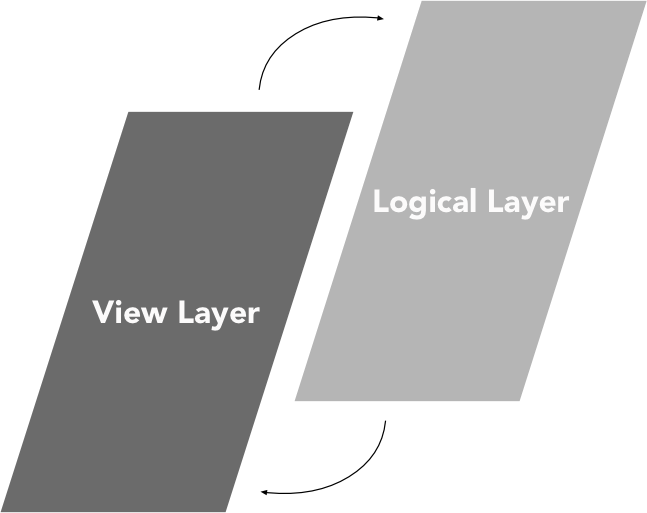
Up to now you catch the fact that you will have two layers in each page:
-
Logical layer (.js): process the data and send it to the view layer, while receiving events triggered from the view layer.
-
View layer (.wxml/.wxss): display the data processed by the logical layer into a view, while sending the events of the view layer to the logical layer.
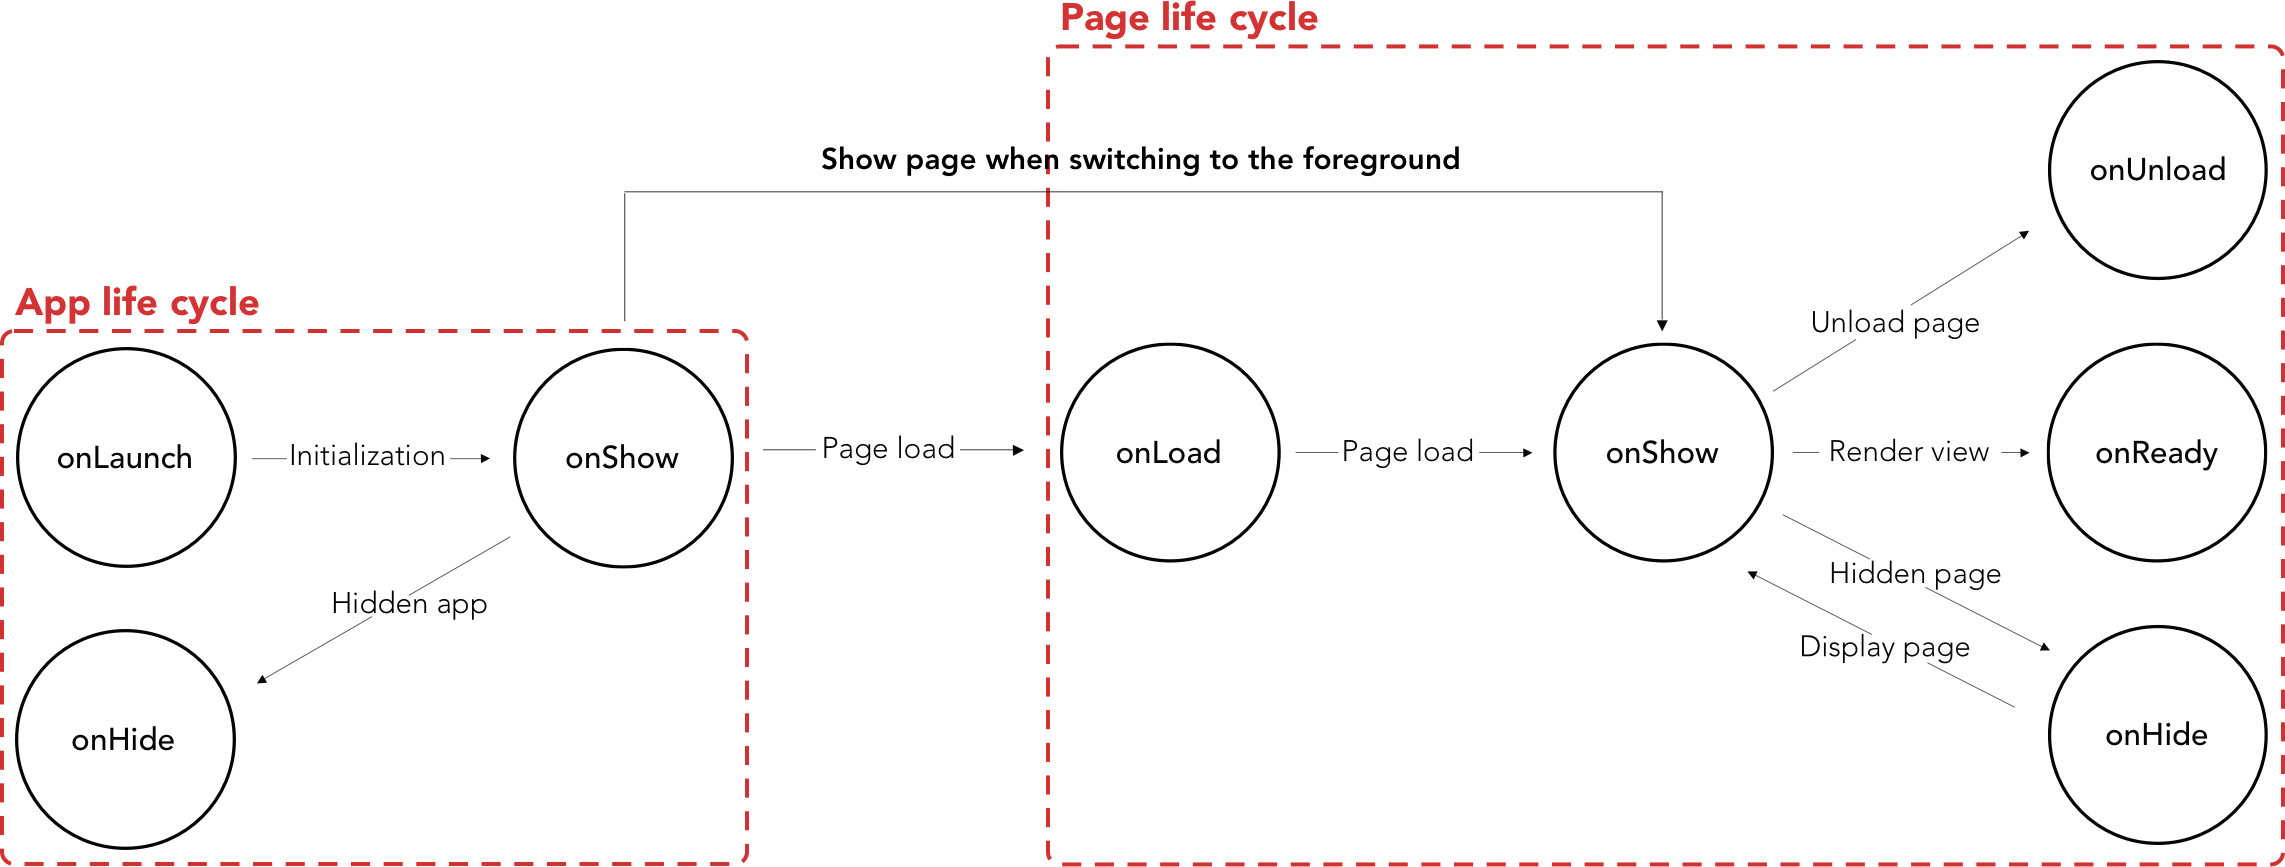
We can break-down a mini-program life cycle in two cycles, the application cycle and the page cycle.
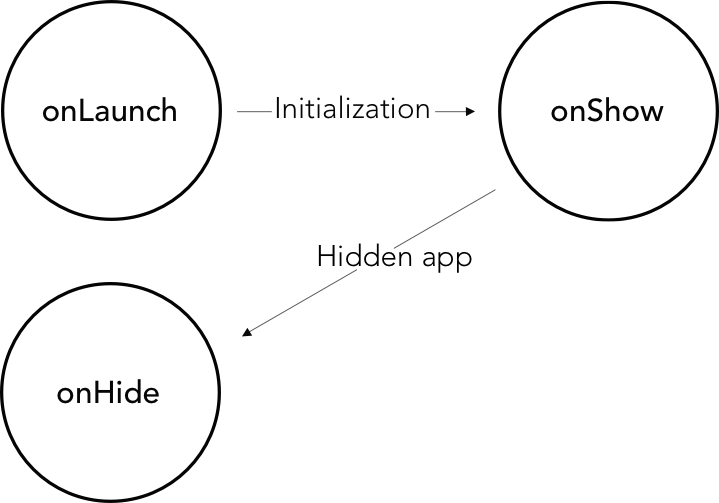
The App() life cycle is the start & end point of the mini-program whereas Page() life cycle is activated when users browse through the mini-program.
App() function is used to register a mini-program. It takes an object as parameter which specifies the life cycle functions of a MP.
Comments:
- A user opens the mini-program which triggers
onLaunchfunction and initialize the MP. - When the initialization is completed, the
onShowfunction is triggered. - The
onHidefunction is triggered when the current user exits the mini-program.
Code snippet of the "App()" life cycle functions.
App({
  onLaunch: function() {
    // Do something when launch.
  },
  onShow: function() {
    // Do something when show.
  },
  onHide: function() {
    // Do something when hide.
  },
  onError: function(msg) {
    console.log(msg)
  },
  globalData: 'I am global data'
})
WeChat framework offers a global function called getApp() which is an instance of App().
Code snippet "getApp()" function.
// .js
var appInstance = getApp()
console.log(appInstance.globalData) // I am global data
getApp() function, can be useful for the simple reason that you can’t define the App() function inside of a Page() function. In order to access the app instance you must call getApp() function.
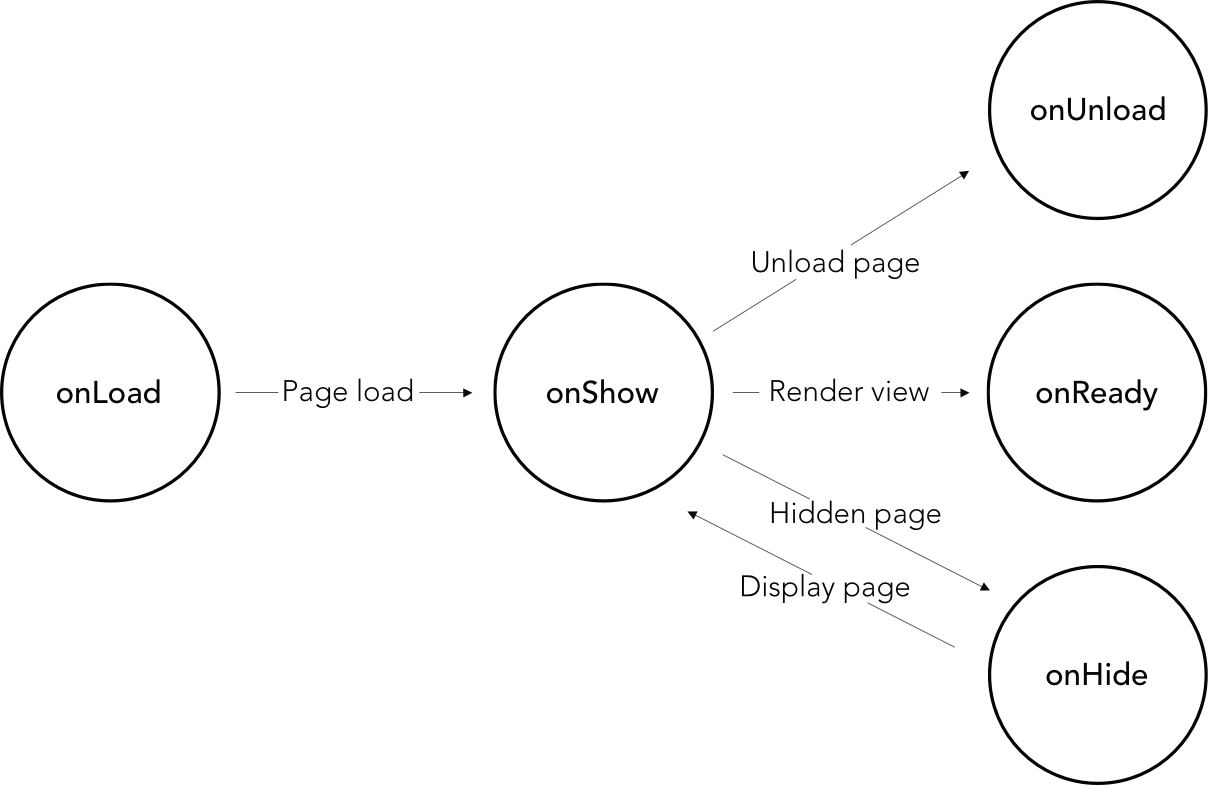
Page() function is used to register a page. It accepts an object as a parameter, that specifies the initial data for the page, life cycle functions, event handler and so on.
Comments:
- After page registration, the framework calls the
onLoadfunction. - When a page loads, it calls the
onShowfunction. - The first time the page is displayed,
onShowfunction callsonReadyto render the view. - On subsequent times,
onShowfunction directly renders a view. - The
onHideis triggered when the mini-program jumps to another page. onUnloadfunction is called when you quit a page by usingwx.redirectTo()andwx.navigateBack(). Or when the current page is relaunched,wx.reLaunch.
Code snippet of "Page()" life cycle functions.
Page({
  data: {
    text: "This is page data."
  },
  onLoad: function(options) {
    // Do some initializations when page load.
  },
  onReady: function() {
    // Do something when page ready.
  },
  onShow: function() {
    // Do something when page show.
  },
  onHide: function() {
    // Do something when page hide.
  },
  onUnload: function() {
    // Do something when page close.
  },
  // Event handler
  viewTap: function() {
    this.setData({
      text: 'Set some data.'
    })
  }
})When the App() life cycle is complete, the page loads by calling onLoad for the first time, and will only call it once.
When the mini-program is running from the background (app life cycle) to the foreground (page life cycle), it first calls the App() onShow function and then calls the Page() onShow function when switching to the foreground.
WeChat recommendations:
App()function cannot be reused and should be register once in the app.js.- Do not call
onLaunchwhen thegetCurrentPages()page is not yet generated. - By using
getApp()you can obtain an instance of App() but lifecycle functions don’t attempt to call theApp()functions.
The setup of your mini-program is simple and designed to save you time and frustration when having customization needs.
WeChat divides the app.json configuration in five parts:
- Routing
- TabBar
- Window
- Network timeout
- Debug
In this part we will break-down this complete app.json setup exemple.
Code snippet "app.json complete setup" example
{
  "pages":[
    "pages/index/index",
    "pages/form/form",
    "pages/wagon/wagon",
  ],
  "window":{
    "navigationBarBackgroundColor": "#D03232",
    "navigationBarTextStyle": "white",
    "navigationBarTitleText": "Le Wagon",
    "backgroundColor": "#eeeeee",
    "backgroundTextStyle": "light",
    "enablePullDownRefresh": true
  },
  "tabBar": {
    "backgroundColor": "#FFFFFE",
    "borderStyle": "#D3D3D3",
    "selectedColor": "#D03232",
    "color": "#131313",
    "list": [{
      "pagePath": "pages/index/index",
      "iconPath": "image/form.png",
      "selectedIconPath": "image/form-hover.png",
      "text": "Form"
    }, {
      "pagePath": "pages/wagon/wagon",
      "iconPath": "image/about.png",
      "selectedIconPath": "image/about-hover.png",
      "text": "About"
    }]
  }
}pages role in app.json is to define all routes of your mini-program. This item's configuration is mandatory and it takes an array of strings. Each sub-folder and files within the parent pages folder corresponds to a routing path.
Code snippet of the "app.json" file.
{
  "pages":[
    "pages/index/index",
    "pages/form/form",
    "pages/wagon/wagon"
  ]
}
Tip:
Each time you add a route path to "pages", the IDE will automatically create the folder and files that corresponds to the path you just created.
The WeChat framework brings several routing logics:
Routing mode description:
-
Initialization: Once the mini-program is launched, the first page is loaded by
onLoadandonShowfunction. -
Open a new page: Opening a new page hides the current page and jumps to another one using the
wx.navigateTo. Behind the scene the first page will be hidden by the call of the onHide function and jump over the other page by calling onLoad and onShow.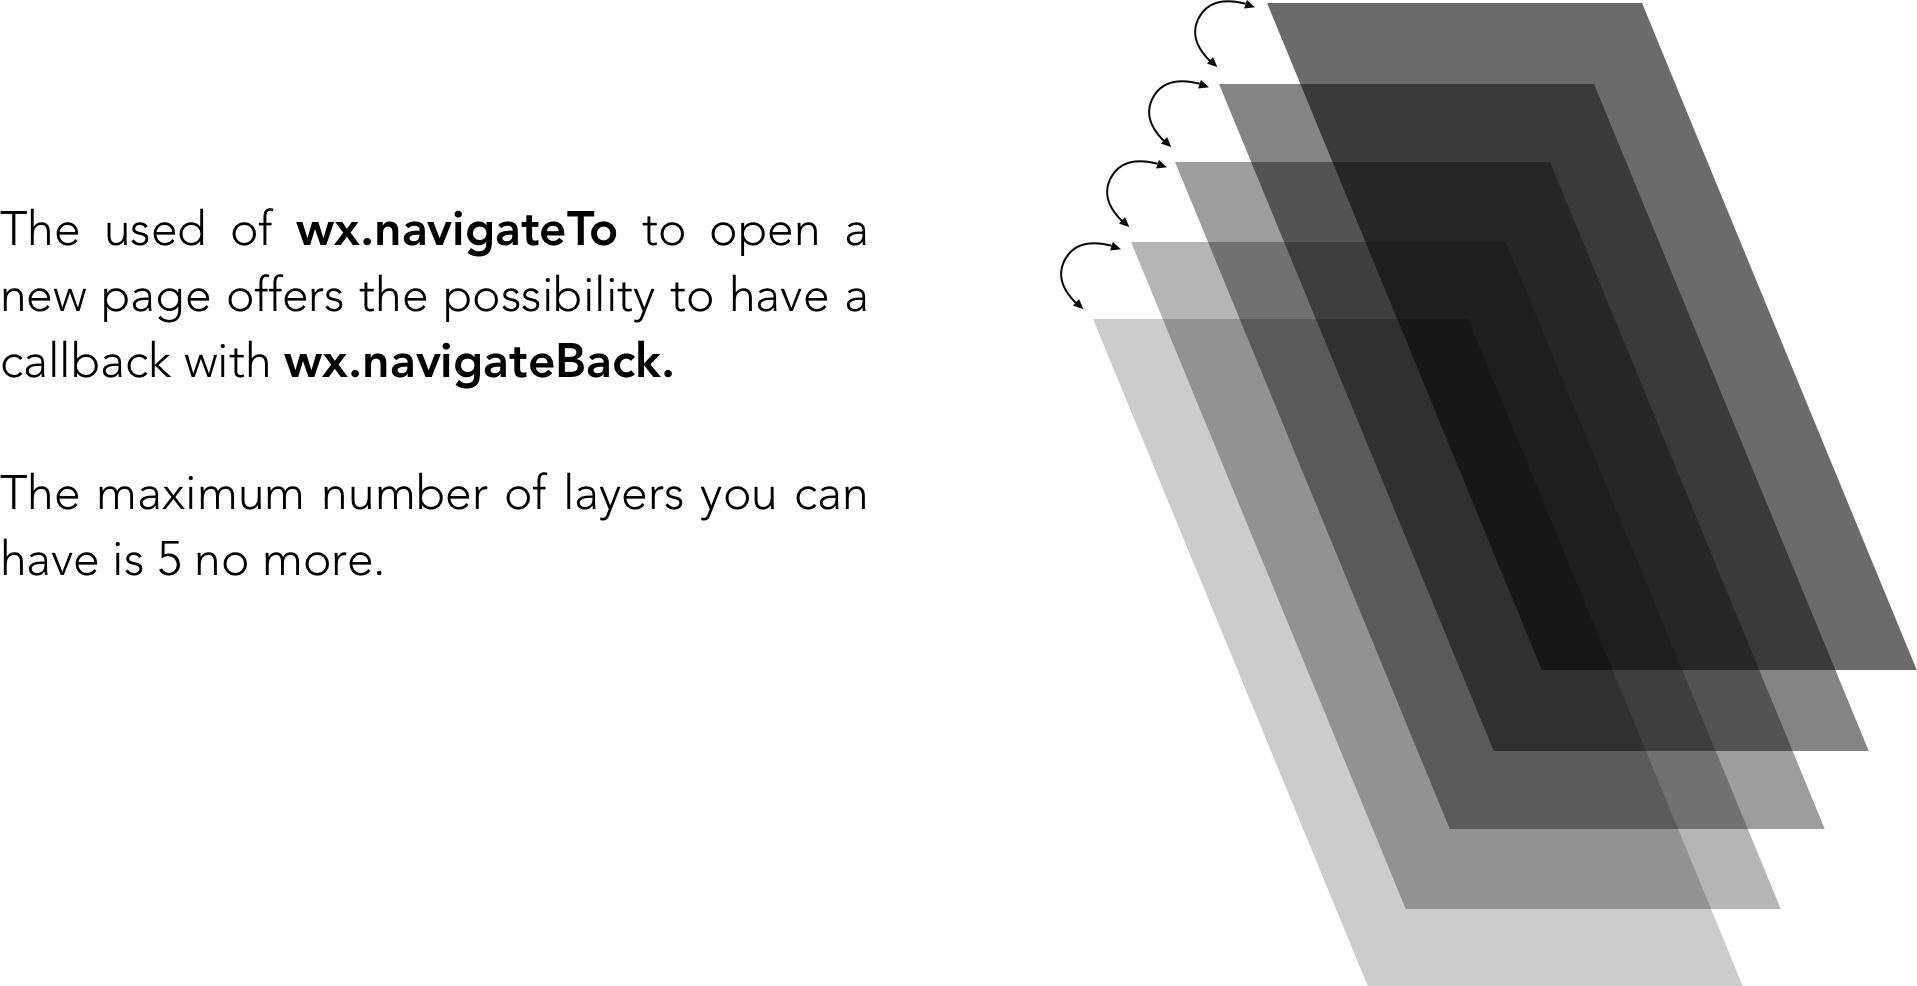
-
Page redirection: Close the current page by calling onUnload and jumps to a page within the app using
wx.redirectTowhich call onLoad and onShow functions. -
Page return:
onUnloadthe current page, callsonLoadfunction and then displays the target page by callingonShow. -
Reloading,
wx.reLaunch: Close all pages and reloads the current page. *Does not work on certain andriod devices. -
Switch tabs,
wx.switchTab: Jumps from one tabBar page to another one and close or hides all other non-tabBar pages by using onUnload, onHide and onShow. Discover all possible scenarios for tabs switching.
Switch tabs, navigation restrictions:
- No callback at the top of the page.
- The tabBar path cannot take parameters.
WeChat recommendations:
navigateTo,redirectTocan only open a non-tabBar page. -switchTabcan only open and display tabBar page. -reLaunchcan be used for every pages.- The tabBar at the bottom of the page is displayed according to the page you are on. As long as the page you are on is defined in the tabBar, the tabBar will be display.
- Page stack modification will lead to routing and page status error, it is not recommended. Dig further in pages stack mecanism.
getCurrentPages():
This function is used to get the instance of the current page stack. It is given as an array in the page stack order. The first item of the array is the first page and the last item the current page.
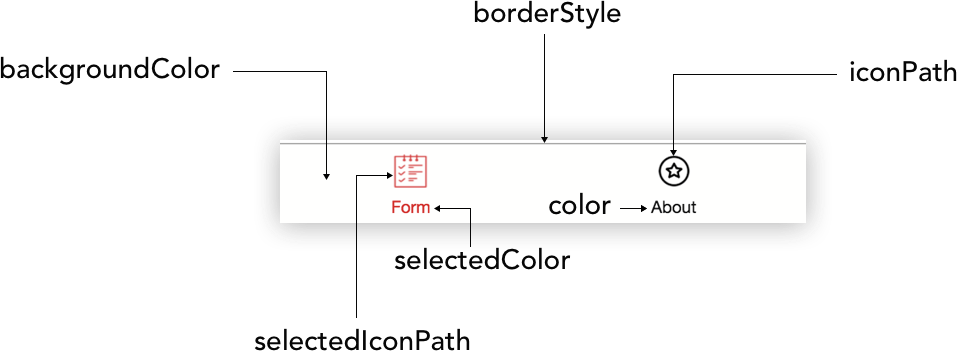
tabBar as the name suggests, is the item which configures the top or bottom tab bar. tabBar is an array which accomodates a minimum of 2 and a maximum of 5 tabs.
Code snippet of the "app.json" file.
{
"tabBar": {
  "backgroundColor": "#FFFFFE",
  "borderStyle": "#D3D3D3",
  "selectedColor": "#D03232",
  "color": "#131313",
  "list": [{
    "pagePath": "pages/index/index",
    "iconPath": "image/form.png",
    "selectedIconPath": "image/form-hover.png",
    "text": "Form"
   }, {
    "pagePath": "pages/wagon/wagon",
    "iconPath": "image/about.png",
    "selectedIconPath": "image/about-hover.png",
    "text": "About"
  }]
}
}
Attributes indication:
Using the tabBar list key, requires an object in each element of the array.
List attributes values are as follow:
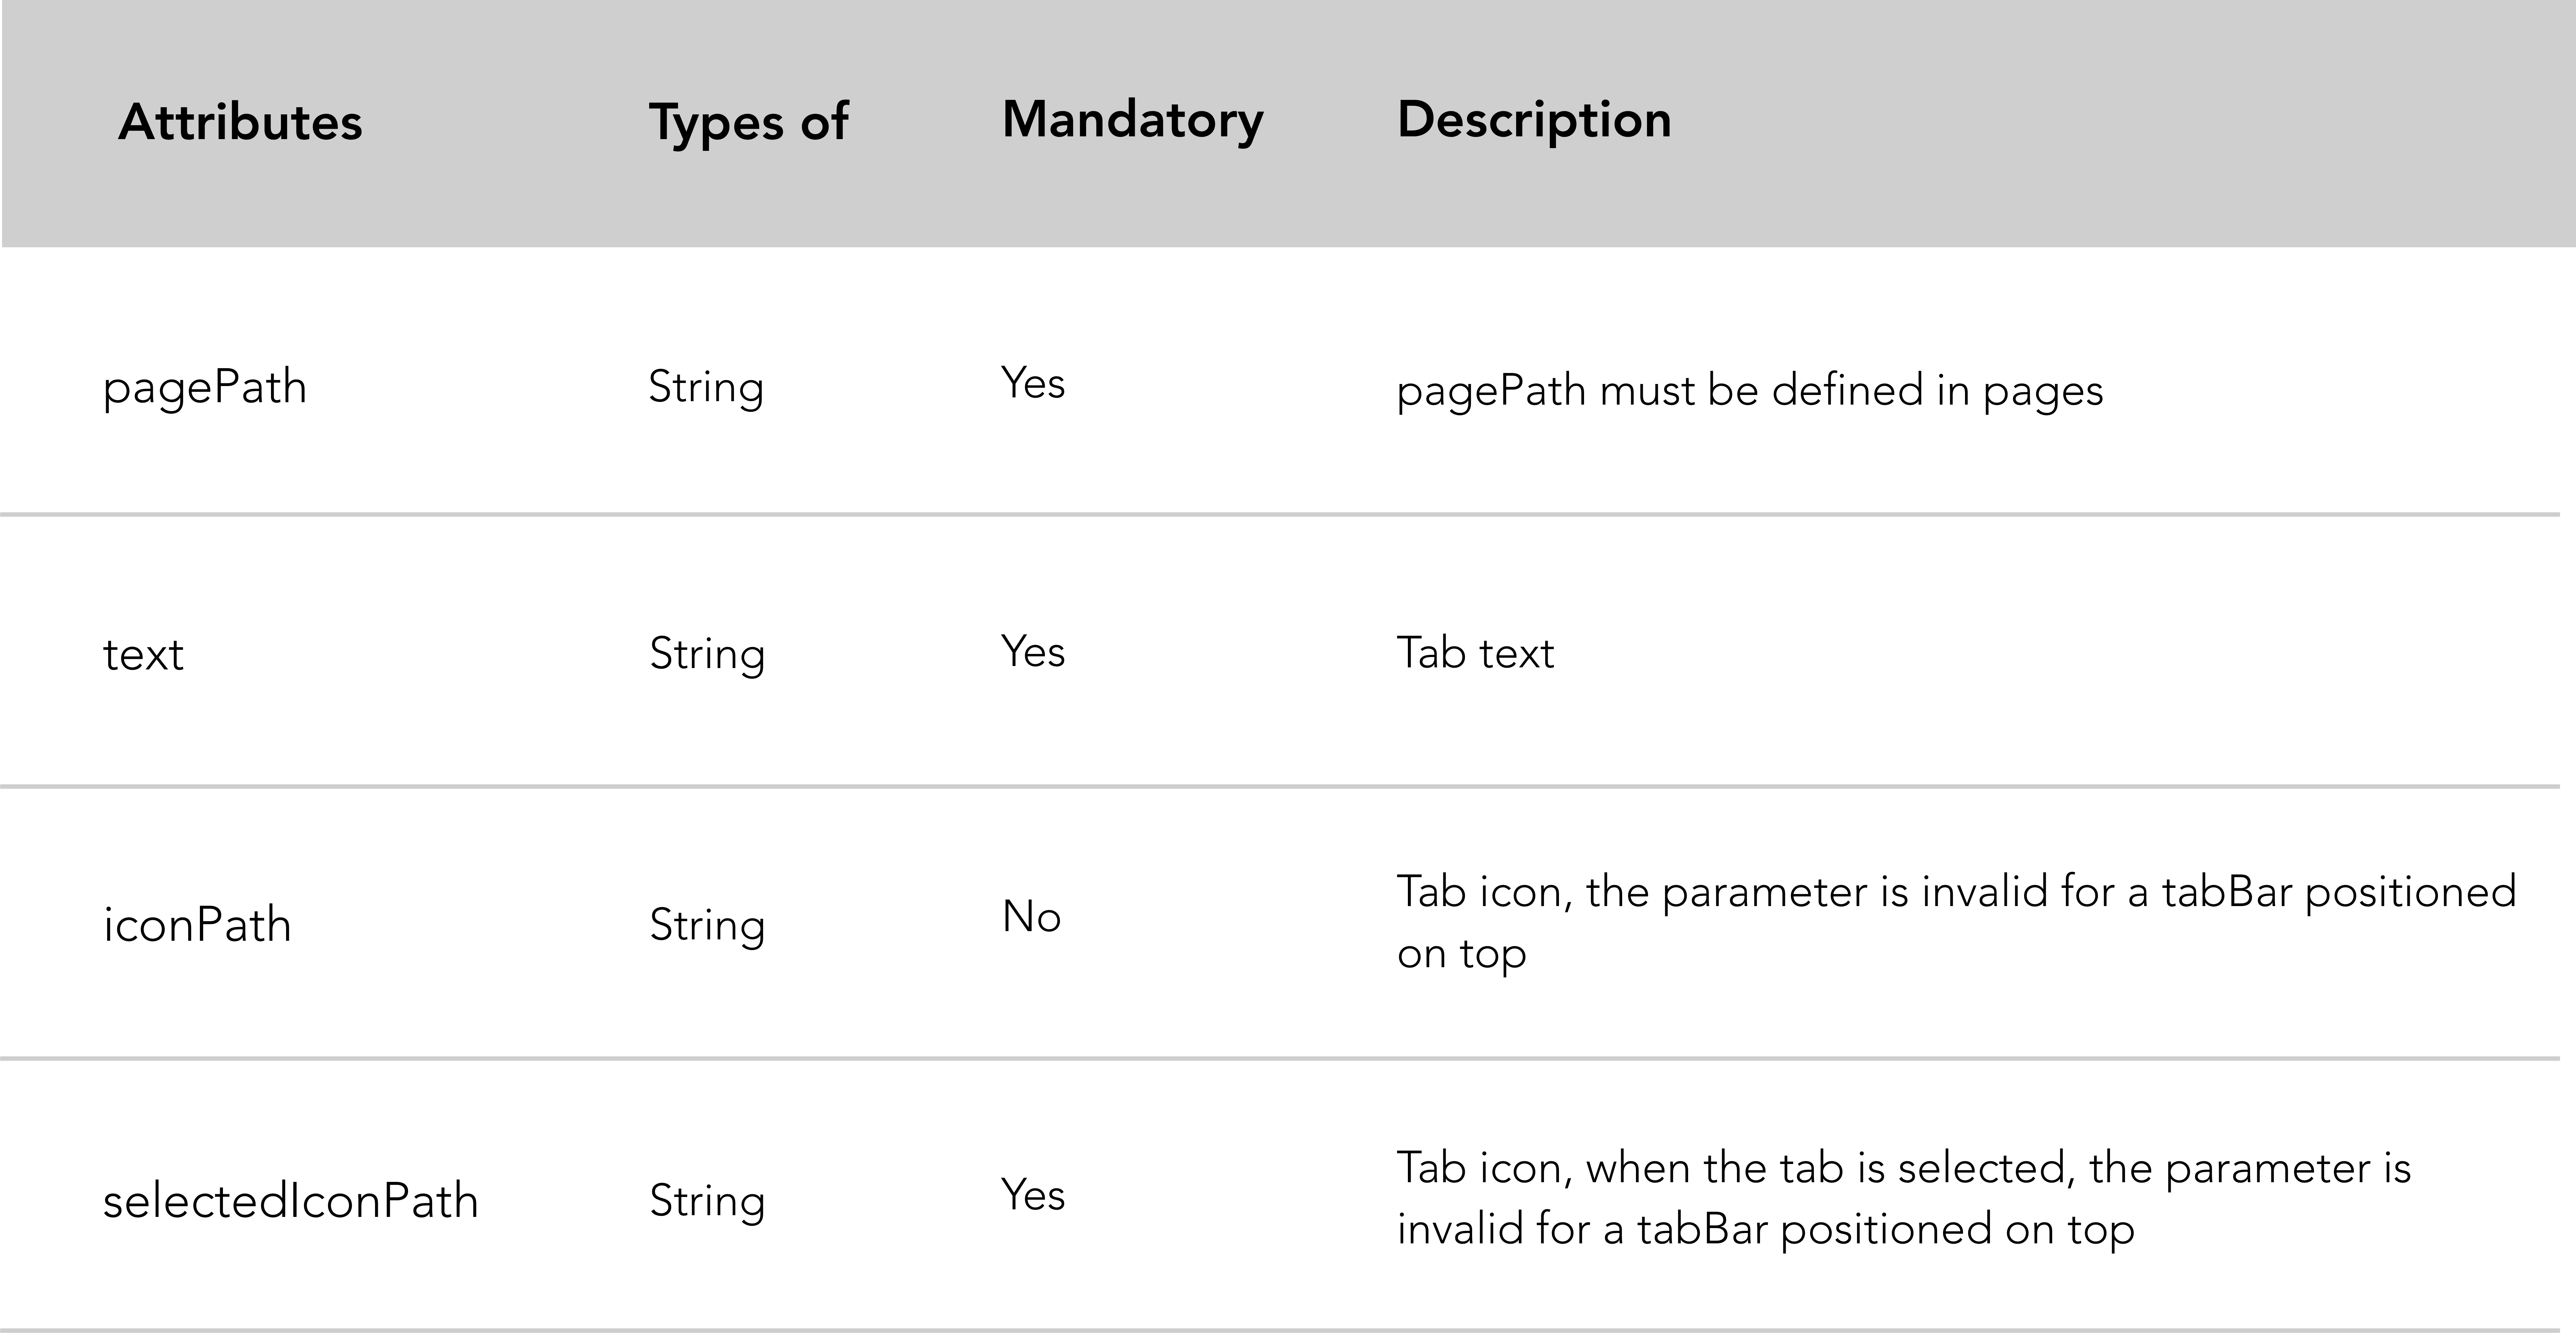
TabBar attributes description:
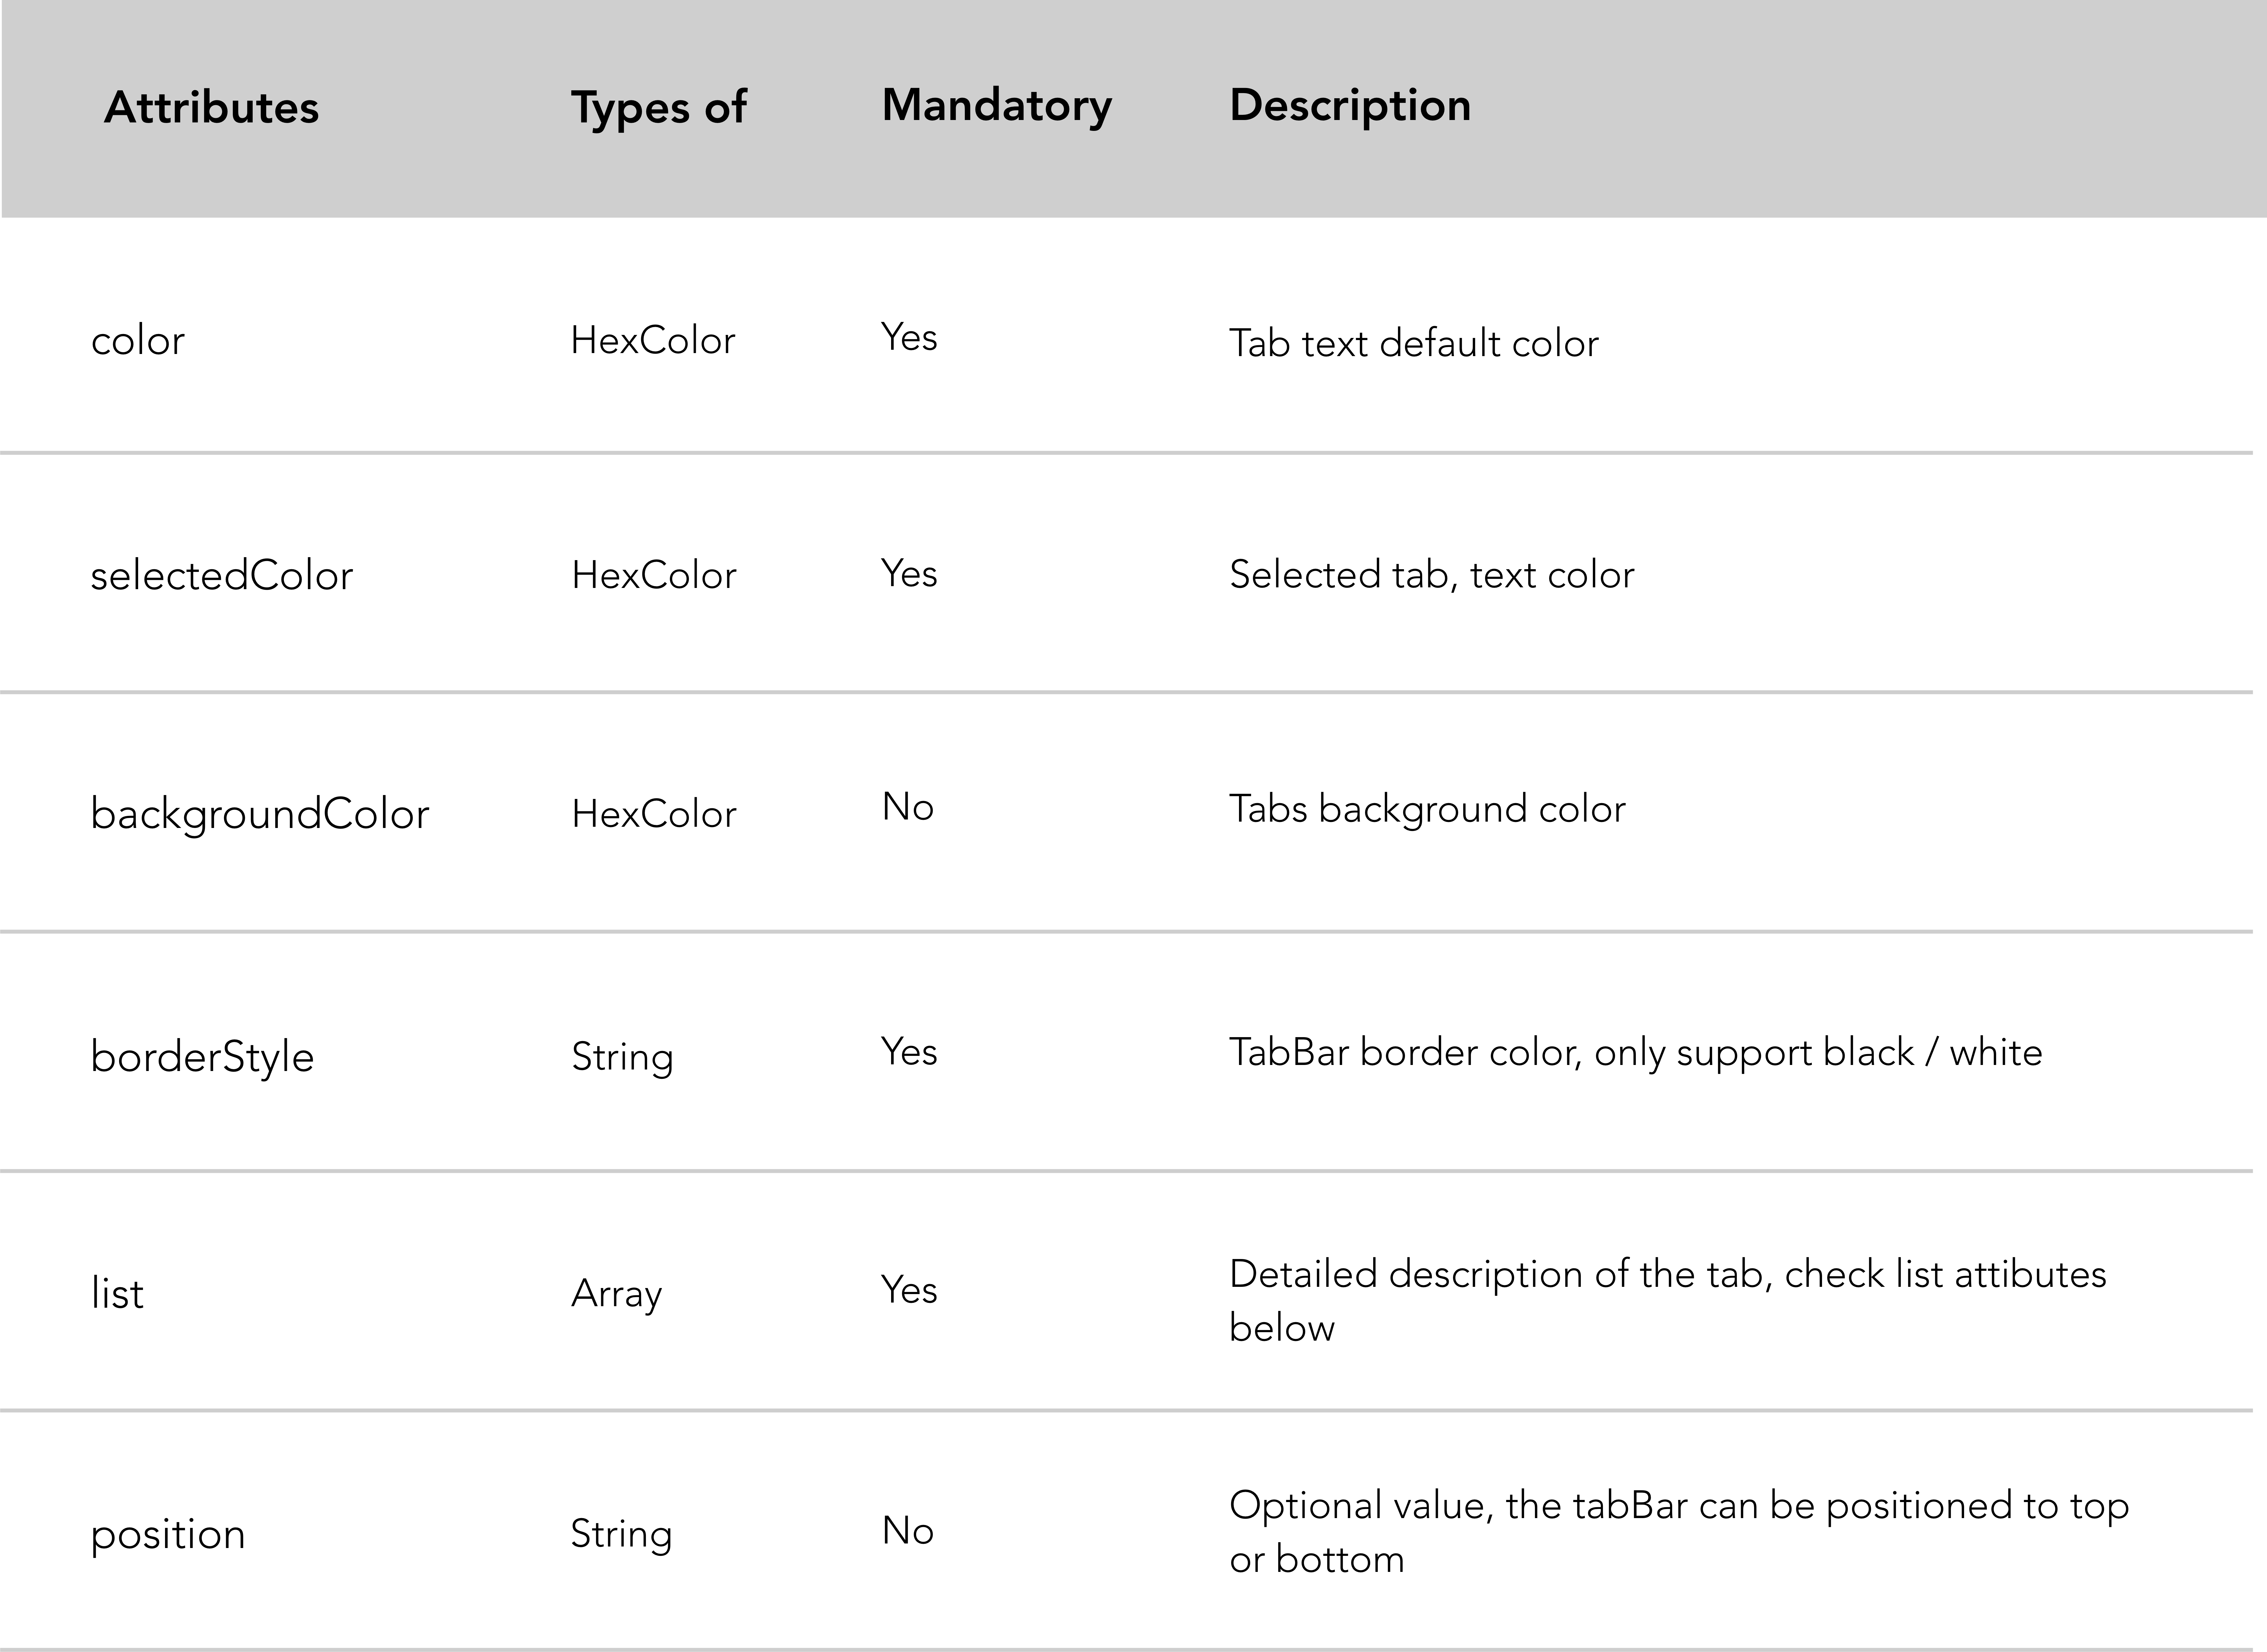
WeChat recommendations:
- Setting your
tabBarposition to top could not display icons. - The limit size of your icons in the bottom
tabBarare, 40kb, 81px*81px.
The window item is used to set mini-program title and common window style.
Code snippet of the "app.json" file.
"window": {
  "navigationBarBackgroundColor": "#D03232",
  "navigationBarTextStyle": "white",
  "navigationBarTitleText": "Le Wagon",
  "backgroundColor": "#eeeeee",
  "backgroundTextStyle": "light",
  "enablePullDownRefresh": true
 }
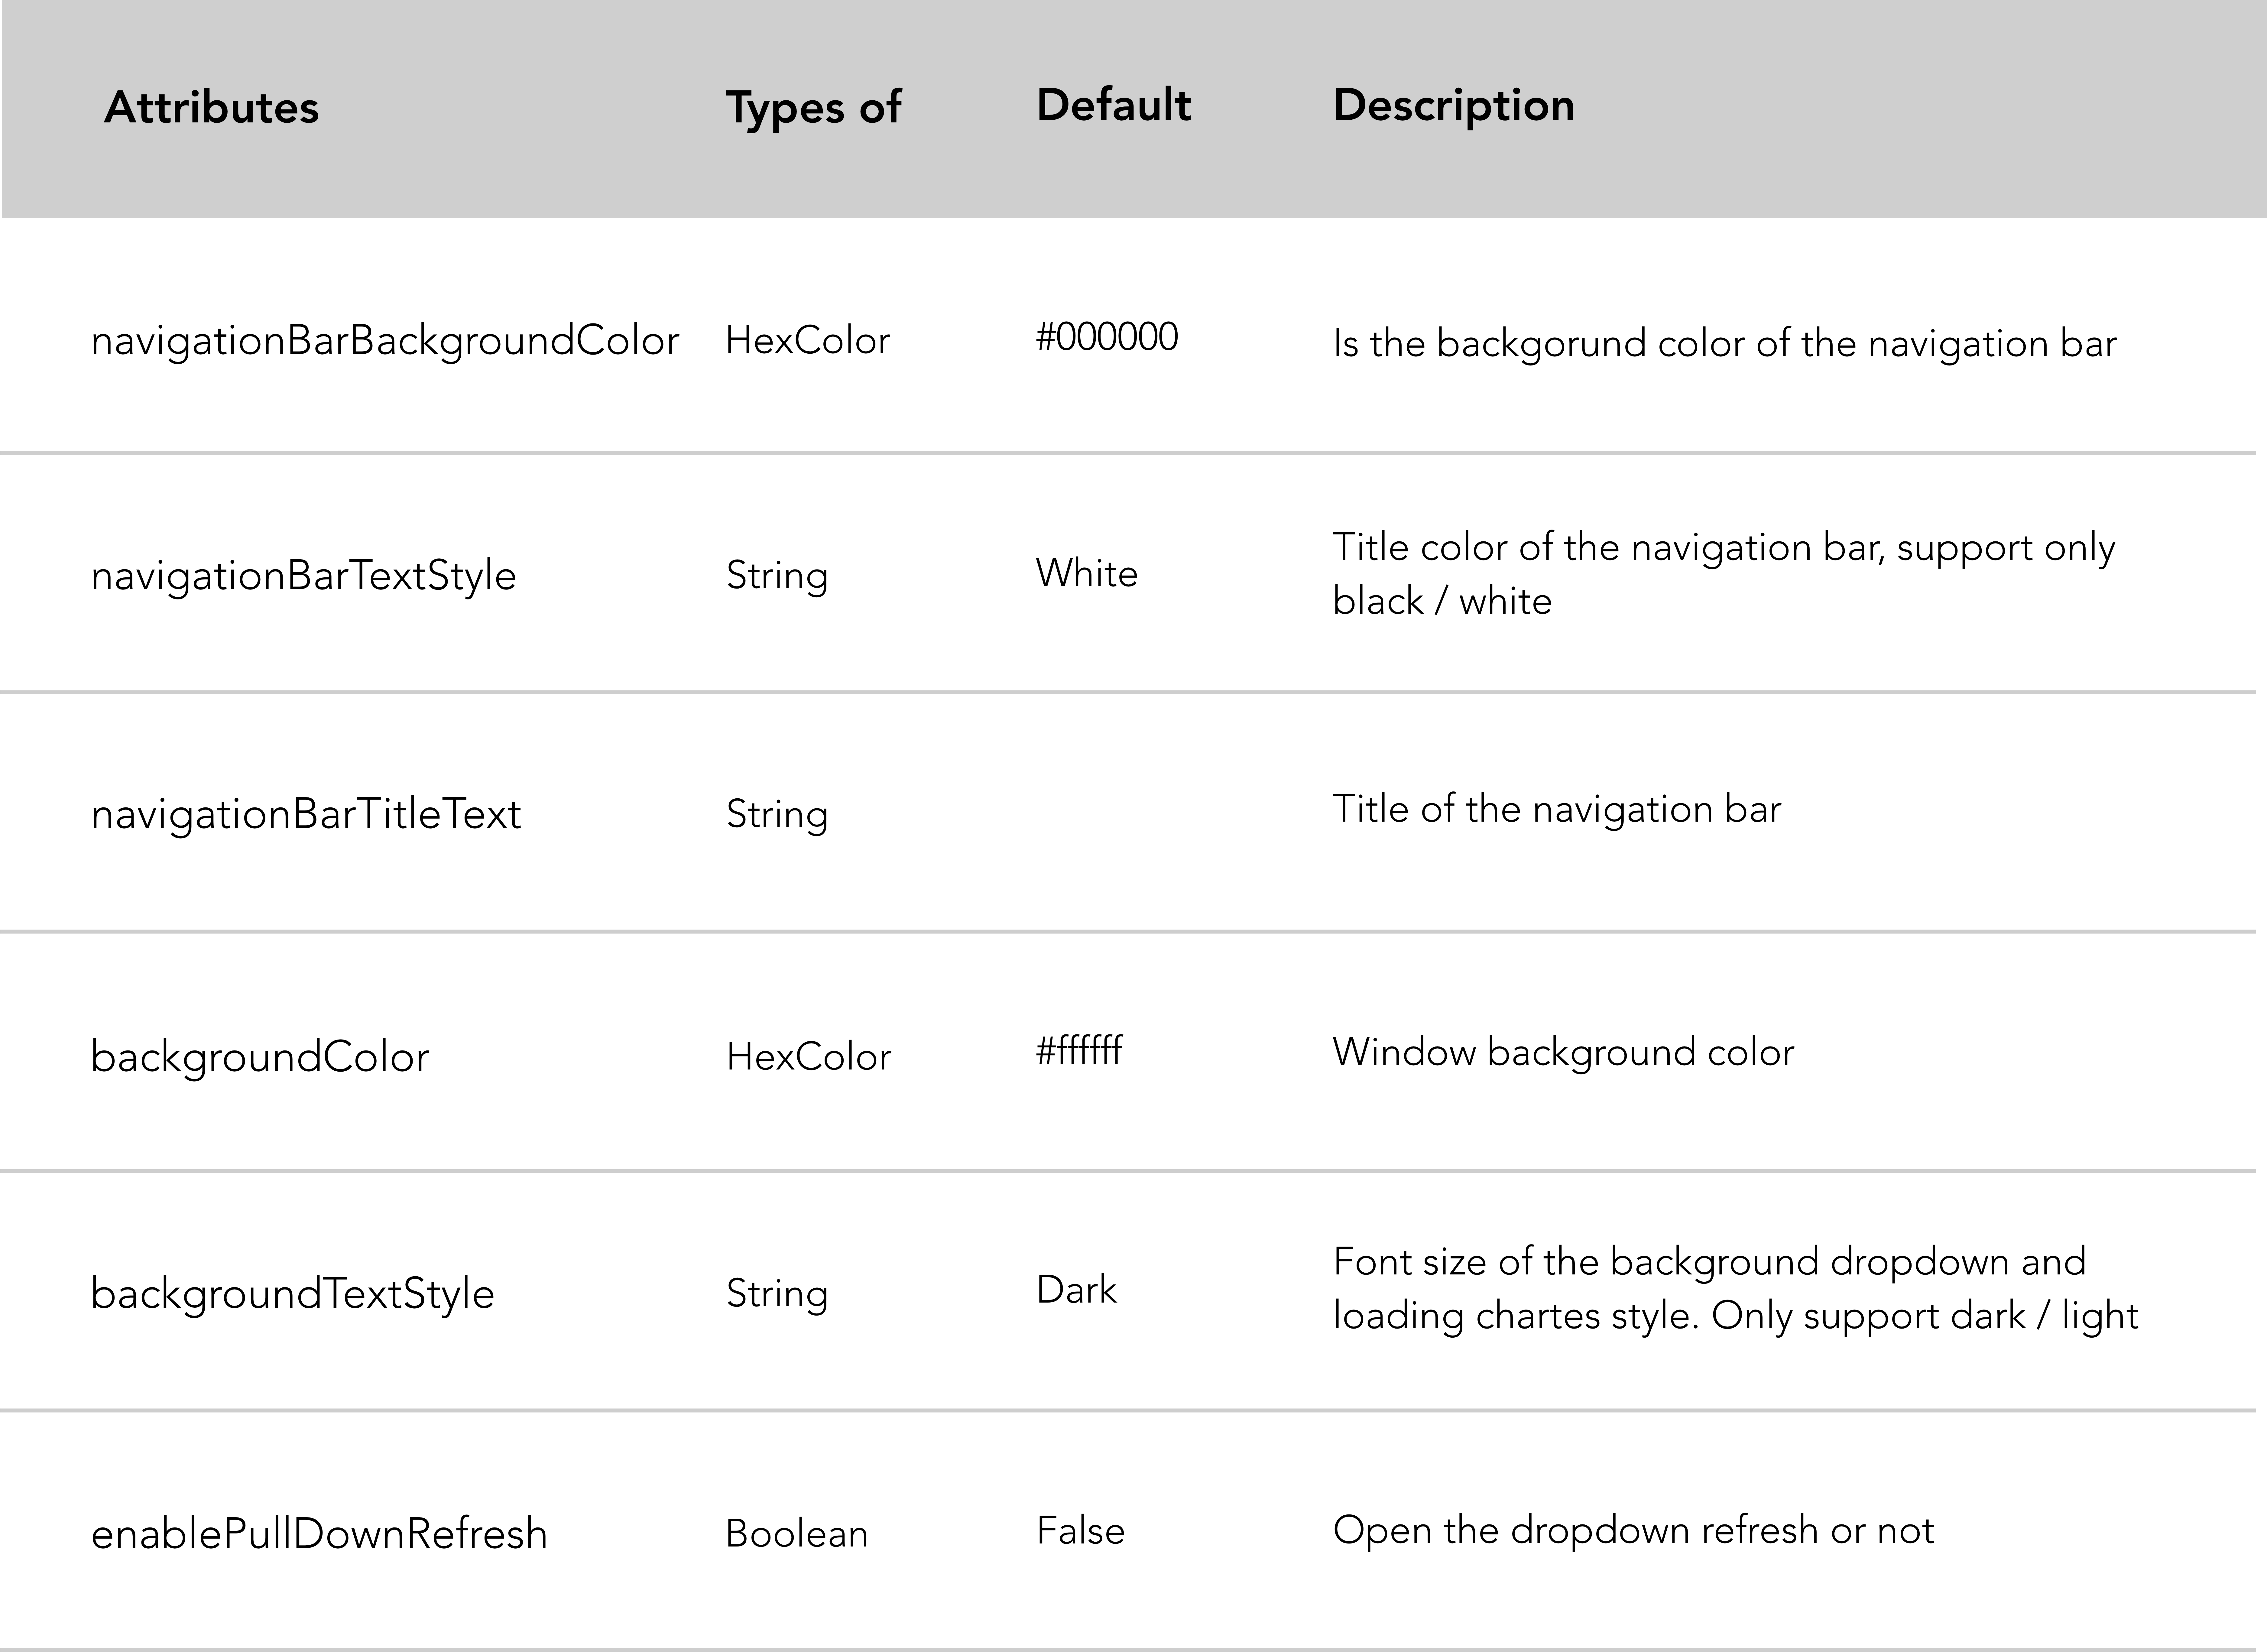
Window attributes description:
"enablePullDownRefresh": true needs to be configured in the global app.json as above and then you can call onPullDownRefresh() in mini-program pages.
Code snippet of the "Enable pull down refresh in a page" file.
 // .js
 Page({
   // Pull down the trigger event
  onPullDownRefresh() {
    // Stop the dropdown refresh
    wx.stopPullDownRefresh()
  }
}}WeChat offers the possibility to change the title of the top navigation bar within each page.
Code snippet of the "change navbar title" file.
// .js
Page({
  // Loading spinner when page loads
  onload: function (){
   wx.showNavigationBarLoading()
  },
  // Change navigation bar title
  onShow: function () {
   wx.setNavigationBarTitle({
    title: 'My new navabar title',
    success: function(res){
      console.log(res)
    }
   })
  }
})
Network timeout may be provided in a variety of network requests. Here is the link to the WeChat documentation if you want to go further.
Here is a link to the WeChat documentation.
WXML is a WeChat markup language similar to HTML. It combines a basic library of components and an event system to build dynamic pages.
The WeChat event system behaves like classic Javascript events which handle logical responses to the view layer.
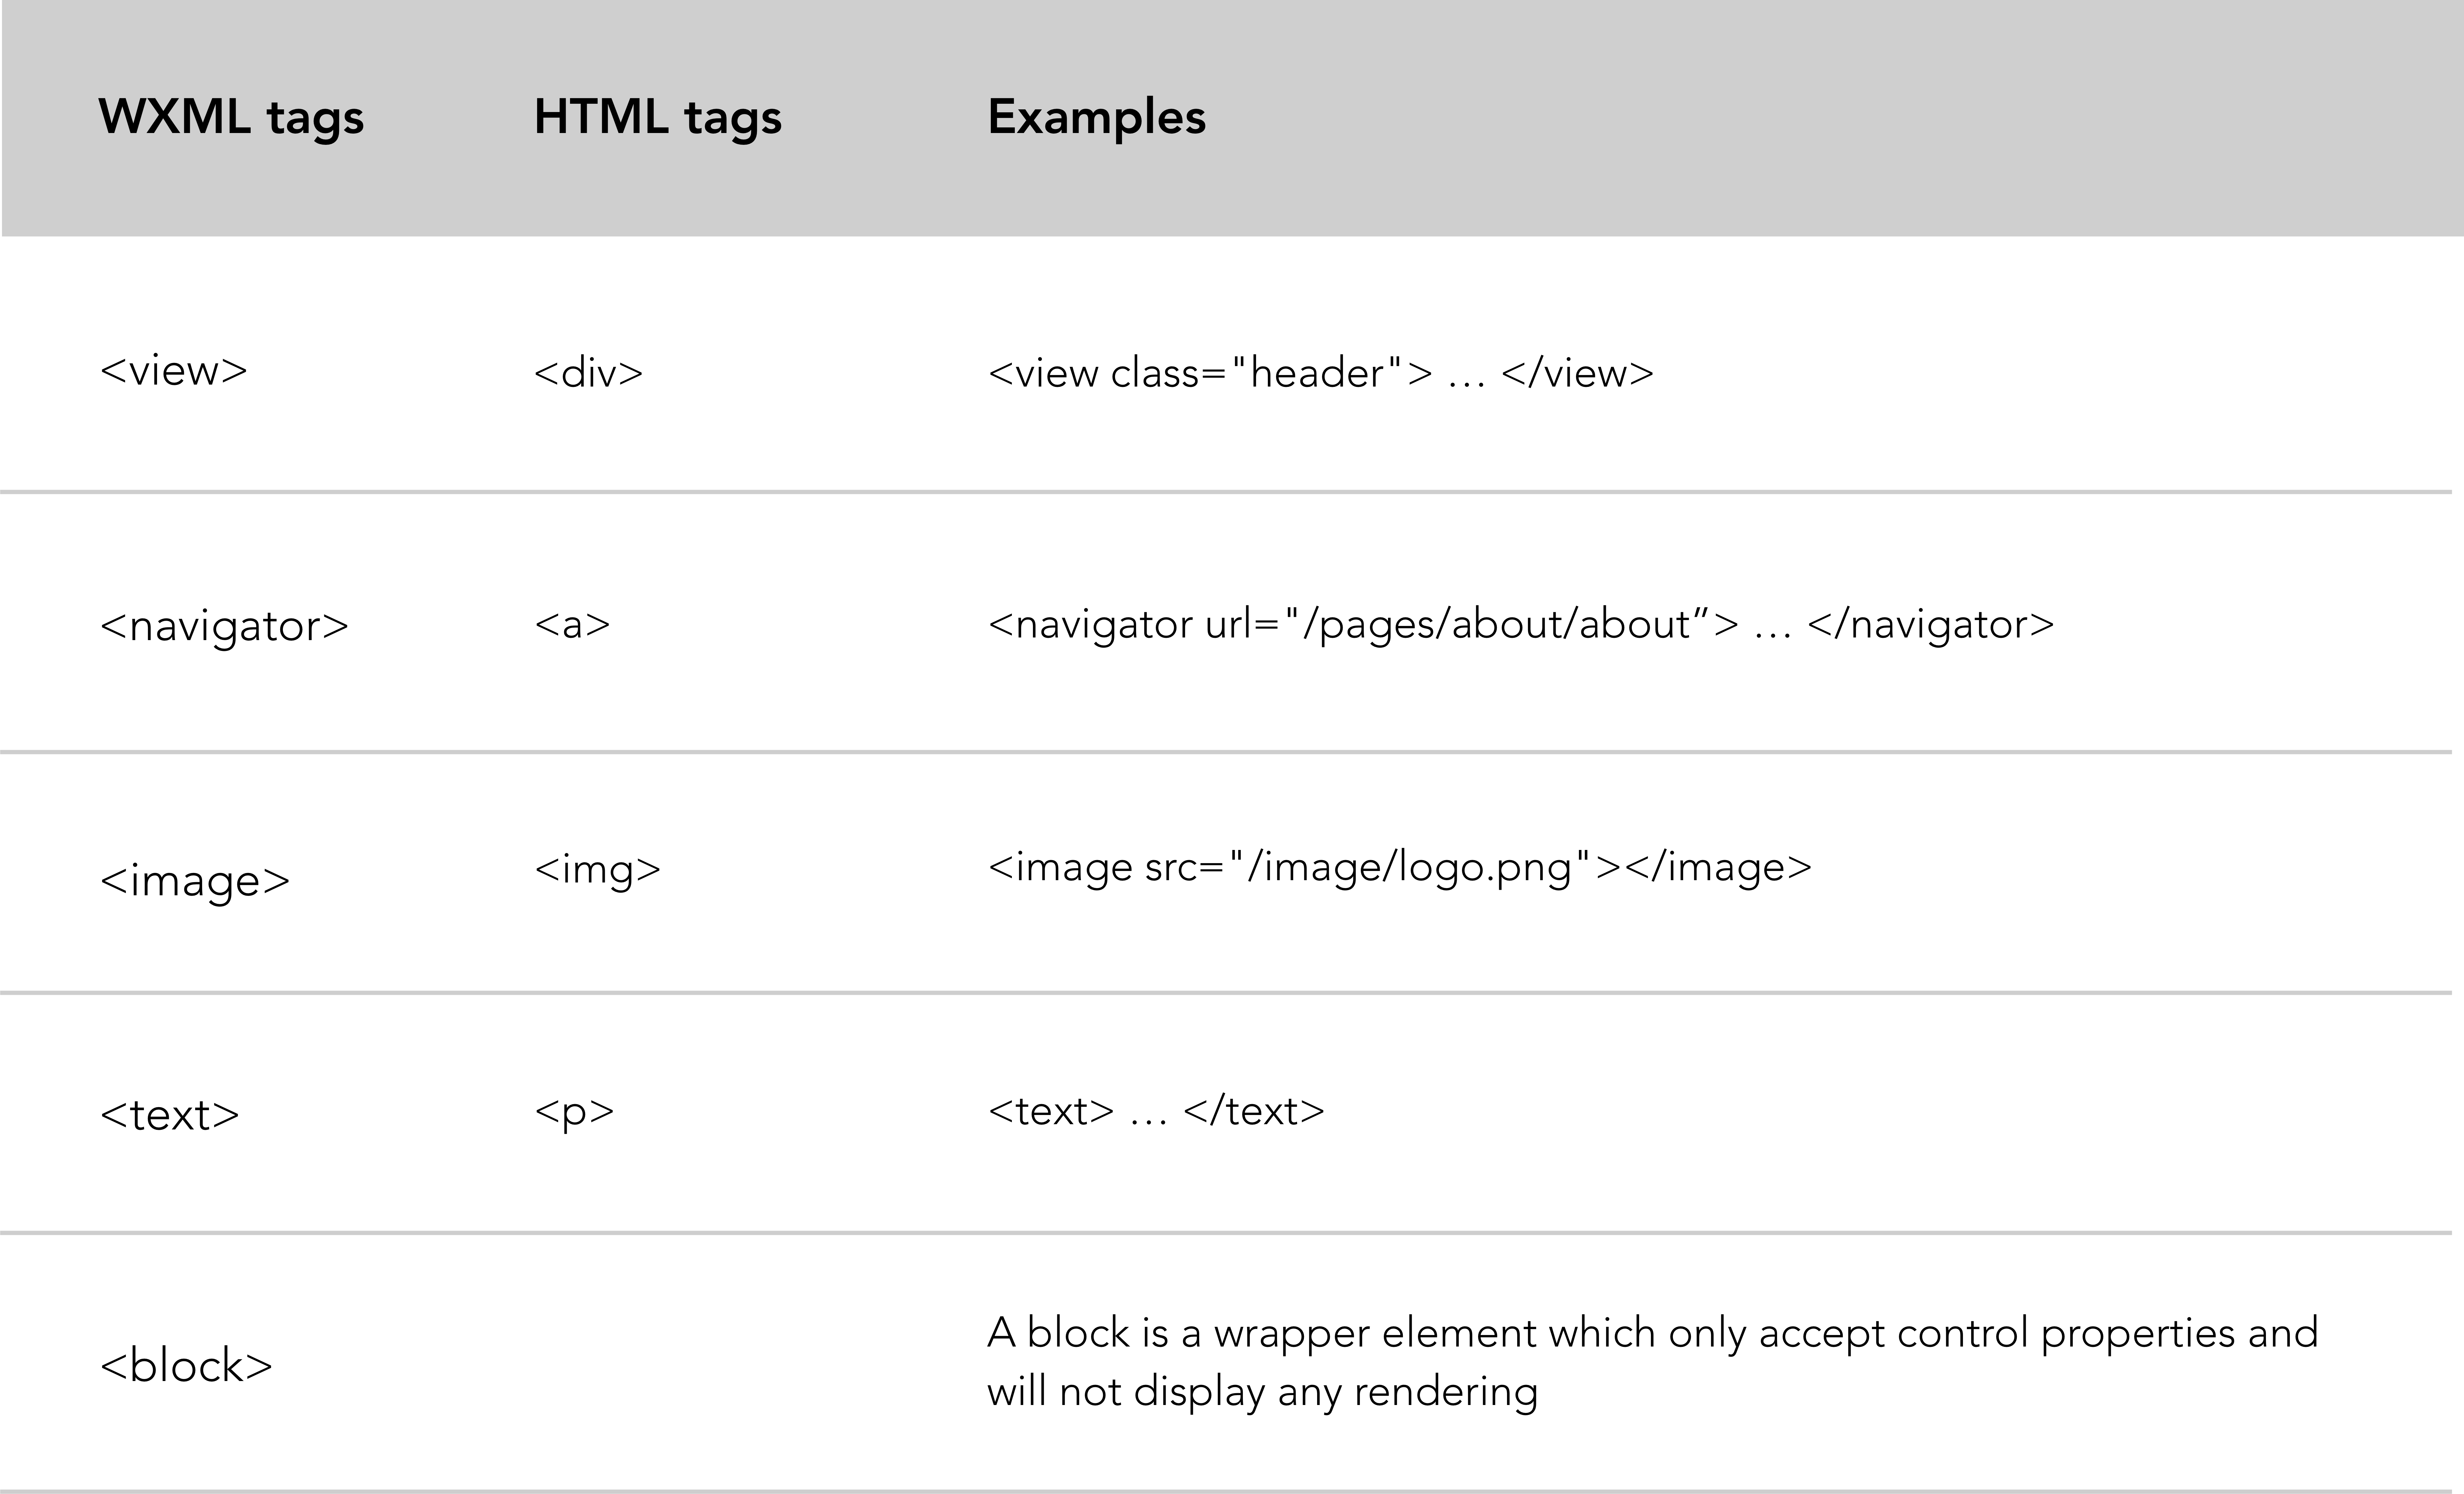
The table below lists the significant differences you will face in development between WXML / HTML:
Further explanations about <block>:
<block> is not a component, it is only a packaging element, it will not do any rendering in the page and only accept control properties.
Note: All components and attributes are lowercase.
The Mini-program framework does not allow developers to use the DOM to control your WXML elements. Instead, you will update your view layer (.wxml file) via data binding method:
In order to comply with WeChat requirements the data attribute has to be initialized in JSON format within Page() function. Data binding technique allows to update data dynamically within the view layer.
A good practice is to initialize data at the top of the Page() function.
Code snippet "data binding" example.
<!-- .wxml -->
<view>{{text}}</view>
<view>{{array[0].msg}}</view>
// .js
Page({
data: {
text: 'init data',
array: [{msg: '1'}, {msg: '2'}]
}
}The dynamic data: which is passed over to the view layer is taken from the data attributes in the corresponding Page() function.
Data binding syntax: Data binding uses Mustache syntax (double braces) to wrap variables. This syntax is a logic less template engine analysis. In short, it is very convenient and easy to use!
WeChat offers lot of possibilities regarding data binding usage. You have the oportunity to use data binding on component attributes, properties, string operations, arithmetic operations, data path and array.
The wx:for control property binds an array from your logical layer (.js file), loops through it and assigns the data.
Code snippet "wx:for" example.
<!-- .wxml -->
<view wx:for="{{array}}">
  {{index}}: {{item.message}}
</view>
// .js
Page({
data: {
array: [{
message: 'foo'
}, {
message: 'bar'
}]
}
})Similar to <view wx:for> you can use <block wx:for> to render multiple lines block. (See block in the WXML table above).
Code snippet "block wx:for" example.
<!-- .wxml -->
<block wx:for="{{array}}" wx:for-item="array-item" wx:key="key">
  <view class="card">
    <view class="card-description">
    </view>
  </view>
</block>
For more details on the code above see this Github repository.
Further resources:
- For more details about list rendering refer to WeChat documentation .
Similar to wx:for, wx:if is used to define a conditional statement and determine whether the block should be rendered or not.
Code snippet "wx:if" example.
<!-- .wxml -->
<!-- Add additional conditions wx:elif ; wx:else -->
<view wx:if="{{length > 5}}"> 1 </view>
<view wx:elif="{{length > 2}}"> 2 </view>
<view wx:else> 3 </view>
// .js
Page({
data: {
length: 10
}
})If you want to display more than one tag within your conditional statement block you can use <block wx:if>.
<!-- .wxml -->
<block wx:if="{{true}}">
 <view> view1 </view>
 <view> view2 </view>
</block>
Dig further in wx:if WeChat documentation.
Templates allow to define code snippets you want to reuse several times in different files of your mini-program.
WXML template item has its own scope and can only use data to pass in.
First, to declare a template you need to define its name.
Code snippet "template" example.
<!-- .wxml -->
<template name="msgItem">
  <view>
    <text> {{index}}: {{msg}} </text>
    <text> Time: {{time}} </text>
  </view>
</template>

<!-- Call the template -->
<template is="msgItem" data="{{item}}"/>
Later on if you want to call a template within the same file use the is attribute and the template name as a value to declare the required template. And don't forget to pass data to the template using the data attribute.
// .js
Page({
  data: {
    item: {
      index: 0,
      msg: 'this is a template',
      time: '2017-05-18'
    }
  }
})To declare a template already defined in a new file you first need to import it.
Code snippet "define a template in a specific file" exemple
<!-- item.wxml -->
<template name="item">
  <text>{{text}}</text>
</template>
Code snippet "import and call the template in index.wxml" exemple
<!-- index.wxml -->
<import src="item.wxml"/>
<template is="item" data="{{text: 'forbar'}}"/>
More details on the WeChat documentation here.
In addition to data initialization and life cycle functions, the framework allows to define event handling functions.
WXML element (event handler) triggers the event and the logical layer binds the event handler to receive an event object as a parameter.
Code snippet "event handler" example.
<!-- .wxml -->
<button type="primary" bindtap="add">Incrementation: {{count}}</button>
// .js
Page({
data: {
count: 1
},
add: function(e) {
this.setData({
count: this.data.count + 1
})
}
})setData() :
This function updates data within the logical layer which next will be send to the view layer.
setData() function receives an object as a parameter and updates the key value by using this.data as a data path.
There are many kind of binding events, most components have their own definition of binding event.
Components binding events:
bindsubmitfor a fom.bindinputfor an input.bindscrollfor a scroll-view.
Code snippet "form binding event" example.
<!-- form.wxml -->
<form bindsubmit="bindFormSubmit">
  <!-- Form inputs -->
  <button type="primary" form-type="submit">Submit</button>
</form>
// form.js
// Form submission function
Page({
bindFormSubmit: function(e) {
// Treatment
}
})Classic binding events:
bind+event_typecatch+event_type
Code snippet "data binding illustration" example.
<button bindtap="ontap" type="primary">Tap<button/>Page({
ontap: function() {
console.log('tap');
}
})The two common binding events used are bind+event_type and catch+event_type. The catch event is the one that prevent against bubbling events.
Bubbling event concept:
For non-javascript folks, bubbling event can be defined when an event occurs in an element nested in another element. Both the parent node and the nested elements are registered as event handler for that particular event.
The parent node of the nested element should use catch+event_type, which will prevent the event from bubbling to ancestor elements.
Code snippet "counteract bubbling effect with catchtap" example.
<!-- .wxml -->
<view id="outter" bindtap="handleTap1">
  outer view
  <view id="middle" catchtap="handleTap2">
    middle view
    <view id="inner" bindtap="handleTap3">
      inner view
    </view>
  </view>
</view>
// .js
Page({
handleTap1: function(e) {
console.log('outter')
},
handleTap3: function(e) {
console.log('inner')
},
handleTap2: function(e) {
console.log('middle')
}
})Mostly used when you nest elements and don’t want to display the parent node of the element you bind.
Code snippet "tap and longtap event binding" example.
<!-- index.wxml -->
<button bindtap="ontap" type="primary">Tap<button/>
<button bindlongtap="onlongtap" type="primary">Long tap<button/>
// index.js
Page({
ontap: function() {
console.log('tap');
},
onlongtap: function() {
console.log('longtap');
}
})Here are practical tips to enable the mini-program sharing. WeChat opens up two ways to share a mini-program:
-
Possibility to enable the forward button within the drop-down menu that appears by clicking on the upper right corner
...of the page. -
Create a forward button within the page of your mini-program. It makes the sharing process more user friendly.
In both variants, the framework will automatically forward a mini-program card with a screen shot of your MP header.
To enable this button we need to use a Page()function called onShareAppMessage.
Code snippet "Enable the forward button of the drop-down menu" example.
// index.js
onShareAppMessage: function () {
    return {
      title: 'Le Wagon coding school',
      path: 'pages/index/index'
    }
  },
In this function you have to define a title that will be displayed on the top of the forward card and the current page path. If you forget to add a title WeChat will add one by default (your mini-program name).
Restriction:
The only thing that you can define in this case is the event onShareAppMessage. The forward button will be created by the framework itself.
This feature allows developers to create a specific forward button within the page by using the button property open-type and its value 'share'.
Code snippet "Create a forward button within the page" example.
<!-- about.wxml -->
<view bindtap="onShareAppMessage">
 <button class="share-btn" open-type="share" type="primary">Share</button>
</view>
Unlike the first case, we have to create the event handler that triggers the onShareAppMessage function. This function calls wx.showShareMenuand pass withShareTicket as a parameter.
// about.js
Page({
  onShareAppMessage: function () {
    console.log('share')
    wx.showShareMenu({
     withShareTicket: true
    })
  }
})
Note: Both variants are using a Page() function which implies that you are sharing the specific page where you declare the function.
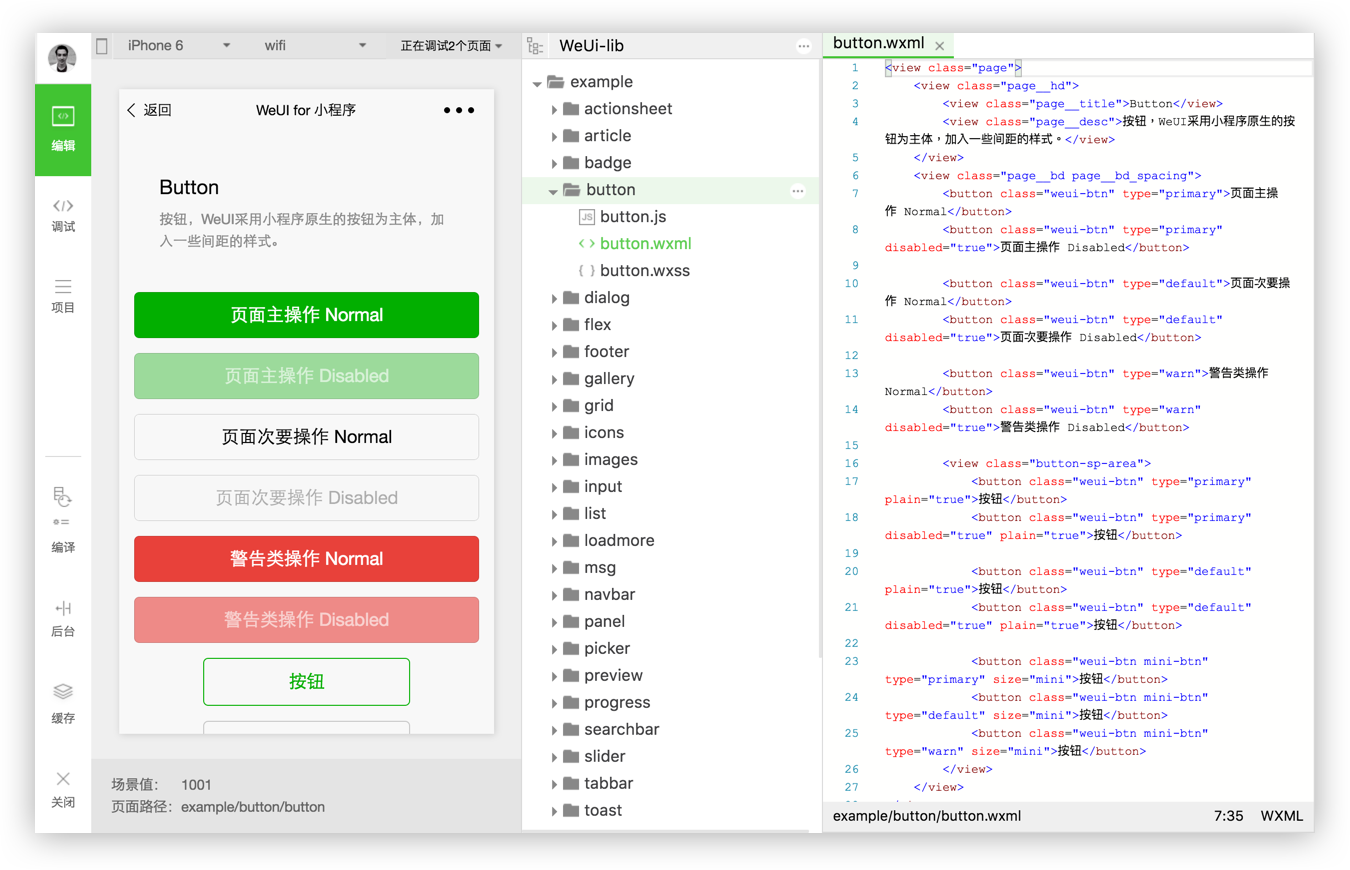
WeChat aims to build a friendly, efficient and consistent user experience. To make it happen WeChat official design team provides a WeUI repository. This basic front-end library (WeUI) is consistent with WeChat native visual experience. WeUI, can be understood as a WeChat front-end library, similar to Bootstrap. It includes a large set of components such as button, cell, dialog, progress, toast, article, actionsheet, icon and more.
Useful Github repositories:
- WeUI offcial demo website, WXSS: https://weui.io/
- WeUI WXSS library: https://github.com/weui/weui-wxss
- WeUI Sketch and Photoshop files: https://github.com/weui/weui-design
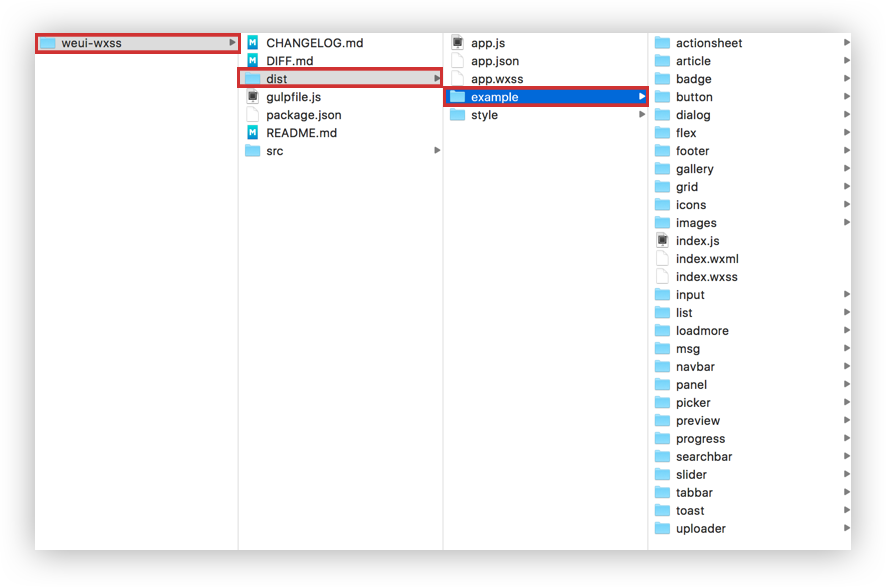
Download WeUI repository locally through the npm:
npm install weui-wxss
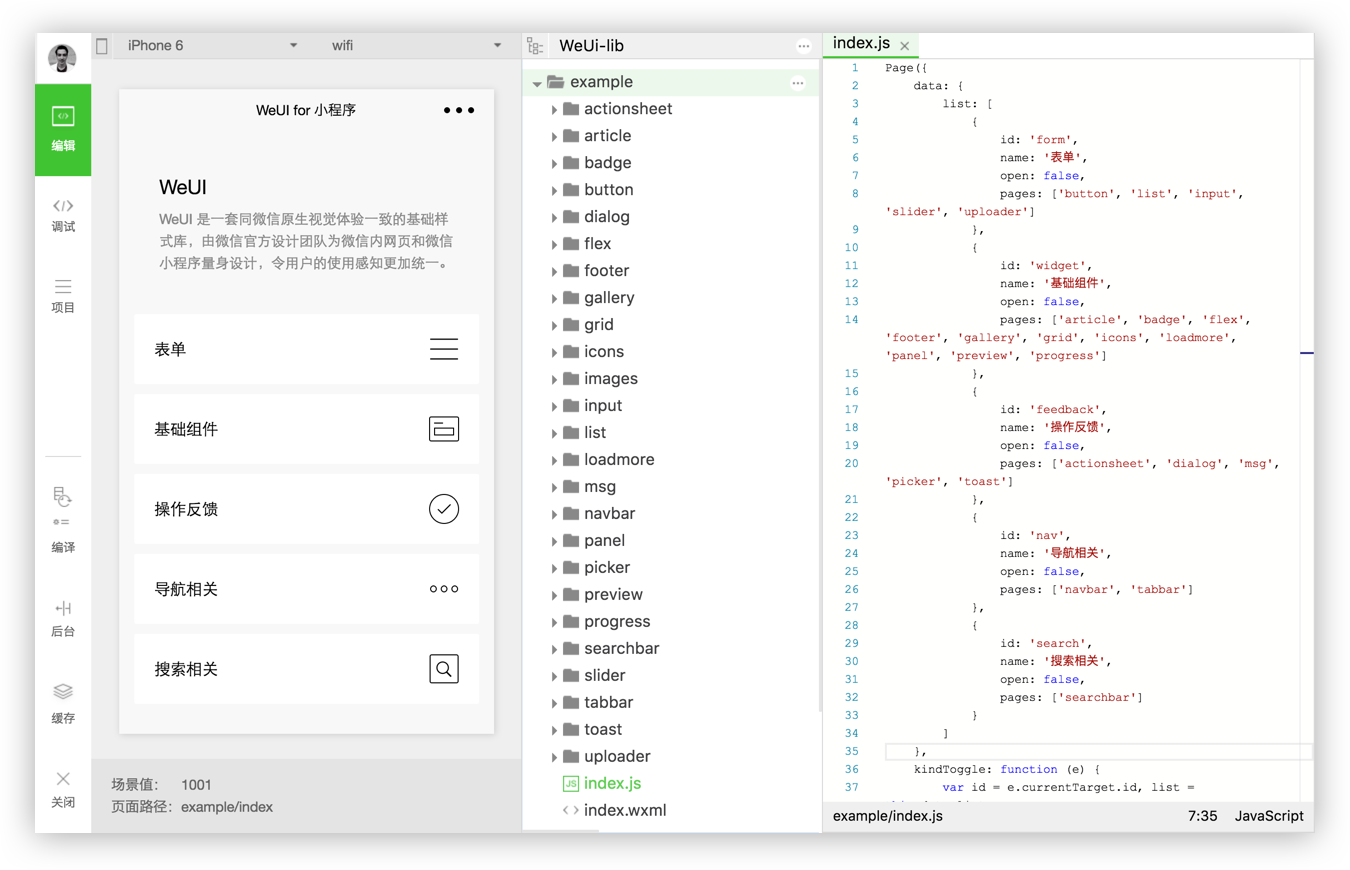
The downloaded code contains WeUI source code and a mini-program sample based on WeUI.
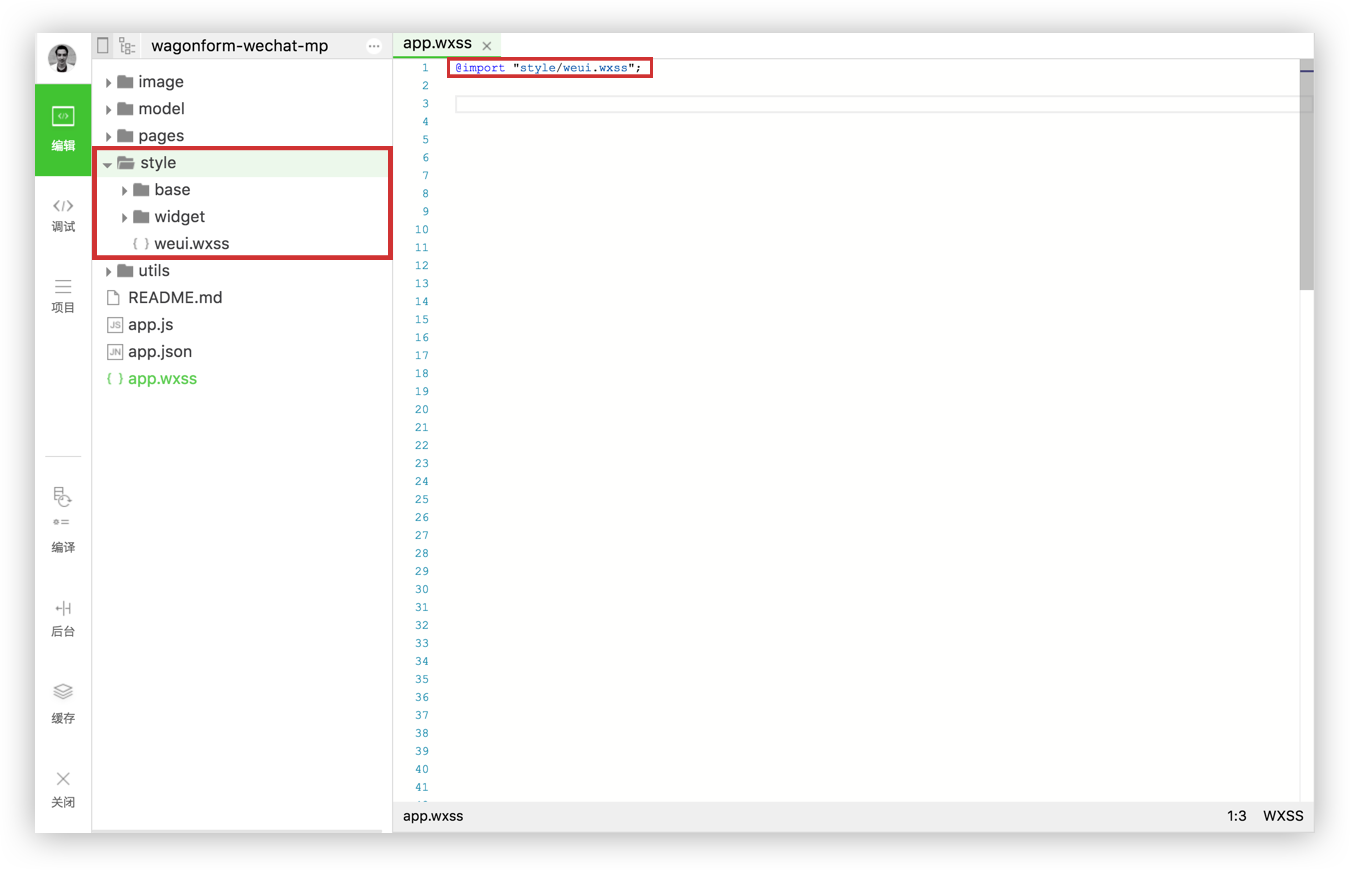
Let's open WeUI mini-program sample in WeChat IDE:
Import WeUI style in your app.wxss to enable the use of WeUI style in your mini-program:
@import "style/weui.wxss";For more details regarding WeChat design guidelines you can find here the full documentation.
WXSS has almost all of the features CSS has. The style sheet defined in app.wxss is the common style rules identified on each page. The style sheet defined in a particular page is a local style that acts only on the current page and thus overwrites same selectors used in app.wxss. WXSS compared to CSS has two major differences:
- Size unit
- Style import
- Selectors supported
WXSS uses rpx (responsive pixel) as unit. It allows to adjust pixels according to the width of the screen. You may continue to use the classic px unit (just not the WeChat way of doing things).
(1rpx = 0.5px ; 1px = 2rpx)
To import outbound style sheet use @import statement followed by the relative path and a ; at the end of the statement.
Code snippet "@import" example.
/* app.wxss*/
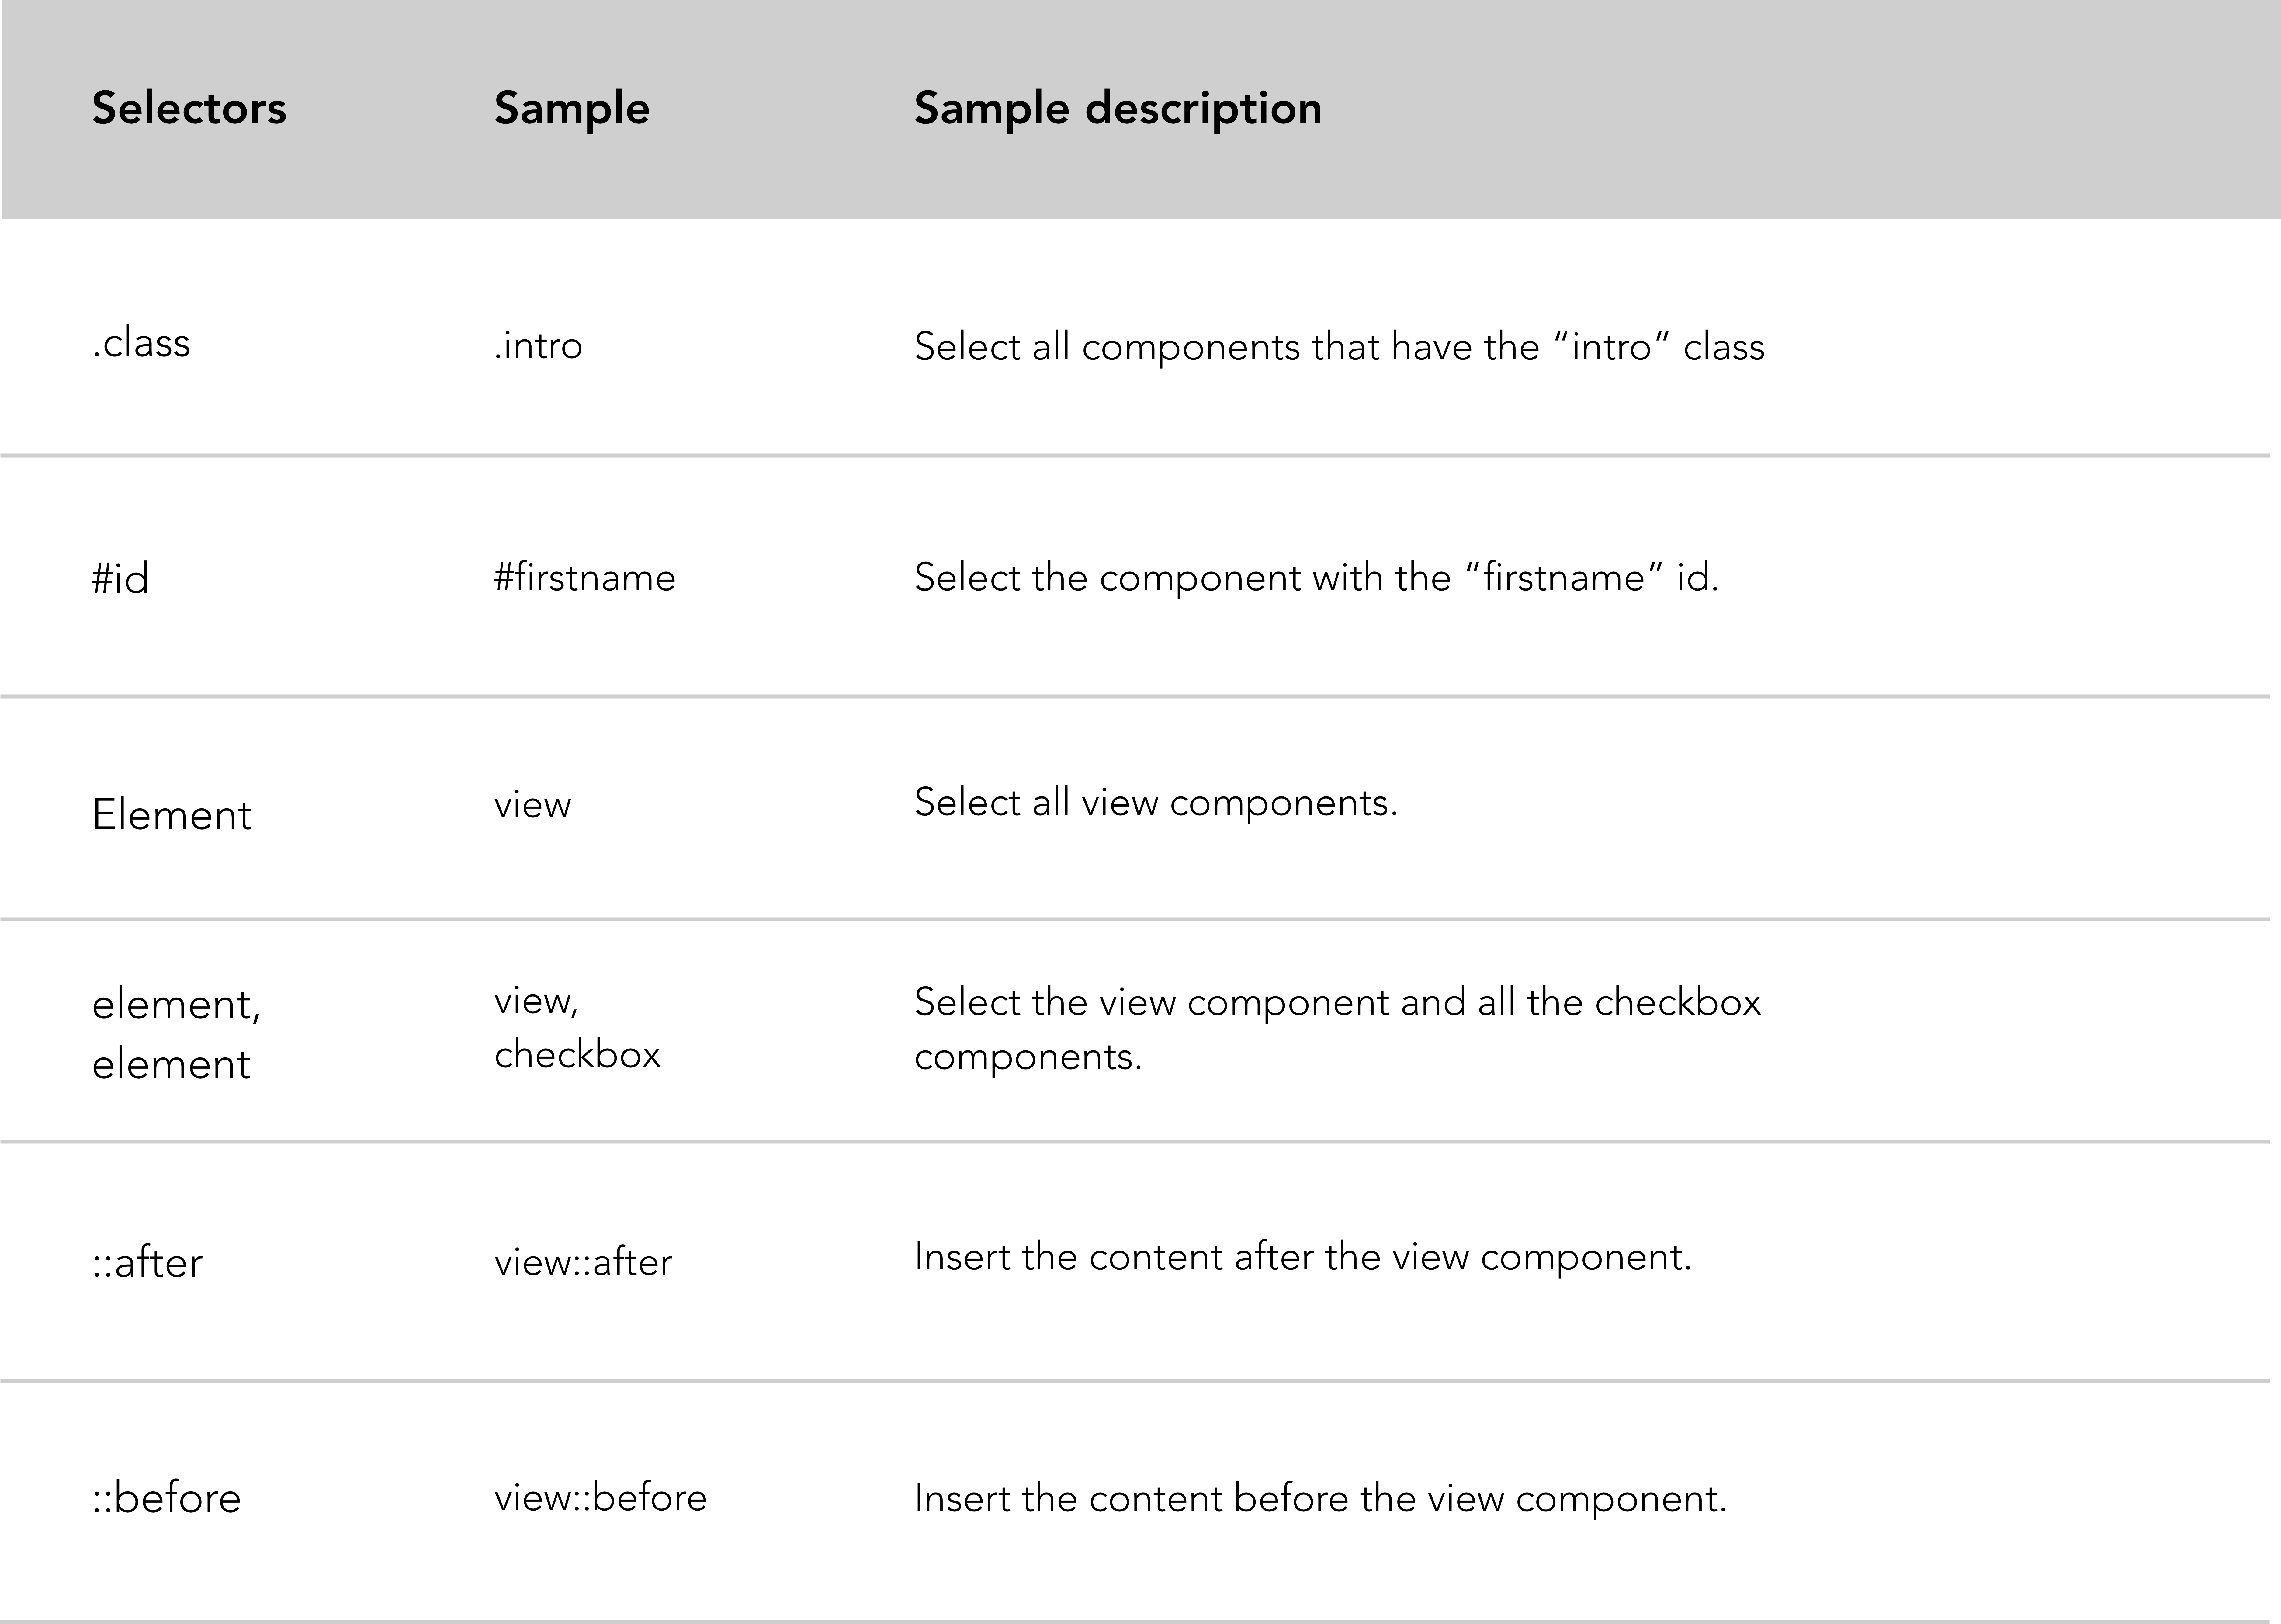
@import "outbound.wxss";WeChat framework cannot support lot of standard CSS selectors, such as cascading selector.
Supported selectors:
WeChat recommendation:
- In development use Iphone 6 device as a standard visual. You may have some glitches on smaller screens.
WeChat framework provides to developers a large set of basic components, the exhaustive list of components is here.
<navigator> is your anchor in html. It is used to link from one page to another. The most important attribute of the navigator element is open-type.
Code snippet "navigator" example.
<!-- .wxml -->
<view class="btn-area">
  <navigator url="/pages/index/index" hover-class="navigator-hover">text</navigator>
  <navigator url="/pages/form/form" open-type="redirect" hover-class="other-navigator-hover">text</navigator>
  <navigator url="/pages/index/index" open-type="switchTab" hover-class="other-navigator-hover">tab switching</navigator>
</view>
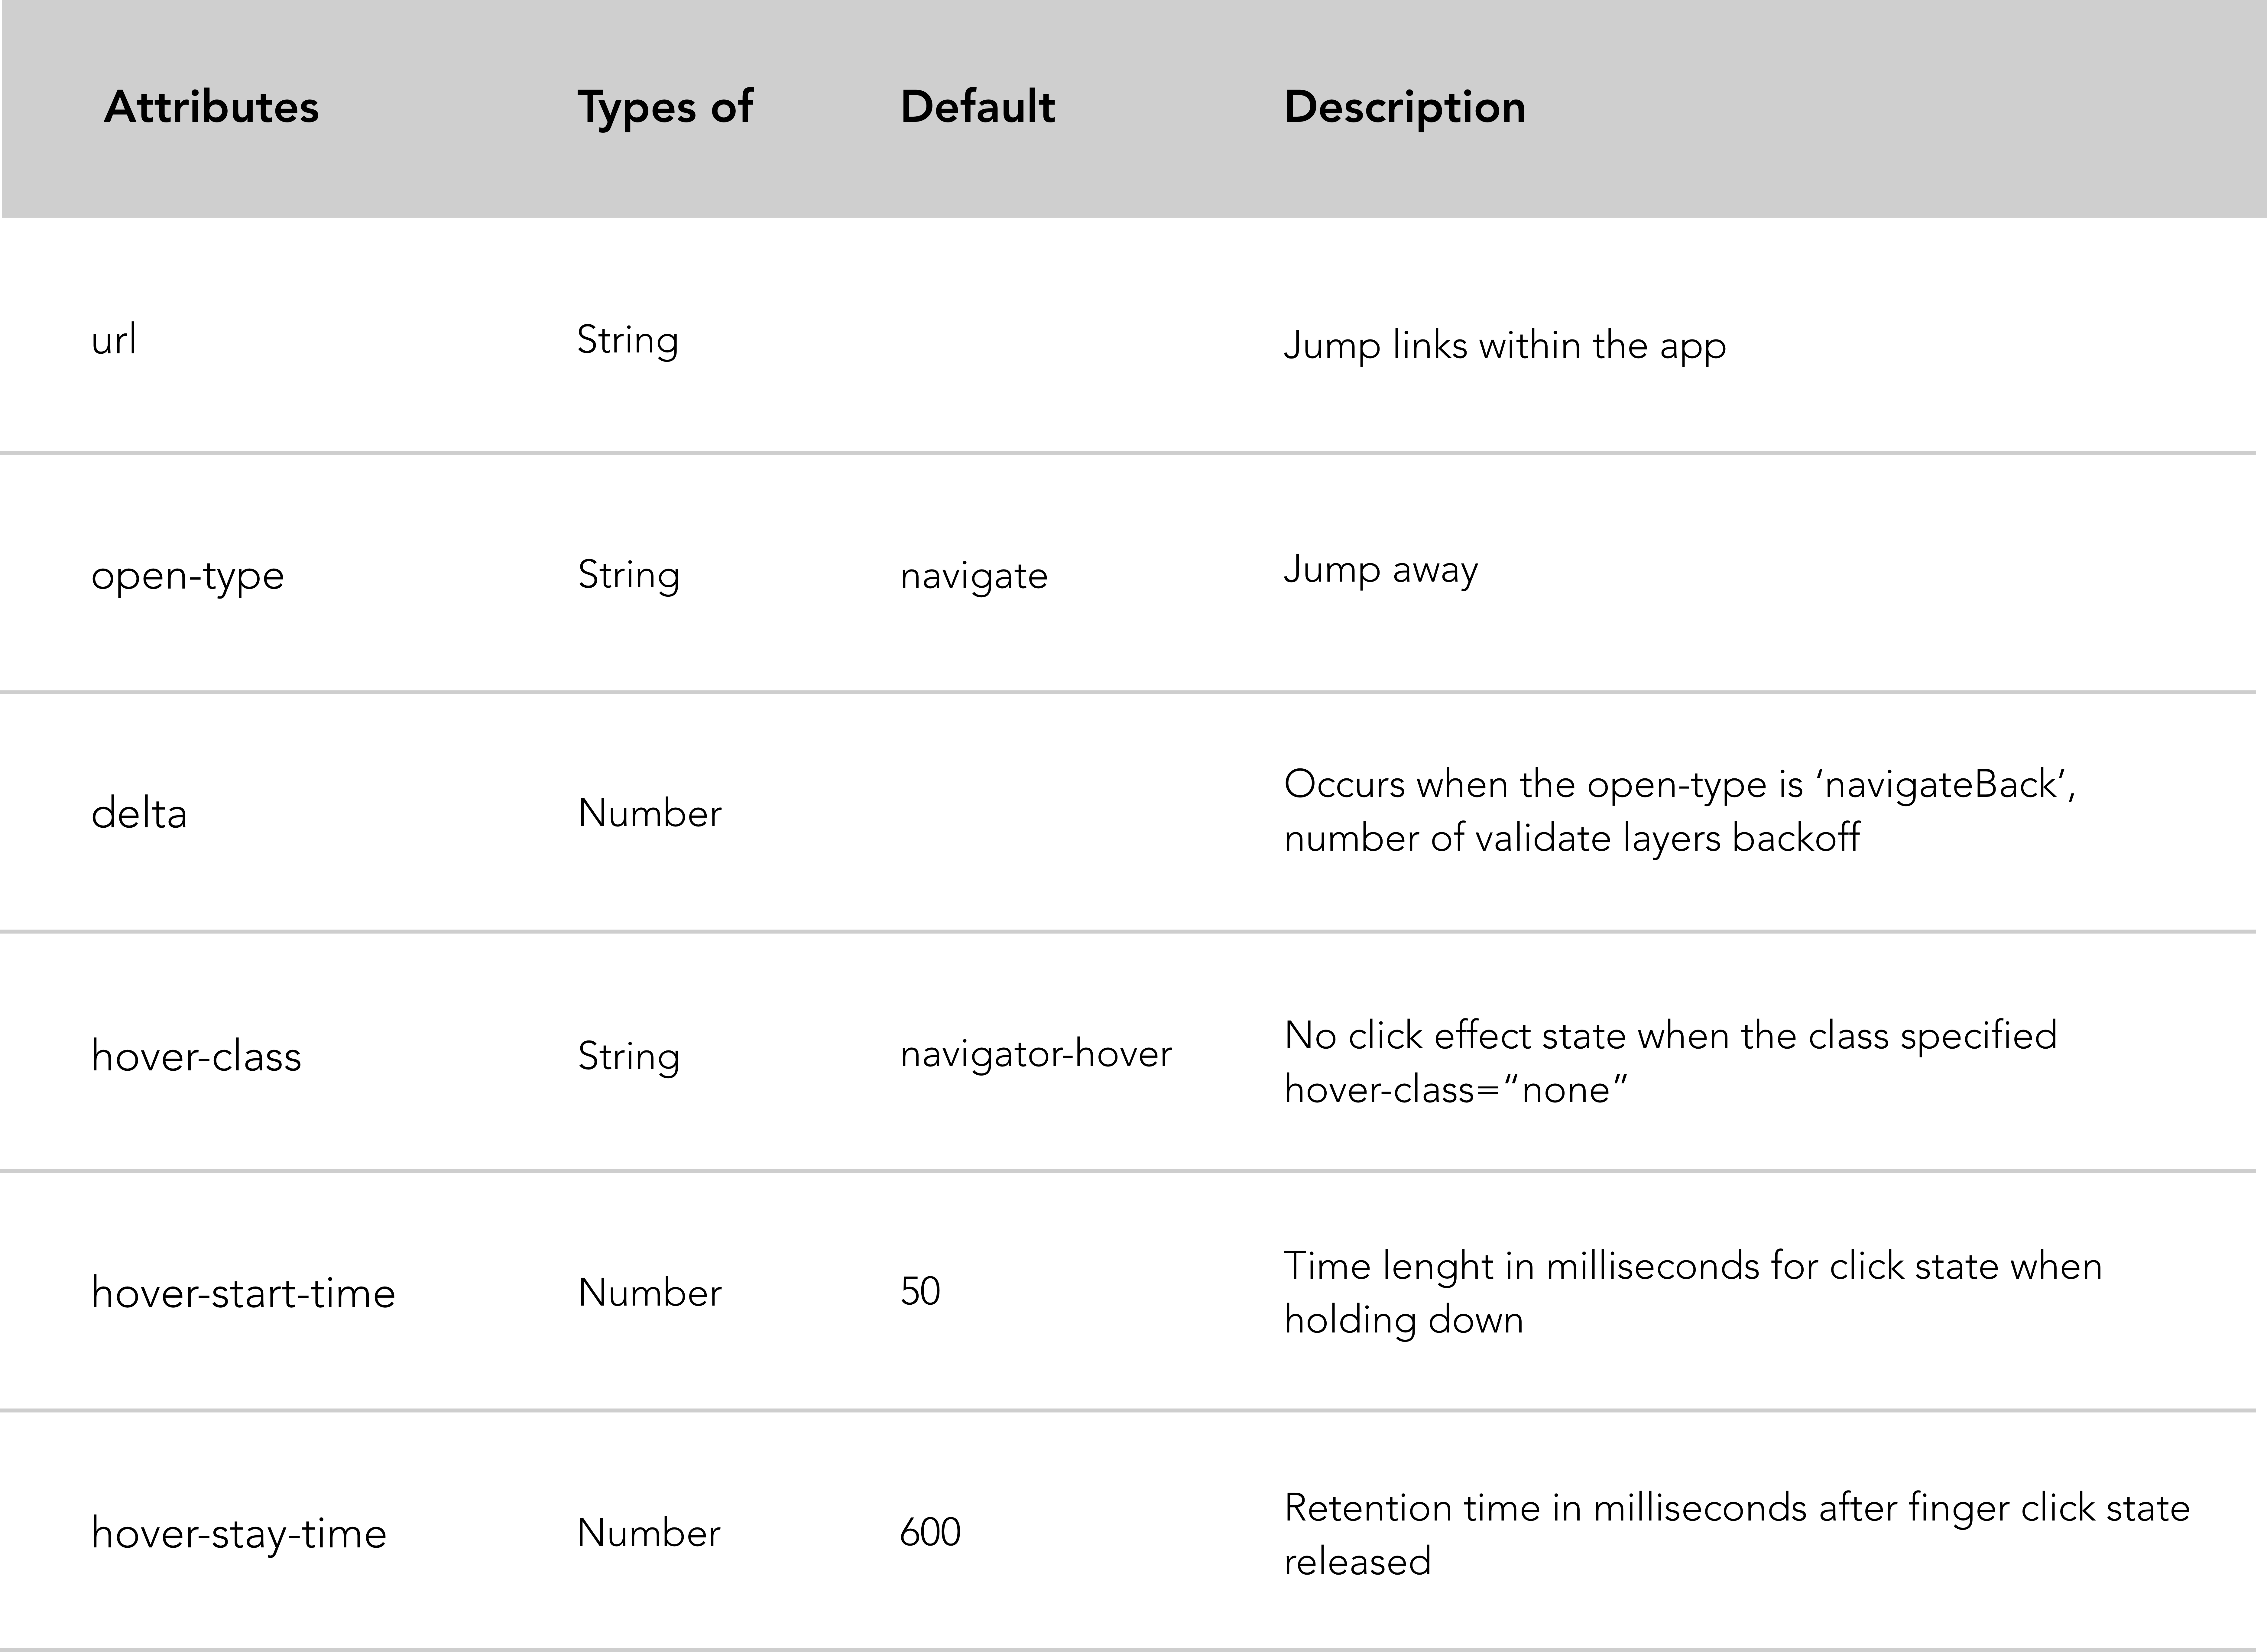
Navigator attributes description:
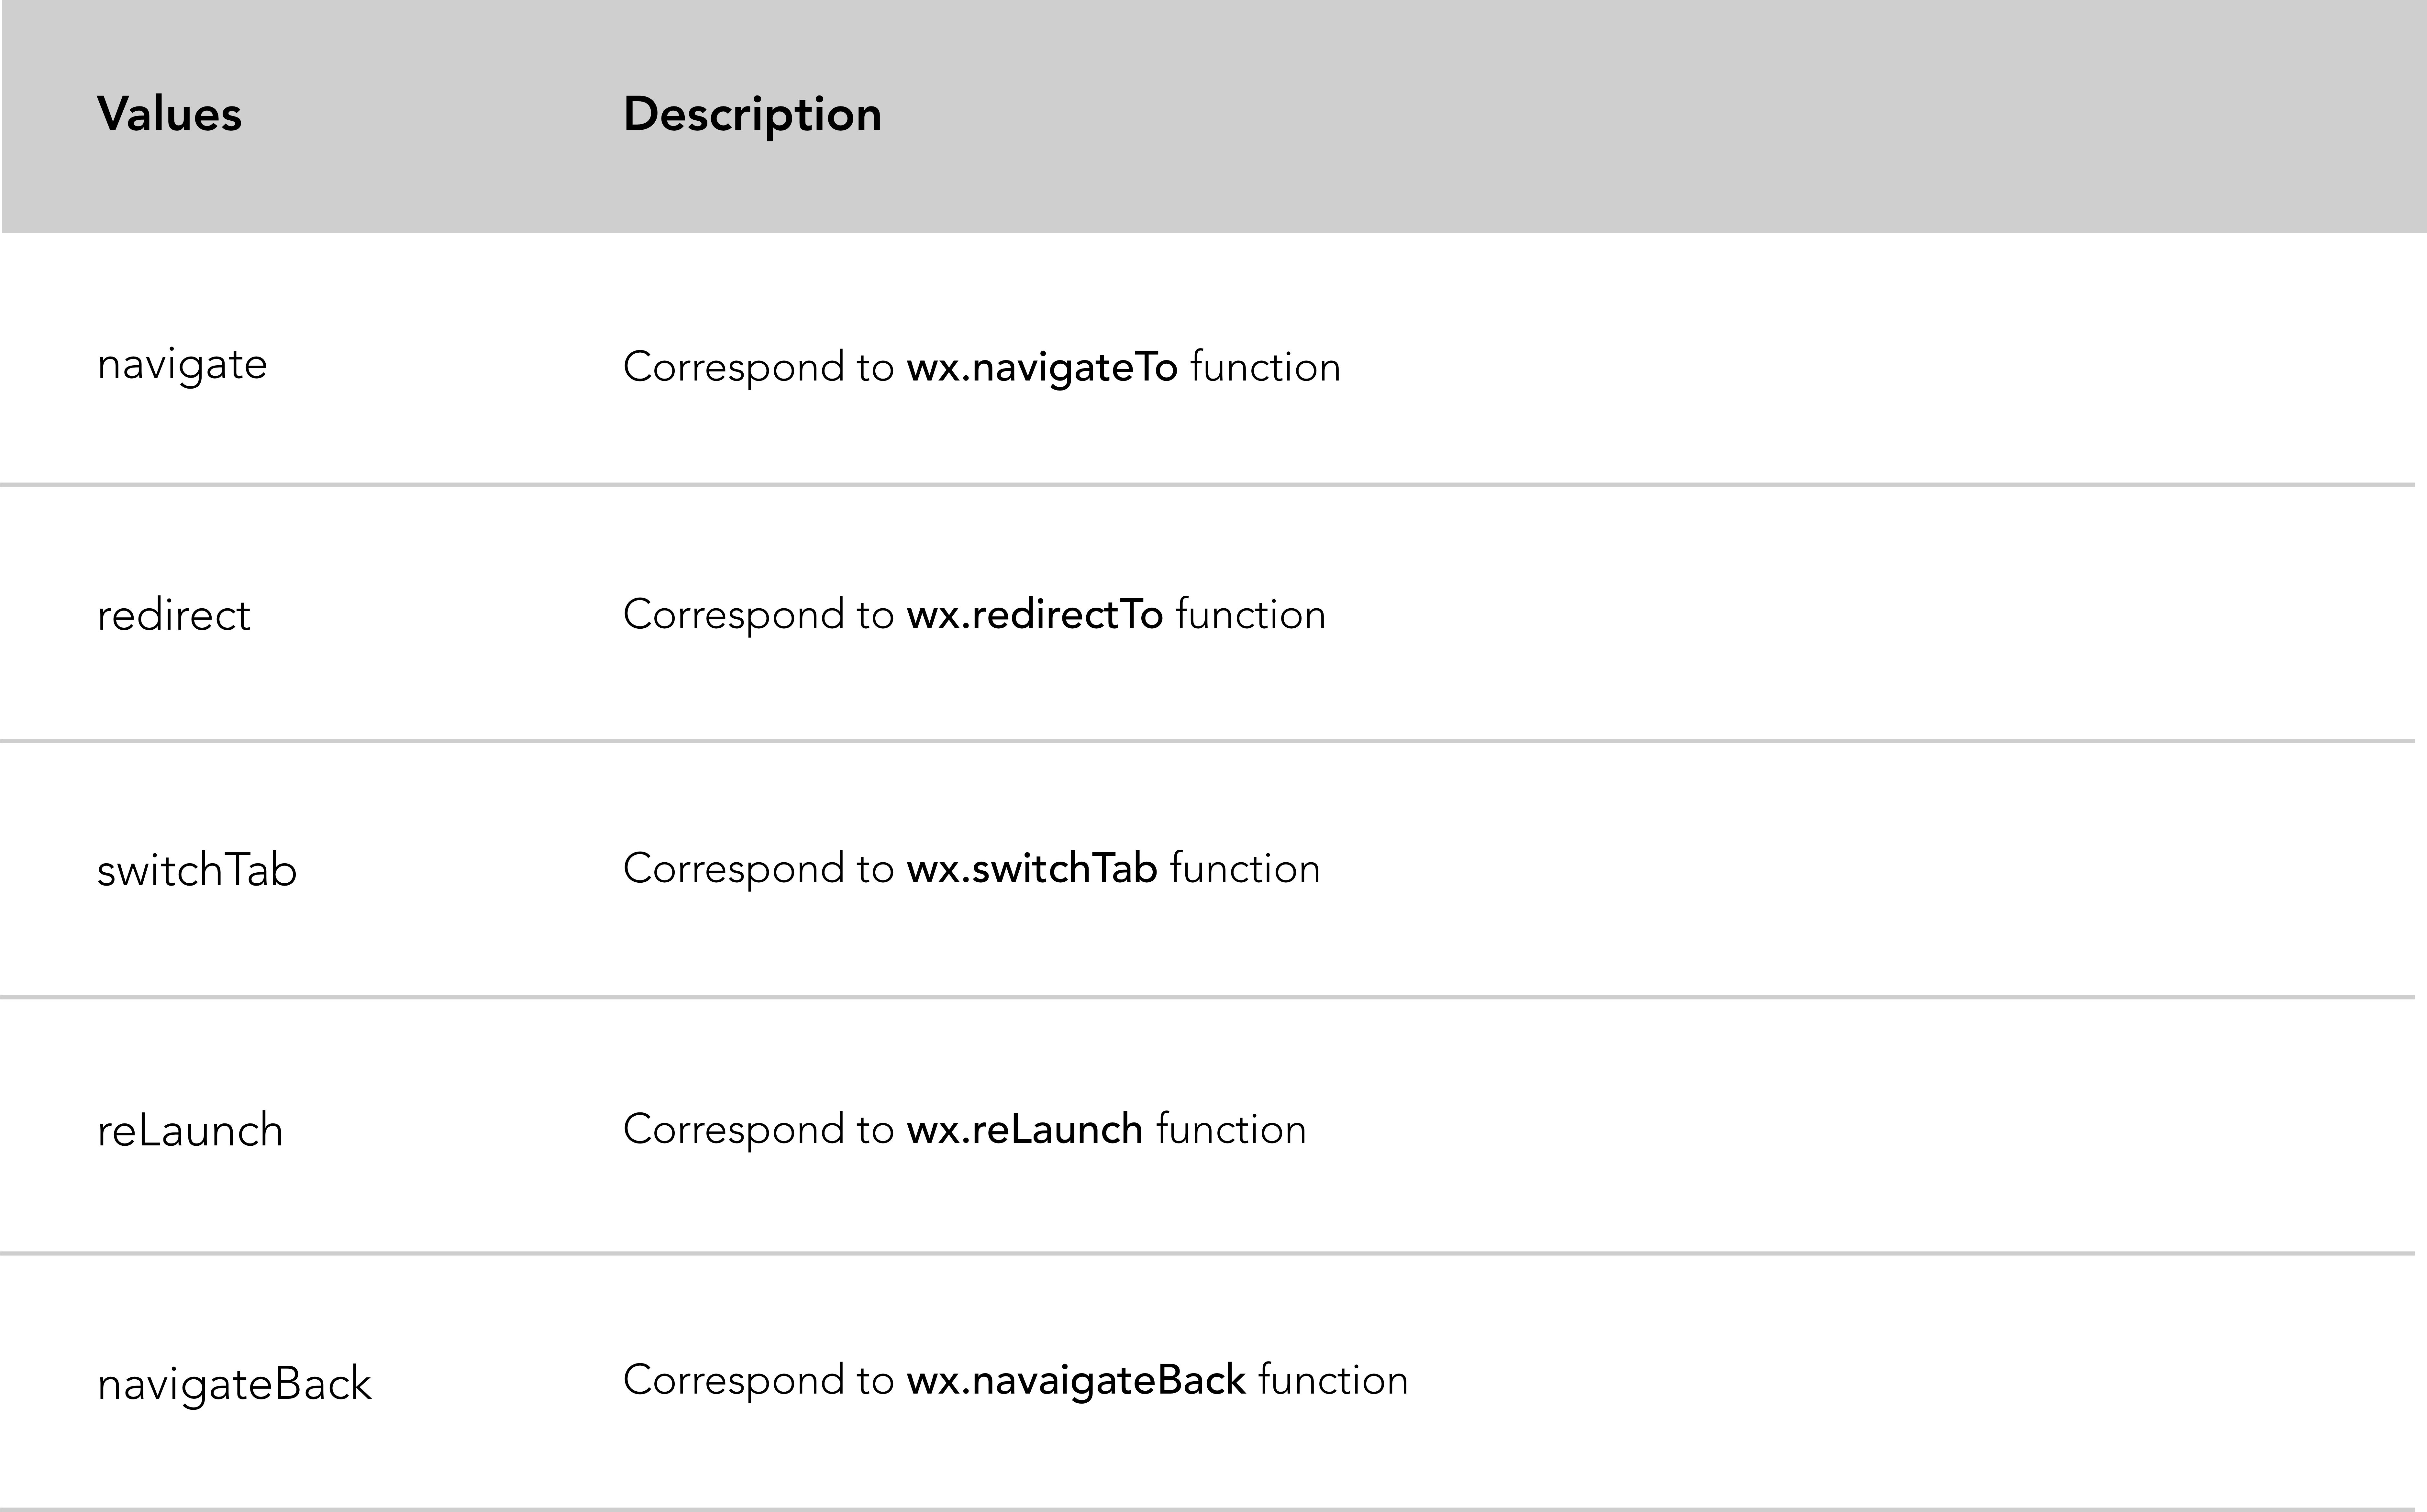
Open type values description:
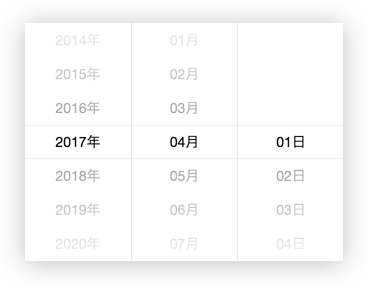
Picker component in WeChat documentation is divided in three selectors, classic selector which is the default one, time selector and date selector.
The use case below is based on a date picker but the logic remains the same for another picker.
Code snippet "date picker" example.
<!-- .wxml -->
<picker mode="date" value="{{date}}" start="2015-09-01" end="2020-09-01" bindchange="bindDateChange">
  <view class="picker">
    Now the date is {{date}}
 </view>
</picker>
// .js
Page({
data: {
date: '2017-05-20'
},
bindDateChange: function (e) {
this.setData({
date: e.detail.value
})
}
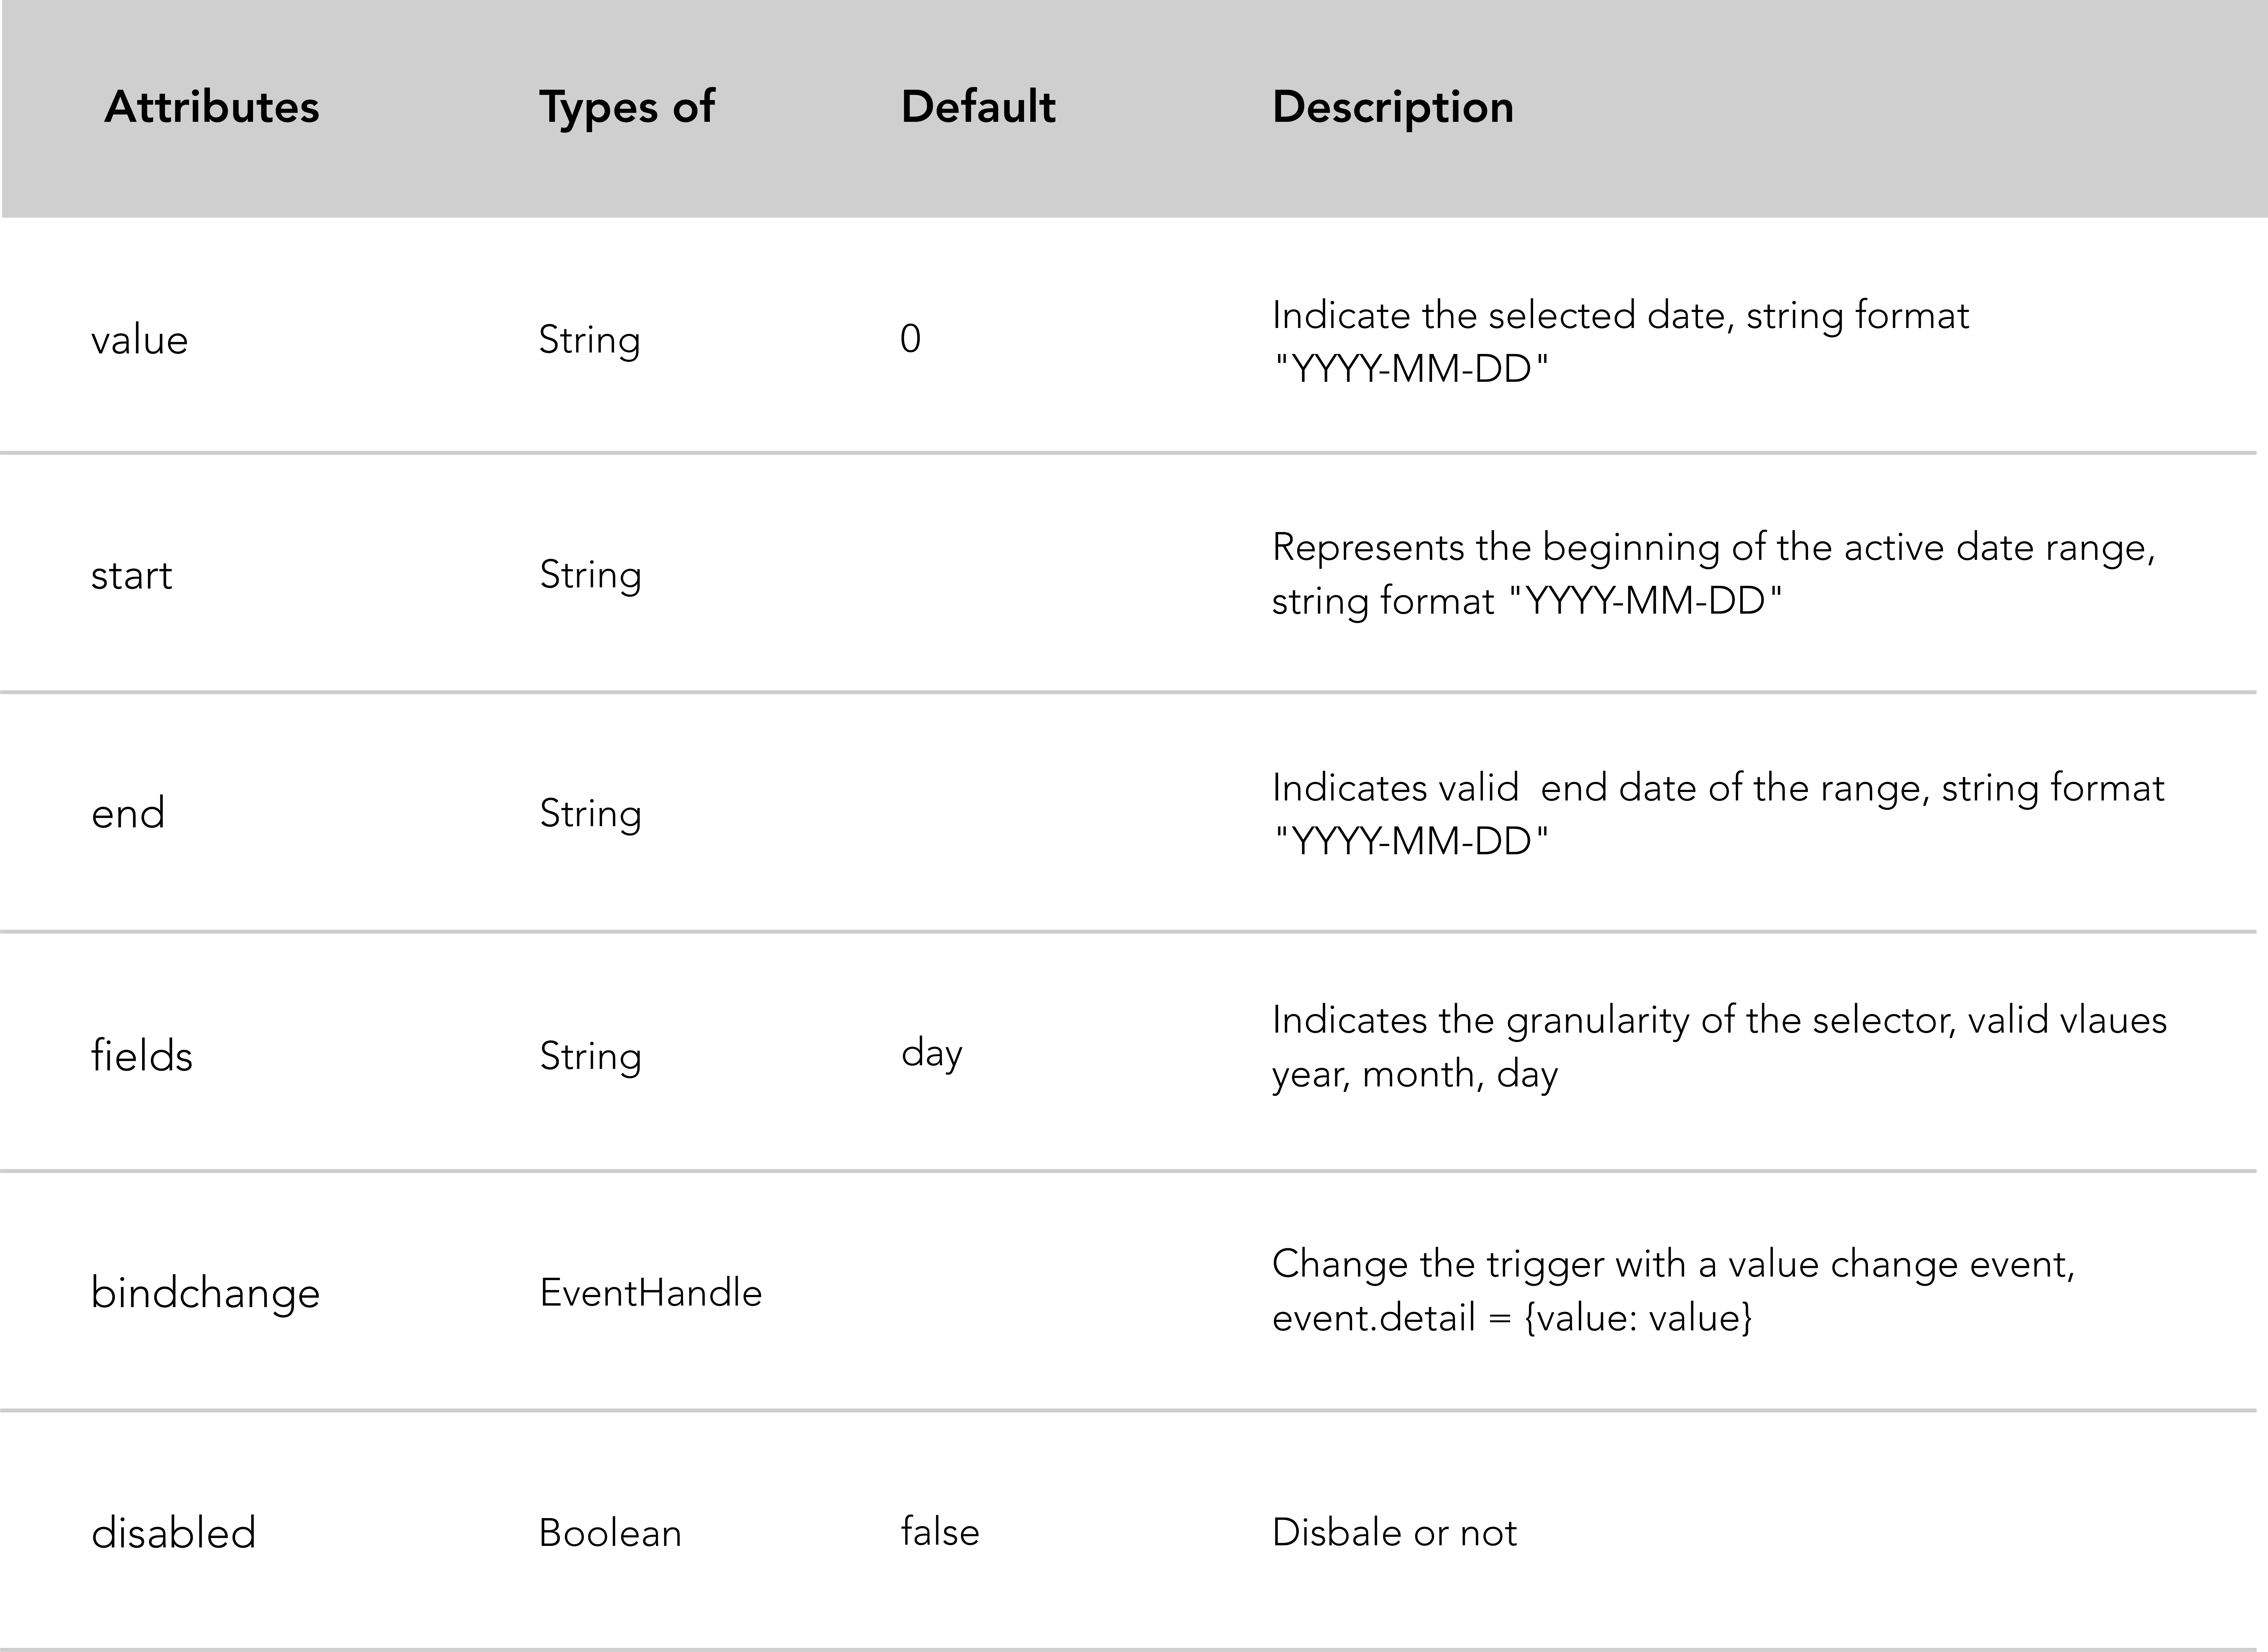
})Date selector attributes:
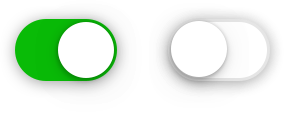
A switch is a visual toggle with two states, on and off.
Code snippet "switch" example.
<!-- .wxml -->
<view class="body-view">
  <switch checked bindchange="switch1Change"/>
  <switch bindchange="switch2Change"/>
</view>
// .js
Page({
switch1Change: function (e){
console.log('switch1 a change event occurs with the value', e.detail.value)
},
switch2Change: function (e){
console.log('switch2 a change event occurs with the value', e.detail.value)
}
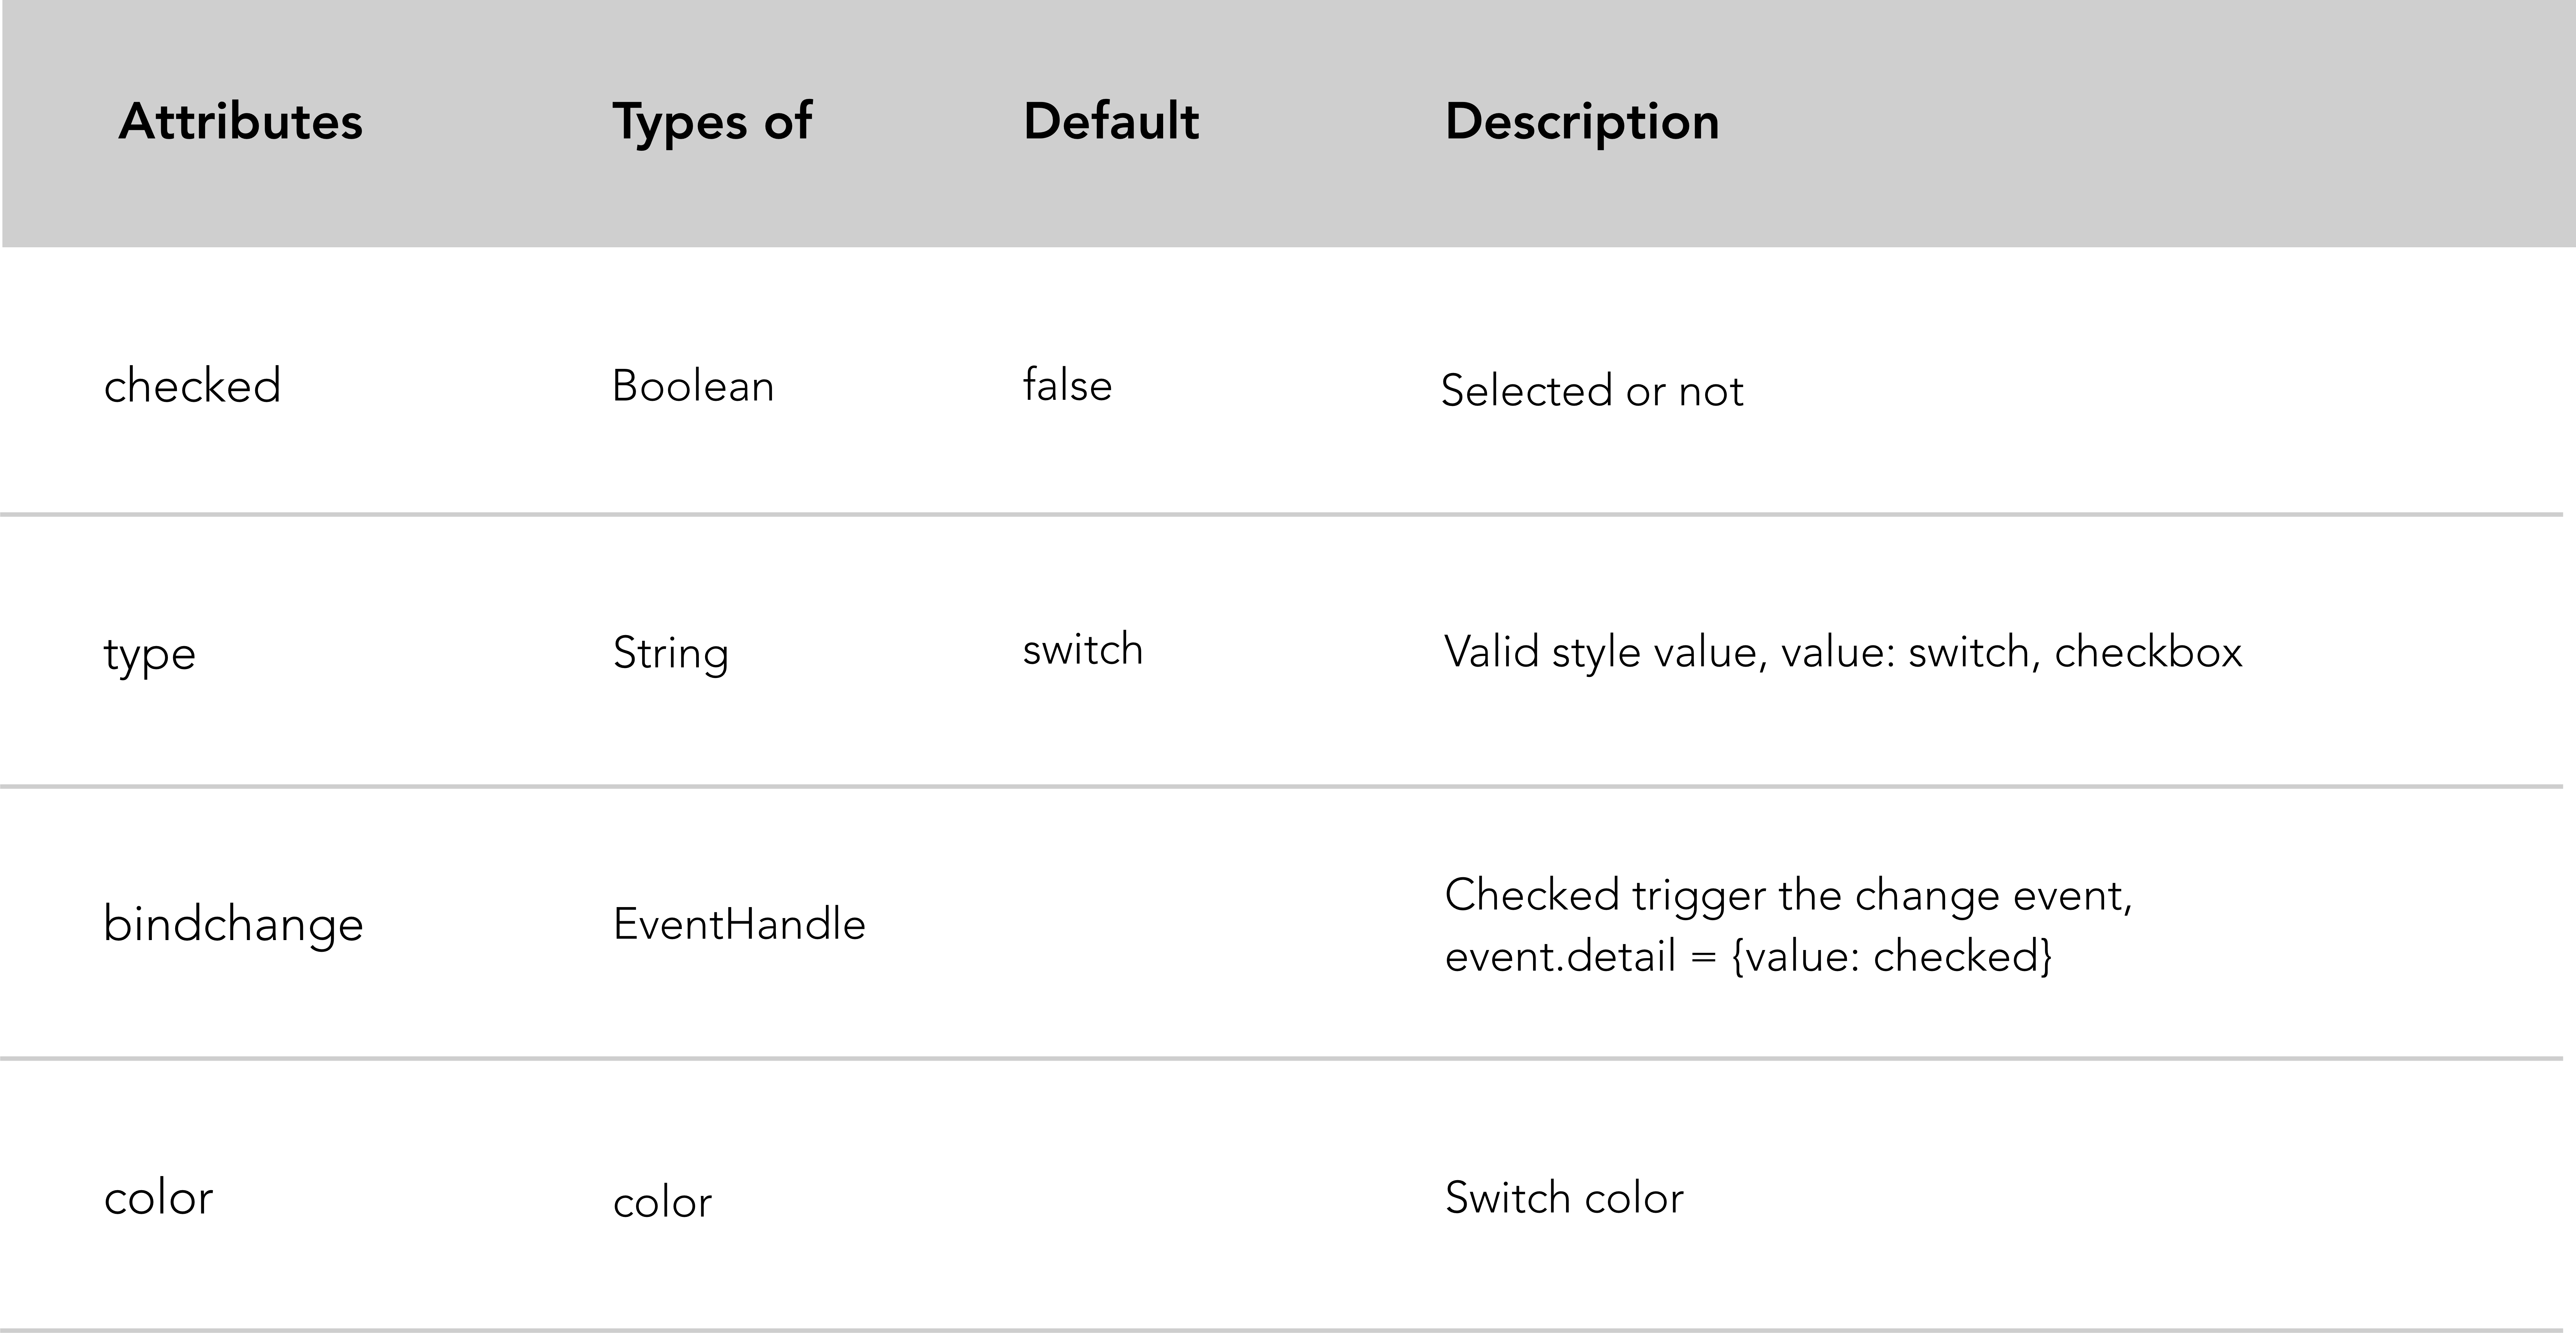
})Switch attributes:
A toast is a non-modal element used to display brief and auto-expiring components to inform users.
In the code snippet below we are faking a form submission to show how a toast is working and display.
Code snippet "spinner btn and toast" example.
<!-- .wxml -->
<form bindsubmit="bindFormSubmit">
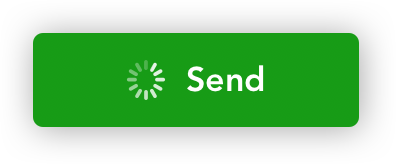
 <button type="primary" form-type="submit" loading="{{loading}}">Send</button>
</form>
In the code snippet above we created a dynamic button with a purpose of submitting a form. The button is animated by a loading spinner when you click on it.
Then we display a toast by using wx.showToast API to inform users.
Page({
  data: {
    loading: false
  },
  bindFormSubmit: function (e) {
    // Enable loading animation on send btn
    this.setData({
      loading: !this.data.loading
    })
    // Loading toast
    wx.showToast({
      title: 'Sending...',
      icon: 'loading',
      duration: 1500
    })
  }
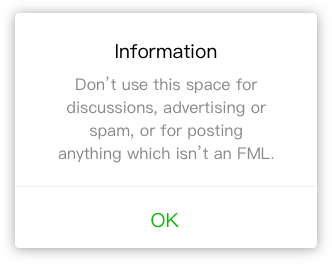
})A modal box allows to overlay a small element over a page. The primary benefit of modal boxes it that they avoid the need to use of conventional window pop-ups or page reloads.
There are five situational categories where modal boxes are commonly used:
- Error: To alert users of an error.
- Warning: To warn users of potentially harmful situations.
- Data: To collect data from users.
- Confirm or Prompt: To remind users to do something before moving on.
- Helper: To inform users of important information.
Code snippet "modal to inform" example.
wx.showModal({
   title: 'Modal title',
   content: 'Modal content ',
   confirmText: "Ok",
   showCancel: false,
   success: function (res) {
      console.log('success')
   }
 })
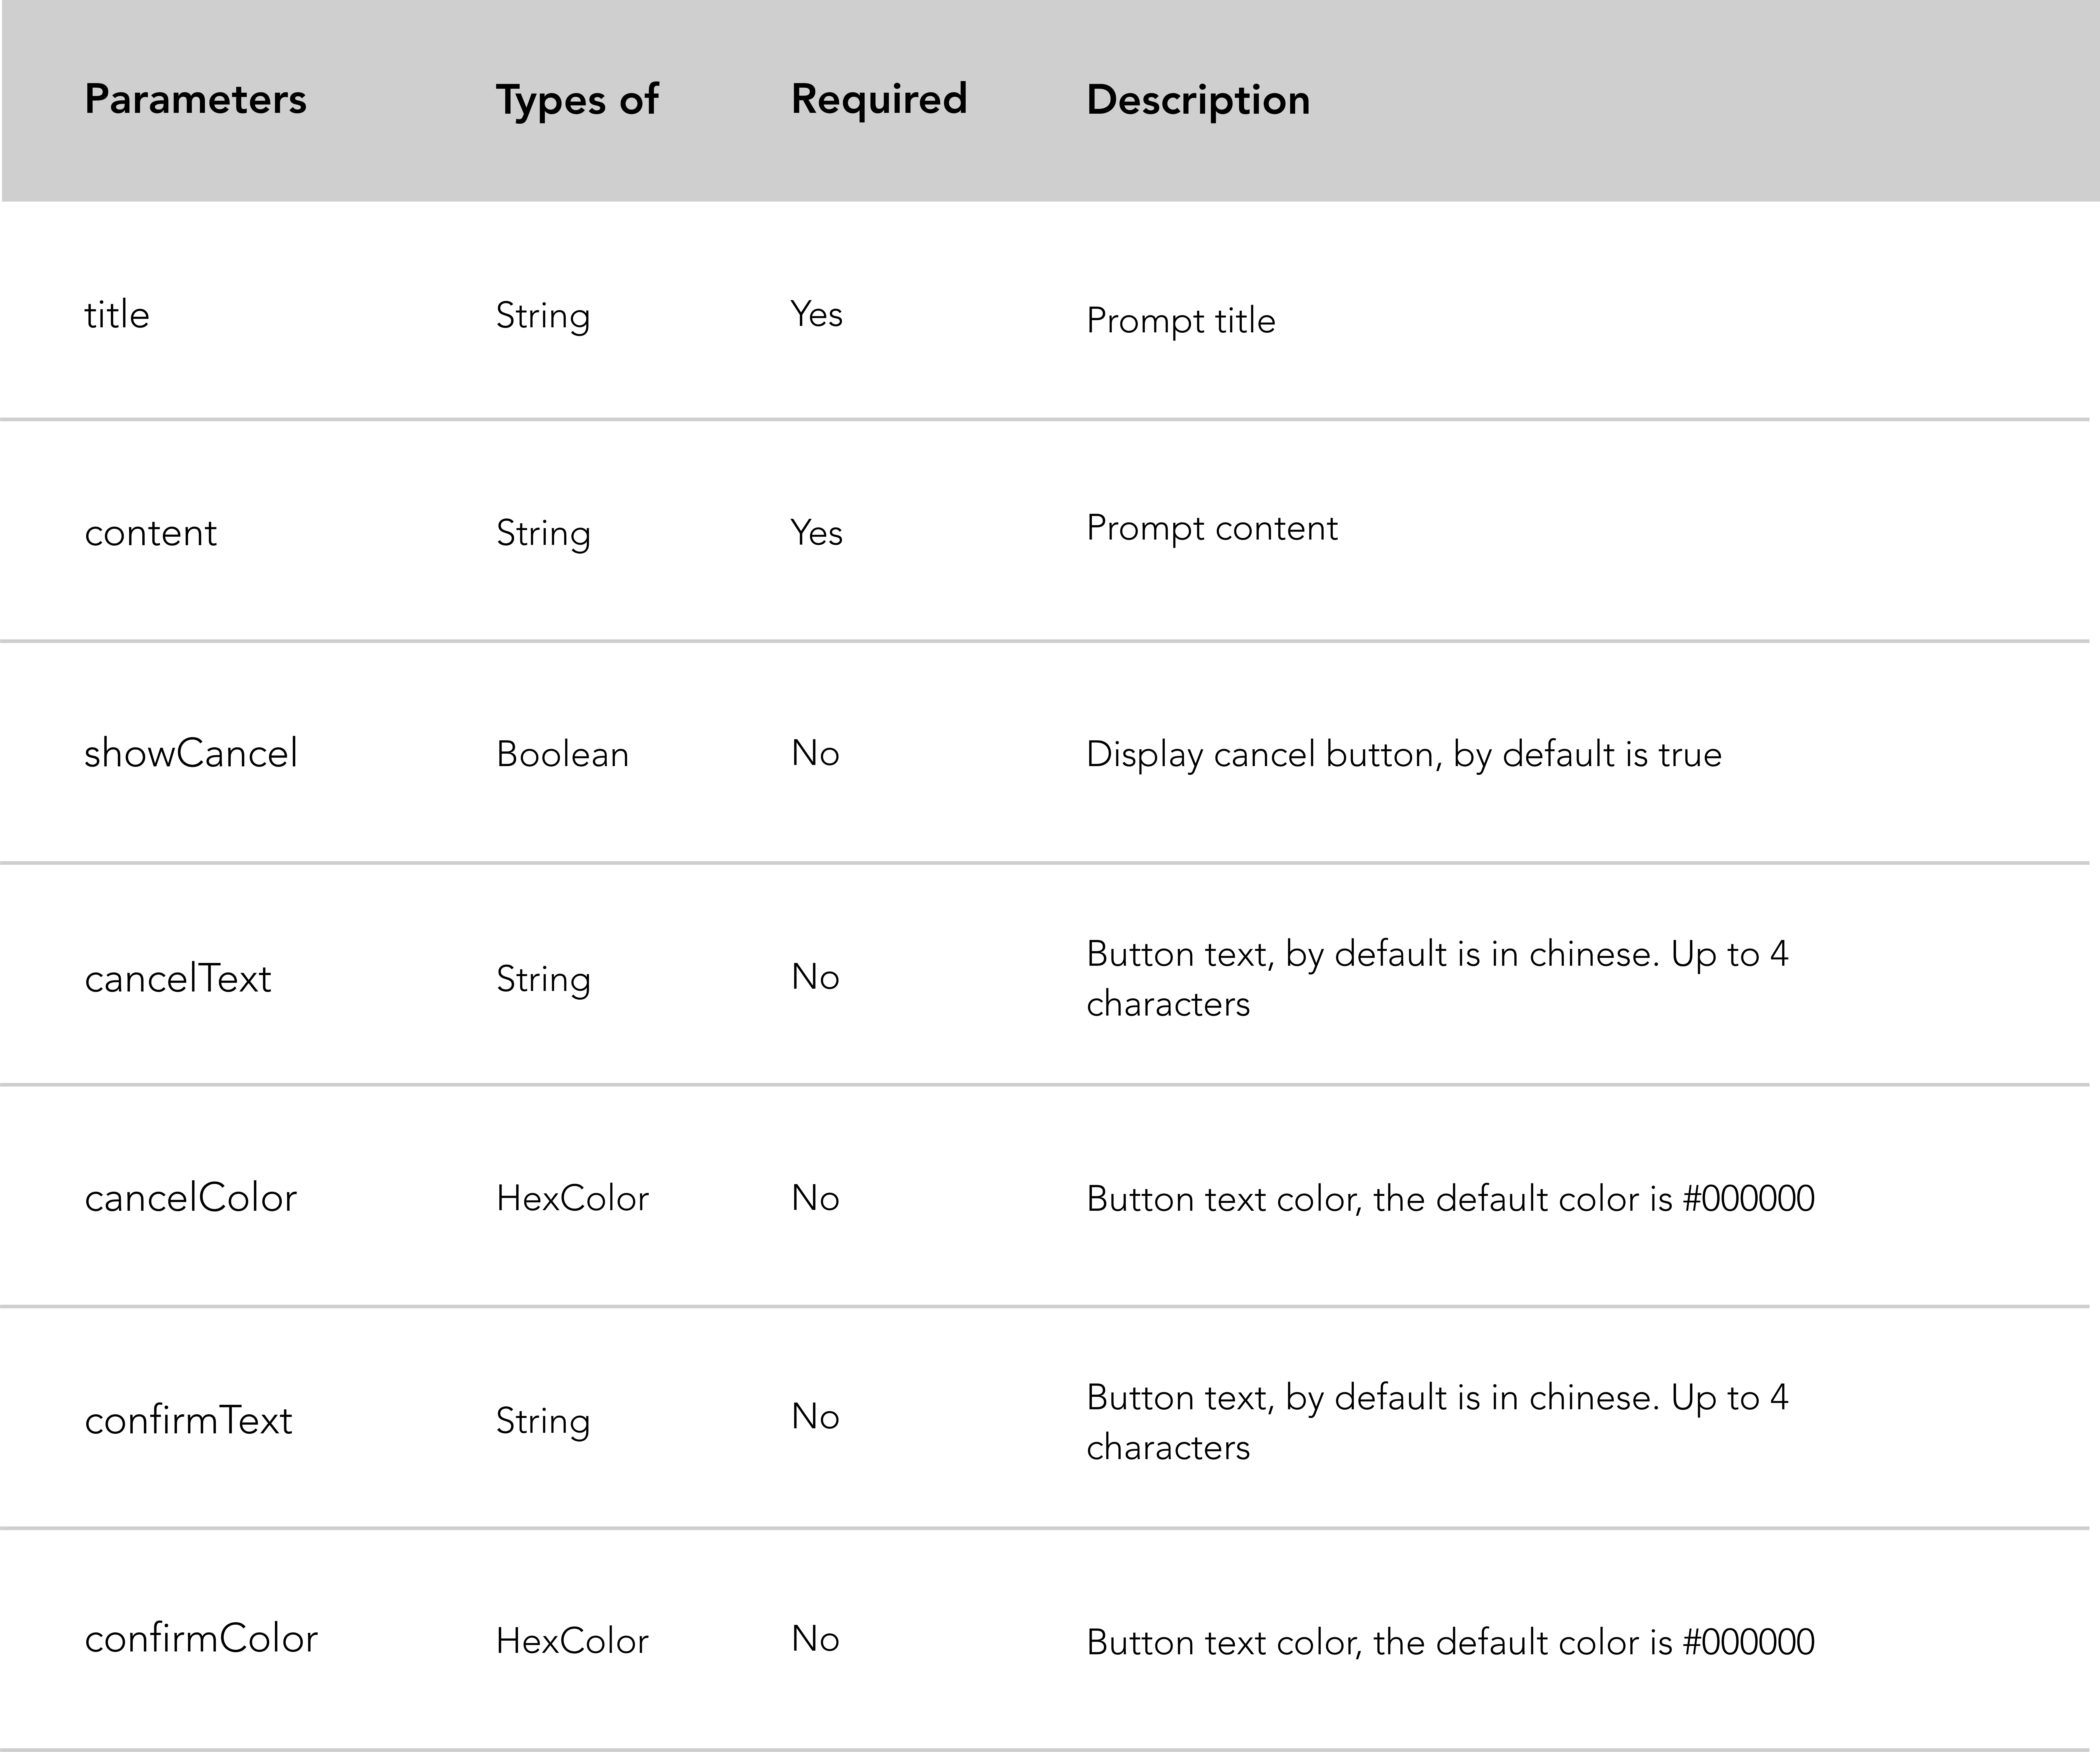
Modal parameters:
The map component is a native component, it has a long list of attributes, we will go through the major ones. Here is the link to WeChat documenation for more details.
map attribute list:
Code snippet "map component" example.
<map id="map" longitude="113.324520" latitude="23.099994" scale="14" controls="{{controls}}" bindcontroltap="controltap" markers="{{markers}}" bindmarkertap="markertap" polyline="{{polyline}}" bindregionchange="regionchange" show-location style="width: 100%; height: 300px;"></map>Refer to the Location-based services part of the wiki if you want to have a look on location-based services WeChat is offering through the API.
WeChat recommendations:
- Do not use scroll-view on map component.
- CSS animation on the map component is invalid.
wx.getLocationneed to specifytypeasgcj02
This section aims to explain the different steps you have to follow if you want to persist your app data and fetch data on a database. We selected Leancloud.cn for the simplicity of its installation for beginners.
Some context first: The example below is based on a Mini-program aimed at gathering feedbacks through a simple form. This mini-program persists the data collected on Leancloud.cn. We will explain how to fetch and display data stored on the DB. To illustrate this second section (fetch data) we created a new page that displays all reviews stored on Leancloud.
Here is the Github repository of the project used to create this tutorial.
Specs:
- Create a form.
- Setup Leancloud in your mini-program.
- Create an object and encapsulate data you want to persist.
- Create your table within Leancloud dashboard.
- Create a new review page and a button to redirect users to this review page.
- Fetch data from Leancloud and display reviews.
Code snippet "create a form" example.
<!-- pages/form/form.wxml -->
<form bindsubmit="bindFormSubmit">
  <view>About the workshop</view>
  <view>Generally how was this workshop?</view>
  <text>Hints: takeaway, speed, time, location, people...</text>
  <view>
   <textarea name="review" maxlength="-1" />
  </view>
  <!-- Refer to the Github repository above if you want the complete form -->
  <button type="primary" form-type="submit">Send</button>
 </form>
When the structure of the form is created as above, next we need to create the event which is trigerred by the form submission.
//pages/form/form.js
Page({
  data:{
    loading: false,
  },
  // Form Submission
  bindFormSubmit: function(e) {
    // Local storage
    var review = e.detail.value.review
    // ...
  }
})
Local storage:
In the bindFormSubmit function, we assigned user's inputs to local variables in the purpose of testing if we can collect form's user inputs locally.
Before we begin the installation, if you are in development white list your domain name by checking up the last checkbox of the project interface within your WeChat IDE . For specific debugging needs you can follow this Leancloud tutorial.
To get started with Leancloud setup, first create an account on Leancloud.
Now that you are ready for the installation and initialization of Leancloud in your mini-program you can follow their documentation that will let you go through a two-step process:
- The installation of the av-weapp-min.js in your utils folder.
- The initialization of the app by adding Leancloud
appIdandappKeyin your app.js.
// app.js
// Require Leancloud library (the av-weapp-min.js file you just add).
const AV = require('./utils/av-weapp-min.js');

// Initialization of the app
AV.init({
 appId: 't6hUVJfOwjHuWXuD9OE06rxxxxxxxxxxxx',
 appKey: 'HndT17mJ7wAIxsv8uxxxxxxxxxx',
});
If you are lost refer to the Github repository of the project.
In the first place, create a new folder called model and add a form.js file to this folder. Named your file in accordance with the kind of object you want to persist, in this case a form. This step is not required but permits to keep your files organised.
Let's create the object:
In the form.js file you just created, require av-weapp-min.js you installed in util.js and assigns it to an AV constant. Then instantiate the Form object.
Code snippet "require Leancloud and create an object" example.
// model/form.js
const AV = require('../utils/av-weapp-min.js');
class Form extends AV.Object {
}
// Register object
AV.Object.register(Form, 'Form');

// Export object
module.exports = Form;
Now that you have instantiated the Form object, create the form object to encapsulate data in the logical layer (here form.js) and redirect user after the form submission.
Code snippet "bindFormSubmit function" example.
const AV = require('../../utils/av-weapp-min.js');
const form = require('../../model/form.js');

// pages/form/form.js
bindFormSubmit: function(e) {
   // Local storage
   console.log(e)
   var review = e.detail.value.review
  // ...

   // Leancloud permissions
   var acl = new AV.ACL();
   acl.setPublicReadAccess(true);
   acl.setPublicWriteAccess(true);

   // Leancloud storage
   setTimeout(function(){
     new Form({
       review: review
       // ...
     }).setACL(acl).save().catch(console.error);

    // Redirect user
    wx.reLaunch({
      url: '/pages/wagon/wagon?form=1'
    });
    }, 2000);
  }
})
Code snippet debrief:
- Inside the
binFormSubmitfunction we added permissions that allow Leancloud to read and write through the object we created and want to persist. - We defined a function
setTimeoutthat encapsulate data in the newFormobject and redirect user when the form is submitted.
Note: setACL(acl) is a Leancloud built-in property.
So far everything is done within your mini-program, what remains to be done is a projection of the data collected within your Leancloud dashboard.
- Create a project in your Leancloud dashboard.
- Create a table in this project by adding the class object you created, such as a
Formclass in this exemple. - Add columns to your table (be cautionous on the data type you specify when you add your columns).
Test it to be sure that the data collected is persisted within your Leancloud dashboard.
First let me remind you the background of this section. We want to display in a new page the list of reviews we have collected and persisted on Leancloud. I assume that you have followed the first section of the tutorial, (if you missed it see above).
Specs:
- Create a new page called
review. - Fetch data from Leancloud and display all reviews stored.
So let's create a new review page and a button that redirects to review page. (tip: just add the route path to your app.json, the framework will create the new page folder and files by itself).
<!-- index.wxml -->
<!-- CTA redirects to review page -->
<view class="cta-margin">
 <navigator url="/pages/review/review" class="btn-index">Reviews</navigator>
</view>
The next step is to fetch data stored on Leancloud and displays it.
Code snippet "fetch data stored on Leancloud and displays it" example.
<!-- review.wxml -->
<block wx:for="{{forms}}" wx:for-item="form" wx:key="objectId">
 <text data-id="{{form.objectId}}" >
  {{form.review}}
 </text>
 <text>
  - {{form.name}}
 </text>
</block>
Above we created a list rendering block using wx:for that display each review and name of the person who creates the review.
// pages/review/review.js
// Require leancloud and object
const AV = require('../../utils/av-weapp-min.js');
const Form = require('../../model/form.js');

// Fetch data from Leancloud
Page({
  data: {
    forms: {}
  },
  onReady: function() {
    new AV.Query('Form')
      .descending('createdAt')
      .find()
      .then(forms => this.setData({ forms }))
      .catch(console.error);
  },
})
Code snippet debrief:
- We are doing a query on the
AVobject which contains the data stored. - Then we are sorting out each form according to its creation date to finish by setting up the
formsarray. - Display data in the view using the Mustache syntax.
In this use case we have just seen how to store data we collect locally to Leancloud and how to fetch data stored from Leancloud.
We recommend you to read the Leancloud documentation or check the LeanTodo mini-program created by Leancloud, Github repository.
When you are in production you have to configure Leancloud domain name within WeChat platform. Follow this leancloud tutorial.
All the user information you have access to through wx.getUserInfo:
wx.getUserInfo({
  success: function(res) {
    var userInfo = res.userInfo
    var nickName = userInfo.nickName
    var avatarUrl = userInfo.avatarUrl
    var gender = userInfo.gender //sex => 0: unknown ; 1: male ; 2:female
    var province = userInfo.province
    var city = userInfo.city
    var country = userInfo.country
  }
})
WeChat "quickstart" (WeChat boilerplate) gives you a getUserInfo function in the app.js file. As the name suggests, this function is meant to obtain user information. Let’s go through this function step by step.
General description:
getUserInfofunction has a parameter cb, which is also a function.- The
Ifblock ofgetUserInfofunction will be passed ifuserInfofromglobalDatais not null. - Otherwise
userInfois null,getUserInfofunction calls the login interface.
// app.js
App({
  getUserInfo:function(cb){
    var that = this
    if(this.globalData.userInfo){
      typeof cb == "function" && cb(this.globalData.userInfo)
    }else{
      // Login interface call
      wx.login({
        success: function () {
          wx.getUserInfo({
            success: function (res) {
              that.globalData.userInfo = res.userInfo
              typeof cb == "function" && cb(that.globalData.userInfo)
            }
          })
        }
      })
    }
  },
  globalData:{
    userInfo:null
  }
})
First case, userInfo form globalData is not null
The if condition statement aims to determine if cb argument passed to get getUserInfo is a function type and if it is, it will pass userInfo.
How do they figure out if cb parameter is a function?
// index.js
var app = getApp()
Page({
  data: {
    userInfo: {},
  },
  onLoad: function () {
    console.log('onLoad')
    var that = this
    app.getUserInfo(function(userInfo){
      that.setData({
        userInfo:userInfo
      })
    })
  }
}
Let's go through this onLoad function of index.js
- The
onLoadfunction callsgetUserInfofunction on the app instance. - They define a function as a parameter that update
userInfoto current user information. - And pass
userInfoupdated toglobalDatain the app.js file.
Second case, userInfo is null
- If
userInfois nullgetUserInfofunction returns theelsestatement which calls the login interface. - Then the current user successfully log in,
getUserInfois called and act as theifblock we saw above.
If current user is already log in, user information are assigned to globalData through index.js page which calls onLaod function. And then the same logic is applied.
Wechat mini-programs have a mechanism of cache in their API. In fact, each mini-program has its own local cache storage.
Reminder: Cache storage is used to store data we want to access quickly. It reduces user waiting time, since the request is satisfied from the local cache which is closer to clients compared to the original server used to request your DB.
Cache storage offers two kind of methods to store data in the cache:
- The synchronous method ,
wx.setStorage:
wx.setStorage ({key: 'name', data: 'Thibault'});wx.setStorage build parameters as a json, a key to specify the stored key and data to specify the key value to store.
- The asynchronous method,
wx.setStorageSync:
wx.setStorageSync ('name', 'Thibault');wx.setStorageSync syntax is simpler, parameters are directly passed. And can get data through the incoming callback function.
WeChat provides three main actions on the cache:
- Save data in the cache,
wx.setStorageorwx.setStorageSync. - Read data from the cache,
wx.getStorageorwx.getStorageSync. - Clear data of the cache,
wx.clearStorageorwx.clearStorageSync. - Remove data in the cache,
wx.removeStorageorwx.removeStorageSync.
Code snippet "set cache (synchronous method)" exemple.
<!-- index.wxml -->
<input style="input" placeholder="Input data" bindinput="inputEvent" />
<button type="warn" bindtap="saveToCache">Save data to cache</button>
<button type="primary" bindtap="jumpToPage">Jump to another page</button>
// index.js
Page({
data: {
inputInfo: ''
},
jumpToPage: function () {
wx.navigateTo({
url: "../show/show"
});
},
inputEvent: function (e) {
console.log(e.detail.value)
this.setData({
inputInfo: e.detail.value
})
},
saveToCache: function () {
wx.setStorage({ key: 'inputInfo', data: this.data.inputInfo,
success: function (res) {
console.log(res)
}
})
}
})Code snippet "Fetch data from the cache and display data in a new page (synchronous method)" exemple.
<!-- show.wxml -->
<view>Data you saved to cache:{{inputInfo}}</view>
// show.js
Page({
data: {
inputInfo: ''
},
onLoad: function (options) {
var that = this;
wx.getStorage({
key: 'inputInfo',
success: function (res) {
console.log(res)
that.setData({
inputInfo: res.data,
})
}
})
}
})You can call up your client code scanner UI by using the wx.scanCode API. It gives direct access to the WeChat scanner through a CTA button with the aim of scanning a QR code.
Code snippet "call up client code scanner" example.
<!-- .wxml -->
<view class="btn-area">
 <button bindtap="bindScan">Scan</button>
</view>
// .js
bindScan: function () {
console.log('scanner')
wx.scanCode({
success: (res) => {
console.log(res)
}
})
}WeChat API provides a full set of location-based services:
wx.chooseLocationto choose the location you want to display.wx.getLocationto get current user location.wx.openLocationto display location on their buit-in map view.wx.createMapContextto personalize your map.
Code snippet "get location" example.
<!-- .wxml -->
<button type="primary" bindtap="listenerBtnGetLocation">Get location</button>
// .js
listenerBtnGetLocation: function () {
wx.getLocation({
type: 'wgs84',
success: function(res) {
var latitude = res.latitude
var longitude = res.longitude
var speed = res.speed
var accuracy = res.accuracy
console.log(res)
}
})
}Above we used the wx.getLocation to retrieve current user position by getting his latitude and longitude.
wx.getLocation further details:
If a user leaves the mini-program but display on top of his chat the mini-program you can continue to call wx.getLocationand so get user location continiously.
Display the current user location on WeChat built-in map:
wx.openLocationAPI call, enables the opening of WeChat built-in map view in order to display the location you got from listenerBtnGetLocation function we created above.
Note: wx.openLocation API call, redirects user to a new map window.
Code snippet "display the current user location" example.
// .js
listenerBtnGetLocation: function () {
 wx.getLocation({
 type: 'wgs84',
 success: function(res) {
   var latitude = res.latitude
   var longitude = res.longitude
   wx.openLocation({
     latitude: latitude,
     longitude: longitude,
     scale: 28
   })
  }
 })
}WeChat image API offers four possibilities:
wx.chooseImageto choose an image from your album or camera.wx.previewImageto preview the image before the upload on the app.wx.getImageInfoto get image information (height, width, path, src).wx.saveImageToPhotosAlbumto save image from the mini-program to your album.
In the example below we create a function called listenerBtnChooseImage with the aim of calling user album or camera by using wx.chooseImage. Then we are using wx.getImageInfo to get image information.
Code snippet "upload an image from album or camera" example.
<!-- .wxml -->
<button type="primary" bindtap="listenerBtnChooseImage">Upload Image</button>
<!-- Display the image user upload -->
<image src="{{src}}" mode="aspecFill"  bindlongtap="imgLongTap"/>
// .js
Page({
data: {
src: []
},
listenerBtnChooseImage: function () {
var that = this
// Upload an image
wx.chooseImage({
count: 1,
sizeType: ['original', 'compressed'],
sourceType: ['album', 'camera'],
success: function (res) {
console.log('success')
that.setData({
src: res.tempFilePaths
})
// Get image info
wx.getImageInfo({
src: res.tempFilePaths[0],
success: function (res) {
console.log(res.width)
console.log(res.height)
console.log(res.path)
}
})
}
})
}
})Now that we have an image on the page let's save the image from the mini-program to current user album by long tapping the image.
Code snippet "long tap the image to save it within user album" example.
<!-- .wxml -->
<image src="{{src}}" mode="aspecFill"  bindlongtap="imgLongTap"/>
// .js
Page({
data: {
src: []
},
listenerBtnChooseImage: function () {
var that = this
// Upload an image
wx.chooseImage({
count: 1,
sizeType: ['original', 'compressed'],
sourceType: ['album', 'camera'],
success: function (res) {
console.log('success')
that.setData({
src: res.tempFilePaths
})
// Get image info
wx.getImageInfo({
src: res.tempFilePaths[0],
success: function (res) {
console.log(res.width)
console.log(res.height)
console.log(res.path)
}
})
}
})
} ,
// Longtap function
imgLongTap: function (){
// Save image to album
wx.saveImageToPhotosAlbum({
filePath: this.data.src,
success(res) {
wx.showToast({
title: 'Save',
icon: 'success',
duration: 1500
})
console.log('success')
}
})
}
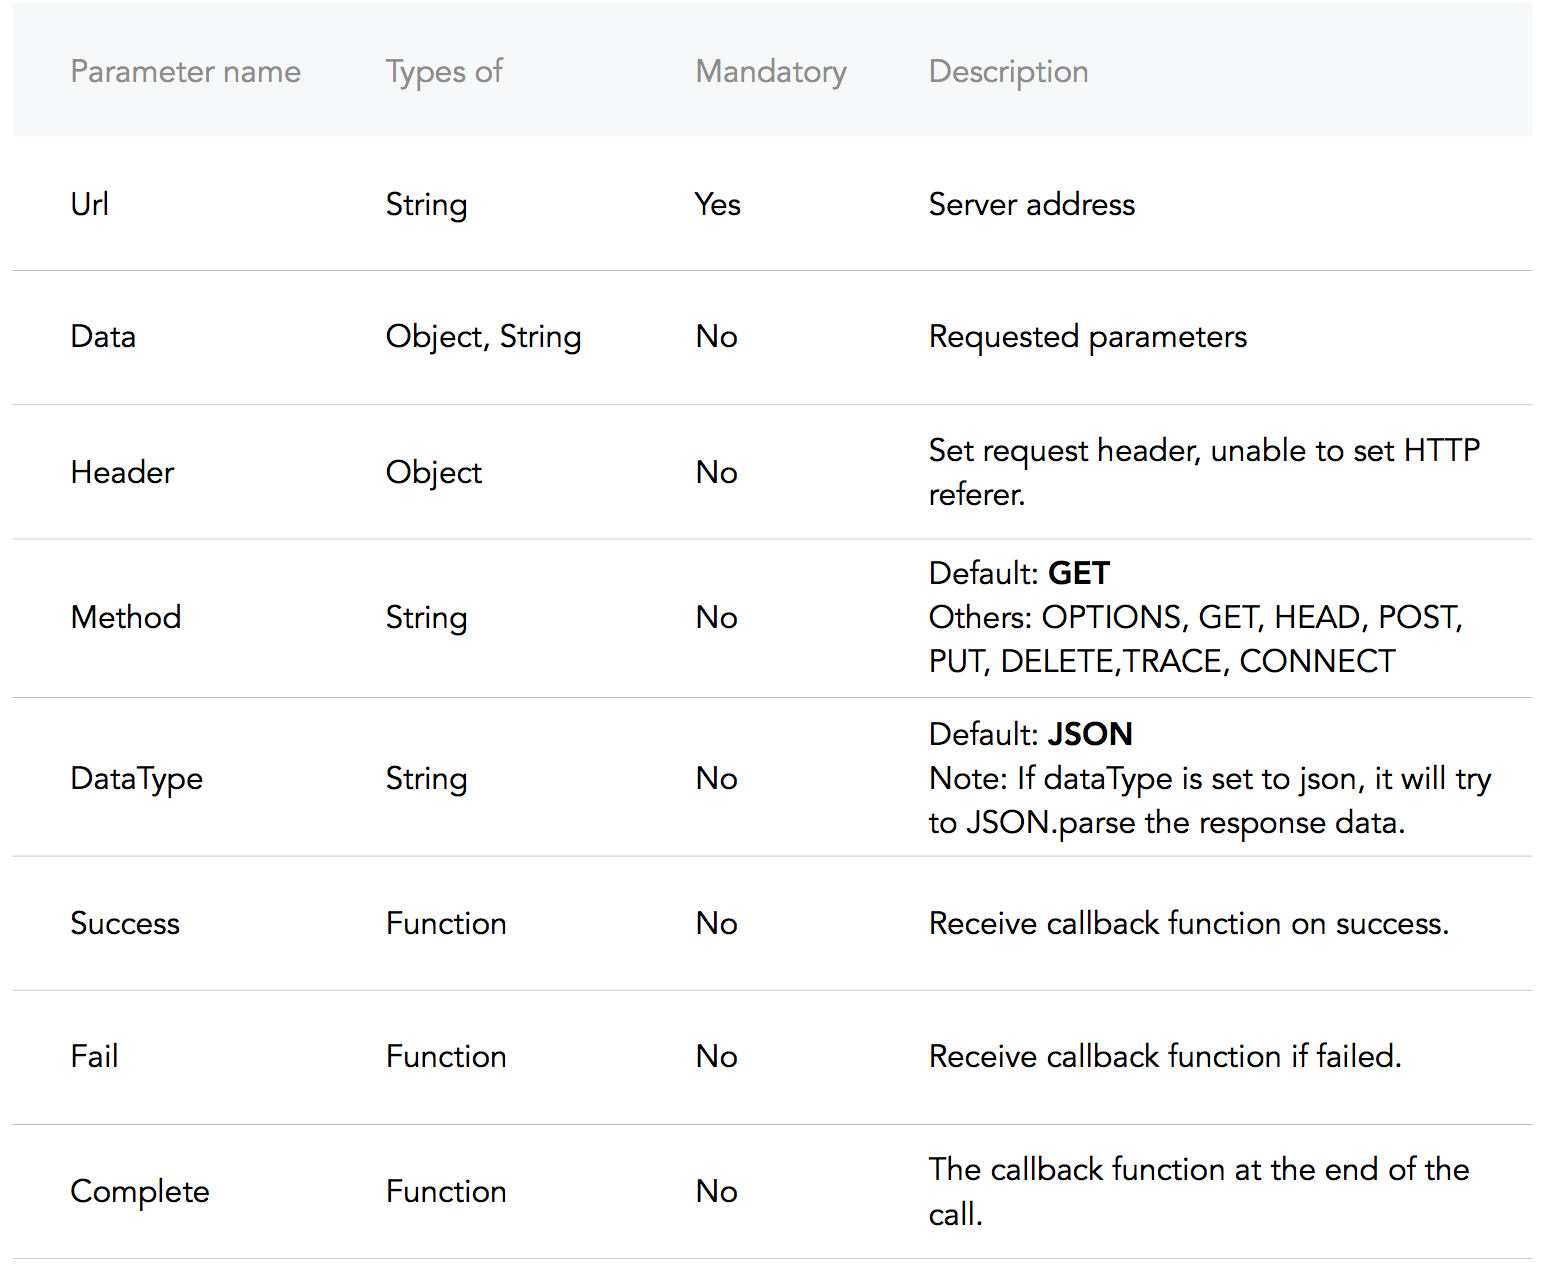
})WeChat network api offers common HTTPS requests, WebSocket, upload and download files.
wx.requestto make a standard HTTPS request.wx.uploadFileto upload a file to the appointed server.wx.downloadFileto download a file from the appointed server.
In the example below we have one function and one event handler: addNewPost and onPullDownRefresh respectively, as their name states, you should be able to add a new post and get posts using a wx.request call.
Code snippet "making a POST HTTPS request" example.
<!-- .wxml -->
<!-- Add Posts -->
<input confirm-type="send" bindconfirm="addNewPost" placeholder="Add a new post!"/>
// .js
Page({
data: {
posts: []
},
addNewPost: function (e) {
var that = this
var message = e.detail.value
// Add a new post
wx.request({
url: 'example.php', // just an example address
method: 'post',
data: {
post: {
content: message
}
},
header: {
'content-type': 'application/json'
}
})
}
})Now that we've posted, let's get and display it to the view layer. For simplicity sake we'll take advantage of onPullDownRefresh to reload new posts.
Code snippet "making a GET HTTPS request" example.
<!-- .wxml -->
<!-- Display Posts -->
<block wx:for="{{posts}}" wx:for-item="post">
	<text>{{post.content}}</text>
</block>

<!-- Add Posts -->
<input confirm-type="send" bindconfirm="addNewPost" placeholder="Add a new post!"/>
// .js
Page({
data: {
posts: []
},
addNewPost: function (e) {
var that = this
var message = e.detail.value
// Add a new post
wx.request({
url: 'example.php', // just an example address
method: 'post',
data: {
post: {
content: message
}
}
})
},
// onPullDownRefresh must first be enabled in the config.
onPullDownRefresh: function () {
var that = this
// by default the request is a GET.
wx.request({
url: 'example.php',
header: {
'content-type': 'application/json'
},
success: {
that.setData({
posts: res.data // Set the Page data for posts to the response data.
})
}
})
}
})All along our mini-programs creation path we encountered issues and questions, we want to share with you. If you had some issues you want to share, reach out us.
WeChat allows only API that have an ICP license, so you can forget about most of the APIs you are familiar with in western countries.
Here is a directory of APIs available in China, check it out.
Image ressources cannot be obtained through the CSS background-image: url(../../images/banner.png);. I know it is dreadful, but we have to deal with it.
There are two ways to bypass this frustration:
-
You can use the CSS
background-image:but you can't use a realtive path, you have to encode your image in base64 and then pass it to to thebackground-image: url(base64 image);. Here is a tool to encode images in base64. -
Or you can use the
<image>tag and treat images with<image>tag attribute likemode. WeChat has 13 modes, 9 are cutting mode and 4 are zoom mode. Here is a link to the documenation.
RPX stands for responsive pixel which is the unit of WeChat mini-programs. According to the official definition, rpx is based on the adaptive screen width.
In fact RPX unit is based on the rem unit which stands for "root em". Why not em unit?
The em unit is relative to the font-size of the parent, which causes compounding issue. The rem unit is relative to the root element which conteracts the compounding issue (font sizing duty).
However, to come back to rpx unit, rpx advantages are:
- It scales according to the width of the ratio (screen width) which makes the experience more responsive.
- It facilitates the realization of high-definition, 1 pixel line.
- Well suported on mobile and tablet devices.
Are you working on a mini-program? Do reach out to us if you’d like to share your work, meet our crew, ask for help!
If you want to contribute, you can send a Pull Request here or give us a shout on shanghai(at)lewagon.com for suggestions!
