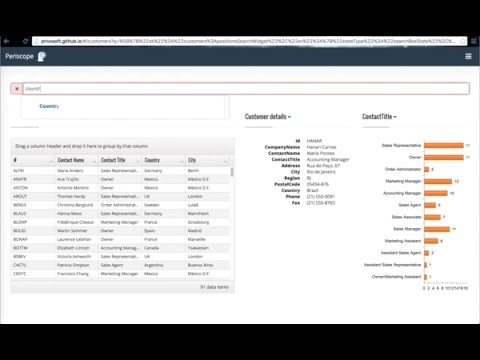
Periscope is a framework for building highly dynamic data discovery and integration dashboards.
When a developer is tasked with building a modern web application he is faced with a myriad of choices. There are numerous commercial Business Intelligence (BI) products, but they cost money and tie you in with the vendor. You can take a stab and building a web application from scratch, but given the fast evolution of web technologies this a rather risky exercise with uncertain outcome, with significant time to be invested into researching the crop of latest and greatest libraries, languages, tooling etc.
Periscope was born out of many years of building modular enterprise dashboard applications, but re-imagined for the latest technology trends as of 2016:
- web: single page app
- easy discovery of data: google like search interface to enable natural data discovery
- highly composable interface to allow seamless navigation between related data
After spending some time researching various frameworks we have determined that a relative newcomer, Aurelia, had the right design philosophy and technical capabilities that would allow us to build extensible, future-proof (as far as this things go (5 years?)) foundation for building a variety of applications.
To keep up to date on Aurelia, please visit and subscribe to the official blog. If you have questions, we invite you to join us on Gitter. If you would like to have deeper insight into our development process, please install the ZenHub Chrome Extension and visit any of our repository's boards. You can get an overview of all Aurelia work by visiting the framework board.
To run the app, follow these steps.
- Ensure that NodeJS is installed. This provides the platform on which the build tooling runs.
- From the project folder, execute the following command:
npm install- Ensure that Gulp is installed. If you need to install it, use the following command:
npm install -g gulp- Ensure that jspm is installed. If you need to install it, use the following command:
npm install -g jspmNote: jspm queries GitHub to install semver packages, but GitHub has a rate limit on anonymous API requests. It is advised that you configure jspm with your GitHub credentials in order to avoid problems. You can do this by executing
jspm registry config githuband following the prompts.
- Install the client-side dependencies with jspm:
jspm install -yNote: Windows users, if you experience an error of "unknown command unzip" you can solve this problem by doing
npm install -g unzipand then re-runningjspm install.
-
Install Kendo-UI pro or eval libraries (we use their grids because they have a lot of features, but Periscope will work with anything). Simply drop the files into
local-packages/kendofolder. -
Install and run JetBrains Hub https://www.jetbrains.com/hub/
-
Install the local server as it is described here https://github.com/privosoft/periscope-auth-server
-
Run configuration task
gulp setup-
Right after the configuration task is complete you need to sigh in to your Jetbrains Hub as admin and create a new Hub user with role 'periscope-developer'
-
Then you need to update your app and local server with the Hub service ClientId and Secret:
- Sigh in to your local Jetbrains Hub as admin
- Open "More Settings" -> "Services" -> Periscope.
- Copy Periscope service ID and secret
- Open the local server configuration file ([periscope-auth-server]/config/config.development.js) and find the following keys config.JETBRAINSHUB_CLIENTID and config.JETBRAINSHUB_SECRET. You need to update these two constants with the Hub service ID and secret.
- Open the demo app configuration file ([periscope-demo-app]/src/config/auth-config.js). Update identSrv -> clientId with the new clientID and add this id into the identSrv -> scope array.
-
Run the local server as it is described here https://github.com/privosoft/periscope-auth-server Please, keep it running while you are playing with periscope-demo-app.
-
To run the app, execute the following command:
gulp watch- Browse to http://localhost:9000 to see the app. You can make changes in the code found under
srcand the browser should auto-refresh itself as you save files.
Note: At present there is a bug in the HTMLImports polyfill which only occurs on IE. We have submitted a pull request to the team with the fix. In the mean time, if you want to test on IE, you can work around the issue by explicitly adding a script tag before you load system.js. The script tag should look something like this (be sure to confirm the version number):
<script src="jspm_packages/github/webcomponents/webcomponentsjs@0.5.2/HTMLImports.js"></script>- You have to create subfolders for each dependent package. Each subfolder name should be the same as package name without the prefix "periscope-" . So your directory srtucture should look as follows:
+-- periscope
|   +-- demo-app
|   +-- framework (for periscope-framework)
|   +-- ui  (for periscope-ui)
|   +-- elastic-search
|   +-- widgets-datatables
|   +-- etc.
-
Run 'git clone', 'npm install' and 'jspm install' for each dependent package.
-
Run gulp watch for demo-app
gulp watch- If you made some changes in any of the dependent package and want to check how they influence on periscope-demo-app behavior just run the following gulp command:
gulp build-dev-envand right after 'build-dev-env' finished working run the following:
gulp update-own-depsTo run the unit tests, first ensure that you have followed the steps above in order to install all dependencies and successfully build the library. Once you have done that, proceed with these additional steps:
- Ensure that the Karma CLI is installed. If you need to install it, use the following command:
npm install -g karma-cli- Install Aurelia libs for test visibility:
jspm install aurelia-framework
jspm install aurelia-http-client
jspm install aurelia-router- You can now run the tests with this command:
karma startIntegration tests are performed with Protractor.
- Place your E2E-Tests into the folder
test/e2e/src - Install the necessary webdriver
gulp webdriver_update-
Configure the path to the webdriver by opening the file
protractor.conf.jsand adjusting theseleniumServerJarproperty. Typically its only needed to adjust the version number. -
Make sure your app runs and is accessible
gulp watch- In another console run the E2E-Tests
gulp e2e