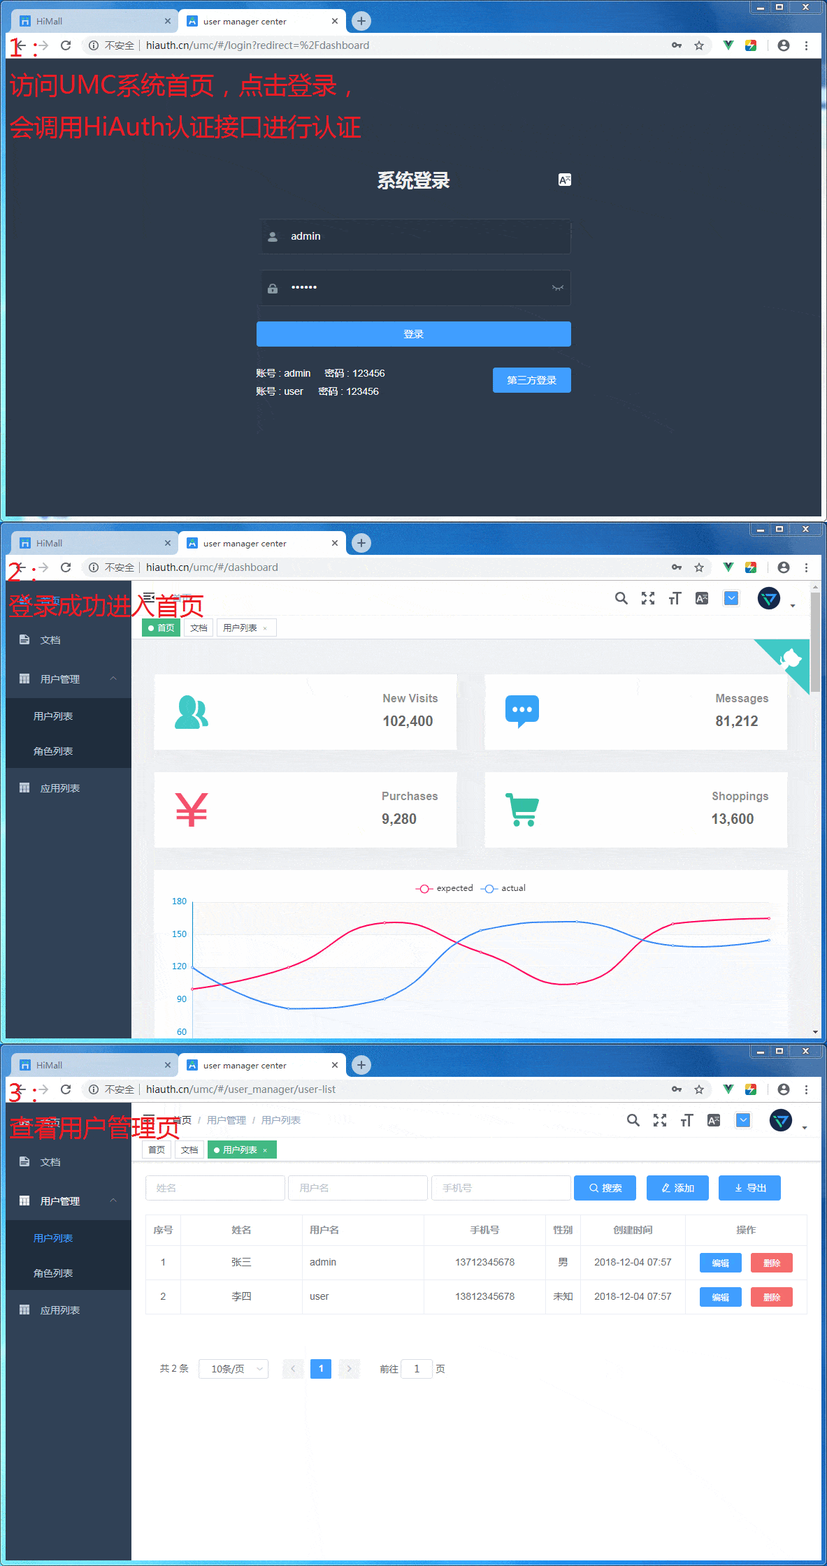
HiAuth是一个开源的基于Oauth2协议的认证、授权系统,除了标准的Oauth2授权流程功能外,还提供了应用管理、用户管理、权限管理。
另外,提供了一个HiMall项目,供用户参考如何集成。 参考HiMall项目,你可以快速的启动一个微服务项目的框架搭建,亦可以在这里找到一些技术的最佳实践,为你的项目开发提供参考。
如果你觉得此项目有价值,请给我点个star,谢谢!
├─doc                  文档目录,架构设计、数据库设计...
├─hi-auth-front        HiAuth项目的前端代码
├─hi-auth-web          HiAuth项目的后端代码
├─hi-mall              HiMall项目,一个集成HiAuth认证、授权的Demo项目(基于Springboot的微服务)
- 这个项目可以帮你实现基于Oauth2协议的统一认证、授权系统
- 这个项目可以帮助你快速的启动一个基于spring技术栈的微服务框架搭建
- 如果你仅仅使用到了Oauth2协议的统一认证、授权系统功能,那么你用技术可以是除java外的技术栈
- password模式下,HiAuth支持了用户名密码、手机号短信两种认证方式
- 发送短信、登录接口实现了图形验证码防刷功能
- HiAuth是一个前后端分离项目,前端使用了vue、element-ui技术,参考这个项目,你可以快速的开启集成开发
- HiMall是一个基于Springboot技术的微服务项目,参考此项目,你可以快速的开启一个微服务项目搭建
- HiMall微服务的认证、授权由HiAuth统一控制和管理
- 基于Springboot项目更容易集成到多个平台(SpringCloud、K8S、Istio)
- 演示了如何通过starter扩展功能(Swagger2、Monitor)
- 演示了如何统一控制接口规范
- 演示了如何规范异常处理
- 演示了如何规范使用Mybaits、分页
- 演示了单元测试、mock测试、测试数据回滚,包括对controller、service的测试
- 演示了Swagger2集成oauth2服务
- HiMall
- UMC
- HiMall: http://hiauth.cn/himall
- UMC: http://hiauth.cn/umc
- Swagger2:http://hiauth.cn/hiauth/swagger-ui.html
- JDK8+
- MySQL5+
- NodeJS v8.11.2+
- Redis
>git clone https://github.com/bestaone/HiAuth.git
在你的mysql数据库中创建库hiauth,并执行下面脚本:
HiAuth\doc\db\hiauth.sql
需要调整的配置有数据库、redis。默认会使用native.properties配置,如果和你的环境不一致,请修改:
# HiAuth\hi-auth-web\src\main\properties\native.properties

hiauth.database.url=jdbc:mysql://127.0.0.1:3306/hiauth?characterEncoding=UTF-8&serverTimezone=UTC
hiauth.database.username=root
hiauth.database.password=123456

hiauth.redis.host=127.0.0.1
hiauth.redis.port=6379
hiauth.redis.database=11
hiauth.redis.password=
# 编译后台,会执行单元测试,需要正确配置数据库和redis
>cd HiAuth\hi-auth-web
>mvn clean install
>mvn spring-boot:run

# 打包前端
>cd HiAuth\hi-auth-front
>npm install
>npm run dev
- 访问HiAuth的Swagger2地址:http://localhost:8181/hiauth/swagger-ui.html
- 直接测试接口,显示未认证
{
  "error": "unauthorized",
  "error_description": "Full authentication is required to access this resource"
}
- 点击认证按钮,会被重定向到登录,输入账号登录进行认证
- 认证成功后被重定向回swagger2页面
- 再次测试接口,获取正确数据
参考 [HiMall项目]
注意:如果授权环节不出现,可以清除下数据库的数据(clientdetails、oauth_access_token、oauth_approvals、oauth_client_token、oauth_code、oauth_refresh_token)
- 使用POST访问获取access_token接口,设置grant_type=password
- 正常访问后返回 json 格式的 token
{
    "access_token": "cc1900b0-e5cb-46a5-b866-ed7b51490099",
    "token_type": "bearer",
    "refresh_token": "a15f5797-2c74-4cf0-a2c0-9408594615fd",
    "expires_in": 1799,
    "scope": "AUTH GOODS ORDER"
}
- 使用GET访问 [http://localhost:8181/hiauth/api/user/1],返回401,未授权
{
    "error": "unauthorized",
    "error_description": "Full authentication is required to access this resource"
}
- 使用GET访问 [http://localhost:8181/hiauth/api/user/1],在请求头添加凭证 Authorization Bearer {access_token},能获取到数据
{
    "code": 10000,
    "data": {
        "id": 1,
        "name": "张三",
        "gender": "MALE",
        "username": "admin",
        "password": "123456",
        "tel": "13712345678",
        "createTime": 1543831032000
    }
}
- 使用POST访问获取access_token接口,设置grant_type=client_credentials
- 正常访问后返回 json token
{
    "access_token": "79af8a11-2bd7-4109-be2c-6c0d8ca0c42f",
    "token_type": "bearer",
    "expires_in": 1799,
    "scope": "AUTH"
}
- 使用GET访问 [http://localhost:8181/hiauth/api/user/1],返回401,未授权
{
    "error": "unauthorized",
    "error_description": "Full authentication is required to access this resource"
}
- 使用GET访问 [http://localhost:8181/hiauth/api/user/1],在请求头添加凭证 Authorization Bearer {access_token},能获取到数据
{
    "code": 10000,
    "data": {
        "id": 1,
        "name": "张三",
        "gender": "MALE",
        "username": "admin",
        "password": "123456",
        "tel": "13712345678",
        "createTime": 1543831032000
    }
}
- 使用POST访问获取access_token接口,设置grant_type=password,scope=ORDER
- 返回的 json token 的权限范围是 ORDER
{
    "access_token": "70fe40ee-4d61-40a2-b999-e19379116ef1",
    "token_type": "bearer",
    "refresh_token": "056cfe3a-38b9-4d42-b4fa-818a17960468",
    "expires_in": 1799,
    "scope": "ORDER"
}
- 使用GET访问 [http://localhost:8181/hiauth/api/user/1],在请求头添加凭证 Authorization Bearer {access_token},被拒绝(这个接口设置了需要AUTH权限)
{
    "error": "insufficient_scope",
    "error_description": "Insufficient scope for this resource",
    "scope": "AUTH"
}
所有的localhost不能使用127.0.0.1代替,因为auth会检查域名的合法性,数据库中登记的是localhost
这里为HiAuth的集成、使用提供了一个Demo项目HiMall。
HiMall是基于Springboot技术的微服务项目,其集成了HiAuth的认证、授权。
HiMall项目包含三个可运行项目,其中两个微服务项目(hi-mall-microsvr-order、hi-mall-microsvr-goods)、一个web项目(hi-mall-web)
- JDK8+
- MySQL5+
- HiAuth
这个项目包含两个数据库。 创建这两个库goods、order,然后,分别执行如下数据库脚本
- HiAuth\hi-mall\doc\db\goods.sql
- HiAuth\hi-mall\doc\db\order.sql
#编译、构建项目
>cd HiAuth\hi-mall
>mvn clean install

#启动goods微服务
>cd hi-mall-microsvr-goods
>mvn spring-boot:run

#启动order微服务
>cd hi-mall-microsvr-order
>mvn spring-boot:run

#启动HiMall聚合服务
>cd hi-mall-web
>mvn spring-boot:run
- 访问地址:http://localhost:8182/himall
- 点击Login,会被重定向到HiAuth系统进行认证
- 认证通过后会被重定向回HiMall,此时HiMall也将持有登录状态
待续...
- 安装配置镜像仓库harbor 将pom.xml中的仓库地址换成你自己的仓库
<docker.repostory>registry.tfit.com</docker.repostory>
- 编译、构建、创建镜像
# hi-auth-web
>cd HiAuth\hi-auth-web
>mvn clean install -Pk8s
>mvn docker:build

# hi-mall
>cd HiAuth\hi-mall
>mvn clean install -Pk8s

# hi-mall-web
>cd hi-mall-web
>mvn docker:build

# hi-mall-microsvr-goods
>cd hi-mall-microsvr-goods
>mvn docker:build

# hi-mall-microsvr-order
>cd hi-mall-microsvr-order
>mvn docker:build

# mvn docker:build 会自动将镜像推送到服务器
- 安装namespace、mysql、redis、ingress
kubectl create -f HiAuth\doc\k8s\1.namespace.yml
kubectl create -f HiAuth\doc\k8s\2.redis.yaml
kubectl create -f HiAuth\doc\k8s\3.ingress.yaml
- 安装数mysql据库
# 安装
kubectl create -f HiAuth\doc\k8s\4.mysql.yaml

# 查看
docker ps

# 进入mysql容器
docker exec -it bc1c0034fbf7 /bin/bash

# 登录mysql
mysql -h127.0.0.1 -uroot -p123456

# 开启远程登录
alter user 'root'@'%' identified with mysql_native_password by'root';
alter  user 'root'@'%' identified by '123456';
- 安装数HiAuth
kubectl create -f HiAuth\doc\k8s\5.hi-auth-web.yaml
kubectl create -f HiAuth\doc\k8s\6.hi-mall-microsvr-goods.yaml
kubectl create -f HiAuth\doc\k8s\7.hi-mall-microsvr-order.yaml
kubectl create -f HiAuth\doc\k8s\8.hi-mall-web.yaml
- 修改host
# 对应k8s主机ip
10.6.1.40  			hiauth.k8s
10.6.1.40  			himall.k8s
本项目执行 MIT 协议
如果群二维码失效了,请先添加我的微信,然我我拉你入群。


