Immerse yourself in the classic strategy game of Battleships, where you strategically position your fleet and attempt to sink your opponent's ships before they sink yours. This game was created as a portfolio project to showcase my current Python skills. A live version of the project can be viewed here.
- Colorful terminal-based interface with ASCII art.
- Interactive gameplay against a computer opponent.
- Customizable grid sizes, ranging from 4x4 to 10x10.
- Three types of ships: Battleship, Cruiser, and Destroyer.
- The ability to exit the game at any point by entering "exit" or "quit".
Run the game and choose a grid size, which can range from 4x4 to 10x10. Place your ships on the grid. You will be prompted to position each type of ship and choose an orientation (horizontal or vertical).
Players take turns guessing the positions of the opponent's ships on the grid. Enter your shot's coordinates when prompted. For instance, "A 1". A 'Hit' is marked with an 'X', and a 'Miss' is marked with an 'O'.

The game continues until all ships of one player are sunk. If you sink all the computer's ships first, you win! But if the computer sinks all your ships first, you lose.
You can exit the game at any point by entering "exit" or "quit" when prompted for input.

- Battleship: 4 spaces, represented by a Cyan 'B'.
- Cruiser: 3 spaces, represented by a Magenta 'C'.
- Destroyer: 2 spaces, represented by a Yellow 'D'.

-
As a player, I want to start a new game so that I can enjoy the Battleships experience from the beginning.
-
As a player, I want to select the grid size (ranging from 4x4 to 10x10) so that I can choose the complexity and duration of the game.
-
As a player, I want to manually place my ships on the grid so that I can strategize the best positions to defend against the computer.
-
As a player, I want to take turns with the computer guessing ship positions so that I can engage in a competitive match to sink the opponent's fleet.
-
As a player, I want to receive visual feedback (like 'Hit' or 'Miss') after each turn so that I can adjust my strategy based on the game's progress.
-
As a player, I want to be notified when all ships of one side are sunk so that I can know if I've won or lost the game.
-
As a player, I want the option to exit the game at any point so that I can leave the game when needed without having to finish the match.
ASCII Art Title:
The game showcases the title "Battleships" in ASCII art at the start, offering an immersive and retro feel to the game.

Interactive Grid Setup:
Players can select the size of the grid they want to play on, ranging from 4x4 to 10x10.
Colorful Terminal Interface:
Utilizes the colorama library to display ships and game feedback in various colors, enhancing the visual experience.

Different Ship Types:
The game features three types of ships, each with its own size and icon:
- Battleship: 4 spaces
- Cruiser: 3 spaces
- Destroyer: 2 spaces
Manual Ship Placement:
Players are prompted to manually place their ships on the grid, allowing them to strategize their ship's positions.

Computer Opponent:
Players compete against a computer opponent that places ships and takes shots randomly.
Turn-based Gameplay:
The game progresses in turns, with the player and the computer alternately guessing ship positions.
Visual Feedback on Hits and Misses:
When a shot is taken, the game provides visual feedback on whether it's a hit or miss. Hits are marked with a red 'X' and misses with 'O'.
Endgame Notifications:
The game notifies the player when all ships of one side are sunk, declaring either a victory or a defeat.
Repeatability:
After a game concludes, players are given the option to restart and play again.
Exit Command: Players can type "exit" or "quit" at any point during the game to immediately exit the game.
Instructions Display: The game provides clear instructions at the start, explaining the gameplay, ship identification, and objectives.
Example Grid Display: Before starting the game, players are shown an example of a 10x10 grid to familiarize themselves with the layout.
- Multiplayer option for the game.
- Option to choose whether to input rows and columns or coordinates in the format A 1 H according to the player's preference.
- Keeping scores for the player and computer.
-
Python was used as the programming language to code the game logic.
-
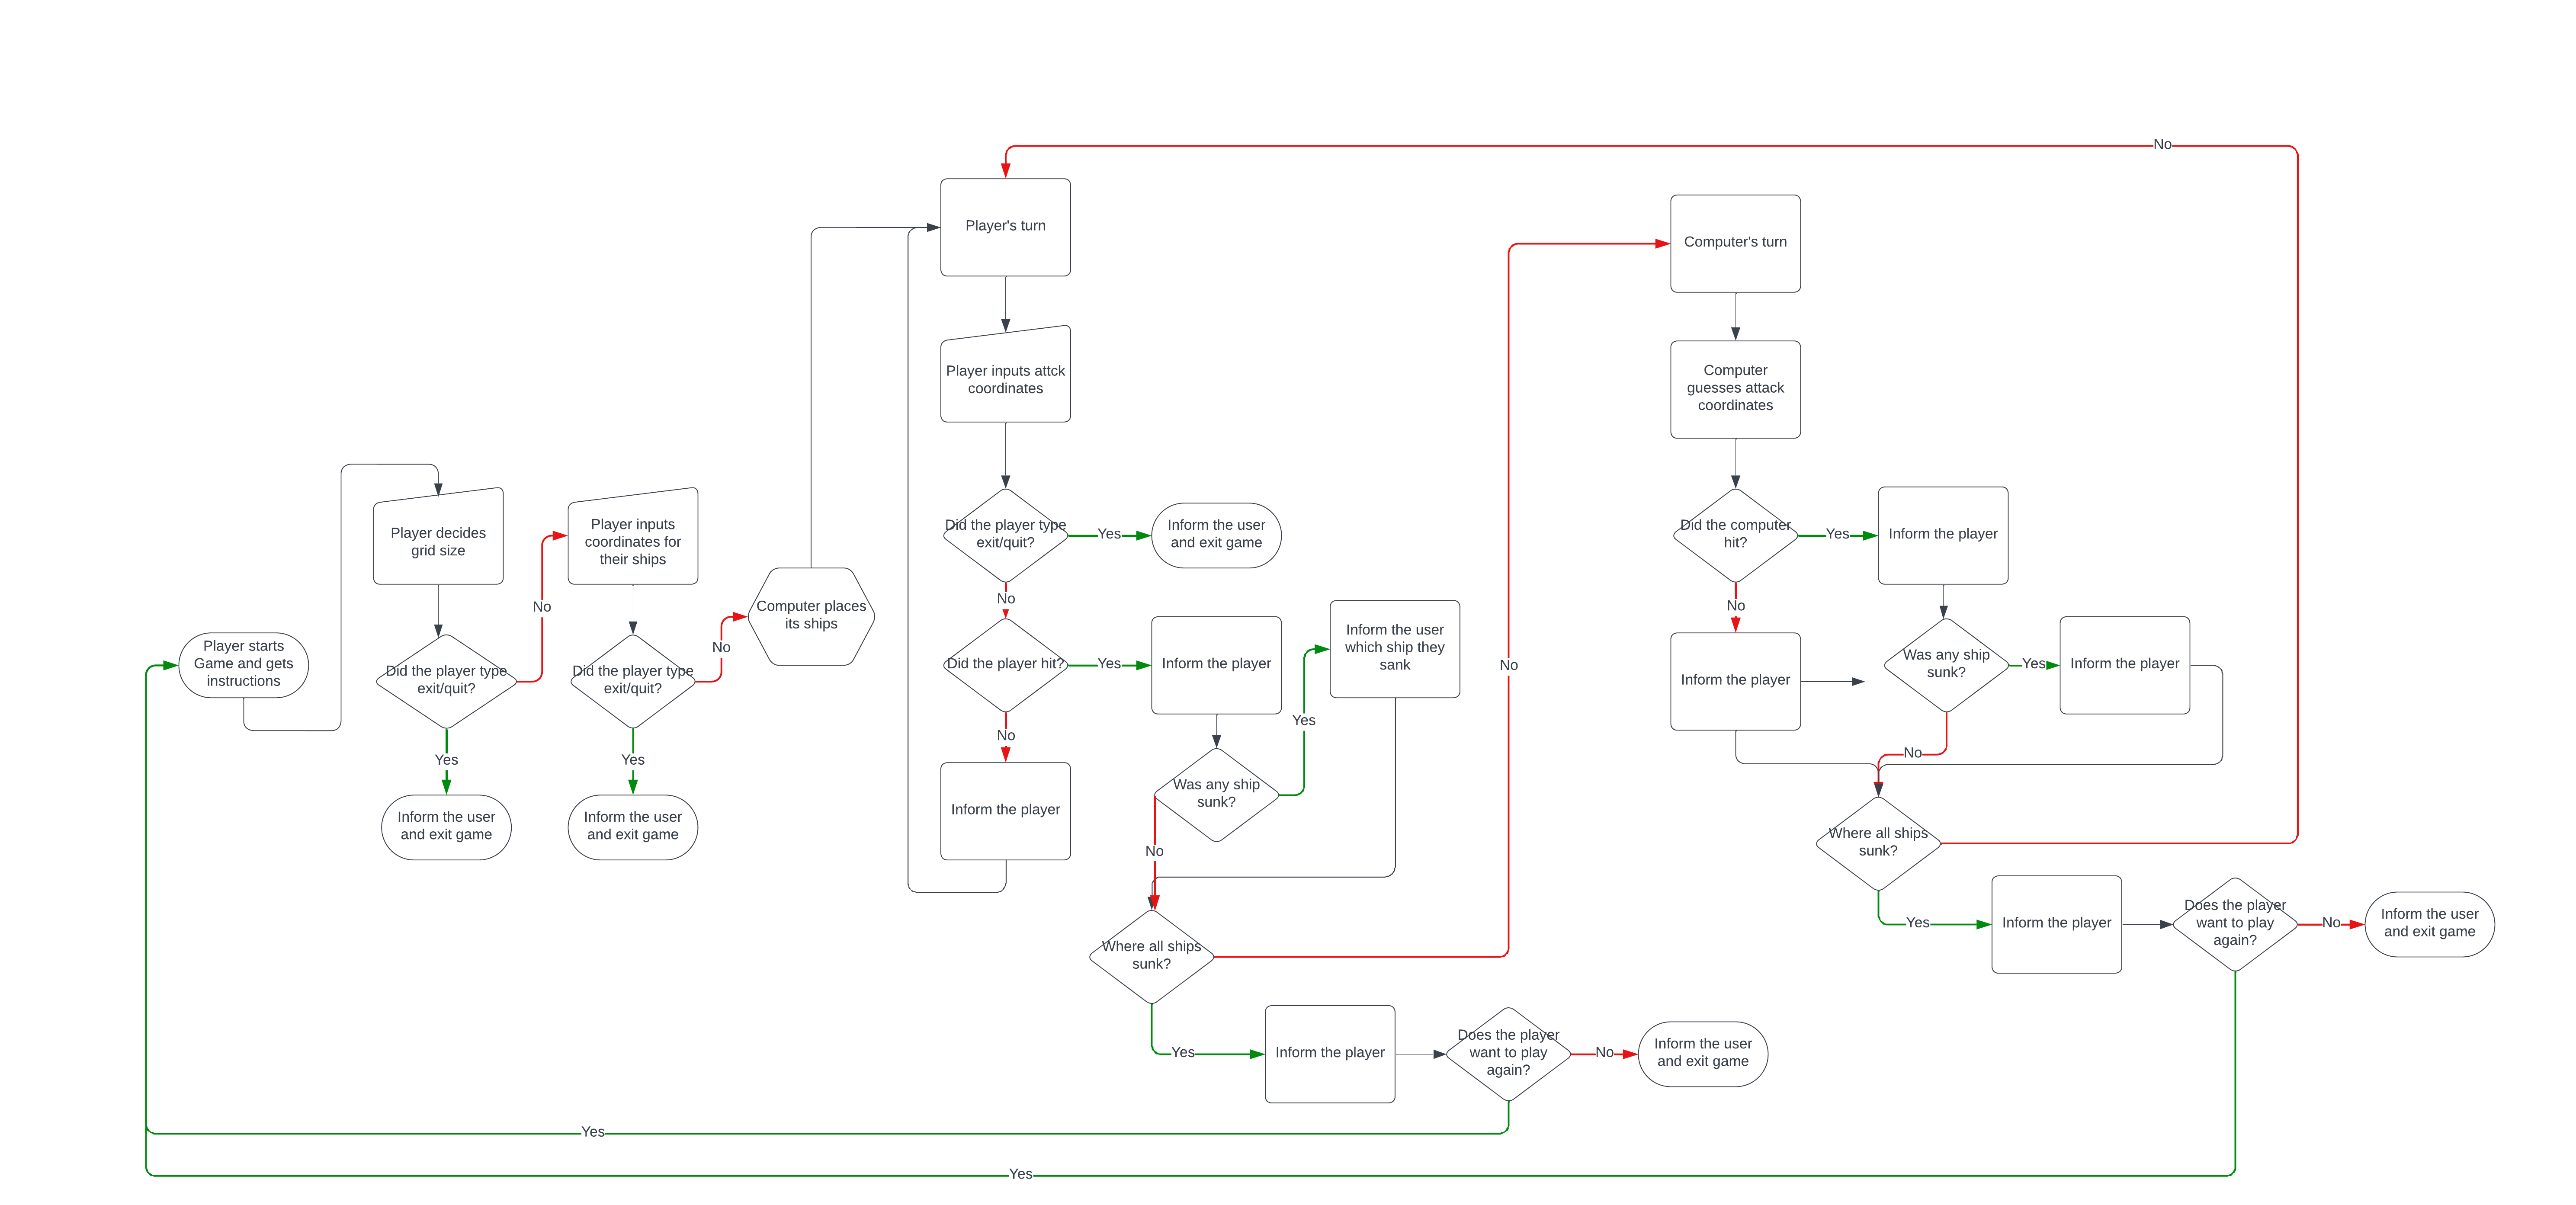
LucidChart was used to create the flow chart for control flow. The flow of the game was laid out and structured to aid in the design of the control flow statements such as if-elif-else statements, while loops and for loops. The actual flowchart can be viewed here.
-
Colorama was installed and imported for adding color to text to make it easier to read.
-
Pyfiglet was installed and imported for adding ascii art to the game title.
-
GoogleDocs was used to create an online spreadsheet to write down testing results.
-
GitHub has been used to store the code, images, and other content related to the project.
-
Heroku was used to deploy the game on the web.
-
Git was used to commit and push code during the development stage.
-
Visual Studio Code was used as an IDE.

- Continuous testing was carried out throughout the development stage and even after deployment on Heroku. The whole project was broken into functions. Each function was checked with PEP8 standard before moving to the next one.
- FlowChart used before the development of the game. It was used to help creating the game logic and visualizing the flow of the game for ease of development.
print()andtype()were used during the development process, to help identify possible errors and bugs.- All the prompts to the user were tested manually.
- The player is not told whether they sunk a ship or not, or which ship they sunk.
After the game was deployed on Heroku at the end of the development stage, a dedicated manual testing was carried out as a user at Heroku terminal. Each input option was tested with all the possible scenarios and particular attention was paid to validating the value of the input. The player's board as well as the computer's board were closely monitored to check if any changes were made as a consequence of the guesses made on each round. Using the words exit/quit was tested manually on all input prompts to the player.
Here are the results:
| Test Case | Action | Expected Outcome | Actual Outcome | Pass/Fail |
|---|---|---|---|---|
| Game Initialization | ||||
| Start Game | Launch the game | Game starts with introduction, ASCII title, and instructions | Game starts with introduction, ASCII title, and instructions | PASS |
| Setting Game Grid Size | ||||
| Valid Grid Size Input | Input a number between 4 and 10 | Game accepts input and proceeds to ship placement phase | Game accepts input and proceeds to ship placement phase | PASS |
| Invalid Grid Size Input | Input a number outside the range 4-10 | Error message displayed and prompted to input valid number | Error message displayed and prompted to input valid number | PASS |
| Non-numeric Input | Input a non-numeric character (e.g., 'A') | Error message displayed and prompted to input valid number | Error message displayed and prompted to input valid number | PASS |
| Ship Placement | ||||
| Valid Ship Position | Place a ship within the grid boundaries | Ship placed on grid | Ship placed on grid | PASS |
| Invalid Ship Position | Place a ship outside grid or overlapping another ship | Error message displayed and prompted to choose a new position | Error message displayed and prompted to choose a new position | PASS |
| Turn Rotation | ||||
| Valid Shot Position | Choose a valid grid position for shot | Display 'Hit' or 'Miss' based on shot outcome | Display 'Hit' or 'Miss' based on shot outcome | PASS |
| Invalid Shot Position | Choose a grid position outside boundaries | Error message displayed and prompted to choose valid position | Error message displayed and prompted to choose valid position | PASS |
| Repeat Shot Position | Shoot at a previously chosen position | Error message indicating position was already shot at | Error message indicating position was already shot at | PASS |
| Game End Conditions | ||||
| Player Wins | Sink all computer's ships | Display victory message | Display victory message | PASS |
| Computer Wins | All player's ships are sunk by computer | Display defeat message | Display defeat message | PASS |
| Exit Game | ||||
| Exit Command | Input 'exit' or 'quit' during any input prompt | Game exits immediately | Game exits immediately | PASS |
| Play Again | After game ends, choose to play again | Game restarts from the beginning | Game restarts from the beginning | PASS |
| Visual & Usability | ||||
| Game Layout and Design | Observe game interface | Ensure that ASCII art, grid, and messages display correctly | ASCII art, grid, and messages display correctly | PASS |
| Instructions Clarity | Read the game's instructions | Instructions should be clear and understandable | Instructions are clear and understandable | PASS |
CI Python Linter was used for validating the python files. No errors reported.

A live version of the project can be viewed here.
- Git was used as the version control software. Commands such as git add ., git status, git commit and git push were used to add, save, stage and push the code to the GitHub repository where the source code is stored.
The site was deployed via Heroku. This project was developed utilizing the Code Institute Template.
pip freeze > requirements.txt was used to add pyfiglet and Colorama imports to Heroku for deployment.
The below steps were followed to deploy this project to Heroku:
- Go to Heroku and click "New" to create a new app.
- Enter your App name, set the region, and press "Create App".
- Go to "Settings" and navigate to Config Vars. Add first Config Var with a key word of 'PORT' and a value of '8000'.
- Still in the "Settings", navigate to Buildpacks and add buildpacks for Python and then NodeJS (must in this order).
- Leave "Settings" and go to "Deploy". Scroll down and set Deployment Method to GitHub. Once GitHub is chosen, find your repository and connect it to Heroku.
- Scroll to the bottom of the deploy page and select preferred deployment type:
- Click Enable Automatic Deploys for automatic deployment when you push updates to Github.
- Further down to Manual Deploy, make sure the "main" branch is selected and click "Deploy Branch".
- The game's live link can be found here.
Navigate to the GitHub Repository you want to clone to use locally:
- Click on the code drop down button
- Click on HTTPS
- Copy the repository link to the clipboard
- Open your IDE of choice (git must be installed for the next steps)
- Type git clone copied-git-url into the IDE terminal
- The project will now been cloned on your local machine for use.
- I would like to acknowledge the absolutely amazing mentor Daisy McGirr. After checking my original code, she introduced me to the appropriate technologies and libraries to enhance the game's look and functionality.
- To Daniel Ahlberg for helping me and putting up with the stress this project was causing me.
- To Lucas Alenbro Lindström for helping me debug and giving me great ideas to implement.
Resources used to implement specific features:
Resources that helped fix issues/errors in the code: