Some basic command of docker
Contents I. INTRODUCE 3 II. INSTALLATION 4
- Ubuntu Desktop 4
- Windows 7 4 3.Centos 6.6 Server 4 III. HOW IT WORKS 6
- Hello World! 6 Option 1: Create a docker container by commands 6 Option 2: Create a docker by Dockerfile 6
- Helpful commands 6 2.1. Docker pull 6 2.2. Docker build 6 2.3. Docker run 7 2.4. Docker ps 8 2.5. Docker images 8 2.6. Docker rm 8 2.7. Docker rmi 9 2.8. Docker attach 9 IV. EXAMPLES 10
- Environment 10
- Example: Create a custom LEMP docker image by Dockerfile 10 V. ISSUES 15
- Import database to docker container 15
- Set static IP address for docker container 15
- Use docker without sudo? 15
I. INTRODUCE
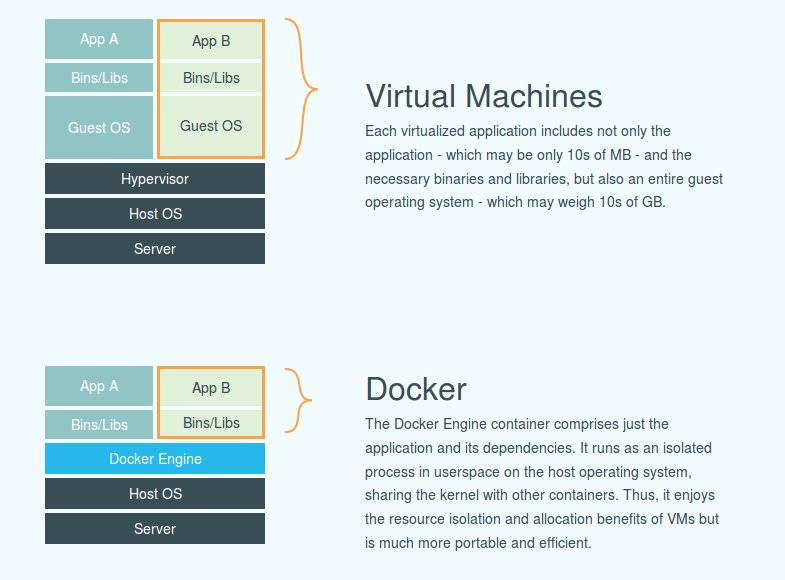
Docker is an open platform for developers and sysadmins to build, ship, and run distributed applications. Consisting of Docker Engine, a portable, lightweight runtime and packaging tool, and Docker Hub, a cloud service for sharing applications and automating workflows, Docker enables apps to be quickly assembled from components and eliminates the friction between development, QA, and production environments. As a result, IT can ship faster and run the same app, unchanged, on laptops, data center VMs, and any cloud.
-
Ubuntu Desktop 14.04 . INSTALL Ubuntu-maintained Package Installation To install the latest Ubuntu package (this is not the most recent Docker release): $ sudo apt-get update $ sudo apt-get install docker.io
Then, to enable tab-completion of Docker commands in BASH, either restart BASH or: $ source /etc/bash_completion.d/docker.io
.UPGRADE To upgrade docker in ubuntu 14.04 $ sudo curl -sSL https://get.docker.com/ubuntu | sudo sh
Another way:
	Suppose it is Ubuntu Trusty (14.04) release, which has 0.9.1 officially
	If you want to upgrade in this release, see new launchpad https://launchpad.net/~docker-maint/+archive/testing, better use ppa installation.
sudo add-apt-repository ppa:docker-maint/testing sudo apt-get update sudo apt-get install docker.io
- Windows 7 Download and install https://github.com/boot2docker/windows-installer/releases/tag/v1.6.2 (view more: https://docs.docker.com/installation/windows/) 3.Centos 6.6 Server .Install Epel repository. Run $ sudo yum install epel-release
. Install docker $ sudo yum install docker-io
. Start docker service $ sudo service docker start III. HOW IT WORKS 0. Environment: Docker 1.5.0
- Hello World! There are 2 options to run a docker container: Option 1: Create a docker container by commands $ docker pull phusion/baseimage $ docker run -d phusion/baseimage
Option 2: Create a docker by Dockerfile . Create a dockerfile with below content: FROM phusion/baseimage:0.9.15 MAINTAINER Viet Duong viet.duong@whitelabelled.com
. Run command on folder contain Dockerfile to build a docker image $ docker build -t phusion/baseimage:0.9.15 .
. Run command to create a docker container with that docker image $ docker run --name helloworld -d phusion/baseimage
- Helpful commands
2.1. Docker pull
Description: Pull an image or a repository from the registry
-a, --all-tags=false Download all tagged images in the repository
Usage:
docker pull [OPTIONS] NAME[:TAG]
2.2. Docker build
Description: Build a new image from the source code at PATH
-f, --file="" Name of the Dockerfile (Default is 'PATH/Dockerfile')
--force-rm=false Always remove intermediate containers
--no-cache=false Do not use cache when building the image
--pull=false Always attempt to pull a newer version of the image
-q, --quiet=false Suppress the verbose output generated by the containers
--rm=true Remove intermediate containers after a successful build
-t, --tag="" Repository name (and optionally a tag) for the image
-m, --memory="" Memory limit for all build containers
--memory-swap="" Total memory (memory + swap),
-1to disable swap -c, --cpu-shares CPU Shares (relative weight) --cpuset-cpus="" CPUs in which to allow exection, e.g.0-3,0,1Usage: docker build [OPTIONS] PATH | URL | - 2.3. Docker run Description: Run a command in a new container -a, --attach=[] Attach to STDIN, STDOUT or STDERR --add-host=[] Add a custom host-to-IP mapping (host:ip) -c, --cpu-shares=0 CPU shares (relative weight) --cap-add=[] Add Linux capabilities --cap-drop=[] Drop Linux capabilities --cidfile="" Write the container ID to the file --cpuset-cpus="" CPUs in which to allow execution (0-3, 0,1) -d, --detach=false Run container in background and print container ID --device=[] Add a host device to the container --dns=[] Set custom DNS servers --dns-search=[] Set custom DNS search domains -e, --env=[] Set environment variables --entrypoint="" Overwrite the default ENTRYPOINT of the image --env-file=[] Read in a file of environment variables --expose=[] Expose a port or a range of ports -h, --hostname="" Container host name --help=false Print usage -i, --interactive=false Keep STDIN open even if not attached --ipc="" IPC namespace to use --link=[] Add link to another container --log-driver="" Logging driver for container --lxc-conf=[] Add custom lxc options -m, --memory="" Memory limit -l, --label=[] Set metadata on the container (e.g., --label=com.example.key=value) --label-file=[] Read in a file of labels (EOL delimited) --mac-address="" Container MAC address (e.g. 92:d0:c6:0a:29:33) --memory-swap="" Total memory (memory + swap), '-1' to disable swap --name="" Assign a name to the container --net="bridge" Set the Network mode for the container -P, --publish-all=false Publish all exposed ports to random ports -p, --publish=[] Publish a container's port(s) to the host --pid="" PID namespace to use --privileged=false Give extended privileges to this container --read-only=false Mount the container's root filesystem as read only --restart="no" Restart policy (no, on-failure[:max-retry], always) --rm=false Automatically remove the container when it exits --security-opt=[] Security Options --sig-proxy=true Proxy received signals to the process -t, --tty=false Allocate a pseudo-TTY -u, --user="" Username or UID (format: <name|uid>[:<group|gid>]) -v, --volume=[] Bind mount a volume --volumes-from=[] Mount volumes from the specified container(s) -w, --workdir="" Working directory inside the container Usage: docker run [OPTIONS] IMAGE [COMMAND] [ARG...]
2.4. Docker ps Description: List containers
-a, --all=false Show all containers (default shows just running) --before="" Show only container created before Id or Name -f, --filter=[] Filter output based on conditions provided -l, --latest=false Show the latest created container, include non-running -n=-1 Show n last created containers, include non-running --no-trunc=false Don't truncate output -q, --quiet=false Only display numeric IDs -s, --size=false Display total file sizes --since="" Show created since Id or Name, include non-running Usage: docker ps [OPTIONS] 2.5. Docker images Description: List images
-a, --all=false Show all images (default hides intermediate images) --digests=false Show digests -f, --filter=[] Filter output based on conditions provided --help=false Print usage --no-trunc=false Don't truncate output -q, --quiet=false Only show numeric IDs Usage: docker images [OPTIONS] [REPOSITORY] 2.6. Docker rm Description: Remove one or more containers
-f, --force=false Force the removal of a running container (uses SIGKILL) -l, --link=false Remove the specified link -v, --volumes=false Remove the volumes associated with the container Usage: docker rm [OPTIONS] CONTAINER [CONTAINER...] 2.7. Docker rmi Description: Remove one or more images
-f, --force=false Force removal of the image --no-prune=false Do not delete untagged parents Usage: docker rmi [OPTIONS] IMAGE [IMAGE...] 2.8. Docker attach Description: Attach to a running container
--no-stdin=false Do not attach STDIN --sig-proxy=true Proxy all received signals to the process Usage: docker attach [OPTIONS] CONTAINER 2.9. Docker exec -it <docker_container> bash
IV. EXAMPLES 0. Environment
- Ubuntu Desktop 14.04 -Docker 1.5.0
- Example: Create a custom LEMP docker image by Dockerfile
. Create Dockerfile with below content: FROM phusion/baseimage:0.9.15 MAINTAINER Viet Duong viet.duong@whitelabelled.com
ENV HOME /root ENV HTTP_SERVER_NAME lemp.dev
ENV DEBIAN_FRONTEND noninteractive
RUN apt-get update
ADD rc.local /etc/rc.local RUN chmod +x /etc/rc.local
RUN apt-get install -y php5 php5-cli php5-mysql php5-gd php5-mcrypt php5-curl mysql-client-core-5.5 nginx php5-fpm
RUN apt-get install -y ssmtp
ADD nginx.conf /etc/nginx/nginx.conf ADD php-fpm.conf /etc/php5/fpm/php-fpm.conf
#ADD mysqld.service /etc/service/mysqld/run ADD php-fpm.service /etc/service/php-fpm/run ADD nginx.service /etc/service/nginx/run
RUN mkdir -p /run/fpm
RUN rm -rf /tmp/* /var/tmp/*
RUN php5enmod mcrypt
VOLUME /srv/http
VOLUME /srv/custom
#EXPOSE 80 3306 EXPOSE 80
RUN /usr/sbin/enable_insecure_key
RUN curl -o /usr/sbin/n98-magerun.phar https://raw.githubusercontent.com/netz98/n98-magerun/master/n98-magerun.phar RUN chmod +x /usr/sbin/n98-magerun.phar
RUN curl -sSL https://raw.github.com/colinmollenhour/modman/master/modman > /usr/sbin/modman RUN chmod +x /usr/sbin/modman
CMD ["/sbin/my_init", "--enable-insecure-key"]
RUN apt-get clean && rm -rf /var/lib/apt/lists/* /tmp/* /var/tmp/*
. Create configuration files that are included on Dockerfile File: rc.local #!/bin/sh -e
if [ -z "$HTTP_SERVER_NAME" ]; then echo "HTTP_SERVER_NAME is empty" else sed -i "s/lamp.dev/${HTTP_SERVER_NAME}/" /etc/nginx/nginx.conf fi
exit 0
File: nginx.config user www-data; worker_processes 1; daemon off;
events { worker_connections 1024; }
http { include mime.types; default_type application/octet-stream;
sendfile        on;

server {
    listen       80;
    server_name  lamp.dev;

    location / {

        root /srv/http;
        index index.php;
        try_files $uri $uri/ /index.php?$args;

        location ~ \.php$ {
            fastcgi_pass   unix:/run/fpm/fpm.sock;
            fastcgi_index  index.php;
            fastcgi_param  SCRIPT_FILENAME  $document_root$fastcgi_script_name;
            fastcgi_param  SCRIPT_NAME $fastcgi_script_name;
            include        fastcgi_params;
            fastcgi_read_timeout 300;
        }

    }
}
}
File: php-fpm.conf ;;;;;;;;;;;;;;;;;;;;; ; FPM Configuration ; ;;;;;;;;;;;;;;;;;;;;;
pid = /run/fpm/fpm.pid daemonize = no
[www] user = www-data group = www-data listen = /run/fpm/fpm.sock listen.owner = www-data listen.group = www-data listen.mode = 0660 pm = dynamic pm.max_children = 5 pm.start_servers = 2 pm.min_spare_servers = 1 pm.max_spare_servers = 3
File: php-fpm.service #!/bin/sh exec /usr/sbin/php5-fpm -c /etc/php5/fpm/ -y /etc/php5/fpm/php-fpm.conf
File: nginx.service #!/bin/sh exec /usr/sbin/nginx -c /etc/nginx/nginx.conf
. Build a custom docker image $ docker build -t whitelabelled/phusion_baseimage .
. Create a docker container by custom docker image $ docker run --name wordpress -v /home/viet/www/wordpress:/srv/http/ -e HTTP_SERVER_NAME=wordpress.local -d whitelabelled/phusion_baseimage
V. ISSUES
- Import database to docker container . Install mysqladmin $ sudo apt-get -y --force-yes install mysql-client
.Create database to docker container $ mysqladmin -h172.17.42.1 -P3306 -uroot -ppassword create magento
. Import database from .sql file to docker container $ mysql -h172.17.42.1 -P3306 -uroot -ppassword magento < /vagrant/db/magento.sql 2. Set static IP address for docker container . Create a command to show docker container IP $ touch docker-ip $ nano docker-ip
. Add below content to docker-ip file: #!/bin/sh exec docker inspect --format '{{ .NetworkSettings.IPAddress }}' "$@"
.Set permission for docker-ip file and copy that file to command folder $ chmod +x docker-ip $ sudo cp docker-ip /usr/bin/
. Assign our target address to your host interface: $ ip addr add 192.168.1.22/24 dev wlan0
. Create a docker container with an IP address $ docker run -d --name web -p 10.12.0.117:80:80 larsks/simpleweb
. Use iptables to forward IP address to docker container IP $ iptables -t nat -I POSTROUTING -s $(docker-ip web) -j SNAT --to-source 192.168.1.22
- Use docker without sudo? . Add the docker group if it doesn't already exist. $ sudo groupadd docker
. Add the connected user "${USER}" to the docker group. Change the user name to match your preferred user. $ sudo gpasswd -a ${USER} docker
. Restart the Docker daemon: $ sudo service docker restart
. If you are on Ubuntu 14.04 and up use docker.io instead: $ sudo service docker.io restart
. Either do a newgrp docker or log out/in to activate the changes to groups.