elasticsearch 실습 정리
- yum install java
#CentOS 6
vi /etc/sysconfig/network
HOSTNAME=myhost

#CentOS 7
hostnamectl set-hostname myhost
- elasticsearch 6.x
cd /etc/yum.repo.d/
vi es6.repo

#elasticsearch
[elasticsearch-6.x]
name=Elasticsearch repository for 6.x packages
baseurl=https://artifacts.elastic.co/packages/6.x/yum
gpgcheck=1
gpgkey=https://artifacts.elastic.co/GPG-KEY-elasticsearch
enabled=1
autorefresh=1
type=rpm-md

#kibana
[kibana-6.x]
name=Kibana repository for 6.x packages
baseurl=https://artifacts.elastic.co/packages/6.x/yum
gpgcheck=1
gpgkey=https://artifacts.elastic.co/GPG-KEY-elasticsearch
enabled=1
autorefresh=1
type=rpm-md- elasticsearch 7.x
cd /etc/yum.repo.d/
vi es7.repo

# elasticsearch
[elastic-7.x]
name=Elastic repository for 7.x packages
baseurl=https://artifacts.elastic.co/packages/7.x/yum
gpgcheck=1
gpgkey=https://artifacts.elastic.co/GPG-KEY-elasticsearch
enabled=1
autorefresh=1
type=rpm-md

# kibana
[kibana-7.x]
name=Kibana repository for 7.x packages
baseurl=https://artifacts.elastic.co/packages/7.x/yum
gpgcheck=1
gpgkey=https://artifacts.elastic.co/GPG-KEY-elasticsearch
enabled=1
autorefresh=1
type=rpm-md- /etc/yum.repos.d/elasticsearch.repo 생성 및 다음 추가
[elasticsearch-6.x]
name=Elasticsearch repository for 6.x packages
baseurl=https://artifacts.elastic.co/packages/6.x/yum
gpgcheck=1
gpgkey=https://artifacts.elastic.co/GPG-KEY-elasticsearch
enabled=1
autorefresh=1
type=rpm-md
$ yum repolist
$ yum install elasticsearch$ wget https://artifacts.elastic.co/downloads/elasticsearch/elasticsearch-6.4.0.rpm
$ rpm -ivh elasticsearch-6.4.0.rpm-
root가 아닌 일반 계정으로만 설치 가능 (root로 실행 불가)
-
설치할 dir에서 압축 해제
# zip파일
$ wget https://artifacts.elastic.co/downloads/elasticsearch/elasticsearch-6.4.0.zip
$ unzip elasticsearch-6.4.0.zip $ unzip elasticsearch-6.4.0.zip
# tar파일
$ wget https://artifacts.elastic.co/downloads/elasticsearch/elasticsearch-6.4.0.tar.gz
$ tar -xzf elasticsearch-6.4.0.tar.gz- 압축해제 후 기본 파일 리스트
LICENSE.txt
NOTICE.txt
README.textile
bin: app 핸들링 관련 파일
config: yml파일 등 설정관련 파일
lib: jar lib파일
logs: 로그파일
modules: app의 모듈 관련 파일
plugins: 내부 plugins파일 (외부 plugin을 이곳에 설치하면 에러 남)
-
rpm 설치와 비교 했을때 config, logs 추가로 생성
-
rpm 설치 시, config 폴더 파일들은 /etc/elasticsearch 에 설치 됨
- 기본 프로그램 ($ES_HOME) : /usr/share/elasticsearch
- 실행 파일 : bin/elasticsearch
- 플러그인 : plugins
- 설정 : /etc/elasticsearch
- elasticsearch.yml
- jvm.options
- log4j2.properties
- 데이터 (path.data) : /var/lib/elasticsearch
- 로그 (path.logs) : /var/log/elasticsearch
- (path.data, path.logs는 elasticsearch.yml에서 변경가능)
# default yml파일 보관
cp /etc/elasticsearch/elasticsearch.yml /etc/elasticsearch/elasticsearch.yml.template- elasticsearch.yml의 다음을 제외하고 삭제
path.data: /var/lib/elasticsearch
path.logs: /var/log/elasticsearch
# 실행
$ service elasticsearch start
# 중지
$ service elasticsearch stop
# es버전/프로세스 확인
$ rpm -qa | grep elastic #rpm설치 시,
$ ps -ef | grep elastic
# app 반응 확인
$ curl localhost:9200-
시작 안되었을 시, 다음의 로그 확인
- rpm 설치: /var/log/elasticsearch/elasticsearch.log
- 소스 설치: <path_installed>/logs/elasticsearch.log
-
기본 경로
- 설치파일: /usr/share/elasticsearch/
- conf파일: /etc/elasticsearch/
- log파일: /var/log/elasticsearch/
- vi /etc/yum.repos.d/kibana.repo
[kibana-6.x]
name=Kibana repository for 6.x packages
baseurl=https://artifacts.elastic.co/packages/6.x/yum
gpgcheck=1
gpgkey=https://artifacts.elastic.co/GPG-KEY-elasticsearch
enabled=1
autorefresh=1
type=rpm-md
yum install kibana- tar
wget https://artifacts.elastic.co/downloads/kibana/kibana-6.4.0-linux-x86_64.tar.gz# default kibana.yml 복사
$ cp /etc/kibana/kibana.yml /etc/kibana/kibana.yml.template- 다음 제외하고 모두 제거
server.host: "0.0.0.0"
elasticsearch.url: "http://localhost:9200"
kibana.index: ".my-kibana"
# 시작
service kibana start
# app 반응 확인
$ curl localhost:5601# settings 로 인덱스 만들기
PUT twitter
{
"settings" : {
"index" : {
"number_of_shards" : 3,
"number_of_replicas" : 1
}
}
}
# index 삭제
DELETE twitter
# index 존재여부 확인
HEAD twitter
# index 세팅 확인
GET twitter/_settings
# index의 상태를 확인(사이즈, 문서수, 실행된 명령 정보들)
GET twitter/_stats
# index의 shard 및 segment 정보들
GET twitter/_segments
# index 정보 요약
GET _cat/indices?v
GET _cat/indices/twitter?v
# CLI 사용
curl -XGET -H 'Content-Type: application/json' http://{es_url}:9200/{index}
XGET, XPUT, XDELETE ...
_stats, _segments, _cat/indices, _cat/indices/{index_name} ...# document ID 를 통해 document indexing
PUT twitter/_doc/1
{
"user" : "kimchy",
"post_date" : "2009-11-15T14:12:12",
"message" : "trying out Elasticsearch"
}
# document id 가 없을 때만 indexing
PUT twitter/_doc/1?op_type=create
{
"user" : "kimchy",
"post_date" : "2009-11-15T14:12:12",
"message" : "trying out Elasticsearch"
}
PUT twitter/_doc/1/_create
{
"user" : "kimchy",
"post_date" : "2009-11-15T14:12:12",
"message" : "trying out Elasticsearch"
}
# POST Method 를 통해 document ID 없이 indexing
POST twitter/_doc
{
"user" : "there",
"post_date" : "2009-11-15T14:12:12",
"message" : "trying out Elasticsearch"
}
# document ID 를 통해 document 조회
GET twitter/_doc/1
# 실제 문서 데이터인 _source object만 조회
GET twitter/_doc/1/_source# document ID 로 삭제
DELETE twitter/_doc/1
# 클러스터 health 정보(노드갯수, 샤드갯수 ) 확인하기
GET _cluster/health
# 클러스터 사용자 설정 정보 확인하기
GET _cluster/settings# 생성
curl -XPUT -H 'Content-Type: application/json' http://{ES_URL}:9200} -d '{... json ...}'
# 삭제
curl -XDELETE -H 'Content-Type: application/json' http://{ES_URL}:9200/{index}- 기본 명령어 (설치/제거)
cd /usr/share/elasticsearch/
# with internet
bin/elasticsearch-plugin install [plugin_name]

# without internet
bin/elasticsearch-plugin install file:///path/to/plugin.zip

# with url
bin/elasticsearch-plugin install [url]

# 설치된 플러그인 리스트 확인
bin/elasticsearch-plugin list

# 제거
bin/elasticsearch-plugin remove [plugin_name]- root계정으로 설치
- 한눈에 클러스터를 보기 위한 도구
# git 설치
$ yum install git
# elasticsearch-head 클로닝
$ git clone https://github.com/mobz/elasticsearch-head.git
# npm 실행 위한 소프트웨어 설치
$ yum install bzip2
$ yum install epel-release
# npm 설치
$ yum install npm
# head 경로로 이동
$ cd <path_clone>/elasticsearch-head
# 해당 npm파일
$ npm install
$ npm run start

http://{server FQDN}:9100- 한눈에 클러스터 지표를 보기 위한 도구
# hq 클로닝
git clone https://github.com/ElasticHQ/elasticsearch-HQ
cd elasticsearch-HQ
yum install python34 python34-pip
alias python=python3
pip3 install -r requirements.txt
python3 application.py

http://{server FQDN}:5000- 초기 설정
vi /etc/elasticsearch/elasticsearch.yml# 노드에 다른 노드가 연결할 수 있게 해준다. (ip, hostname가능)
network.host: 0.0.0.0
# 웹 브라우저에서 es에 접근 가능케 해주는 설정(head나 HQ플러그인 사용시 설정)
http.cors.enabled: true
# 웹 브라우저로 접근할 수 있는 IP ACL 설정
http.cors.allow-origin: "*"
# 클러스터의 다른 노드들이 다음의 노드들을 master로 인식하게 해준다.(ip, hostname가능)
# 클러스터 이름을 전제로 설정된 호스트 가운데 master가 결정됨
# master노드가 있으면 합류, 없으면 지정된 호스트 중 하나 master로 선출
discovery.zen.ping.unicast.hosts: [ "master01.com", "master02.com", "master03.com" ]
# cluster 이름 설정
cluster.name: itmare-es
# node 이름 설정
node.name: itmare-master01- index 저장경로 설정 변경하기
sudo mkdir /es
mkdir /es/data1
mkdir /es/data2
mkdir /es/logs
# 해당 유저가 elasticsearch라면, 접근할 수 있게 권한 변경
sudo chown -R elasticsearch.elasticsearch /es
# index 데이터 저장 경로 설정
path.data: /es/data1, /es/data2
# log 데이터 저장 경로 설정
path.logs: /es/logs# 설정 적용위해 재시작
service elasticsearch restart
# 제대로 적용되고 데이터 쌓이는지 확인 후, 설정 제거 (path.data, path.logs)- 경로 설정 내용 삭제
- 마스터 노드 이름을 제외한 모든 설정 동일하게 변경
- discovery 설정하기
discovery.zen.ping.unicast.hosts: [  "master01.com:9300", "master02.com:9300",  "master03.com:9300",  ]
# 최소 마스터 갯수 설정 [  ( (num_master/2) + 1) 개  ]
# 해당 노드 수 많큼 마스터가 내려가면 데이터 무결성 위해 클러스터 중지
discovery.zen.minimum_master_nodes: 2
# network.host설정에서 외부의 데이터 호출을 받는 부분만 분리
network.bind_host: 0.0.0.0
# 클러스터 내의 다른 노드들과 통신을 하는 부분만 분리
network.publish_host: master01.com # 각각 해당 서버의 주소
# http프로토콜을 통해 es의 API를 전달할때 사용할 포트 설정
http.port: 9200
# 클러스터 내에 노드들이 서로 통신 할때 사용할 포트 설정
# 노드는 서로의 용량이나 샤드상태를 알아야하기 때문에 tcp통신을 해야함
transport.tcp.port: 9300- master node에 추가하기
# 마스터 노드로서 role 부여
node.name: itmare-master01
node.master: true
node.data: false- Data node에 추가하기
# 데이터 노드에 적절한 노드이름과 다음을 추가 (기존 마스터 노드 설정 추가)
node.name: itmare-data01
node.master: false
node.data: true - jvm.options 시스텀 환경 설정하기
# jvm.options 파일 열기
$ sudo vi /etc/elasticsearch/jvm.options
# min/max heap size 설정
# master node
-Xms2g
-Xmx2g
# data node
-Xms4g
-Xmx4g- user limit 설정하기
# limits.conf 파일 열기
$ sudo vi /etc/security/limits.conf

# 다음 추가
elasticsearch      soft  nofile      65536
elasticsearch      hard  nofile      65536

# limits.d/<숫자>-nproc.conf 열기
$ sudo vi /etc/security/limits.d/20-nproc.conf

# 다음 추가
elasticsearch         soft  noproc      4096
elasticsearch hard noproc 4096- 설정 추가/변경 후, 노드 한대씩 재시작
sudo service elasticsearch restart- 그 밖의 시스템 설정
# sysctl.conf 파일 열기
$ sudo vi /etc/sysctl.conf
# mmap count 변경 설정
vm.max_map_count=262144
# swap 관련 설정
vm.swappiness=1# 변경한 커널 parameter 적용
$ sudo sysctl -p# 클러스터 라우팅 할당을 off로 변경
PUT _cluster/settings
{
"transient" : {
"cluster.routing.allocation.enable" : "none"
}
}# 작업하고자 하는 노드의 프로세스 중지
$ sudo systemctl stop elasticsearch
# ==> 결과: 해당 노드의 샤드가 unassigned로 변경됨# es 프로세스 재시작
$ sudo systemctl start elasticsearch
# ==> 결과: 해당 노드가 클러스터에 추가됨 but unassigned된 샤드들은 변동 없음(샤드가 없는상태로 클러스터에 추가됨)# 클러스터에 추가된 것이 확인됐으면 라우팅 할당을 "on"
PUT _cluster/settings
{
"transient" : {
"cluster.routing.allocation.enable" : "all"
}
}
# ==> 결과: unassigned 샤드들이 다시 올라온 노드로 복귀# POST _cluster/reroute 를 활용, 샤드 강제 분배
POST _cluster/reroute
{
"commands": [ {
"move": {
"index": "<index_name>",
"shard": <shard_number>,
"from_node": "<node_name_1>",
"to_node": "<node_name_2>"
}
}]
}# PUT _cluster/settings의 disk threshold를 이용하는 방법
PUT _cluster/settings
{
"transient":
{
"cluster.routing.allocation.disk.threshold_enabled": "true",
"cluster.routing.allocation.disk.watermark.low": "85%",
"cluster.routing.allocation.disk.watermark.high": "90%"
}
}
# low: 더 이상 차오르지 못하도록 할 임계치, 신규로 생성되는 인덱스는 제외
# high: 설정 즉시 임계치 이상 되는 노드를 임계치로 맞추기 위해 샤드 재분배 진행# PUT _cluster/settings의 disk threshold를 이용하는 방법2
PUT _cluster/settings
{
"transient":
{
"cluster.routing.allocation.disk.threshold_enabled": "true"
"cluster.routing.allocation.disk.watermark.flood_stage": "95%"
}
}
# flood_stage:
# - 디스크 용량이 더 이상 차오르지 못하도록 할 임계치
# - 임계치가 넘으면 인덱스를 삭제 가능한 read only 모드로 변경
# - 데이터 정리 후, 해당 인덱스에 대해 read only 해제 필요
PUT twitter/_settings
{
"index.blocks.read_only_allow_delete": null
}# 운영 중인 replica shard 갯수 변수
PUT twitter/_settings
{
"index": {
"number_of_replicas": 2
}
}# refresh_interval
# index가 refresh될 때 마다 새로운 로그가 발생했으면 그걸 색인한다.
# segment에 저장된 데이터를 검색할 수 있도록 commit point를 생성하는 주기
# reset은 null로 설정
PUT twitter/_settings
{
"index": {
"refresh_interval": "2s"
}
}
#확인
GET twitter/_settings# Routing Allocation: 데이터 노드에 샤드를 어떤 방식으로 할당할 것인지 결정
PUT twitter/_settings
{
"index": {
"routing.allocation.enable": "none"
}
}
# all(default): 모든 샤드에게 할당 허용 설정
# none: 샤드 할당되지 않도록 설정
# primaries: 프라이머리 샤드만 할당되도록 설정
# new_primaries: 새롭게 생성되는 인덱스의 프라이머리 샤드만 할당되도록 설정# Routing Rebalance
# 데이터 노드에 샤드를 어떤 방식으로 재배치 할 것인지를 결정
PUT twitter/_settings
{
"index": {
"routing.rebalance.enable": "none"
}
}
# all(default): 모든 샤드 재배치 허용 설정
# none: 모든 샤드들에게 재배치 불허 설정
# primaries: 프라이머리 샤드만 재배치 허용 설정
# replicas: 리플리카 샤드만 재배치 허용 설정- routing.allocation과 routing.rebalance의 차이점 allocation은 어떻게 unassigned 샤드가 할당되는지, 언제 unassigned 샤드가 노드로 할당을 허락하는지를 설정하고, rebalance는 언제 es가 노드에서 다른 노드로 기존 샤드를 재배치함으로써, 노드 주위 데이터의 균형(샤드 카운트)맞추는 걸 시도한다. rebalance를 disable하면, 새로운 노드가 추가 됐을때 es는 샤드를 움직여 클러스터에 동일한 샤드수를 맞추는데 이걸 막는다. but 이것은 watermark 관련 이벤트 발생시에, 데이터의 이동 또한 막는다.
PUT data1/_doc/1
{ "count": 5 }

GET data1

PUT data2/_doc/1
{ "message": "ES Tutorial Dynamic Mapping" }
GET data2# 인덱스 생성 시, 사용자 정의 세팅이나 매핑을 자동으로 적용
PUT _template/mytemplate
{
"index_patterns": ["te*", "bar*"],
"order" : 0,
"settings":
{
"number_of_shards": 3
}
}
GET _template/mytemplate- 2가지 방법
node.attr.box_type: hotin elasticsearch.yml./bin/elasticsearch -Ecode.attr.box_type=hot- box_type attribute는 임의적이고, 원하는데로 변경 가능 (가시성 위해 hot/warm 설정)
sudo vi /etc/elasticsearch.yml

#hot-data node
node.attr.box_type: hot
#warm-data node
node.attr.box_type: warm
# template을 통해 새로 생성되는 index는 hot쪽으로만 라우팅
PUT _template/mytemplate
{
"index_patterns": ["*"],
"order" : 0,
"settings": {
"number_of_shards": 5,
"index.routing.allocation.require.box_type" : "hot"
}
}
# 이후, 결정된 일자 이후의 index들의 type을 warm으로 변경
# 위 과정은 사람이 일일히 하기 힘들어 curator를 두어 배치로 운영 (추후설명)# index.routing.allocation.require.box_type을 이용해 Hot / Warm 간 shard 이동
PUT test/_settings
{
"index.routing.allocation.require.box_type":"warm"
}PUT /_cluster/settings
{
"persistent":{
# 사용자 변경 없으면 영구적인 설정 (static setting 보다 우선순위 높음)
},
"transient":{
# cluster restart 시, 리셋되는 설정
}
}# 샤드가 할당되지 못한 이유에 대해 explain사용하여 확인 가능 ===> 많이 사용
GET _cluster/allocation/explain# 할당 실패한 샤드 강제 분배 ===> 많이 사용
# - 인덱스 세팅 중, 어떤 상황에 의해 할당되지 못한 샤드를 다시 할당하는 시도 횟수에 제한이 있음
# - index.allocation.max_retries값에 의해 default로 5번만 추가 시도함
# - 5번 전부 실패하면 샤드 할당을 더 이상 하지 않는다.
# ex) 대표적인 예로 디스크 볼륨이 부족한 경우, 5번 시도 후 샤드 할당 포기,
# 디스크 볼륨 정리하고 retry 시도
POST _cluster/reroute
POST _cluster/reroute?retry_failed# cluster API로 클러스터 라우팅 할당 모드를 변경
PUT _cluster/settings
{
"transient":{
"cluster.routing.allocation.enable":"none"
}
}
# all (default) - 모든 샤드들에게 할당을 허용
# none - 샤드가 할당되지 않도록 설정
# primaries - 프라이머리 샤드만 할당되도록 설정
# new_primaries - 새롭게 생성되는 인덱스의 프라이머리 샤드만 할당되도록 설정# cluster API로 운영중인 특정 노드의 샤드 제외
# 좀 더 안정적인 rolling restart를 할 때, 샤드를 미리 다 제거하고 진행
# unassigned 샤드가 있는 상황에서, 추가로 노드를 작업해야할 때 진행
# IP는 class 별로도 세팅 가능
PUT _cluster/settings
{
"transient" : {
"cluster.routing.allocation.exclude._ip" : "1.1.1.1, 2.2.2.2, 3.3.3.*"
}
}
# exclude.{attribute} 종류
# _name : node이름으로 노드 매치
# _ip : hostname과 관련된 ip address와 노드 매치
# _host : hostname으로 노드 매치# POST _cluster/reroute를 이용한 unassigned 샤드 강제 분배
POST _cluster/reroute
{
"commands": [{
"allocate_replica": {
"index": "twitter",
"shard": 0,
"node": "test04"
}
}]
}# - 원본 인덱스의 세팅이나 매핑은 복제되지 않는다.
# - 클러스터 내부 뿐 아니라, 외부 클러스터의 인덱스도 복제 가능# 내부 인덱스 복사
POST _reindex
{
"source": {
"index": "twitter"
},
"dest": {
"index": "new_twitter"
}
}# 외부 인덱스 복사
reindex.remote.whitelist: "otherhost:9200, another:9200, 127.0.10.*:9200, localhost:*, <aws>.compute.amazonaws.com:9200"
$ curl -XPOST -H 'Content-Type: application/json' http://{my_cluster_url}/_reindex
{
"source": {
"remote": {
"host": "http://otherhost:9200"
},
"index": "twitter"
},
"dest": {
"index": "re_twitter"
}
}# 인덱스 문서의 인덱싱, 삭제, 업데이트를 벌크로 진행할 수 있는 API
# java. python 등 언어별로 bulk api 라이브러리 제공
# 7.x이상부터는 `"_type"` 필요없음, 이전 버전의 `type`명이 `_doc`이 아니라면 추가
# 6.x 이하
POST _bulk
{ "index" : { "_index" : "test", "_type" : "_doc", "_id" : "1" } }
{ "field1" : "value1" }
{ "delete" : { "_index" : "test", "_type" : "_doc", "_id" : "2" } }
{ "create" : { "_index" : "test", "_type" : "_doc", "_id" : "3" } }
{ "field1" : "value3" }
{ "update" : { "_index" : "test", "_type" : "_doc", "_id" : "1"} }
{ "doc" : {"field2" : "value2"} }
# 7.x 이상
POST _bulk
{ "index" : { "_index" : "test", "_id" : "1" } }
{ "field1" : "value1" }
{ "delete" : { "_index" : "test", "_id" : "2" } }
{ "create" : { "_index" : "test", "_id" : "3" } }
{ "field1" : "value3" }
{ "update" : { "_index" : "test", "_id" : "1" } }
{ "doc" : {"field2" : "value2"} }
# 특정 index에 bulking할 경우
POST myIndex/_bulk
{ "index" : { "_id" : "1" } }
{ "field1" : "value1", "field2" : "value2" }
{ "index" : { "_id" : "2" } }
{ "field1" : "value3", "field2" : "value4" }
...# accounts.json 파일 bulk 인덱싱하기
curl -s -H "Content-Type: application/x-ndjson" -XPOST localhost:9200/bank/account/_bulk --data-binary "@accounts.json"- elasticsearch에는 rollback과 같은 transaction기능이 없기때문에, bulk indexing 중간에 어떤 이유로 연결이 끊어지면 진행여부 확인 불가능하다. 해당 index를 삭제하고 다시 bulk index를 하는 것을 권고 (안전하다)
// 인덱스에 별칭을 부여하는 API
// _reindex API와 함께 자주 사용
// 존재하는 인덱스와 같은 이름으로는 설정 불가

// ex1
POST /_aliases
{
	"actions": [
		{ "add": { "index": "twitter*", "alias": "twitters" } }
	]
}

// ex2
POST /_aliases
{
	"actions": [
		{ "add": { "indices": ["data1", "data2"], "alias": "datas" } }
	]
}

// ex3
POST /_aliases
{
	"actions": [
		{ "add": { "index": "*temp", "alias": "temp_index" } }
	]
}# - segment를 강제로 병합하는 API
# - 인덱싱 중인 인덱스에는 비추!!
# - 인덱싱이 끝난 인덱스는 하나의 segment로 merge를 추천
# - I/O 비용이 크기 때문에 인덱싱이나 검색이 없는 시간대에 진행
POST /_forcemerge?max_num_segments=1# - 인덱스의 상태를 open/close 할 수 있는 api
# - closed 인덱스 read/write 불가
# - 클러스터 전체 샤드에서 제외
# - 라우팅 disabled
POST twitter/_close
POST twitter/_open- Analyzer 테스트
## Analysis
# 애널라이저 확인
POST _analyze
{
  "text": "Winter is coming!!!"
}

# standard
POST _analyze
{
  "analyzer": "standard",
  "text": "Winter is coming!!!"
}

# whitespace
POST _analyze
{
  "analyzer": "whitespace",
  "text": "Winter is coming!!!"
}

# english
POST _analyze
{
  "analyzer": "english",
  "text": "Winter is coming!!!"
}
# 사용자 정의 analyzer
PUT myanalyze
{
"settings": {
"analysis": {
"analyzer": {
"my_analyzer" : {
"char_filter": [ "html_strip" ],
"tokenizer": "standard",
"filter": [ "uppercase" ]
}
}
}
}
}
# 설정한 analyzer를 활용, API 테스트
POST myanalyze/_analyze
{
"analyzer": "my_analyzer",
"text": "<b>Winter is coming!!!</b>"
}
# 토크나이저만 변경
PUT myanalyze1
{
"settings": {
"analysis": {
"analyzer": {
"my_analyzer": {
"tokenizer": "my_tokenizer"
}
},
"tokenizer": {
"my_tokenizer": {
"type": "classic",
"max_token_length": 5
}
}
}
}
}# Example: "title" filter에서 "canlendar"를 stopword를 지정 해보자
# 기본 구조 및 analyzer 설정/적용
PUT blogs_new
{
"settings": {
"number_of_replicas": 1,
"number_of_shards": 3,
"analysis": {
"char_filter": {
},
"tokenizer": {
},
"filter": {
"my_filter":{
"type": "stop",
"stopwords": ["calendar"]
}
},
# 생성한 "my_filter"를 custom analyzer("my_analyzer")에 적용
"analyzer": {
"my_analyzer":{
"type": "custom",
"tokenizer": "whitespace",
"filter": ["lowercase", "my_filter", "snowball"]
}
}
}
},
# 생성한 "my_analyzer"를 사용할 필드에 매핑
"mappings" : {
"properties" : {
"title" : {
"type" : "text",
"fields" : {
"keyword" : {
"type" : "keyword",
"ignore_above" : 256
}
},
"analyzer": "my_analyzer"
}
}
}
}
# 결과
# 기존 blogs
GET blogs/_search
{
"query": {
"match": {
"title": "calendar"
}
}
} #===> value: 4
# my_analyzer 적용한 blogs_new
GET blogs_new/_search
{
"query": {
"match": {
"title": "calendar"
}
}
} # ===> value: 0GET bank/_search
{
"from":0, "size": 10,
"query" : {
"match": { /* 검색하고싶은 key/value 추가 */}
}
}
// pagination
GET bank/_search
{
"from":0, "size": 2,
"query" : {
"match" : { "address": "Fleet" }
}
}
// max pagination 사이즈 변경
PUT bank/_settings
{
"index.max_result_window": 10001
}
// 정렬: 오름차순(asc), 내림차순(desc)
GET bank/_search
{
"sort": {
"age": "desc"
}
}
// 스코어가 계산되는 과정 확인
GET bank/_search
{
"explain": true,
"from":0, "size": 2,
"query" : {
"match" : { "address": "Fleet" }
}
}
// _source 필터링
// 관련 query에 대한 값만 리턴
GET bank/_search
{
"_source": false,
"sort": { "age": "desc" }
}
// age와 gender만 리턴
GET bank/_search
{
"_source": [ "age","gender" ],
"sort": { "age": "desc" }
}
// ge가 들어간 쿼리만 리턴
GET bank/_search
{
"_source": [ "*ge*" ],
"sort": { "age": "desc" }
}
// highlight로 검색결과 하이라이팅 (리턴값에서 HTML의 <em> tag가 검색쿼리,"Fleet"를 wrap한다.)
GET bank/_search
{
"query": {
"match": {
"address": {
"query": "Fleet"
}
}
},
"highlight": {
"fields": {
"address": {}
}
}
}- Full Text Query (Query Context)
// match query
// 쿼리값을 analyze하여 검색
GET bank/_search
{
  "query": {
     "match": { "address": "345 Fleet" }
  }
}// ==> address에 345와 Fleet가 포함된 모든 결과 리턴


// boost로 검색, score에 가중치 적용 가능
GET bank/_search
{
  "query": {
    "match": {
      "address": {
        "query": "345 Fleet",
        "boost": 2.0
      }
    }
  }
}// ==> "score": 3.222,  boost값 2.0 적용시: 6.444


// match_phrase query
// 쿼리 값을 analyze한 후, 해당 값으로 쿼리 구문 만들어 검색 (구문 검색)
GET bank/_search
{
  "query": {
     "match_phrase": { "address": "425 Fleet W" }
  }
}// ==> address값이 "425 Fleet w"구문을 포함하는 결과값 리턴


// match_phrase_prefix query
// 쿼리 값을 쿼리 구문만들어 검색, 마지막 문자를 와일드 카드로 검색
GET bank/_search
{
  "query": {
     "match_phrase_prefix": {
       "address": "425 Fleet W"
     }
  }
}// ==> address값의 "425 Fleet W*"구문을 포함하는 결과값 리턴


// multi match
// index(multi_match_index)에 doc추가 1
POST multi_match_index/_doc
{
  "first": "ks asd gf",
  "comment": "It's a test doc"
}
// index(multi_match_index)에 doc추가 2
POST multi_match_index/_doc
{
  "first": "gf gh rd",
  "comment": "It's a ks test doc"
}
// index에서 multi_match 사용
GET multi_match_index/_search
{
  "query": {
    "multi_match": {
      "query": "ks",
      "fields": [ "first", "comment"]
    }
  }
}// ==> first와 comment field의 값에 ks 포함된 결과값 리턴


// query_string
// match, multi_match, match_prase_prefix의 기능을 사용 할 수 있는 쿼리
GET bank/_search
{
   "query": {
    "query_string" : {
      "query" : "Walk Flee*",
      "fields": [ "address", "employer"]
    }
  }
} // ==> address와 employer 필드에 "Walk Flee*"를 포함한 결과값 리턴- Term Level Query (Filter Context)
// term Query
// invented index에서 token 중 term이 정확히 일치할때만 결과 리턴
// keyword필드에 대해서만 쿼리 가능
GET bank/_search
{
  "query": {
    "term" : {
      "gender.keyword": "M"
    }
  }
} // ==> 성별이 "M"일때만 결과값 리턴


// terms Query
// 여러개의 용어에 대해 검색 가능 or 검색과 유사한 기능
GET bank/_search
{
  "query": {
    "terms" : {
      "gender.keyword": ["A","M"]
    }
  }
}

// range Query
// numeric, date, geo 필드에 대해서만 가능
// gte, gt, lte, lt 사용
GET bank/_search
{
  "query": {
    "range" : {
      "age": {
        "gte": 25,
        "lte": 30
      }
    }
  }
}

// wildcard Query
// term level 쿼리 중 와일드카드 사용 가능한 쿼리
// analyze가 안됨
GET bank/_search
{
  "query": {
    "wildcard" : { "lastname.keyword": "D*e" }
  }
}// must
// 문서에 일치하는 항목, 스코어 계산
GET bank/_search
{
"query": {
"bool": {
"must": [
{ "match": { "address": { "query": "Fleet" }}}
]
}
}
}
// filter
// 문서에 일치하는 항목, 스코어 0, filter context 에서 실행
GET bank/_search
{
"query": {
"bool": {
"filter": [
{ "match": { "address": { "query": "Fleet" }}}
]
}
}
}
// should
// 문서에 일치하는 항목
// must나 filter항목이 없으면 적어도 하나의 쿼리절과 일치되는 결과 리턴
GET bank/_search
{
"query": {
"bool": {
"should": [
{ "match": { "state": { "query": "MI", "boost": 2 }}},
{ "term": { "gender.keyword": { "value": "M" }}}
],
"minimum_should_match" : 1
}
}
}
// must_not
// 문서에 일치하지 않는 항목, 스코어 1 세팅
GET bank/_search
{
"query": {
"bool": {
"must_not": [
{ "match": { "address": { "query": "Fleet" }}}
]
}
}
}
// bool all
GET bank/_search
{
"query": {
"bool": {
"must": [ { "term": { "gender.keyword": "F" }}],
"filter": [ { "range": { "age": { "lte": "30" }}}],
"should": [ { "match": { "state": { "query": "MI" }}},
{ "match": { "city": { "query": "Nogal" }}}],
"must_not": [ { "match": { "address": "Hope" }}]
}
}
}# template
PUT text_index
{
"mapping": {
"_doc": {
"properties": {
"title": {
"type": "text"
}
}
}
}
}# template
PUT keyword_index
{
"mappings": {
"_doc": {
"properties": {
"title": {
"type": "keyword"
}
}
}
}
}// template
PUT date_index
{
"mapping":{
"_doc":{
"properties":{
"date":{
"type": "date"
}
}
}
}
}PUT date_index/_doc/1
{ "date": "2019-01-01"}
PUT date_index/_doc/2
{ "date": "2019-01-01T12:10:30Z"}
PUT date_index/_doc/3
{ "date": "1546301430000"}
GET date_index/_search
{
"sort":{"date": "asc"}
}PUT date_index_format
{
"mappings": {
"_doc": {
"properties": {
"date": {
"type": "date",
"format": "yyyy-MM-dd HH:mm:ss||yyyy-MM-dd||epoch_millis"
}
}
}
}
}PUT numeric_index
{
"mappings": {
"_doc": {
"properties": {
"number_of_bytes": {
"type": "integer"
},
"time_in_seconds": {
"type": "float"
},
"price": {
"type": "scaled_float",
"scaling_factor": 100
}
}
}
}
}- 매핑을 정의해서 인덱스를 만들 때
PUT object_index
{
	"mappings":{
		"_doc":{
			"properties":{
				"region":{
					"type":"keyword"
				},
				"manager":{
					"properties":{
						"age":{"type":"integer"},
						"name":{
							"properties":{
								"first":{"type":"keyword"},
								"last":{"type":"keyword"}
							}
						}
					}
				}
			}
		}
	}
}- 매핑 타입을 추가할 때
PUT object_index/_mapping/_doc
{
	"properties":{
		"region":{
			"type":"keyword"
		},
		"manager":{
			"properties":{
				"age":{"type":"integer"},
				"name":{
					"properties":{
						"first":{"type":"keyword"},
						"last":{"type":"keyword"},
						"full":{"type":"text"}
					}
				}
			}
		}
	}
}- object type indexing
PUT object_index/_doc/1
{
	"region":"US",
	"manager":{
		"age": 30,
		"name":{
			"first":"John",
			"last":"Smith",
			"full":"Smith John"
		}
	}
}- object type searching
GET object_index/_search
{
	"query":{
		"match":{
			"manager.name.first":{
				"query":"John"
			}
		}
	}
}# template
PUT nested_index
{
"mappings":{
"_doc":{
"properties":{
"user":{
"type":"nested"
}
}
}
}
}PUT nested_index/_doc/1
{
"user":[
{
"first":"John",
"last":"Smith"
},
{
"first":"Steve",
"last":"Jordan"
}
]
}- nested필드는 nested query로 검색
GET nested_index/_search
{
	"query":{
		"nested":{
			"path":"user",
			"query":{
				"bool":{
					"must":[
						{"match":{"user.first":"John"}},
						{"match":{"user.last":"Smith"}}
					]
				}
			}
		}
	}
}- 굳이 니즈가 있다면, copy_to 기능 권고
# 생성
PUT copy_index
{
	"mappings":{
		"_doc":{
			"properties":{
				"first_name":{"type":"text","copy_to":"full_name"},
				"last_name":{"type":"text","copy_to":"full_name"},
				"full_name":{"type":"text"}
			}
		}
	}
}
# 도큐먼트 추가
POST copy_index/_doc
{
	"first_name":"John",
	"last_name":"Smith"
}
# 도큐먼트 확인
GET copy_index/_search
{
	"query":{
		"match":{
			"full_name":"John Smith"
		}
	}
}# template
PUT twitter/_settings
{
"index":{
"refresh_interval": -1 #==> VALUE
}
}
# VALUE
# "1s": 1초 후 저장
# -1: disable
# null: 초기
PUT twitter/_doc/1?refresh=true
{"msg":"first doc"}
- multi field로 검색을 해야할 때 가능한 적은 필드로 검색
- copy_to를 이용하면 두개의 필드를 하나로 줄여 검색 가능
PUT myindex
{
	"mapping":{
		"_doc":{
			"properties":{
				"first_name":{"type":"text", "copy_to": "full_name"},
				"last_name": { "type": "text", "copy_to": "full_name" },
				"full_name": { "type": "text" }
			}
		}
	}
}

## ==> _all 대신 사용과 동일- numeric field에 대해 keyword field로 인덱싱 고려
PUT nonum
{
	"mappings":{
		"_doc":{
			"properties":{
				"account_no":{"type":"keyword"}
			}
		}
	}
}

POST nonum/_doc
{
	"account_no":"12345"
}
POST nonum/_doc
{
	"account_no":"22345"
}- 검색이나 range 쿼리는 가능
GET nonum/_search
{ "query": { "term": { "account_no": "12345" } } }

GET nonum/_search
{ "query": { "range": { "account_no": { "gte": 12300 } } } }- 집계 등의 수치 계산은 불가능
POST nonum/_search?size=0
{
	"query":{
		"constant_score":{
			"filter":{
				"match_all":{}
			}
		}
	},
	"aggs":{
		"hat_prices":{"sum":{"field":"account_no"}}
	}
}- wildcard의 사용은 자제
GET bank/_search
{
	"query":{"query_string":{"query":"Flee*"}}
}

GET bank/_search
{
	"query":{"match":{"address":"Fleet"}}
}- exact match 검색을 할 땐 match 대신 term 쿼리를 사용
PUT test1
{
	"mappings":{"_doc":{"properties":{"gender":{"type":"keyword"}}}}
}

POST test1/_doc
{
	"gender":"F"
}

GET test1/_search
{
	"query":{"match": {"gender": {"query": "F" }}}
}

GET test1/_search
{
	"query":{"term": {"gender": {"value": "F" }}}
}- filter context는 필터절 내부로 보냄
//  xxx
GET bank/_search
{
	"query":{
		"bool":{ "must": [ { "term": { "gender.keyword": "F"} } ] }
	}
}
// ooo
GET bank/_search
{
	"query":{
		"bool":{ "filter": [ { "term": { "gender.keyword": "F"} } ] }
	}
}- bool 쿼리는 범위를 좁히면서 검색
// xxx
GET bank/_search
{
	"query": {"bool": {
		"must": [ {"match": {"state": {"query": "MI" }}}],
		"filter": [ {"range": { "age": {"lte": "30" }}}]
	}}
}
// ooo
GET bank/_search
{
	"query": {"bool": {
		"filter": [ {"range": {"age": {"lte": "30" }}}],
		"must": [ {"match": {"state": {"query": "MI" }}}]
	}}
}#// indexing이 끝난 index는 검생성능을 위해 shard들의 segment를 하나로 병합
POST twitter/_forcemerge?max_num_segments=1- Routing key를 이용한 인덱싱
POST rindex/_doc?routing=user1
{
	"title": "This is document"
}

POST rindex/_doc?routing=user1
{
	"title": "This is a document for korea"
}

GET rindex/_search?routing=user1
{
	"query":	{ "match": {	"title": "korea" } }
}- Routing 과 같이 알아야할 rollover API
PUT logs-000001
{
	"aliases":{
		"logs_write":{}
	}
}

POST logs_write/_doc
{
	"TEST": "TTT1"
}

POST logs_write/_doc
{
	"TEST": "TTT2"
}

#// 문서가 2개 이상이면 인덱스 새로 생성
POST logs_write/_rollover
{
	"conditions":{
		"max_age": "7d",
		"max_docs": 2,
		"max_size": "5gb"
	}
}

POST logs_write/_doc
{
	"TEST": "TTT1"
}

POST logs_write/_doc
{
	"TEST": "TTT2"
}
#// 인덱스 이름을 지정해서 생성
POST logs_write/_rollover/my_new_index_name1
{
	"conditions":{
		"max_age":   "7d",
		"max_docs":  2,
		"max_size": "5gb"
	}
}

POST logs_write/_doc
{
	"TEST": "TTT1":
}

POST logs_write/_doc
{
  "TEST": "TTT2"
}
#// ?dry_run 으로 모의실행도 가능
POST logs_write/_rollover/my_new_index_name2?dry_run
{
	"conditions": {
		"max_age":   "7d",
		"max_docs":  2,
		"max_size": "5gb"
	}
}#// 스래드풀에 대한 개요
GET _nodes/thread_pool
#// 현재 각 스레드풀의 상태
GET _nodes/stats/thread_pool
#// curl사용해서 확인 시,
curl -XGET 'http://host:port/_nodes/thread_pool'
#// 모니터링
GET _nodes/stats
#// thread pool 정보만 실시간으로 조회
GET _cat/thread_pool/search?v#// elasticsearch.yml 파일에 큐 사이즈 조절 가능
thread_pool.bulk.queue_size: 10000
thread_pool.search.queue_size: 10000#// 클러스터에 속한 node들의 상태를 확인할 수 있는 명령
GET _cat/nodes
#// ?v옵션을 통해 항목의 필드명 확인 가능
GET _cat/nodes
#// heap.percent - 사용중인 heap memory percentage
#// ram.percent - 사용중인 memory percentage
#// cpu - 사용중인 cpu 리소스 percentage
#// load_1m,5m,15m - 사용중인 load average 값
#// node.role - 노드의 role (m - master, d - data, i - injest)
#// &h= 옵션을 통해 필요한 항목만 발췌 가능
GET _cat/nodes?v&h=ip,node.role
#// &s=ip:asc 옵션을 통해 정렬 가능 (역순 desc)
GET _cat/nodes?v&h=ip,node.role&s=ip:asc
#// &format=json 옵션을 통행 json 포맷으로 변경 가능
GET _cat/nodes?v&h=ip,node.role&s=ip:asc&format=json
#// 샤드 및 디스크 용량 관련 사항 조회
GET _cat/allocation?v
#// shards - 샤드 갯수
#// disk.indices - 인덱스가 사용하고 있는 디스크 용량
#// disk.used - 실제 시스템에서 사용된 디스크 용량
#// disk.avail - 실제 시스템에서 사용 가능한 디스크 용량
#// disk.total - 실제 시스템에서 전체 디스크 용량
#// disk.percent - 실제 시스템의 디스크 용량 사용률
#// 샤드 정보 조회
GET _cat/shards?v
#// shard - 샤드 넘버
#// prirep - 프라이머리, 리플리카 샤드 여부
#// state - 샤드 상태
#// docs - 도큐멘트 갯수
#// store - 저장된 사이즈
#// 인덱스 별로 조회 가능
GET _cat/shards/twitter?v
#// 인덱스 정보 조회
GET _cat/indices?v
#// health - 인덱스 헬스 상태 (green, yellow, red)
#// status - 인덱스 open 상태 (open, close)
#// pri - 프라이머리 샤드 갯수
#// rep - 리플리카 샤드 갯수
#// docs.count - 도큐멘트 갯수
#// docs.deleted - 삭제된 도큐멘트 갯수
#// store.size - 리플리카를 포함한 실제 저장된 사이즈
#// pri.store.size - 프라이머리 실제 저장된 사이즈
#// 인덱스 별로 조회 가능
GET _cat/indices/twitter?v
#// 클러스터 헬스체크 상태
GET _cat/health?v
#// status - 클러스터 전체 상태(green, yellow, red)
#// node.total - 클러스터에 속해져있는 전체 노드 갯수
#// node.data - 데이터노드 role 을 가지는 노드 갯수
#// shards - 클러스터에 저장된 전체 샤드 갯수
#// pri - 클러스터에 저장된 프라이머리 샤드 갯수
#// relo - 현재 재 할당중인 샤드 갯수
#// init - 샤드 상태 변경 전 초기화를 거치고 있는 샤드 갯수
#// unassign - 할당되지 않은 샤드 갯수
#// pending_tasks - 상태가 변경되는 과정에서 지연이 일어나고 있는 task 갯수
#// active_shards_percent - 안정적인 상태에서 운영중인 샤드의 percentage
#// 세팅된 템플릿 조회
GET _cat/tempalates?v
#// name - 템플릿 이름
#// index_patterns - 템플릿이 적용될 인덱스 패턴
#// order - 템플릿 오더 넘버
#// version - 템플릿 버전 정보- elasticsearch.py활용 모니터링 하기
# 모듈 설치
sudo easy_install pip
sudo pip install urllib3

# 실행 권한 부여
chmod -x elasticsearch.py

# 실행: OPTION은 파이썬 코드에 추가 가능, 커스텀 가능
python elasticsearch.py <OPTION> <ES_HOST:ES_PORT>


example)---------------------------------------------------------------------------------------------------
[jinwookchung@es01 ~] python es.py n es01:9200
ip      heap.percent ram.percent cpu load_1m load_5m load_15m node.role master name
10.142.0.12       25      86  13  0.08  0.05   0.05 di    -    itmare-hot02
10.142.0.7       6      84   1  0.00  0.01   0.05 mi    *    itmare-master02
10.142.0.6       5      88   3  0.02  0.04   0.05 mi    -    itmare-master01
10.142.0.13       49      88   2  0.00  0.01   0.05 di    -    itmare-hot03
10.142.0.11       27      85   9  0.03  0.03   0.05 di    -    itmare-hot01

[jinwookchung@es01 ~]- 2013년 첫 릴리즈
- InfluxDB는 data store를 위해 구글이 만든 key/value database library인 LevelDB를 사용하고 있다. 따라서, 아래와 같은 LevelDB의 특징을 가지고 있다. (참고1, 참고2)
- 기본적으로 데이타를 compression하기 때문에 읽기와 삭제에 다소 느릴 수 있다.
- LevelDB와 다르게 SQL-like query language를 지원, group by, join, 또 복수개의 time series(RDBMS에서 테이블이라고 이해)를 merge하는 것도 가능하다.
- InfluxDB는 distributed and scale horizontally하게 설계되었다. 따라서, cluster에 새로운 node만 추가하면 쉽게 scale-out 할 수 있다.
- Continuous Queries를 지원, 정해준 시간마다 해당 query를 실행해서 그 결과 값을 지정하는 테이블의 특정 칼럼으로 저장하게 해준다. 보통 분석, 통계 데이타를 쌓을 때 스케줄러를 통해 많이 하는 작업(downsampling 같은 작업)인데, InfuxDB는 이런 작업을 Continuous Query 한방으로 해결해준다.
- MongoDB 처럼 Schemaless design 이다.
- Primary interface로 native HTTP API를 제공하고 Java, Javascript, Ruby, Rails, Python, PHP, Node.js, Go 등 많은 library를 제공한다.
- Go로 작성
- InfluxDB는 오픈소스, 소스를 다운로드 받아서 쓰실 수 도 있고 아니면, influxdb.org에서 매달 일정 비용을 내고 호스팅 서비스를 받을 수 있다.
- Linux & OS X
- HTTP API / JSON over UDP
- Numeric data and String
- Sharding 지원 / Selelctable replication factor
- InfluxDB 는 여러모로 시계열DB(TSDB) 중에 가장 널리 선택받고 사용 중
- _stats 지표를 초단위로 저장할 TSDB로 influxdb 활용하기
# rpm으로 설치
$ wget https://dl.influxdata.com/influxdb/releases/influxdb-1.7.1.x86_64.rpm
$ sudo yum localinstall -y influxdb-1.7.1.x86_64.rpm

# deb으로 설치
$ wget https://dl.influxdata.com/influxdb/releases/influxdb_1.7.1_amd64.deb
$ sudo yum -y install dpkg
$ sudo dpkg -i influxdb_1.7.1_amd64.deb


# influxdb 구동
$ sudo systemctl start influxdb
$ sudo systemctl enable influxdb- influxDB 실행
$ influx -precision rfc3339
- http://:8086
- DB 생성
CREATE DATABASE mdb
use mdb
show field keys
select * from docs
- influxdb에 접속하고 쓰기 위해 influxdb site-package 설치
# 설치
$ sudo pip install --ignore-install influxdb
# 확인
$ sudo pip list
- _stat 지표를 visualize하기 위해 grafana 활용하기
# _stat 지표를 visualize 하기 위해 grafana 활용
$ wget https://s3-us-west-2.amazonaws.com/grafana-releases/release/grafana-5.3.4-1.x86_64.rpm
$ sudo yum localinstall -y grafana-5.3.4-1.x86_64.rpm

$ sudo systemctl start grafana-server
$ sudo systemctl enable grafana-server-
http://<설치된호스트>:3000
-
influxdb.py 사용한 stat API 활용하기
# 실행 권한 주기
chmod +x infl.py

# docs라는 이름으로 field추가
./infl.py

# 참고
# 임포트할 패키지명과 파일명이 같을 경우 어떤걸 임포트할지 결정하는 과정에서 컴파일 에러 발생
# influxdb site-package가 설치되어있음에도 실행파일이 influxdb.py라면 "ImportError: cannot import name InfluxDBClient"에러가 발생한다.- influxdb에서 확인
$ influx -precision rfc3339
...
> show field keys
> select * from docs- infl.py을 루프로 돌림
while(true); do ./infl.py; done &- 시계열db에 es쪽 stat API를 통해서 데이터를 받아서 influxdb로 밀어넣는 상황
- 재확인
$ influx -precision rfc3339
...
> show field keys
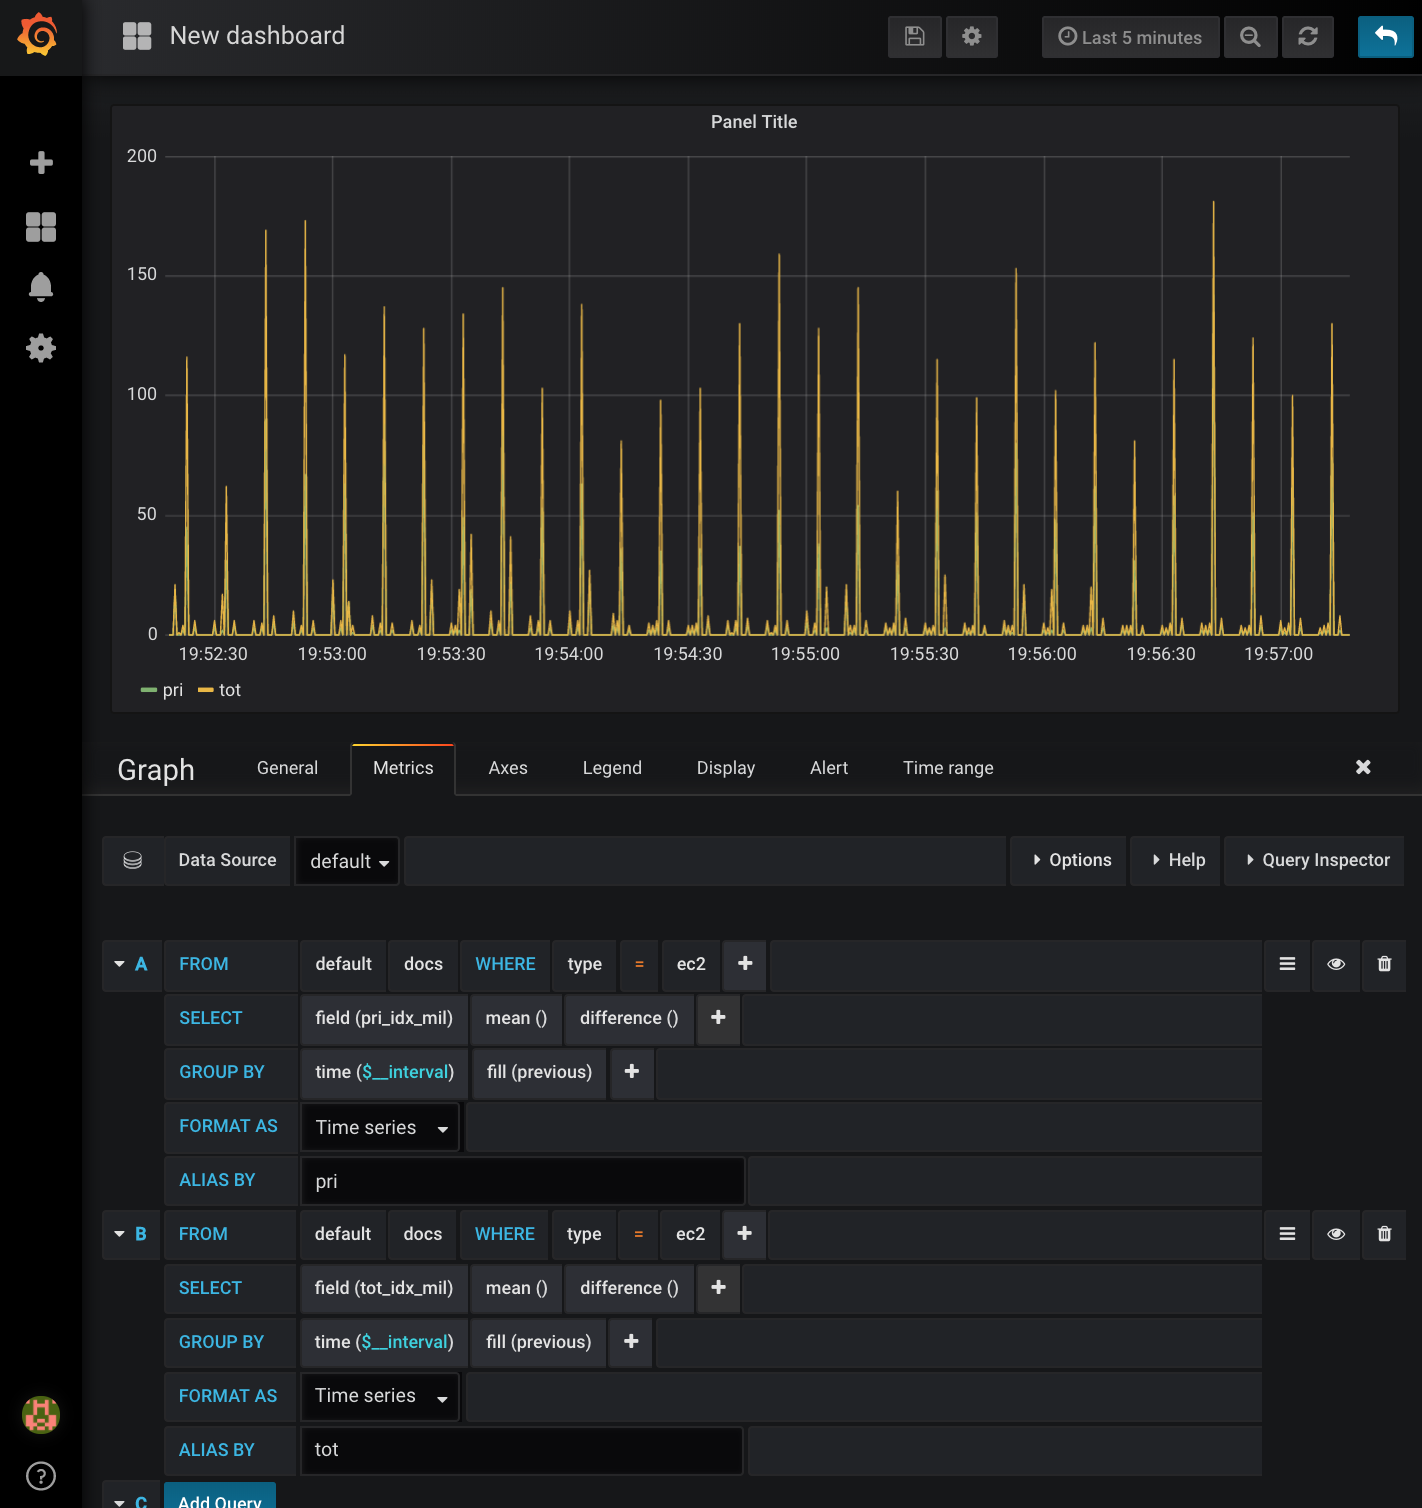
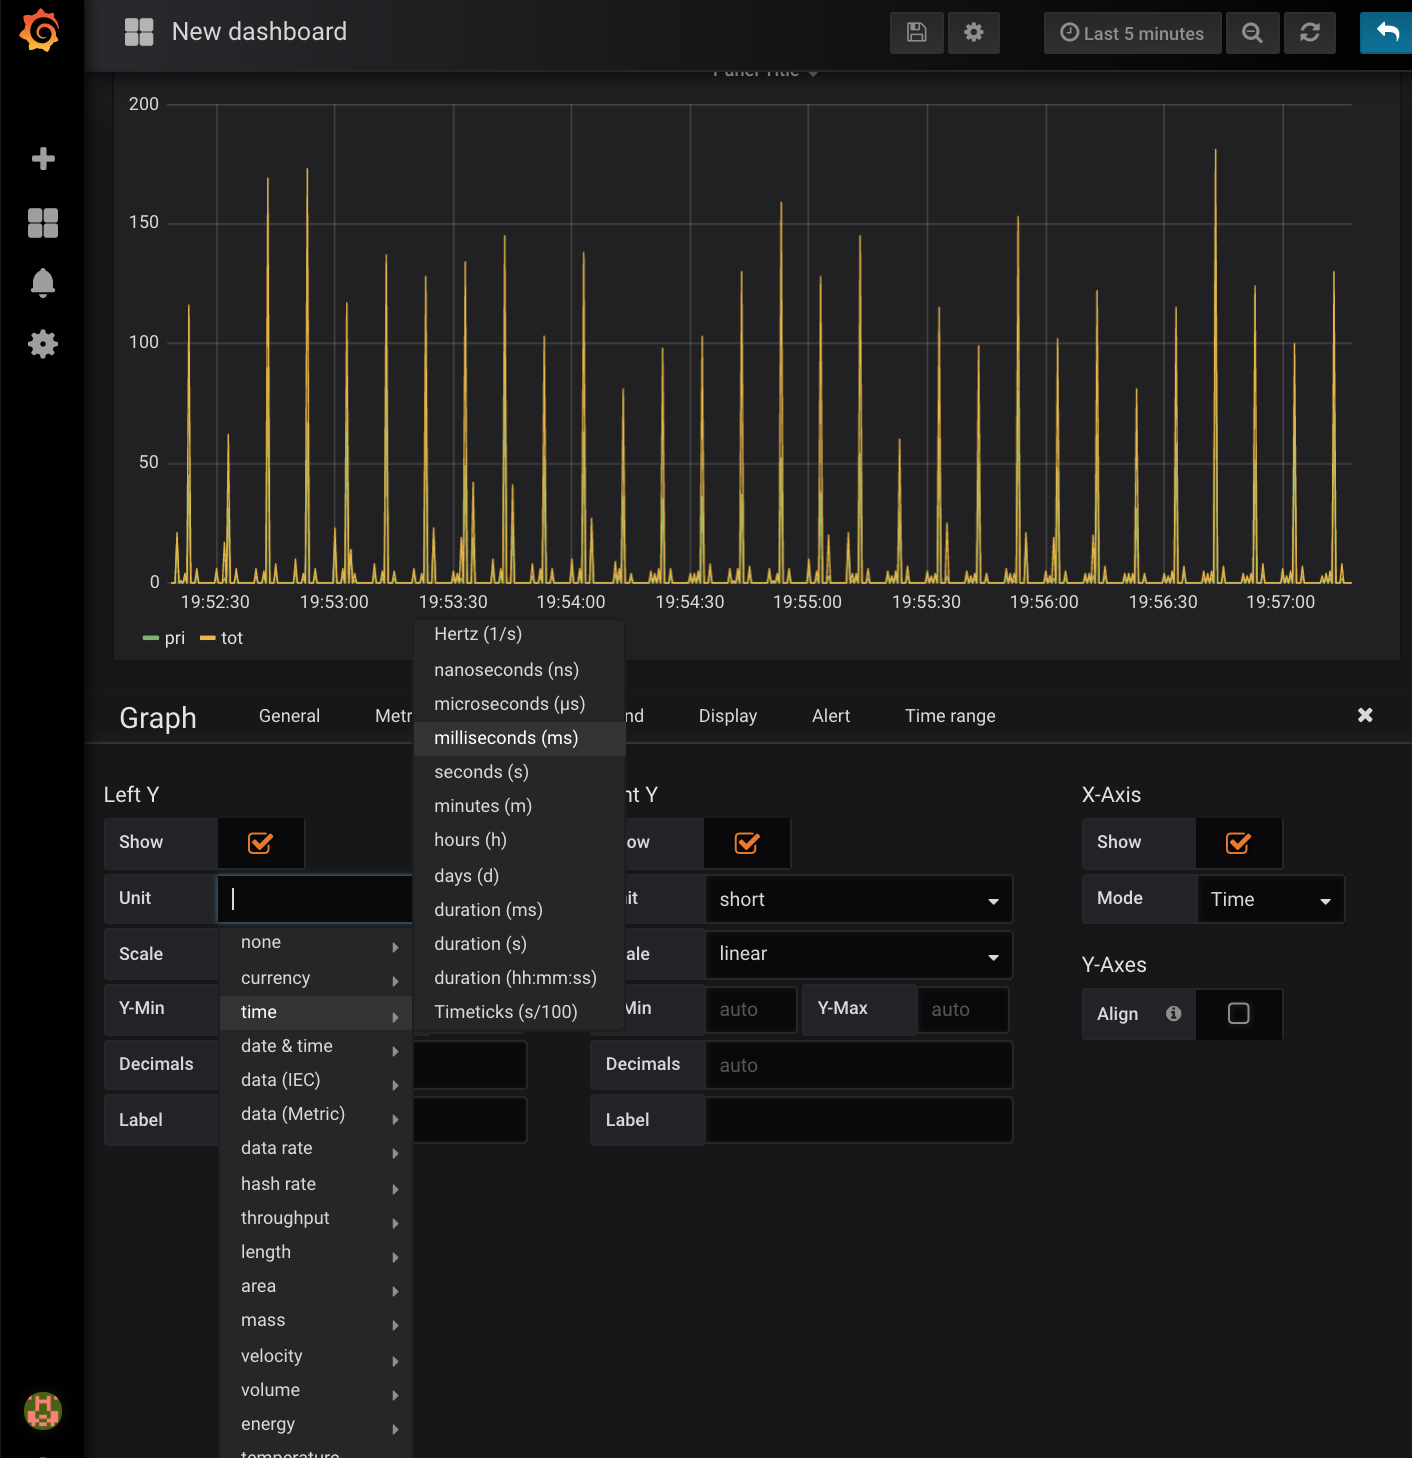
> select * from docs- grafana 사용하기
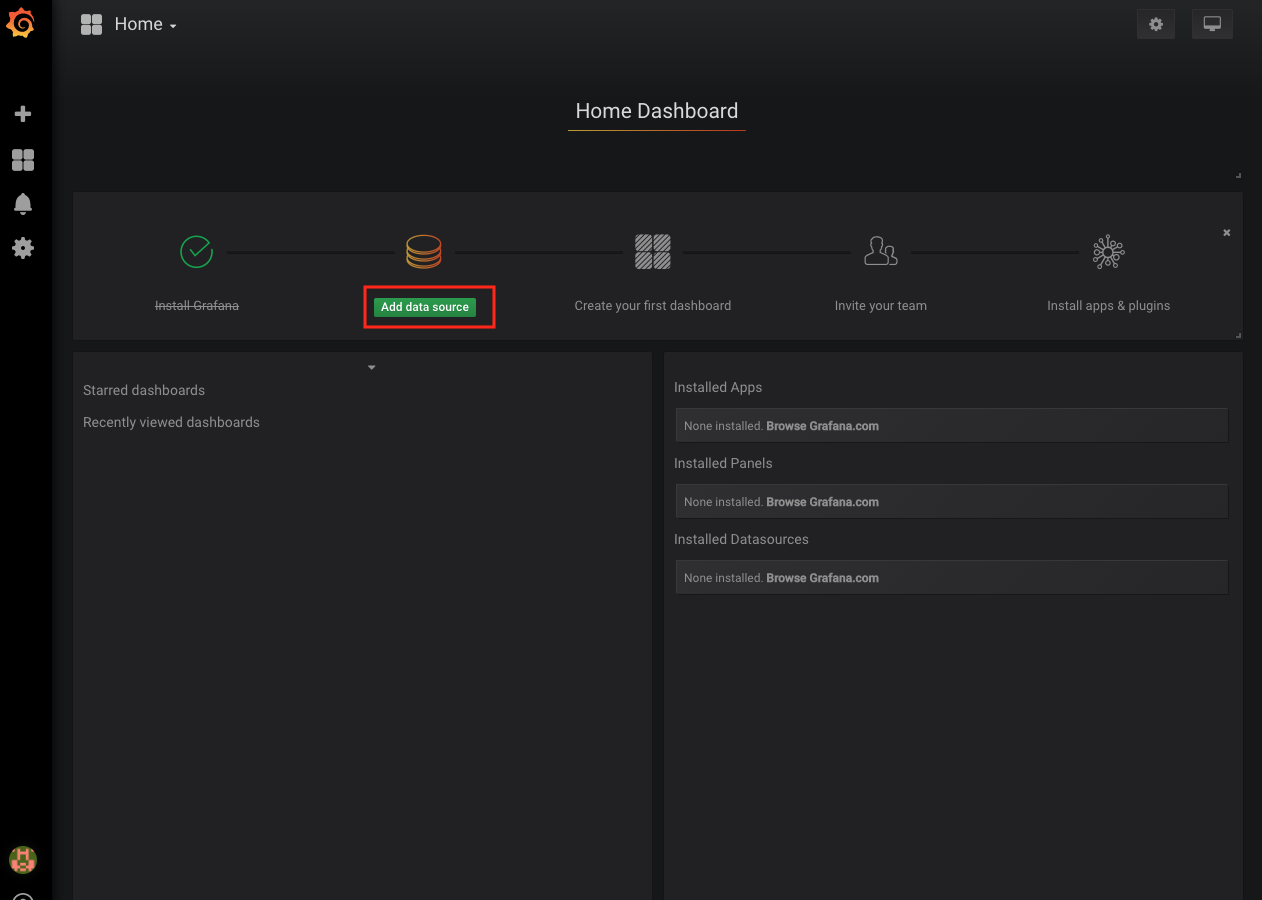
- data source추가
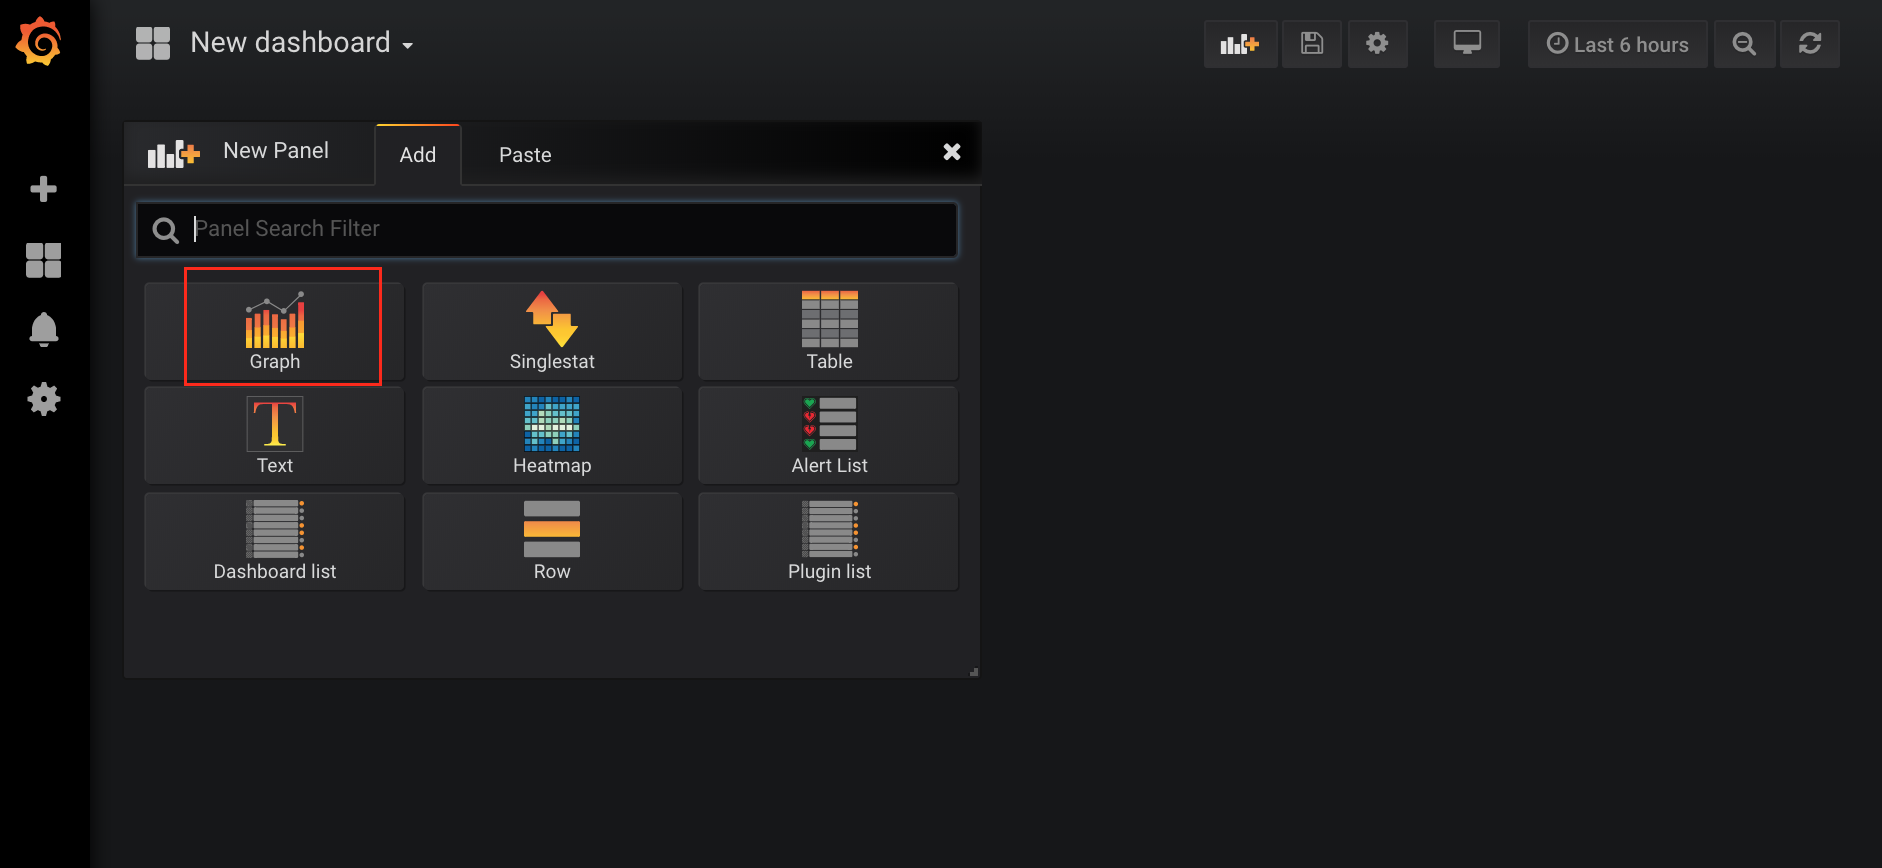
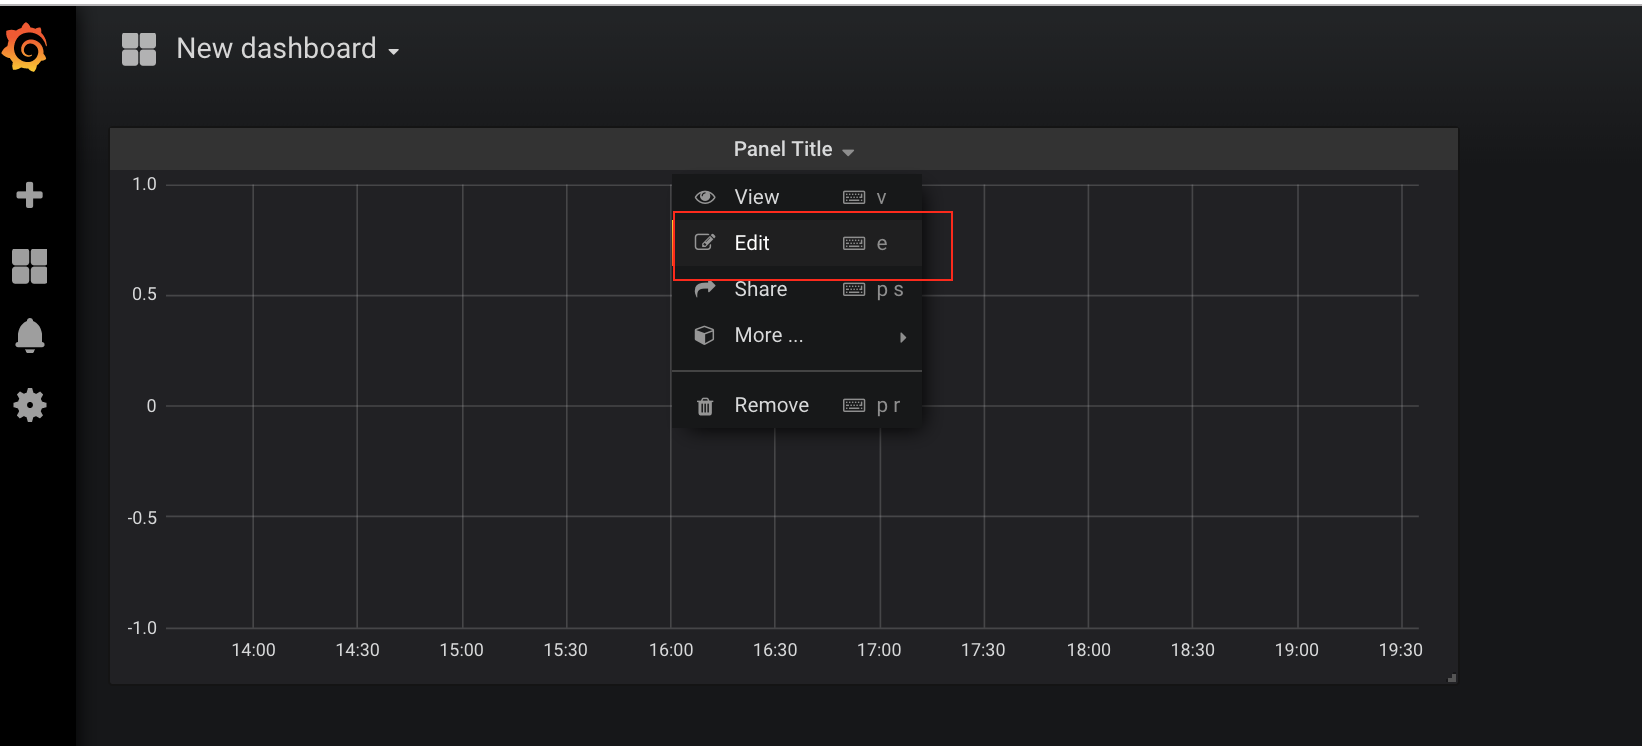
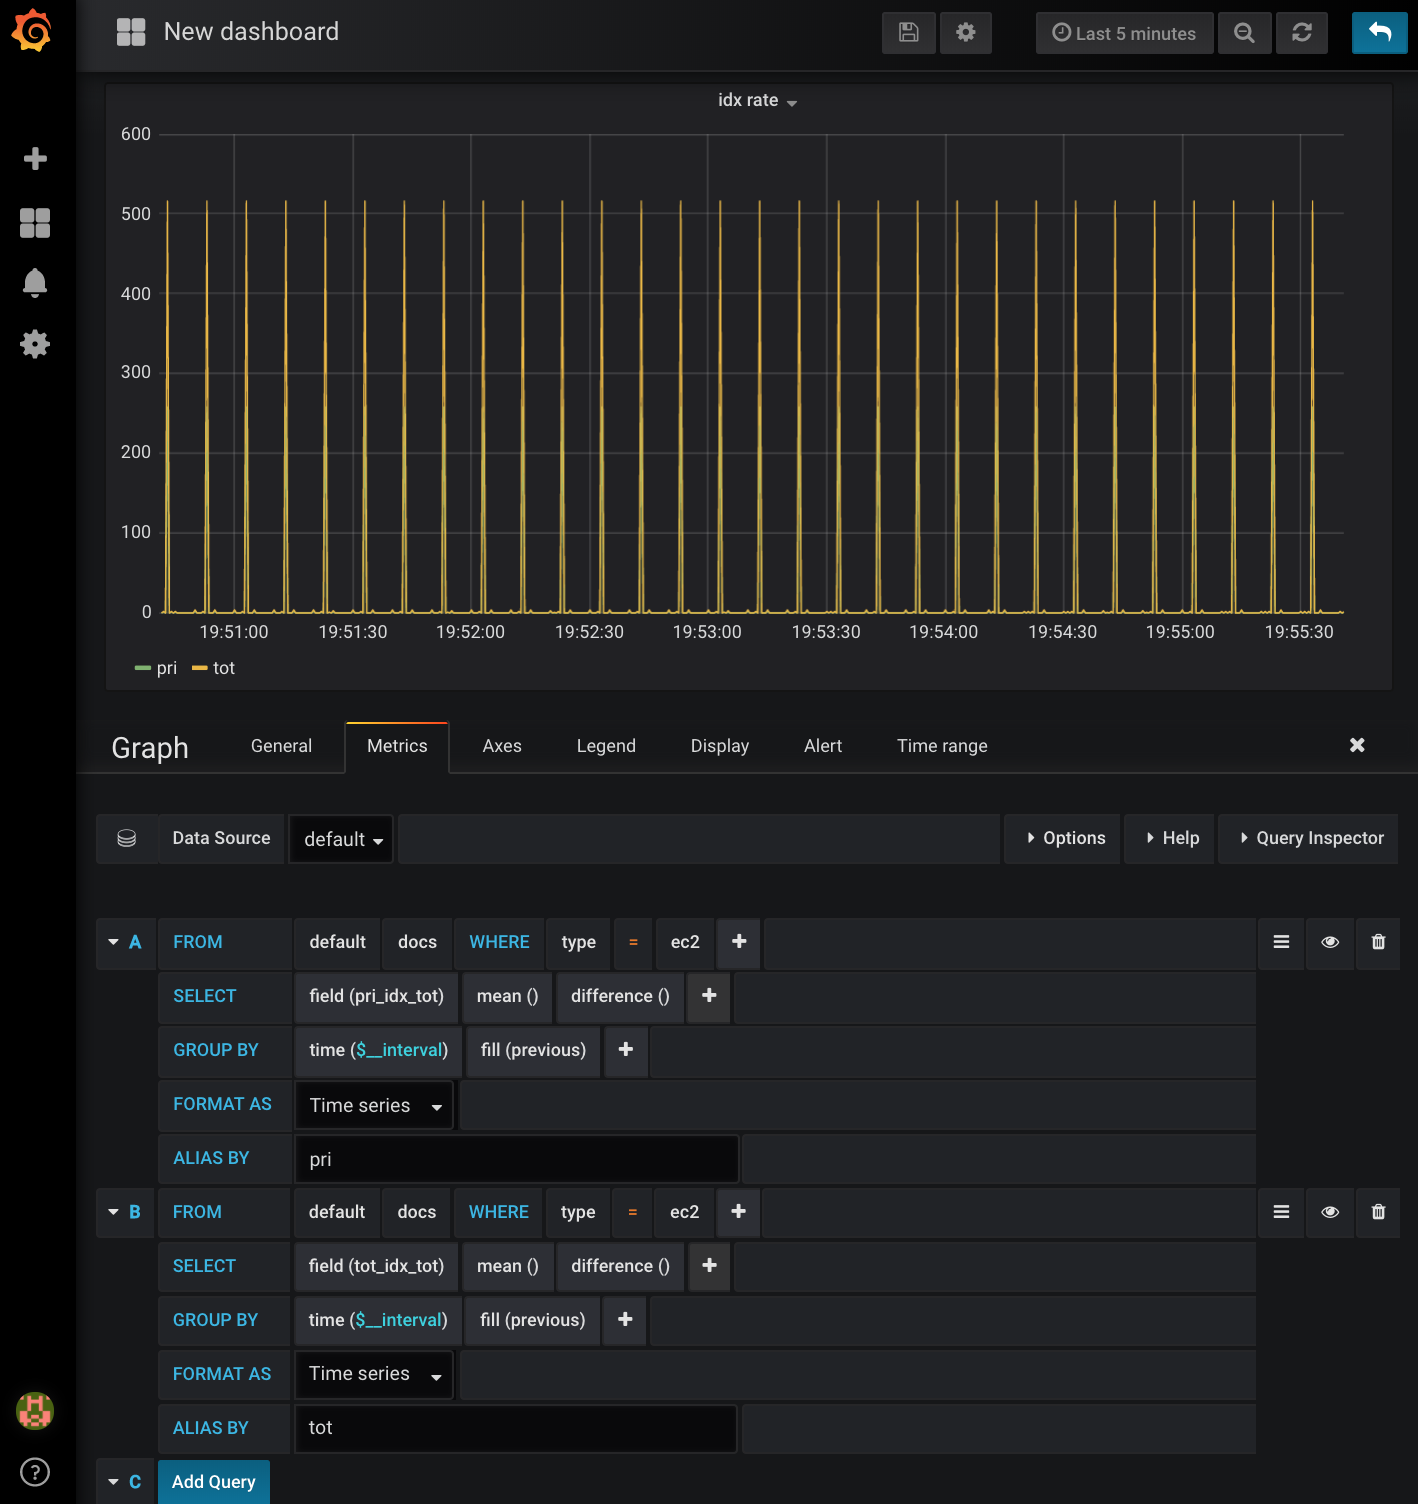
- dashboard 만들기
.
.
.
.
.
.
.
.
.
.
.
.
.
.
- Elasticsearch 가 5.0으로 올라오면서 상용모드(config 내 network.host 값이 loopback이 아닌 경우)인 경우 bootstrap 체크가 까다로워짐
bootstrap checks failed
max virtual memory areas vm.max_map_count [65530] is too low, increase to at least [262144]- 실행 시 아래와 같은 메시지가 뜰 경우 vm.max_map_count 값을 262144로 변경
-
sysctl.conf 수정
$ sudo vi /etc/sysctl.conf # 다음을 추가 또는 변경 vm.max_map_count=262144 -
command에서 변경
$ /usr/sbin/sysctl -w vm.max_map_count=262144
-
vm.max_map_count 값 확인 방법
cat /proc/sys/vm/max_map_count
-
참고 (링크)
- bulk insert되는 속도가 느려지고, 자주 익셉션이 발생하는 경우
- bulk queue가 너무 적은 것은 아닌가 의심 필요
- thread pool 상태를 봤을 때,
rejected된 건수가 많이 보일때
- 버전6.3부터 bulk --> write로 변경됨


