- logstash 설치
wget https://artifacts.elastic.co/downloads/logstash/logstash-6.4.0.rpm
rpm -vi logstash-6.4.0.rpm

cd /usr/share/logstash
bin/logstash --version- 데이터 업로드
scp -i ~/.ssh/itmare3_rsa /Users/jinwookchung/Desktop/git-note/es-engineer/datasets/blogs.csv itmare3@es01:/home/itmare3/
scp -i ~/.ssh/itmare3_rsa /Users/jinwookchung/Desktop/git-note/es-engineer/datasets/blogs.conf itmare3@es01:/home/itmare3/

cd /usr/share/logstash
mkdir datasets
cd datasets
mv /home/itmare3/blogs
mv /home/itmare3/blogs.csv /usr/share/logstash/datasets/
mv /home/itmare3/blogs.conf /usr/share/logstash/datasets/- indexing
cd /usr/share/logstash
vi blogs.conf #==> csv파일 위치로 경로 수정
bin/logstash -f datasets/blogs.conf
vi ~/.bash_profile
export LS_HOME=/home/ec2-user/logstash
PATH=$PATH:$LS_HOME/bin-
filebeat를 통해, log 데이터 indexing
-
데이터 업로드
scp -i ~/.ssh/itmare3_rsa /Users/jinwookchung/Desktop/git-note/es-engineer/datasets/elastic_blog_curated_access_logs.tar.gz itmare3@es01:/home/itmare3/
scp -i ~/.ssh/itmare3_rsa /Users/jinwookchung/Desktop/git-note/es-engineer/datasets/filebeat.yml itmare3@es01:/home/itmare3/

cd /etc/filebeat
mkdir datasets
mv /home/itmare3/elastic_blog_curated_access_logs.tar.gz /etc/filebeat/datasets
tar -zxvf /etc/filebeat/datasets/elastic_blog_curated_access_logs.tar.gz
mv /home/itmare3/filebeat.yml /etc/filebeat/- indexing
cd /home/elastic/
vi filebeat.yml #==> log파일 경로 수정
filebeat -e -c filebeat.ymlGET /
# response
{
"name": "Y-fW5AH",
"cluster_name": "elasticsearch",
"cluster_uuid": "14TRgGKJSA2zI0wsP98DAg",
"version": {
"number": "6.3.1",
"build_flavor": "default",
"build_type": "tar",
"build_hash": "eb782d0",
"build_date": "2018-06-29T21:59:26.107521Z",
"build_snapshot": false,
"lucene_version": "7.3.1",
"minimum_wire_compatibility_version": "5.6.0",
"minimum_index_compatibility_version": "5.0.0"
},
"tagline": "You Know, for Search"
}정답
- 6.3.1정답
- Y-fW5AH정답
- elasticsearch정답
- 노드는 랜덤생성, 클러스터 이름의 default는 elasticsearchGET /_cat/indices?v
# response
health status index uuid pri rep docs.count docs.deleted store.size pri.store.size
yellow open logs_server3 RIQi8NtxROCeTtNIgpjF2A 5 1 584814 0 203.9mb 203.9mb
yellow open blogs Kprg3NgVQ_uMLKFtgvu5YA 5 1 1594 0 6.2mb 6.2mb
yellow open logs_server2 dbVJ3RxTTQagltf3iKp-FA 5 1 584599 0 202.7mb 202.7mb
yellow open logs_server1 lSCHs2CURZ-VnkjyxoyEyw 5 1 582063 0 198.8mb 198.8mb
green open .kibana n59ZjM5KTDiVl7bBXzfROg 1 0 5 1 30.1kb 30.1kb정답
- 컬럼의 header가 사라진다.정답
- 5개, index 컬럼의 이름
정답
- 1594| id | title | category | date | author_first_name | author_last_name | author_company |
|---|---|---|---|---|---|---|
| 1 | Better query execution | Engineering | July 15, 2015 | Adrien | Grand | Elastic |
| 2 | The Story of sense | May 28, 2015 | Boaz | Leskes |
정답
{
  "id": "1",
  "title": "Better query execution",
  "category": "Engineering",
  "date":"July 15, 2015",
  "author":{
    "first_name": "Adrian",
    "last_name": "Grand",
    "company": "Elastic"
  }
}정답
# empty field는 생략하거나, null(생략과 같음), "" (empty string)
{
  "id": "2",
  "title": "The Story of Sense",
  "date":"May 28, 2015",
  "author":{
    "first_name": "Boaz",
    "last_name": "Leskes"
  }
}
상위 json데이터를 indexing하기, id field를 다른 field와 마찬가지로 document에 인덱싱하고, URL에도 추가하기, index이름을 my_blogs로 하고 _doc과 id 추가하기.
정답
PUT my_blogs/_doc/1
{
  "id": "1",
  "title": "Better query execution",
  "category": "Engineering",
  "date":"July 15, 2015",
  "author":{
    "first_name": "Adrian",
    "last_name": "Grand",
    "company": "Elastic"
  }
}
PUT my_blogs/_doc/2
{
  "id": "2",
  "title": "The Story of Sense",
  "date":"May 28, 2015",
  "author":{
    "first_name": "Boaz",
    "last_name": "Leskes"
  }
}{
"id": "57",
"title": "Phrase Queries: a world without Stopwords",
"date":"March 7, 2016",
"category": "Engineering",
"author":{
"first_name": "Gabriel",
"last_name": "Moskovicz"
}
}정답
POST my_blogs/_doc/
{
  "id": "57",
  "title": "Phrase Queries: a world without Stopwords",
  "date":"March 7, 2016",
  "category": "Engineering",
  "author":{
    "first_name": "Gabriel",
    "last_name": "Moskovicz"
  }
}
정답
GET my_blogs/_doc/1# 제대로 삭제 됐다면, GET으로 id 2를 호출할때, 다음과 같은 response
{
"_index": "my_blogs",
"_type": "_doc",
"_id": "2",
"found": false
}정답
DELETE my_blogs/_doc/2정답
DELETE my_blogs# response
{
"hits":{
"total":1594
}
}정답
GET blogs/_search
{
  "query":{
    "match_all":{}
  }
}정답
GET blogs/_search
{
  "size": 100,
  "query":{
    "match_all":{}
  }
}정답
GET blogs/_search
{
  "query":{
    "range":{
      "publish_date":{
        "gte":"2017-05-01",
        "lte":"2017-05-31"
      }
    }
  }
}정답
GET blogs/_search
{
  "query":{
    "match":{
      "title":"elastic"
    }
  }
}정답
- "elastic stack"을 match로 query하면, elastic 또는 stack을 포함하는 blog를 리턴한다. 즉, title에 stack이란 단어만 가지고 있는 blog도 리턴한다.
operator를 사용해서 title field의 "elastic stack"을 쿼리할떄 결과값이 elastic과 stack을 모두 포함하게 쿼리하기 (response: 70 hits)
정답
GET blogs/_search
{
  "query":{
    "match":{
      "title":{
        "query":"elastic stack",
        "operator":"and"
      }
    }
  }
}정답
GET blogs/_search
{
  "query":{
    "match":{
      "content":"search"
    }
  }
}정답
GET blogs/_search
{
  "query":{
    "match":{
      "content":"search analytics"
    }
  }
}정답
GET blogs/_search
{
  "query":{
    "match":{
      "content":{
        "query":"search analytics",
        "operator":"and"
      }
    }
  }
}정답
GET blogs/_search
{
  "size":3,
  "query":{
    "match_phrase":{
      "content":"search analytics"
    }
  }
}정답
GET blogs/_search
{
  "query":{
    "match_phrase":{
      "content":{
        "query":"search analytics",
        "slop": 1
      }
    }
  }
}정답
GET blogs/_search
{
  "query":{
    "match":{
      "content":"performance optimizations improvements"
      }
    }
  }
}정답
GET blogs/_search
{
  "query":{
    "match":{
      "content":{
        "query":"performance optimizations improvements",
        "minimum_should_match": 2
      }
    }
  }
}
위의 결과값을 튜닝, must_not 옵션을 사용해서, title 에 release, releases 또는 released을 포함하는 blog를 제외하고 쿼리하기 (47 hits)
정답
GET blogs/_search
{
  "query": {
    "bool": {
      "must": [
        {
          "match": {
            "content": {
              "query":"performance optimizations improvements",
              "minimum_should_match": 2
            }
          }
        }
      ],
      "must_not": [
        {
          "match": {
            "title": "release releases released"
          }
        }
      ]
    }
  }
}- must: 문서가 모든 필터에 매치될때 (AND)
- should: 문서가 하나의 필터라도 매치될때 (OR)
- must_not: 문서가 필터에 매치되지 않을때 (NOT)
- should가 없는 query에선 "correct"한 답을 얻기 힘들다. 그치만 should clause를 각 field("category","content","title")에 추가하면 적절한 top hit을 결과값으로 확인할 수 있다.
{
  "title": "Elastic Cloud and Meltdown",
  "publish_date": "2018-01-07T23:00:00.000Z",
  "author": "Elastic Engineering",
  "category": "Engineering",
  "content": " Elastic is aware of the Meltdown and Spectre vulnerabilities...",
  "url": "/blog/elastic-cloud-and-meltdown",
  "locales": ["de-de","fr-fr"]
}
정답
PUT tmp_blogs/_doc/1
{
  "title": "Elastic Cloud and Meltdown",
  "publish_date": "2018-01-07T23:00:00.000Z",
  "author": "Elastic Engineering",
  "category": "Engineering",
  "content": " Elastic is aware of the Meltdown and Spectre vulnerabilities...",
  "url": "/blog/elastic-cloud-and-meltdown",
  "locales": ["de-de","fr-fr"]
}정답
GET tmp_blogs/_mapping

# response
{
  "tmp_blogs": {
    "mappings": {
      "_doc": {
        "properties": {
          "author": {
            "type": "text",
            "fields": {
              "keyword": {
                "type": "keyword",
                "ignore_above": 256
              }
            }
          },
          "category": {
            "type": "text",
            "fields": {
              "keyword": {
                "type": "keyword",
                "ignore_above": 256
              }
            }
          },
          "content": {
            "type": "text",
            "fields": {
              "keyword": {
                "type": "keyword",
                "ignore_above": 256
              }
            }
          },
          "locales": {
            "type": "text",
            "fields": {
              "keyword": {
                "type": "keyword",
                "ignore_above": 256
              }
            }
          },
          "publish_date": {
            "type": "date"
          },
          "title": {
            "type": "text",
            "fields": {
              "keyword": {
                "type": "keyword",
                "ignore_above": 256
              }
            }
          },
          "url": {
            "type": "text",
            "fields": {
              "keyword": {
                "type": "keyword",
                "ignore_above": 256
              }
            }
          }
        }
      }
    }
  }
}- keyword datatype(Query context): 정확한 값으로 검색할때 사용,
- sorting 가능, aggregation 가능, analyze 불가능
- ex) email address, hostname, status code, zip code, tag (filtering, ex:
status가published인 모든 blog포스트를 찾을때)
- text datatypes(Filter context): full-text로 인덱싱되는 필드타입,
analyzer를 통해 단어로 검색가능하도록 인덱싱 됨- sorting 불가능, aggregation 불가능, analyze 가능
- ex) email본문, 상품설명
정답
- title: 일반 string이므로 text, 하지만 검색과 정렬이 필요할지모르니
fieldsparameter를 사용해 keyword 추가 설정 - publish_date: date 으로 설정
- author: 일반 string이므로 text, 하지만 검색과 정렬이 필요할지모르니
fieldsparameter를 사용해 keyword 추가 설정 - category: 검색 필요, 일반적으로 카테고리는 드랍다운메뉴 또는 리스트, 고로 keyword 로 설정
- content: 정렬(sorting)과 집계(aggregation)가 필요없음, 고로 text 로 설정
- url: 일반 string이므로 text, 하지만 검색과 정렬이 필요할지모르니
fieldsparameter를 사용해 keyword 추가 설정 - locales: fixed string의 array이다. 검색할 필요성 없다. keyword 만으로 설정
정답
PUT tmp_blogs
{
  "mappings": {
    "_doc":{
      "properties":{
        "title":{
          "type":"text",
          "fields":{
            "keyword":{
              "type":"keyword",
              "ignore_above":256
            }
          }
        },
        "publish_date":{
          "type":"date"
        },
        "author":{
          "type":"text",
          "fields":{
            "keyword":{
              "type":"keyword",
              "ignore_above":256
            }
          }
        },
        "category":{
          "type":"keyword"
        },
        "content":{
          "type":"text"
        },
        "url":{
          "type":"text",
          "fields":{
            "keyword":{
              "type":"keyword",
              "ignore_above":256
            }
          }
        },
        "locales":{
          "type":"keyword"
        }
      }
    }
  }
}
아래 샘플 document를 indexing하고, category field에서 engineering 과 Engineering 을 검색해 보기, 어떤것이 리턴되고 리턴되지 않는지 확인해보고, 그 이유는?
PUT tmp_blogs/_doc/1
{
  "title": "Elastic Cloud and Meltdown",
  "publish_date": "2018-01-07T23:00:00.000Z",
  "author": "Elastic Engineering",
  "category": "Engineering",
  "content": " Elastic is aware of the Meltdown and Spectre vulnerabilities...",
  "url": "/blog/elastic-cloud-and-meltdown",
  "locales": ["de-de","fr-fr"]
}
정답
GET tmp_blogs/_search
{
  "query":{
    "match":{
      "category": "engineering"   # 또는 "Engineering"
    }
  }
}- keyword field에는 text analysis이 없다. "engineering"은 category field의 값과 매치되지 않는다.
"Introducing beta releases: Elasticsearch and Kibana Docker images!"정답
GET _analyze
{
  "text": "Introducing beta releases: Elasticsearch and Kibana Docker images!"
}정답
- **standard** analyzerGET _analzye
{
"analyzer": "whitespace",
"text": "Introducing beta releases: Elasticsearch and Kibana Docker images!"
}- whitespace analyzer는 대문자를 소문자로 변경하지 않고, punctuation을 제거하지 않는다.
- Standard Analyzer: default analzyer, punctuation 제거, 대문자를 소문자로, stop word 제거
- Whitespace Analyzer: whitespace로만 term 분리
- Simple Analyzer: 모든 알파벳은 소문자로, punctuation 제거
- Stop Analyzer: simple analzyer에 stop word 제
- Keyword Analyzer: 어떤 text이던간에 single term으로써 정확히 같은 text를 리턴한다.
"text": "This release includes mainly bug fixes."정답
- english analyzer는 snowball stemmer를 사용하지 않고, english_stemmer 를 사용한다.
- english stemmer: mainly => mainli
- snowball stemmer: mainly => main
- standard tokenizer
- lowercase token filter
- asciifolding token filter
"text": "Elasticsearch é um motor de buscas distribuído."정답
GET _analyze
{
  "tokenizer": "standard",
  "filter": ["lowercase", "asciifolding"],
  "text": "Elasticsearch é um motor de buscas distribuído."
}- é/í 가 e/i 로 변경
"text": "C++ can help it and your IT systems."정답
GET _analyze
{
  "analyzer": "english",
  "text": "C++ can help it and your IT systems."
}

# response
{
  "tokens": [
    {
      "token": "c",
      "start_offset": 0,
      "end_offset": 1,
      "type": "<ALPHANUM>",
      "position": 0
    },
    {
      "token": "can",
      "start_offset": 4,
      "end_offset": 7,
      "type": "<ALPHANUM>",
      "position": 1
    },
    {
      "token": "help",
      "start_offset": 8,
      "end_offset": 12,
      "type": "<ALPHANUM>",
      "position": 2
    },
    {
      "token": "your",
      "start_offset": 20,
      "end_offset": 24,
      "type": "<ALPHANUM>",
      "position": 5
    },
    {
      "token": "system",
      "start_offset": 28,
      "end_offset": 35,
      "type": "<ALPHANUM>",
      "position": 7
    }
  ]
}- "C++"의 기호가 사라지고, "IT"에 변화가 생긴다.
- "c++"(소/대문자 모두)를 "cpp"로 변환
- "IT"를 (not "it") "_IT_"로 변환
- 모든 text를 소문자로 변환
- default stop word 제거
- 다음 term 제거: can, we, our, you, your, all
정답
# before
GET _analyze
{
  "analyzer": "english",
  "text": "C++ can help it and your IT systems."
}

# create index
PUT analysis_test
{
  "settings":{
    "analysis":{
      "char_filter":{
        "cpp_it":{
          "type": "mapping",
          "mappings": ["c++ => cpp", "C++ => cpp", "IT => _IT_"]
        }
      },
      "filter":{
        "my_stop":{
          "type":"stop",
          "stopwords":["can","we","our","you","your","all"]
        }
      },
      "analyzer":{
        "my_analyzer":{
          "tokenizer":"standard",
          "char_filter":["cpp_it"],
          "filter":["lowercase","stop","my_stop"]
        }
      }
    }
  }
}

# after
GET analysis_test/_analyze
{
  "analyzer":"my_analyzer",
  "text": "C++ can help it and your IT systems."
}GET blogs/_search
{
"query": {
"match": {
"content": "c++"
}
}
}
GET blogs/_search
{
"query": {
"match": {
"title": "IT"
}
}
}- 위에서 구성한 my_analyzer 를 활용해서, blogs_analyzed index 생성하기
- my_analyzer 이름의 analyzer를 multi-field(content 와 title field)에 추가하기 (multi-field type: text)
정답
PUT blogs_analyzed
{
  "settings": {
    "analysis": {
      # filter 추가 1
      "char_filter": {
        "cpp_it": {
          "type": "mapping",
          "mappings": ["c++ => cpp", "C++ => cpp", "IT => _IT_"]
        }
      },
      # filter 추가 2
      "filter": {
        "my_stop": {
          "type": "stop",
          "stopwords": ["can", "we", "our", "you", "your", "all"]
        }
      },
      # 상위 두개의 filter를 analyzer의 filter에 추가
      "analyzer": {
        "my_analyzer": {
          "tokenizer": "standard",
          "char_filter": ["cpp_it"],
          "filter": ["lowercase", "stop", "my_stop"]
        }
      }
    }
  },
  "mappings": {
    "_doc":{
      "properties":{
        "title":{
          "type":"text",
          "fields":{
            "keyword":{
              "type":"keyword",
              "ignore_above":256
            },
            # title field에 analyzer 추가
            "my_analyzer":{
              "type":"text",
              "analyzer": "my_analyzer"
            }
          }
        },
        "publish_date":{
          "type":"date"
        },
        "author":{
          "type":"text",
          "fields":{
            "keyword":{
              "type":"keyword",
              "ignore_above":256
            }
          }
        },
        "category":{
          "type":"keyword"
        },
        "content":{
          "type":"text",
          "fields":{
            # content field에 analyzer 추가
            "my_analyzer":{
              "type":"text",
              "analyzer": "my_analyzer"
            }
          }
        },
        "url":{
          "type":"text",
          "fields":{
            "keyword":{
              "type":"keyword",
              "ignore_above":256
            }
          }
        },
        "locales":{
          "type":"keyword"
        }
      }
    }
  }
}POST _reindex
{
"source": {"index": "blogs"},
"dest": {"index": "blogs_analyzed"}
}정답
GET blogs_analyzed/_search
{
  "_source": "title",
  "query":{
    "match":{
      "title.my_analyzer": "IT"
    }
  }
}

GET blogs_analyzed/_search
{
  "_source": "content",
  "query": {
    "match": {
      "content.my_analyzer": "c++"
    }
  }
}- 클러스터의 이름은?
- 클러스터의 노드 수는?
- 현재 마스터 노드는?
- 클러스터에 있는 index 수는?
- logs_server2 index의 샤드 수와 할당된 샤드의 위치(node)는?
정답
GET _cluster/state

GET _cat/nodes?v
GET _cat/indices?v
GET _cat/shards?v
GET _cat/shards/logs_server2?v정답
PUT test
{
  "settings": {
    "number_of_shards": 4,
    "number_of_replicas": 2
  }
}PUT test/_doc/
{
"test": "test"
}정답
# response
{
  "error": "Incorrect HTTP method for uri [/keke/_doc] and method [PUT], allowed: [POST]",
  "status": 405
}- put으로 indexing할떄: doc ID 필요
- POST로 indexing할떄: doc ID없이도 가능
PUT test/_doc/1
{
  "test":"test"
}
# or
POST test/_doc
{
  "test":"test"
}GET test1/_doc/1정답
{
  "error": {
    "root_cause": [
      {
        "type": "index_not_found_exception",
        "reason": "no such index",
        "resource.type": "index_expression",
        "resource.id": "test1",
        "index_uuid": "_na_",
        "index": "test1"
      }
    ],
    "type": "index_not_found_exception",
    "reason": "no such index",
    "resource.type": "index_expression",
    "resource.id": "test1",
    "index_uuid": "_na_",
    "index": "test1"
  },
  "status": 404
}- test1 index가 존재하지 않는다.
- test1 index 이름을 변경하던지, test1 index 생성
GET blogs/_search
{
  "query": {
    "match": {
      "title": "open source software",
      "minimum_should_match": 2
    }
  }
}
정답
# response
{
  "error": {
    "root_cause": [
      {
        "type": "parsing_exception",
        "reason": "[match] query doesn't support multiple fields, found [title] and [minimum_should_match]",
        "line": 5,
        "col": 31
      }
    ],
    "type": "parsing_exception",
    "reason": "[match] query doesn't support multiple fields, found [title] and [minimum_should_match]",
    "line": 5,
    "col": 31
  },
  "status": 400
}- match query는 multiple field를 지원하지 않는다. (title, minimum_should_match)
# fixed one
GET blogs/_search
{
  "query":{
    "match":{
      "title":{
        "query":"open source software",
        "minimum_should_match": 2
      }
    }
  }
}GET blogs/_search
{"query":{"match":{"title":{"query":"open source software,"minimum_should_match":2}}}}
정답
# response
{
  "error": {
    "root_cause": [
      {
        "type": "json_parse_exception",
        "reason": "Unexpected character ('m' (code 109)): was expecting comma to separate Object entries\n at [Source: org.elasticsearch.transport.netty4.ByteBufStreamInput@1e3aee93; line: 1, column: 61]"
      }
    ],
    "type": "json_parse_exception",
    "reason": "Unexpected character ('m' (code 109)): was expecting comma to separate Object entries\n at [Source: org.elasticsearch.transport.netty4.ByteBufStreamInput@1e3aee93; line: 1, column: 61]"
  },
  "status": 500
}- response로부터 JSON parse exception이란 것을 확인할 수 있다. JSON 문법 수정 필요
- software 다음에 double quote 필요
PUT test1/_doc/1
{
  "date": "2017-09-10"
}

PUT test2/_doc/1
{
  "date": "September 10, 2017"
}

GET test*/_search
{
  "query": {
    "match": {
      "date": "September"
    }
  }
}
정답
# response (각각 환경마다 다를 수 있음)
{
  "took": 40,
  "timed_out": false,
  "_shards": {
    "total": 10,
    "successful": 5,
    "skipped": 0,
    "failed": 5,
    "failures": [
      {
        "shard": 0,
        "index": "test1",
        "node": "NAPM4UaBSiiQdO5Gi65RgQ",
        "reason": {
          "type": "query_shard_exception",
          "reason": """
failed to create query: {
  "match" : {
    "date" : {
      "query" : "September",
      "operator" : "OR",
      "prefix_length" : 0,
      "max_expansions" : 50,
      "fuzzy_transpositions" : true,
      "lenient" : false,
      "zero_terms_query" : "NONE",
      "auto_generate_synonyms_phrase_query" : true,
      "boost" : 1.0
    }
  }
}
""",
          "index_uuid": "du5PFM_oQCK72FxhpqVVyA",
          "index": "test1",
          "caused_by": {
            "type": "parse_exception",
            "reason": "failed to parse date field [September] with format [strict_date_optional_time||epoch_millis]",
            "caused_by": {
              "type": "illegal_argument_exception",
              "reason": "Parse failure at index [0] of [September]"
            }
          }
        }
      }
    ]
  },
  "hits": {
    "total": 1,
    "max_score": 0.2876821,
    "hits": [
      {
        "_index": "test2",
        "_type": "_doc",
        "_id": "1",
        "_score": 0.2876821,
        "_source": {
          "date": "September 10, 2017"
        }
      }
    ]
  }
}- 별다른 에러 코드가 없으므로 status code는 200, 하지만 샤드 검색결과를 확인해보면 5개의 성공과 5개의 실패가 있다.
- 검색에 wildcard(asterisk)가 포함되면 자주 발생하는 상황
- 이것은 찾음과 못찾음을 말하는 것이 아니라, 검색이 가능과 불가능을 말한다고 할 수 있다.
- 여기서 September 는 date 로써 파씽될 수 없다.
- test2 index의 mapping을 확인해 보자
GET test2/_mapping

# response
{
  "test2": {
    "mappings": {
      "_doc": {
        "properties": {
          "date": {
            "type": "text",
            "fields": {
              "keyword": {
                "type": "keyword",
                "ignore_above": 256
              }
            }
          }
        }
      }
    }
  }
}- 위의 response에서 볼 수 있는것과 같이, test2 index에 포함된 date field의 type은 text 인 것을 확인 할 수 있다.
정답
GET blogs/_search
{
  "query":{
    "match":{
      "content": "open source"
    }
  }
}
GET blogs/_search
{
"query":{
"match":{
"content": "open source"
}
}
}- content field에서 쿼리한 결과(hit)이 더 많다.(430 > 6) 적절성은 파악하긴 애매
정답
GET blogs/_search
{
  "query":{
    "multi_match":{
      "query": "open source",
      "fields": ["content", "title"]
    }
  }
}- hits: 433, 겹치는 결과값이 3개
정답
GET blogs/_search
{
  "query":{
    "multi_match": {
      "query": "open source",
      "fields": ["content", "title^2"]
    }
  }
}- score값이 2배가 된다.
정답
GET blogs/_search
{
  "query":{
    "multi_match":{
      "fields": ["content", "title"],
      "type": "phrase"
    }
  }
}- 이전 결과값과 비교했을때, 더 적은 hit갯수가 리턴된다. (hits: 165)
정답
GET blogs/_search
{
  "_source": "title",
  "query": {
    "match": {
      "title": {
        "query":"oven sauce",
        "fuzziness": 2
      }
    }
  }
}정답
GET blogs/_search
{
  "_source": "title",
  "query": {
    "match": {
      "title": {
        "query":"oven sauce",
        "fuzziness": "auto"
      }
    }
  }
}
match_phrase query를 사용, content field에서 "elastic stack"을 검색해보자. 그리고 publish_date field를 통해 newest부터 oldest 순으로 정렬해보자.
정답
GET blogs/_search
{
  "query":{
    "match_phrase":{
      "content":"elastic stack"
    }
  },
  "sort": [
    {
      "publish_date": {
        "order": "desc"
      }
    }
  ]
}정답
GET blogs/_search
{
  "_source": ["author","publish_date"],
  "query":{
    "match_phrase": {
      "content": {
        "query":"elastic stack"
      }
    }
  },
  "sort": [
    {
      "author": {
        "order": "asc"
      }
    },
    {
      "publish_date": {
        "order": "desc"
      }
    }
  ]
}정답
GET blogs/_search
{
  "size": 3,
  "query": {
    "match_phrase": {
      "content": {
        "query" : "elastic stack"
      }
    }
  },
  "sort": [
    {
      "author.keyword": {
        "order": "asc"
      }
    },
    {
      "publish_date": {
        "order": "desc"
      }
    }
  ]
}정답
GET blogs/_search
{
  "from": 9,
  "size": 3,
  "query": {
    "match_phrase": {
      "content": {
        "query" : "elastic stack"
      }
    }
  },
  "sort": [
    {
      "author.keyword": {
        "order": "asc"
      }
    },
    {
      "publish_date": {
        "order": "desc"
      }
    }
  ]
}- from 의 default값은 0, 즉 첫번쨰 포지션은 0이다.
위의 쿼리를 수정해서, title field와 content field에서 <mark> HTML tag를 사용해서 "elastic stack"을 검색했을때 highlight되게 쿼리해 보자 ("reqire_field_match":false일때 모든 field를 highlight한다.)
정답
GET blogs/_search
{
  "size": 3,
  "query": {
    "match_phrase": {
      "content": {
        "query" : "elastic stack"
      }
    }
  },
  "sort": [
    {
      "author.keyword": {
        "order": "asc"
      }
    },
    {
      "publish_date": {
        "order": "desc"
      }
    }
  ],
  "highlight": {
    "fields": {
      "title" : {},
      "content" : {}
    },
    "require_field_match": false,
    "pre_tags": ["<mark>"],
    "post_tags": ["</mark>"]
  }
}- field: text를 검색하기 위해 사용된다.
- field.keyword: filter, aggregation, sort 등을 사용하기 위해 사용된다.
위의 쿼리를 수정해서, "elastic stack"을 검색할때 "Engineering" category로써 결과를 필터해 보자. ("match_phrase" block을 지우고 "bool" query에서 다시 시작)
정답
GET blogs/_search
{
  "size": 3,
  "query": {
    "bool": {
      "must": [
        {
          "match_phrase": {
            "content": "elastic stack"
          }
        }
      ],
      "filter": {
        "match":{
          "category.keyword":"Engineering"
        }
      }
    }
  },
  "sort": [
    {
      "author.keyword": {
        "order": "asc"
      }
    },
    {
      "publish_date": {
        "order": "desc"
      }
    }
  ]
}정답
GET logs_server*/_search
{

  "aggs": {
    "my_url_value_count": {
      "cardinality": {
        "field": "originalUrl.keyword"
      }
    }
  }
}
위의 쿼리를 수정해서, originalUrl field에 "elastic" 단어를 포함하는 document들을 포함하는 집단을 display하기 위해 쿼리해 보자 (value: 4557)
정답
GET logs_server*/_search
{
  "query":{
    "match":{
      "originalUrl":"elastic"
    }
  },

  "aggs": {
    "my_url_value_count": {
      "cardinality": {
        "field": "originalUrl.keyword"
      }
    }
  }
}정답
- 경도(lat)가 가장 높은 값 찾아서, 갯수 확인
GET logs_server*/_search
{
  "_source": "geoip.location.lat",
  "size": 0,
  "aggs": {
    "my_northernmost_request": {
      "max": {
        "field": "geoip.location.lat"
      }
    }
  }
}정답
GET logs_server*/_search
{
  "query":{
    "range": {
      "geoip.location.lat": {
        "gte": 72
      }
    }

  }
}정답
- AGG_TYPE cardinality 사용
GET logs_server*/_search
{
  "size":0,
  "aggs": {
    "distinct_status_code_count": {
      "cardinality": {
        "field": "status_code"
      }
    }
  }
}정답
- AGG_TYPE terms 사용
GET logs_server*/_search
{
  "size":0,
  "aggs": {
    "status_code_buckets": {
      "terms": {
        "field": "status_code"
      }
    }
  }
}정답
GET logs_server*/_search
{
  "size":0,
  "aggs": {
    "status_code_buckets": {
      "terms": {
        "field": "status_code",
        "order": {
          "_key": "asc"
        }
      }
    }
  }
}GET blogs/_search
{
"query": {
"bool": {
"must": {
"multi_match": {
"query": "open source",
"fields": [
"title^2",
"content"
],
"type": "phrase"
}
}
}
},
"highlight": {
"fields": {
"title": {},
"content": {}
},
"require_field_match": false,
"pre_tags": [
"<mark>"
],
"post_tags": [
"</mark>"
]
}
}정답
GET blogs/_search
{
  "query": {
    "bool": {
      "must": {
        "multi_match": {
          "query": "open source",
          "fields": [
            "title^2",
            "content"
          ],
          "type": "phrase"
        }
      }
    }
  },
  "highlight": {
    "fields": {
      "title": {},
      "content": {}
    },
    "require_field_match": false,
    "pre_tags": [
      "<mark>"
    ],
    "post_tags": [
      "</mark>"
    ]
  },
  "aggs": {
    "category_buckets": {
      "terms": {
        "field": "category.keyword",
        "size": 10
      }
    }
  }
}정답
GET logs_server*/_search
{
  "size":0,
  "aggs": {
    "logs_by_week": {
      "date_histogram": {
        "field": "@timestamp",
        "interval": "week"
      }
    }
  }
}정답
GET logs_server*/_search
{
  "size": 0,
  "aggs": {
    "logs_by_week": {
      "date_histogram": {
        "field": "@timestamp",
        "interval": "week"
      },
      "aggs": {
        "status_code_buckets": {
          "terms": {
            "field": "status_code"
          }
        }
      }
    }
  }
}
suitable level of accuracy를 delivery하고 있음을 확실히 하기 위해, status_code field의 term query에 있는 show_term_doc_count_error 를 enable해보자.
정답
GET logs_server*/_search
{
  "size": 0,
  "aggs": {
    "logs_by_week": {
      "date_histogram": {
        "field": "@timestamp",
        "interval": "week"
      },
      "aggs": {
        "status_code_buckets": {
          "terms": {
            "field": "status_code",
            "show_term_doc_count_error": true
          }
        }
      }
    }
  }
}정답
GET logs_server*/_search
{
  "size":0,
  "aggs": {
    "city_buckets": {
      "terms": {
        "field": "geoip.city_name.keyword",
        "size": 20
      }
    }
  }
}정답
GET logs_server*/_search
{
  "size":0,
  "aggs": {
    "city_buckets": {
      "terms": {
        "field": "geoip.city_name.keyword",
        "size": 20,
        "show_term_doc_count_error": true
      }
    }
  }
}-
elasticsearch가 실행되고 있는 모든 노드 정지, kibana 정지
-
다음을 elasticsearch.yml 모든 노드에 추가
xpack.security.enabled: true-
모든 노드 시작
-
curl 'localhost:9200/_cat/nodes?pretty'실행하면
[root@es01 elasticsearch]# curl 'localhost:9200/_cat/nodes?pretty'
{
  "error" : {
    "root_cause" : [
      {
        "type" : "security_exception",
        "reason" : "missing authentication token for REST request [/_cat/nodes?pretty]",
        "header" : {
          "WWW-Authenticate" : "Basic realm=\"security\" charset=\"UTF-8\""
        }
      }
    ],
    "type" : "security_exception",
    "reason" : "missing authentication token for REST request [/_cat/nodes?pretty]",
    "header" : {
      "WWW-Authenticate" : "Basic realm=\"security\" charset=\"UTF-8\""
    }
  },
  "status" : 401
}-
credential 만들어야함
-
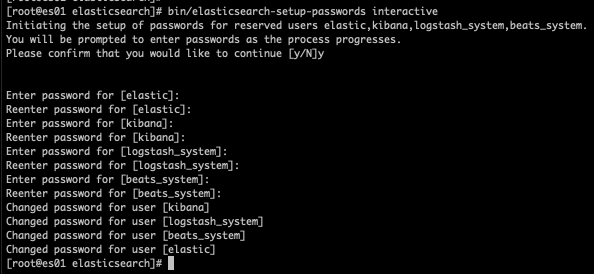
다음을 실행
cd /usr/share/elasticsearch
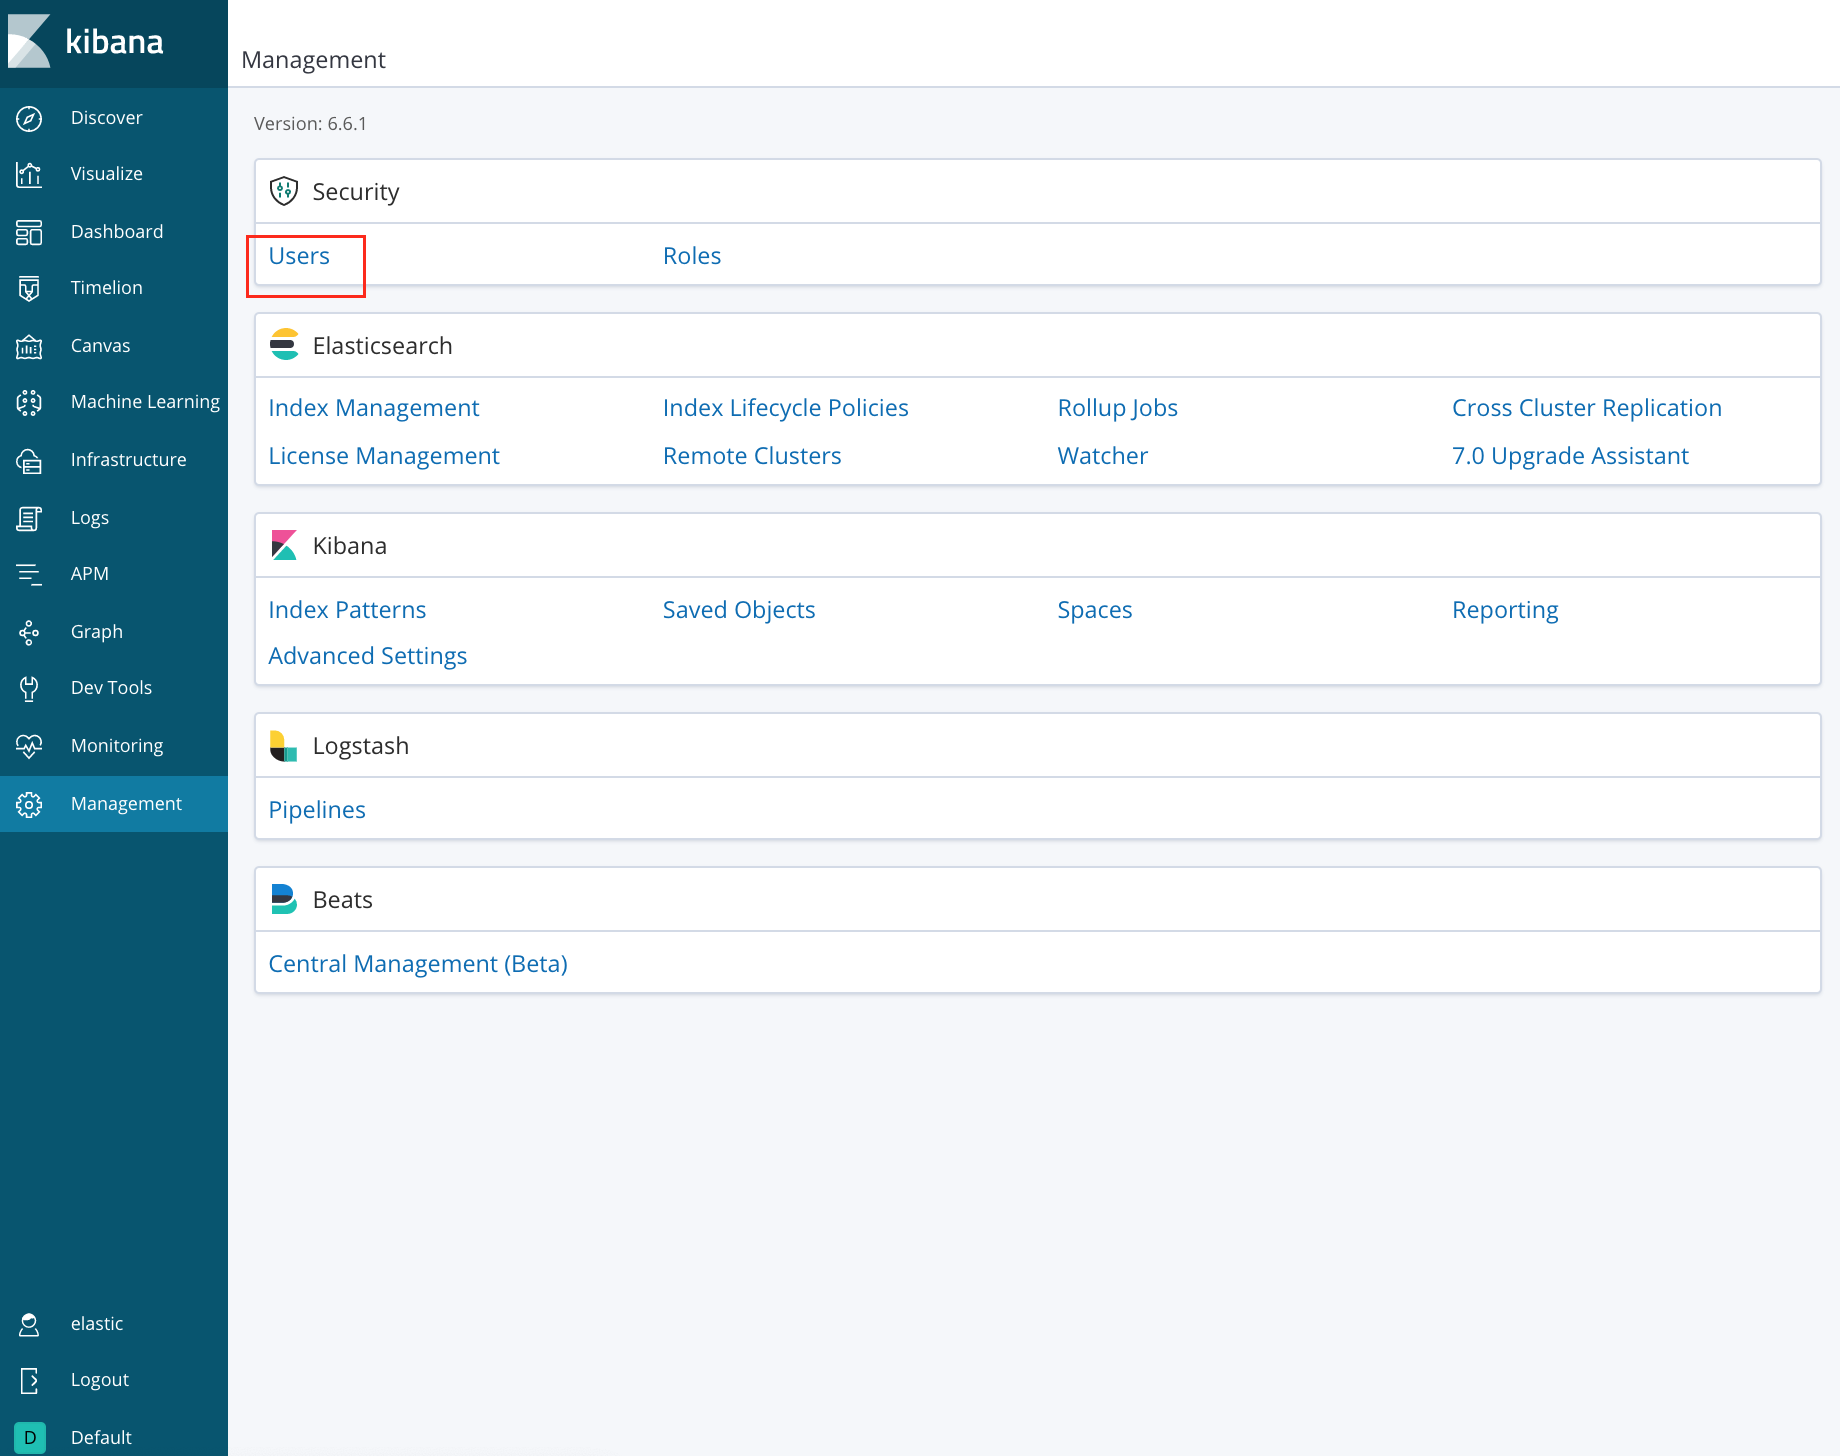
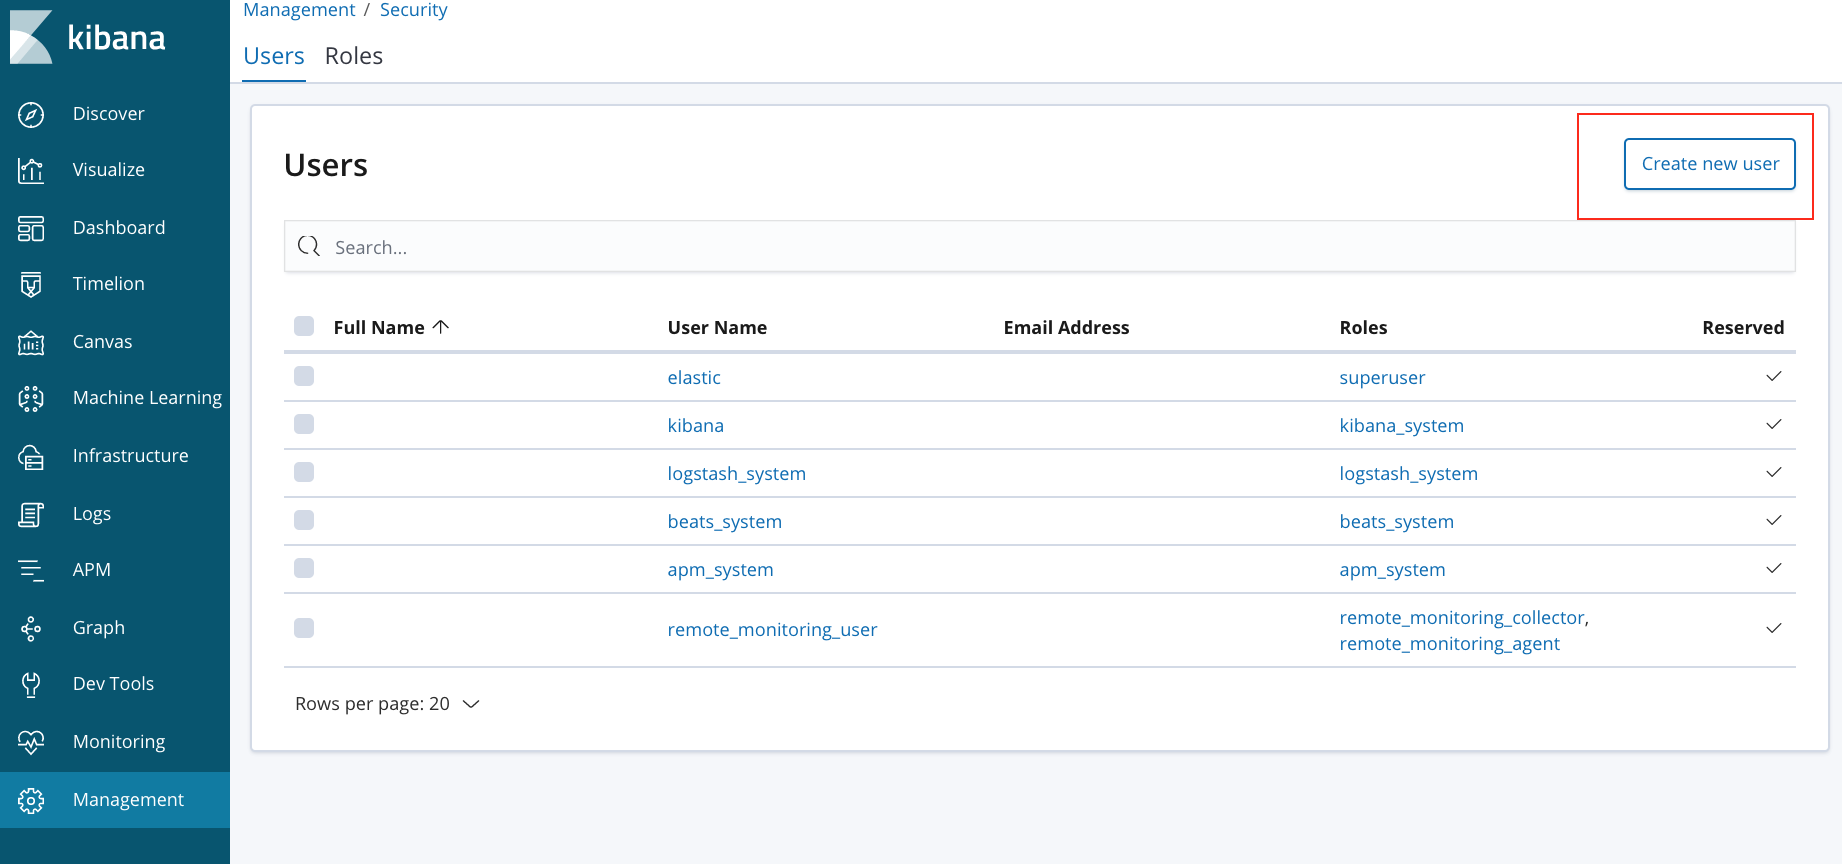
bin/elasticsearch-setup-passwords interactive- 다음을 kibana.yml에 추가
elasticsearch.username:"elastic"
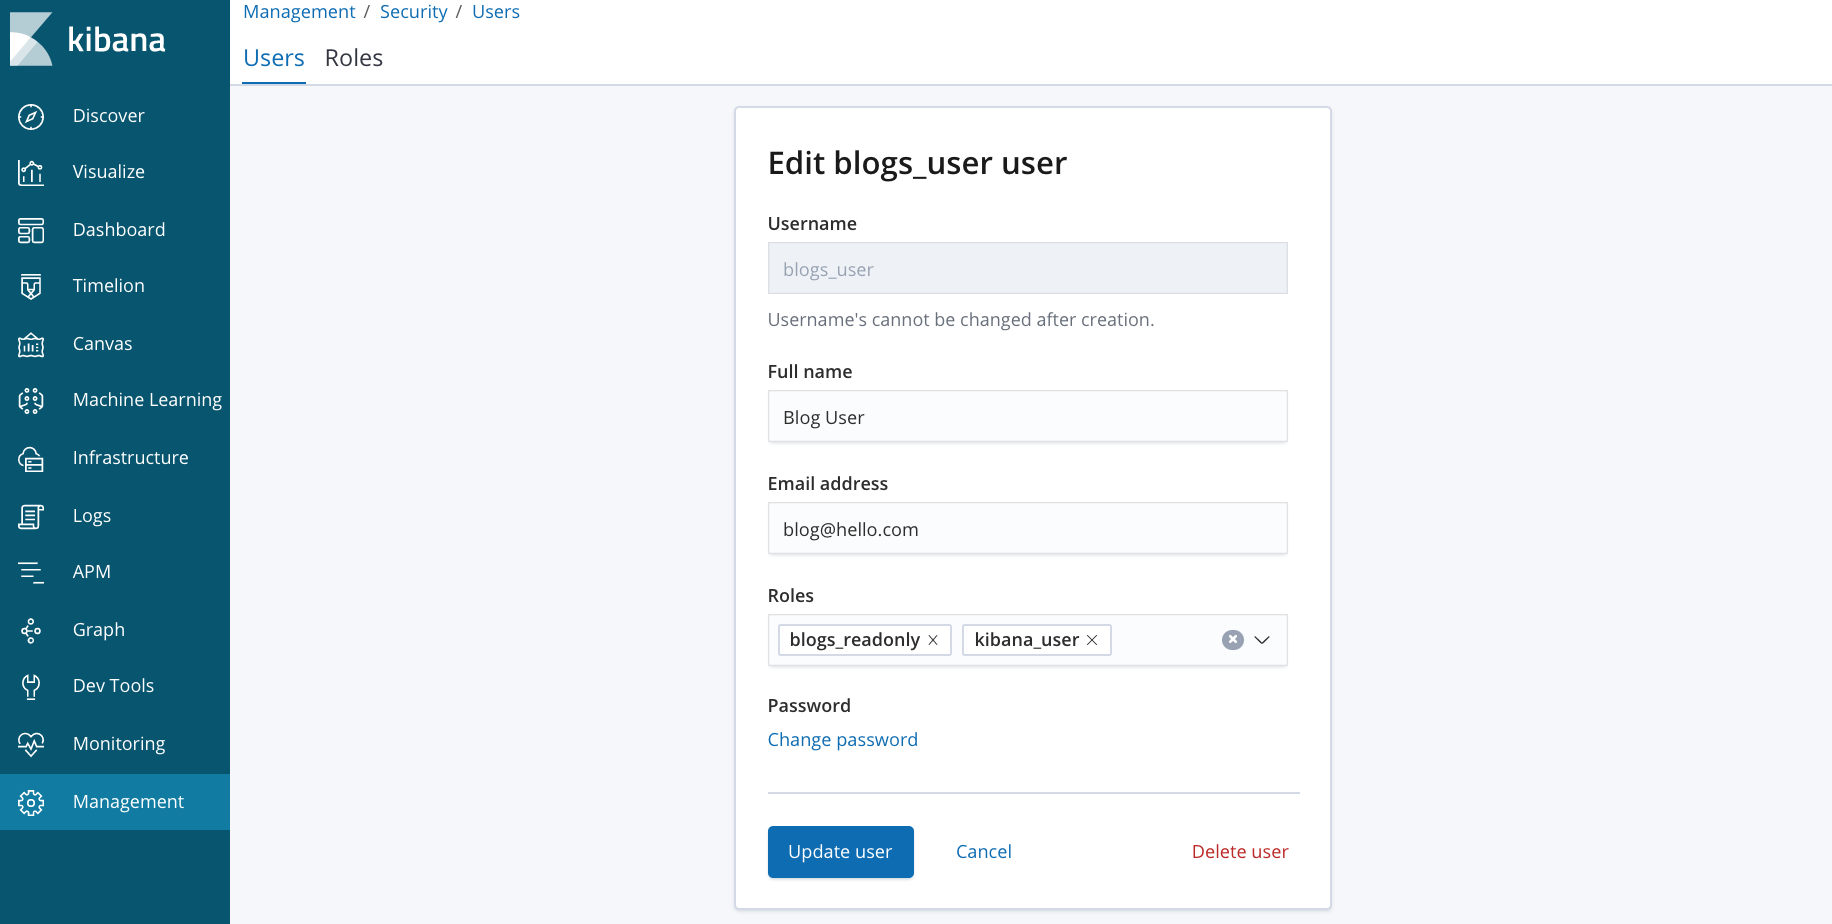
elasticsearch.password:"<PASSWORD>"- kibana 재시작
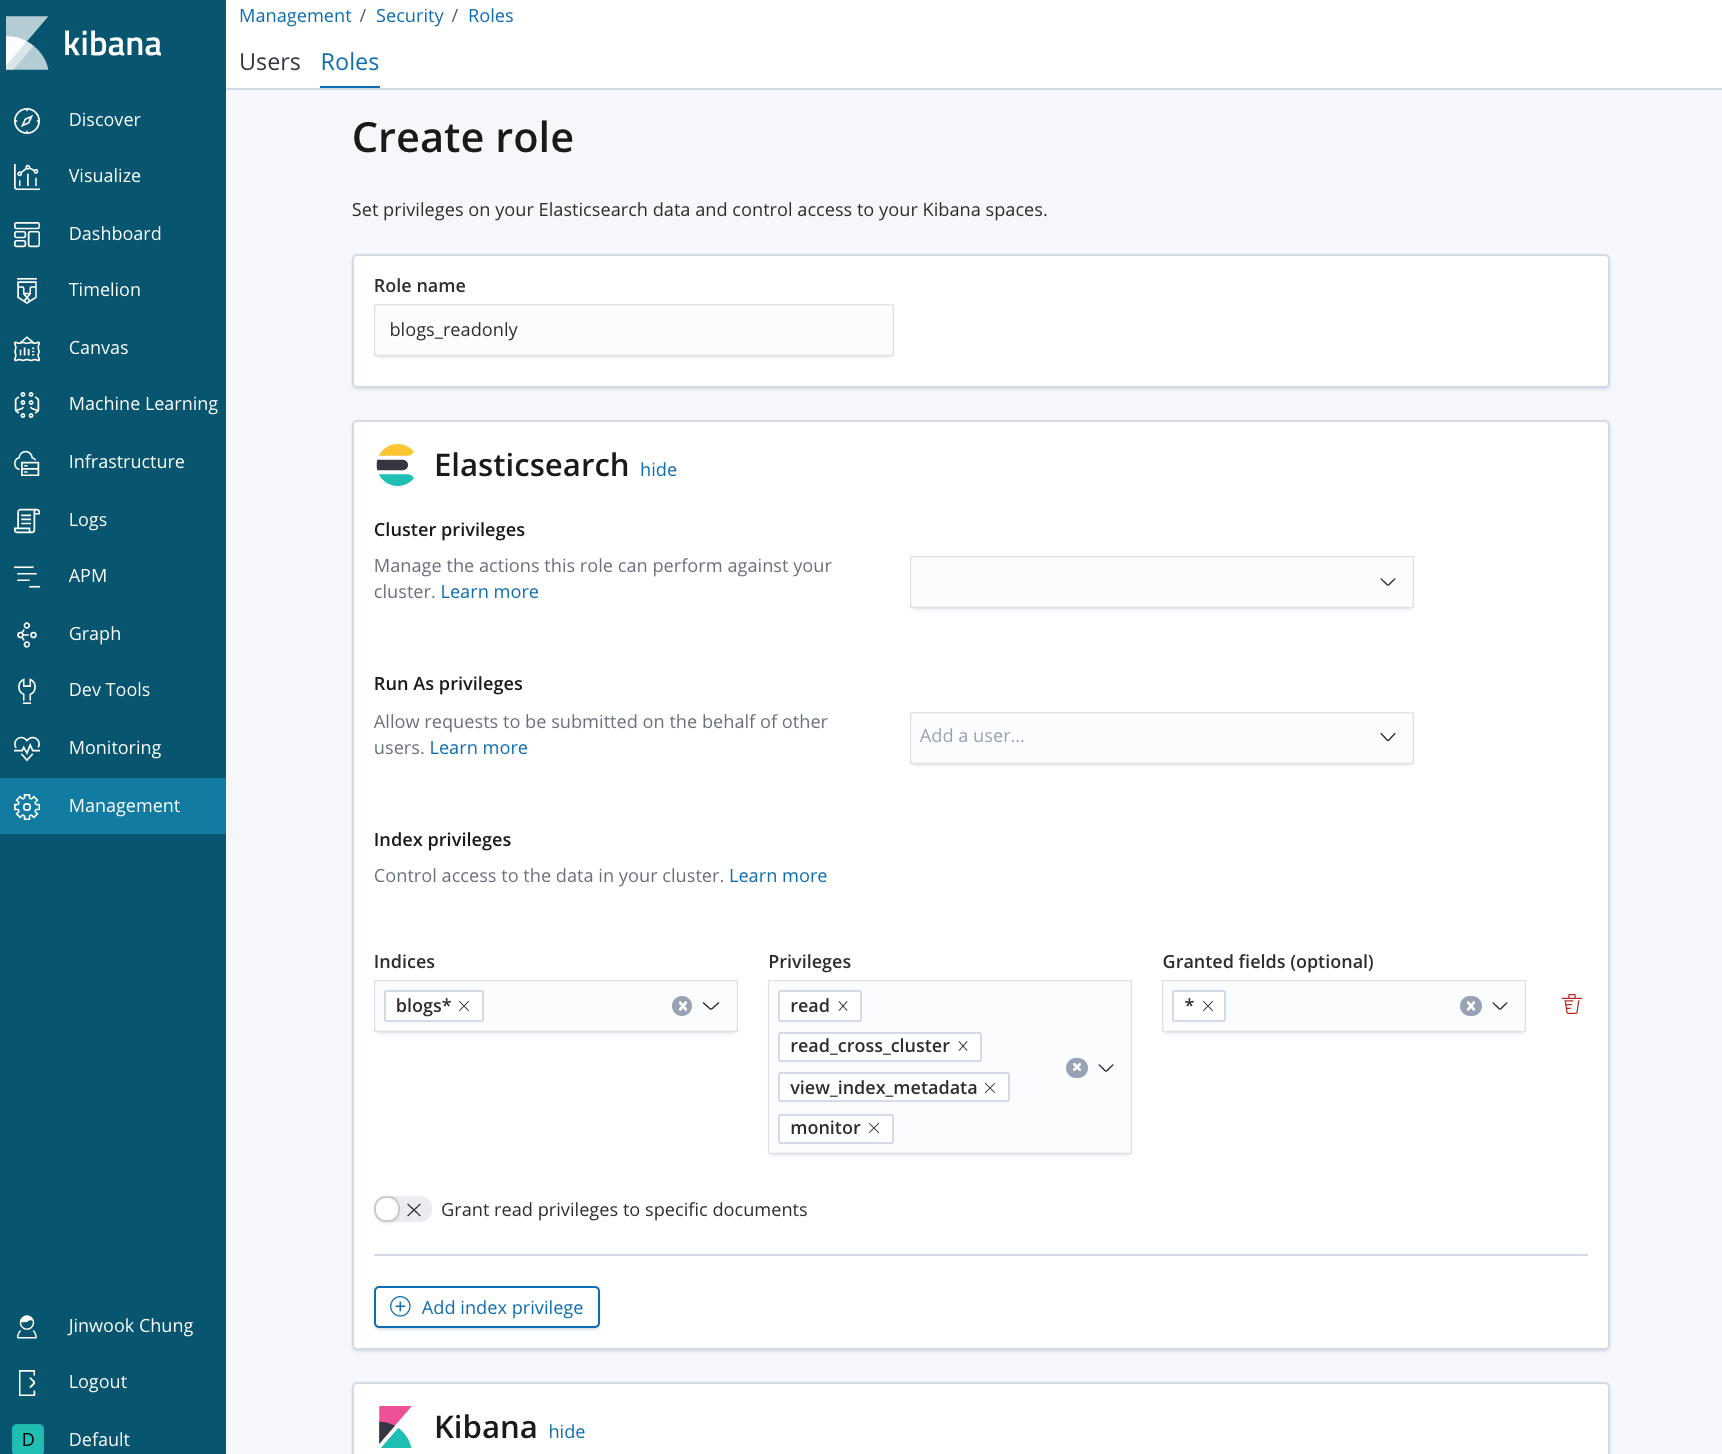
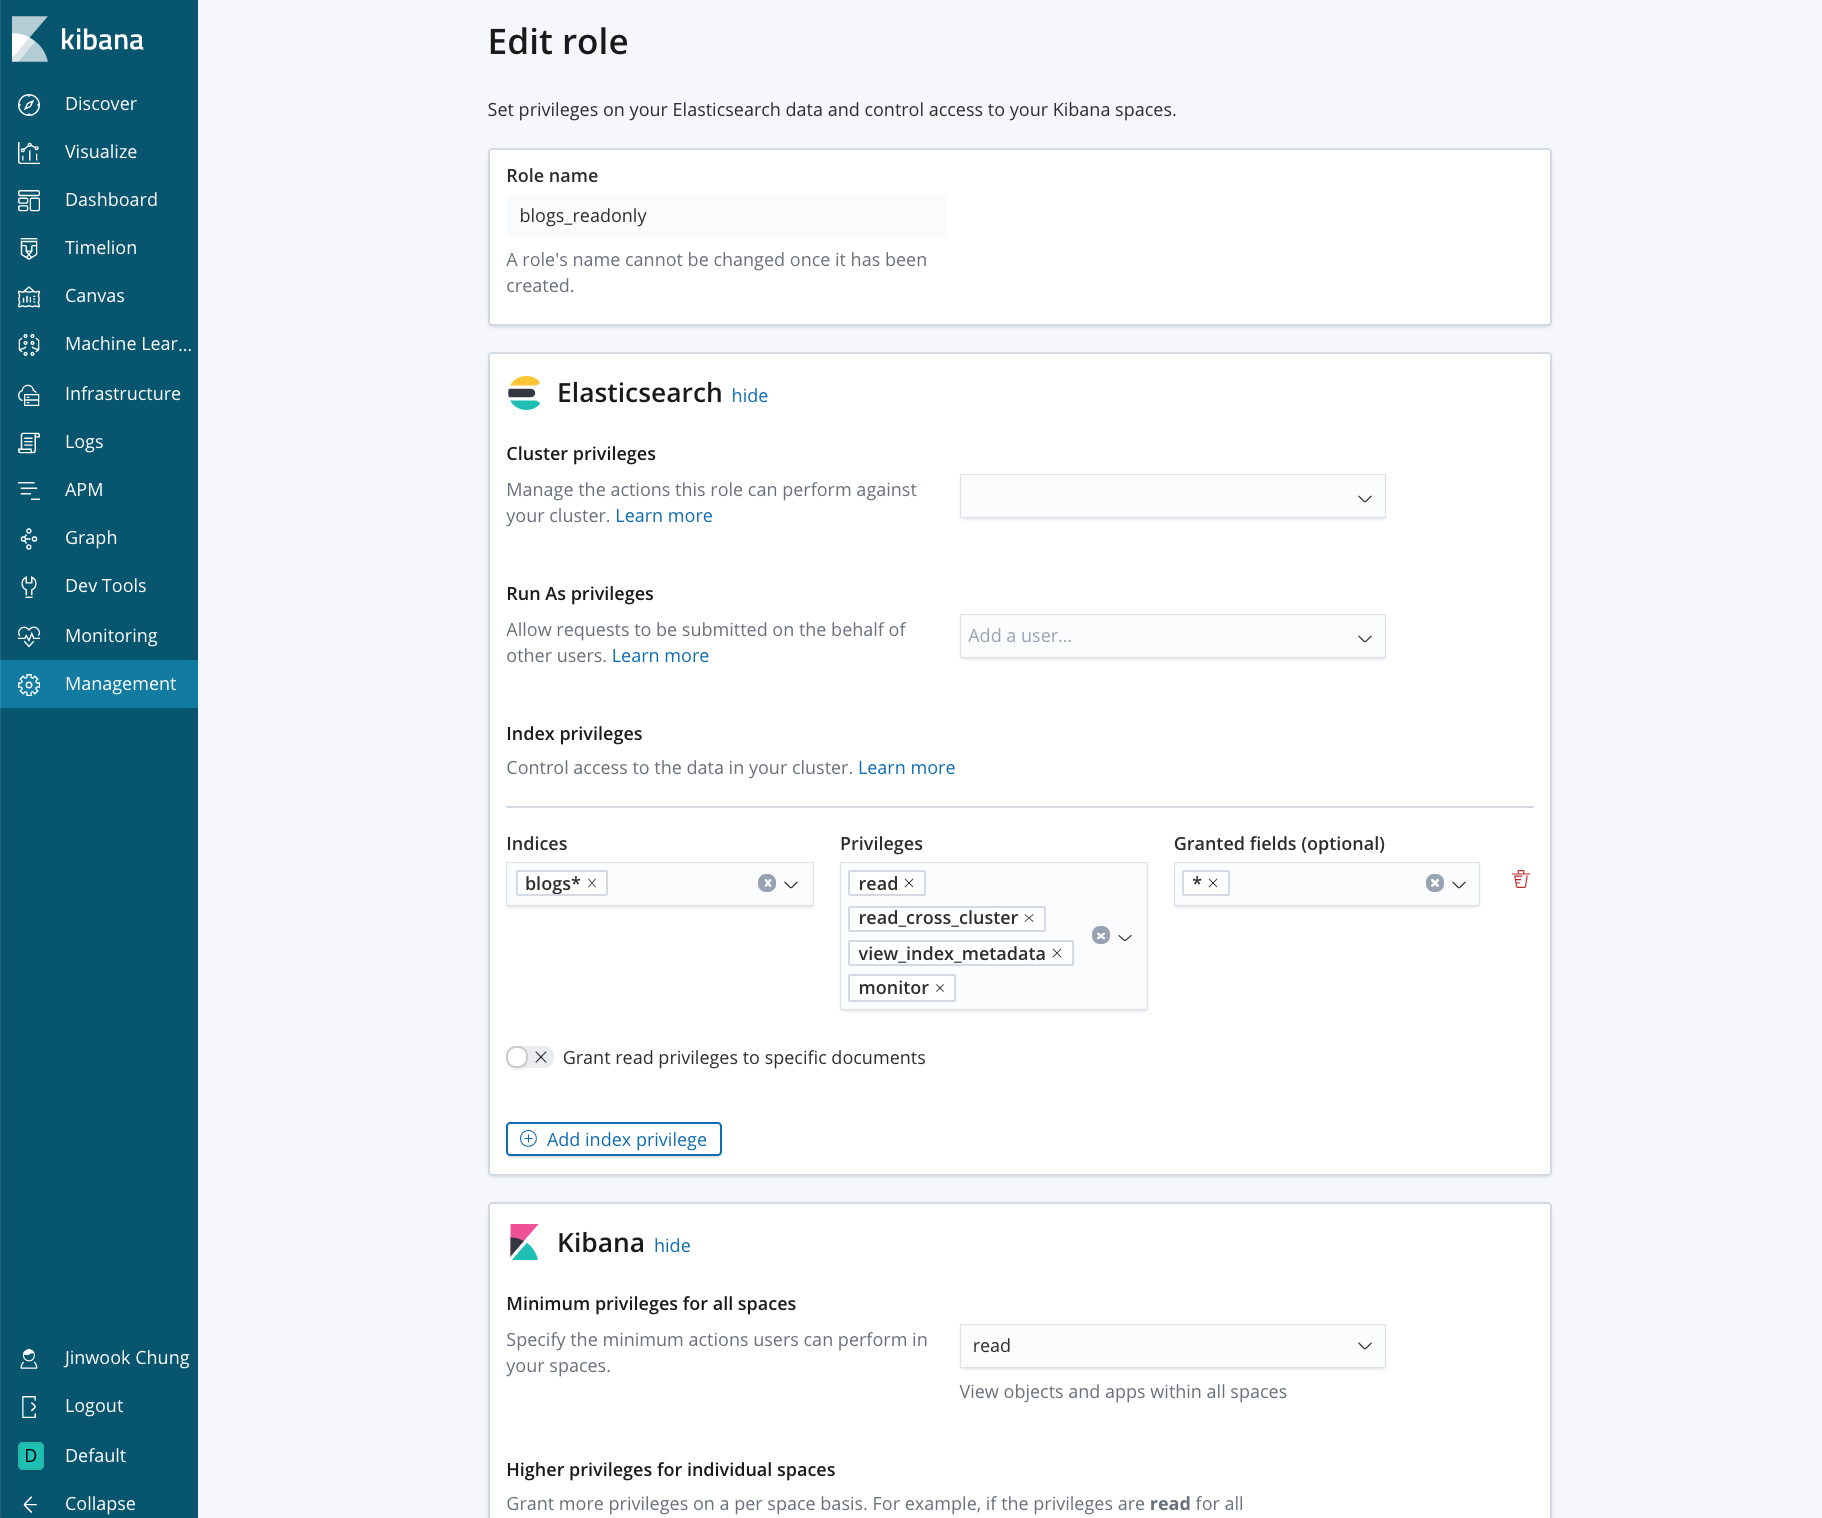
- 로그아웃하고 방금 생성한 blogs_user 로 로그인
- 아래의 command 실행해보자
GET blogs*/_search

GET _cat/indices

PUT blogs/_doc/1
{
  "a": "b"
}

DELETE blogs- blogs_user 는 권한이 없는 것을 확인 할 수 있다.
현재 클러스터의 index 중, 3개의 index가 web access logs를 포함하고 있다. 모든 current indexing이 logs_server3 에 되길 원한다고 가정하자. logs_server 를 가르키는 alias를 access_logs_write 이름으로 정의해 보자.
정답
POST _aliases
{
  "actions": [
    {
      "add": {
        "index": "logs_server3",
        "alias": "access_logs_write"
      }
    }
  ]
}정답
POST _aliases
{
  "actions": [
    {
      "add": {
        "index": "logs_server*",
        "alias": "access_logs_read"
      }
    }
  ]
}GET access_logs_read/_search이름이 access_logs_template index template을 정의하자. 이 template은 logs_server/* 의 settings와 mappings와 같다. 추가로 order 값을 10으로 설정하자.
정답
POST _template/access_logs_template
{
  "index_patterns": "logs_server*",
  "order": 10,
  "settings" : {
    "index" : {
      "number_of_shards" : "5",
      "number_of_replicas" : "1"
    }
  }
  ,
  "mappings" : {
    "doc" : {
      "properties" : {
        "@timestamp" : {
          "type" : "date"
        },
        "geoip" : {
          "properties" : {
            "city_name" : {
              "type" : "text",
              "fields" : {
                "keyword" : {
                  "type" : "keyword",
                  "ignore_above" : 256
                }
              }
            },
            "continent_code" : {
              "type" : "text",
              "fields" : {
                "keyword" : {
                  "type" : "keyword",
                  "ignore_above" : 256
                }
              }
            },
            "country_code2" : {
              "type" : "text",
              "fields" : {
                "keyword" : {
                  "type" : "keyword",
                  "ignore_above" : 256
                }
              }
            },
            "country_code3" : {
              "type" : "text",
              "fields" : {
                "keyword" : {
                  "type" : "keyword",
                  "ignore_above" : 256
                }
              }
            },
            "country_name" : {
              "type" : "text",
              "fields" : {
                "keyword" : {
                  "type" : "keyword",
                  "ignore_above" : 256
                }
              }
            },
            "location" : {
              "properties" : {
                "lat" : {
                  "type" : "float"
                },
                "lon" : {
                  "type" : "float"
                }
              }
            },
            "region_name" : {
              "type" : "text",
              "fields" : {
                "keyword" : {
                  "type" : "keyword",
                  "ignore_above" : 256
                }
              }
            }
          }
        },
        "host" : {
          "type" : "text",
          "fields" : {
            "keyword" : {
              "type" : "keyword",
              "ignore_above" : 256
            }
          }
        },
        "http_version" : {
          "type" : "text",
          "fields" : {
            "keyword" : {
              "type" : "keyword",
              "ignore_above" : 256
            }
          }
        },
        "input" : {
          "properties" : {
            "type" : {
              "type" : "text",
              "fields" : {
                "keyword" : {
                  "type" : "keyword",
                  "ignore_above" : 256
                }
              }
            }
          }
        },
        "language" : {
          "properties" : {
            "code" : {
              "type" : "text",
              "fields" : {
                "keyword" : {
                  "type" : "keyword",
                  "ignore_above" : 256
                }
              }
            },
            "url" : {
              "type" : "text",
              "fields" : {
                "keyword" : {
                  "type" : "keyword",
                  "ignore_above" : 256
                }
              }
            }
          }
        },
        "level" : {
          "type" : "text",
          "fields" : {
            "keyword" : {
              "type" : "keyword",
              "ignore_above" : 256
            }
          }
        },
        "method" : {
          "type" : "text",
          "fields" : {
            "keyword" : {
              "type" : "keyword",
              "ignore_above" : 256
            }
          }
        },
        "originalUrl" : {
          "type" : "text",
          "fields" : {
            "keyword" : {
              "type" : "keyword",
              "ignore_above" : 256
            }
          }
        },
        "response_size" : {
          "type" : "long"
        },
        "runtime_ms" : {
          "type" : "long"
        },
        "status_code" : {
          "type" : "long"
        },
        "user_agent" : {
          "type" : "text",
          "fields" : {
            "keyword" : {
              "type" : "keyword",
              "ignore_above" : 256
            }
          }
        }
      }
    }
  }
}정답
PUT logs_server4

GET logs_server4정답
POST _aliases
{
  "actions": [
    {
      "remove": {
        "index": "logs_server3",
        "alias": "access_logs_write"
      }
    },
    {
      "add": {
        "index": "logs_server4",
        "alias": "access_logs_write"
      }
    }
  ]
}
access_logs_write alias를 사용해서, "_id"를 1로 할당하고 다음의 데이터를 인덱싱해보자. GET을 사용해서 logs_server4 index에 제대로 값이 인덱싱되었는지 확인해보자.
{
  "@timestamp": "2018-03-21T05:57:19.722Z",
  "originalUrl": "/blog/logstash-jdbc-input-plugin",
  "host": "server2",
  "response_size": 58754,
  "status_code": 200,
  "method": "GET",
  "runtime_ms": 143,
  "geoip": {
    "country_code2": "IN",
    "country_code3": "IN",
    "continent_code": "AS",
    "location": {
      "lon": 77.5833,
      "lat": 12.9833
    },
    "region_name": "Karnataka",
    "city_name": "Bengaluru",
    "country_name": "India"
  },
  "language": {
    "url": "/blog/logstash-jdbc-input-plugin",
    "code": "en-us"
  },
  "user_agent": "Amazon CloudFront",
  "http_version": "1.1",
  "level": "info"
}
정답
# indexing하기
PUT access_logs_write/doc/1
{
  "@timestamp": "2018-03-21T05:57:19.722Z",
  "originalUrl": "/blog/logstash-jdbc-input-plugin",
  "host": "server2",
  "response_size": 58754,
  "status_code": 200,
  "method": "GET",
  "runtime_ms": 143,
  "geoip": {
    "country_code2": "IN",
    "country_code3": "IN",
    "continent_code": "AS",
    "location": {
      "lon": 77.5833,
      "lat": 12.9833
    },
    "region_name": "Karnataka",
    "city_name": "Bengaluru",
    "country_name": "India"
  },
  "language": {
    "url": "/blog/logstash-jdbc-input-plugin",
    "code": "en-us"
  },
  "user_agent": "Amazon CloudFront",
  "http_version": "1.1",
  "level": "info"
}

# 확인해보기
GET logs_server4/doc/1DELETE my_blogs
PUT my_blogs/_doc/1
{
"id": "1",
"title": "Better query execution",
"category": "Engineering",
"date":"July 15, 2015",
"author":{
"first_name": "Adrian",
"last_name": "Grand",
"company": "Elastic"
}
}
PUT my_blogs/_doc/2
{
"id": "2",
"title": "The Story of Sense",
"date":"May 28, 2015",
"author":{
"first_name": "Boaz",
"last_name": "Leskes"
}
}- document 2를 업데이트 하자: "category"의 값을 "Engineering", "author.company"의 값을 "Elastic"
- "_id" 3인 새로운 document를 다음과 함께 인덱싱하자.
{
  "title": "Using Elastic Graph",
  "category": "Engineering",
  "date": "May 25, 2016",
  "author": {
    "first_name": "Mark",
    "last_name": "Harwood",
    "company": "Elastic"
  }
}
정답
POST my_blogs/_doc/_bulk
{"update": {"_id":2}}
{"doc": {"category":"Engineering", "author.company":"Elastic"}}
{"index": {"_id":3}}
{"title": "Using Elastic Graph","category": "Engineering","date":"May 25, 2016","author": {"first_name": "Mark","last_name": "Harwood","company": "Elastic"}}정답
GET my_blogs/_doc/_mget
{
  "docs":[
    {"_id":1},
    {"_id":2}
  ]
}
documents in chunk를 가져오기 위해, scroll search를 사용해서 500개의 document를 blogs index로 부터 가져오자. 쿼리의 오버헤드를 줄이기 위해 "_doc" 로써 document를 정렬하고, timeout을 3분으로 설정하자.
정답
GET blogs/_search?scroll=3m
{
  "size": 500,
  "query": {
    "match_all": {}
  },
  "sort": [
    {
      "_doc": {
        "order": "asc"
      }
    }
  ]
}정답
GET _search/scroll
{
  "scroll": "3m",
  "scroll_id": "<PUT_YOUR_SCROLL_ID>"
}
Snapshot part 정리중
- 각 노드에
mkdir -p /shared_folder/my_repo를 실행 - 각 노드의
elasticsearch.yml에path.repo: /shared_folder/my_repo추가 - es 재가동
정답
PUT _snapshot/my_local_repo
{
  "type":"fs",
  "settings":{
    "location": "/shared_folder/my_repo"
  }
}
.
.
.
.
.
.
.
.
.
.
.
.
.
.
.
.
.
.
To be fully prepared for the Elastic Certified Engineer exam, candidates should be able to complete all of the following exam objectives with only the assistance of the Elastic documentation:
- Deploy and start an Elasticsearch cluster that satisfies a given set of requirements
- Configure the nodes of a cluster to satisfy a given set of requirements
- Secure a cluster using Elasticsearch Security (doc)
- Define role-based access control using Elasticsearch Security (doc)
-
Define an index that satisfies a given set of requirements
-
Perform index, create, read, update, and delete operations on the documents of an index
-
Define and use index aliases
-
Define and use an index template for a given pattern that satisfies a given set of requirements
-
Define and use a dynamic template that satisfies a given set of requirements
-
Use the Reindex API and Update By Query API to reindex and/or update documents
-
Define and use an ingest pipeline that satisfies a given set of requirements, including the use of Painless to modify documents
-
Write and execute a search query for terms and/or phrases in one or more fields of an index
-
Write and execute a search query that is a Boolean combination of multiple queries and filters
-
Highlight the search terms in the response of a query
-
Sort the results of a query by a given set of requirements
-
Implement pagination of the results of a search query
-
Use the scroll API to retrieve large numbers of results
-
Apply fuzzy matching to a query
-
Define and use a search template
-
Write and execute a query that searches across multiple clusters
-
Write and execute metric and bucket aggregations
-
Write and execute aggregations that contain sub-aggregations
-
Write and execute pipeline aggregations
-
Define a mapping that satisfies a given set of requirements
-
Define and use a custom analyzer that satisfies a given set of requirements
-
Define and use multi-fields with different data types and/or analyzers
-
Configure an index so that it properly maintains the relationships of nested arrays of objects
-
Configure an index that implements a parent/child relationship
-
Allocate the shards of an index to specific nodes based on a given set of requirements
-
Configure shard allocation awareness and forced awareness for an index
-
Diagnose shard issues and repair a cluster’s health
-
Backup and restore a cluster and/or specific indices
-
Configure a cluster for use with a hot/warm architecture
-
Configure a cluster for cross cluster search
