- package managing tool
- node.js의 npm과 비슷한 형태로 쿠버에 패키지 배포를 가능케 해주는 tool
- chart라 부르는 package format을 사용하는데 chart는 쿠버 리소스를 describe 하는 파일들의 집합이다.
- 특정 경로에 모여있는 파일들을 통틀어 char라고 부른다.
- 복잡한 앱 배포 관리
- 쿠버 오케스트레이션된 앱의 배포는 복잡하다. 쿠버 환경에서 helm차트는 복잡한 앱 배포를 코드로 관리하여 자동 배포 할 수 있도록 제공
- 앱의 빠른 배포를 통해 다양한 테스트 환경 배포 및 운영 환경 배포 시간을 줄여 개발에 집중토록 한다.
- Hooks
- 쿠버 환경에서 helm차트로 설치, 업그레이드, 삭제, 롤백 과 같은 앱 생명주기 관리를 위한 기능을 Hook을 통해 제공
- 릴리즈 관리
- helm으로 배포된 앱은 하나의 릴리즈로 불린다. 해당 릴리즈는 배포된 앱의 버전 관리를 가능토록 한다.
- Helm repository: 모든 차트의 메타데이터를 가지고 있는 저장소
- Chart: 쿠버에서 리소스를 만들기 위해 탬플릿화 된 yaml 형식의 파일 (파일들의 집합)
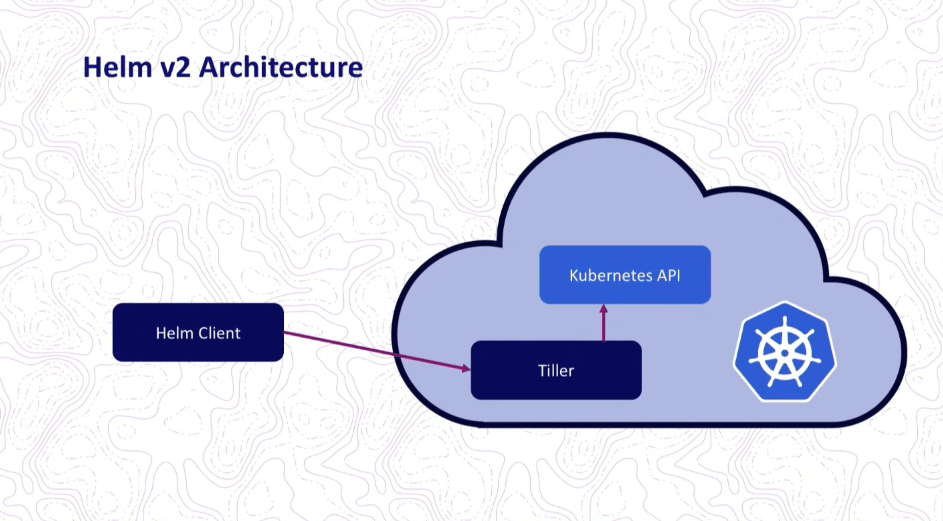
- Helm Client: 외부의 저장소에서 차트를 가져 오거나, gRPC로 Helm Server와 통신하여 요청하는 역할 담당
- Helm Server: Helm Client의 요청을 처리하기 위해 대기하며, 요청이 있을 경우, 쿠버에 Chart를 설치하고 릴리즈 버전을 관리
-
Chart:
- helm package
- app을 실행하기 위한 모든 리소스가 정의 되어 있다.
-
Repository:
- chart들이 공유되는 공간
-
Release:
- 쿠버 클러스터에서 돌아가는 앱들은 모두 고유의 release 버전을 가지고 있음
- helm은 Chart 를 쿠버에 설치하고, 설치할때 마다 release 버전이 생성되고, 새로운 chart를 찾기 위해 Helm chart repository 에서 검색할 수 있다.
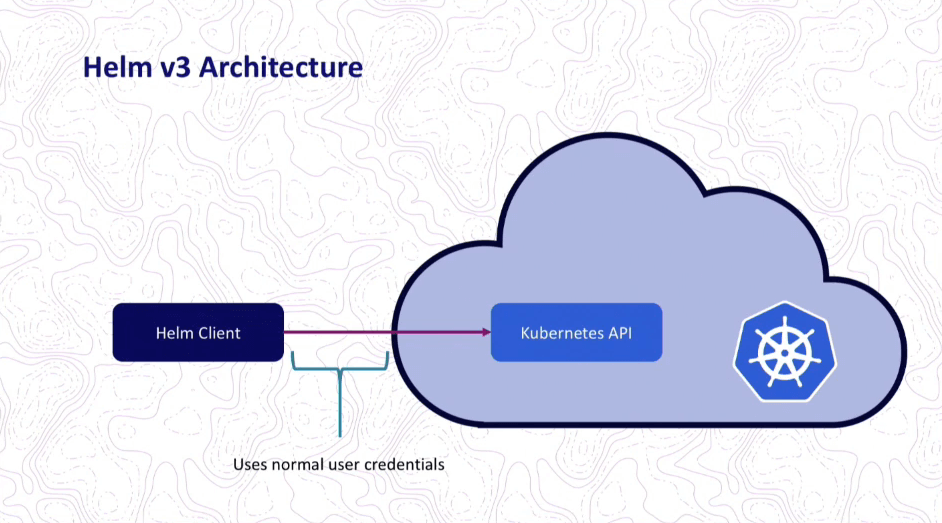
- 가장 큰 차이점은 Tiller가 없어진 것 (server-side component of helm 2)
- tiller는 쿠버 클러스터에 모든 접근 권한을 가질 수 있도록 구성되었다.
- helm 3는 보안이 강화되었다.
- helm이 API server와 직접적으로 통신한다. permission은 쿠버의 config file 기반이다. 고로 user permission을 제한 할 수 있다.
- Local chart development
- Managing repositories
- Interacting with the Tiller server
- Sending charts to be installed
- Asking for information about releases
- Requesting upgrading or uninstalling of existing releases
- Local chart development
- Managing repositories
- Managing releases
- Interfacing with the Helm library
- Sending charts to be installed
- Requesting upgrading or uninstalling of existing releases
- Listening for incoming requests from the Helm client
- Combining a chart and configuration to build a release
- Installing charts into Kubernetes, and then tracking the subsequent release
- Upgrading and uninstalling charts by interacting with Kubernetes
- Combining a chart and configuration to build a release
- Installing charts into Kubernetes, and providing the subsequent release object
- Upgrading and uninstalling charts by interacting with Kubernetes
- tiller는 helm의 server-side 요소이며, 주된 목적은 여러 다른 operator가 동일한 릴리스 set로 작업 할 수 있도록하는 역할을 한다.
- 처음 helm 2가 개발됐을때, 쿠버는 Role-based Access Control(RBAC)이 없었고, 각각의 helm이 자신을 돌봐야 했다.
- 누가 무엇을 어디에 설치할 수 있는지 알아야 했다.
- 이런 복잡성(complexity)는 쿠버 1.6부터 RBAC 릴리즈와 함꼐 default로 사용되기 때문에 더 이상 필요 없게 되었다.
- 그래서 helm이 같은 job을 할 필요가 없고, helm3에서 제거되었다.
- tiller는 또한 helm 릴리즈 정보와 helm 상태를 유지하기 위한 central hub 역할을 하였다.
- helm3에서 같은 정보는 쿠버의 API서버로 부터 직접적으로 가져온다.
- tiller가 사라지면서, helm의 security model은 더욱 단순해졌다.
- Helm permission은 kubeconfig 파일을 사용하여 단순하게 평가된다.
- cluster admin은 user permission을 제한할 수 있다.
- helm 2는 2-way strategic merge patch를 사용했다.
- 만약 니가 어떤 helm operation을 수행하기 원한다면, helm은 가장 최근의 manifest chart를 제안된 chart manifest와 비교한다.
- 이 액션은 쿠버의 리소스에 적용시키기 위해 필요한 변화가 무엇인지 결정하기 위해 두개의 chart에 대한 차이점을 체크했다.
- 근데 만약 변경 사항이 manual로 클러스터에 적용됐다면 고려되지 않았다. (ex: kubectl edit)
- 이런 액션은 리소스를 이전 상태로 롤백이 불가능했다. 왜냐면, helm 2는 이전에 적용된 chart의 manifest만을 체크했다.
- 이부분에 대한 대비책으로 3-way strategic merge patch가 나왔다.
- helm 3는 live state도 고려하게 되었다. (old/live/new manifest)
- helm으로 3개의 리플리카 셋과 함께 설정되는
my_app을 실행했다.
helm install my_app ./my_app- 누군가가 실수로 다음의 방법으로 리플리카 수를 변경하였다.
kubectl edit를 통한 수정
or
kubectl scale -replicas=0 deployment/my_app- 다른 누군가가 알수없는 이유로
my_app이 다운되었음을 알아챘고 다음을 실행하였다.
helm rollback my_app- helm 2에서는, old manifest와 new manifest를 비교하는 patch를 생성한다. 하지만 둘 간에 차이가 없기 때문에 rollback 할게 없다고 판단하게 된다. 왜냐면 rollback은 live state를 고려하지 않고 old/new manifest만 비교하기 떄문. (replica는 여전히 0)
- 결과적으로 롤백은 수행되지 않고 복제본 수도 계속 0으로 유지된다.
- helm 3에서는, patch는 old manifest, live state, new manifest를 사용하여 생성된다. helm은 relica 수가 old state에는 3, live state에는 0이라고 판단하기 때문에 new manifest가 3으로 다시 변경되어야 한다고 결정하며, 수정하기 위한 patch를 생성하게 된다.
- helm 2에서는 name이 없을떄는 random으로 이름이 생성된다.
- helm 3에서는, name이 없으면 helm install 시, 에러를 던진다.
- helm 2에서는, release info를 저장하기 위해 ConfigMap을 사용한다.
- helm 2는 설정 자체가 암호화어 저장되고, 키 또는 configMap 중 하나가 보관되므로 많은 작업을 수행해야 한다.
- helm 3에서는, default storage driver 대신해서 (helm.sh/release 의 secret type과 함께) Secrets 을 사용한다.
- helm 3는 여러작업을 수행하는 대신 config를 직접적으로 Secret에 저장한다. 심플하게 secret을 가져와서 적용
- release name이 클러스터에서 유니크할 필요가 없다.
- release가 포함된 Secret은 release가 설치된 namespace에 저장되므로, 다른 namespace에 같은 이름의 release를 가질 수 있다.
- JSON Schema validation은 chart값에 강제 적용 될 수 있다.
- 이 기능을 토대로, 사용자로 부터 제공된 값이 chart maintainer로써 생성된 스키마를 따르는 지 확인할 수 있다.
- 이 기능은 Ops와 Dev의 협력을 더 가능하게 해주며, 사용자가 chart에 잘못된 값을 설정할때 이에 대한 더 효율적인 error reporting을 제공한다.
- local Chart Repository를 실행하는데 사용하는
helm serve는 사용자가 별로 없어서 제거 되었다. - 제거되었지만, plugin으로써 사용은 가능하다.
- 스크립트를 통한 helm 설치
curl https://raw.githubusercontent.com/kubernetes/helm/master/scripts/get > get_helm.sh
chmod 700 get_helm.sh
echo "PATH=$PATH:/usr/local/bin" >> ~/.bashrc
source ~/.bashrc

./get_helm.sh- helm과 tiller 초기화에 사용될 tiller 서비스 계정 생성
kubectl -n kube-system create sa tiller clusterrole(클러스터 관련 규칙 집합)을 서비스 계정에 연결
kubectl create clusterrolebinding tiller --clusterrole cluster-admin --serviceaccount=kube-system:tiller- helm 로컬 환경 구성
helm init --service-account tiller- tiller 서버 확인
kubectl get pod --namespace kube-system- helm 버전 확인
helm version- Chart repo 업데이�트
helm repo update- 스크립트를 통한 helm 설치
curl https://raw.githubusercontent.com/helm/helm/master/scripts/get-helm-3 > get_helm.sh
chmod 700 get_helm.sh
./get_helm.sh- 다음과 같은 에러 발생 시, PATH에 helm 설치된 경로 추가
$ ./get_helm.sh
Downloading https://get.helm.sh/helm-v3.2.0-linux-amd64.tar.gz
Preparing to install helm into /usr/local/bin
helm installed into /usr/local/bin/helm  #====>  추가
which: no helm in (/sbin:/bin:/usr/sbin:/usr/bin)
helm not found. Is /usr/local/bin on your $PATH?
Failed to install helm
	For support, go to https://github.com/helm/helm.

# 경로 추가
echo "PATH=/sbin:/bin:/usr/sbin:/usr/bin:/usr/local/bin" >> ~/.bashrc
source ~/.bashrc- Helm Chart repo 추가
helm repo add stable https://kubernetes-charts.storage.googleapis.com/- stable Chart list 보기
helm search repo stable- Chart 업데이�트
helm repo update- stable/mysql 차트 설치
- 명령어 실행 시, 루트 비밀번호 가져오고, ubuntu 포드를 설치하고, mysql 데이터베이스에 연결하는데 사용할 명령어가 출력
helm install stable/mysql- 루트 비밀번호 가져오기
kubectl get secret --namespace default <random_name>-mysql -o jsonpath="{.data.mysql-root-password}" | base64 --decode; echo- Ubuntu 포드
kubectl run -i --tty ubuntu --image=ubuntu:16.04 --restart=Never -- bash -il- mysql 클라이언트 설치
apt-get update && apt-get install mysql-client -y- mysql db 연결
mysql -h <random_name>-mysql -p # 위에서 얻은 비밀번호 입력- mysql 차트 기능의 기본 보기를 가져오기
helm inspect stable/mysql- 기본 차트 생성해보기
helm create foo- foo 폴더에 다음과 같은 파일이 생김
foo
|-- .helmignore
|-- Chart.yaml  # chart에 관한 정보를 가진 yaml 파일 (버전, 설명, 이름 등)
|-- charts  # 다른 의존성이 있는 차트를 사용할 때 필요한 폴더
|-- templates  # 실제 배포하고 싶은 탬플릿의 경로
|   |-- NOTES.txt
|   |-- _helpers.tpl
|   |-- deployment.yaml
|   |-- ingress.yaml
|   |-- service.yaml
|   |-- serviceaccount.yaml
|   |-- tests
|-- values.yaml # 기본으로 지정해 놓은 변수들이 있는 yaml 파�일 (쿠버 object별로 설정 가능)
.
.
.
.
.
.
.
- 모든 object에 values의 값이 잘 적용됐는지, configmap을 통한 data값이 잘 적용되었는지 확인
helm template bootsample- helm chart 설치
helm install --name <원하는이름> <차트경로>
# 예시
helm install --name myapp myapp- v2와 v3의 helm 차트 삭제
# v2
helm delete myapp   # --> 릴리즈 정보를 삭제하지 않는다.  (삭제하려면, --purge 추가)
# v3
helm uninstall myapp #--> 릴리즈 정보도 삭제한다.  (삭제하지 않으려면, --keep-history 추가)
.
.
.
.
.
.
.
.
.
.
- 테스트 작업 순서 (참고)
-
mvn clean package -DskipTests=true -Pk8s-dev -pl core-module-globalworkflow -am
- -pl : Multi-Project 구조에서 모든 프로젝트가 아닌 특정 프로젝트를 대상으로 mvn 을 수행하고 싶을 경우 ‘-pl’ 옵션을 사용하면 된다.
- -am: ‘-pl’ 에 명시한 프로젝트를 참조하는 프로젝트 들도 같이 빌드 한다.
- 메이븐 옵션 정리 : https://suji-developer.tistory.com/12
- docker tag e9bcf7c161e8 registry.dataplatform.io:5000/dpcore/core-api-gateway:k8s
- docker save -o core-api-gateway.tar registrpusy.dataplatform.io:5000/dpcore/core-api-g ateway:k8s
- mv core-api-gateway.tar /Users/hhlee/ragnarr/temp_data/
- docker load -i core-api-gateway.tar
- docker push registry.dataplatform.io:5000/dpcore/core-api-gateway:k8s
- helm package core-api-gateway
- helm push --username dpcore --password dpcore --ca-file /root/chartmuseum/secrets/tls.crt core-api-gateway-0.1.0.tgz accu-repo
- helm repo update
- helm install --name core-api-gateway --namespace dpcore accu-repo/core-api-gateway
-
kubectl exec -it my-pod --container main-app -- /bin/bash
continue


