A Python library for creating GUI applications from JSON configuration files. This library allows you to define GUI layouts, widgets, and their properties in JSON format and automatically generate the corresponding interface.
Multi-Backend Support:
- Qt backend via qtpy (supports PySide6/PyQt6)
- wxPython backend as a cross-platform alternative
- tkinter backend built into Python (no additional dependencies)
- GTK backend via PyGObject (native Linux desktop integration, GTK3/GTK4 support)
The library automatically detects available backends and provides a unified interface, allowing you to switch between Qt, wxPython, tkinter, and GTK seamlessly.
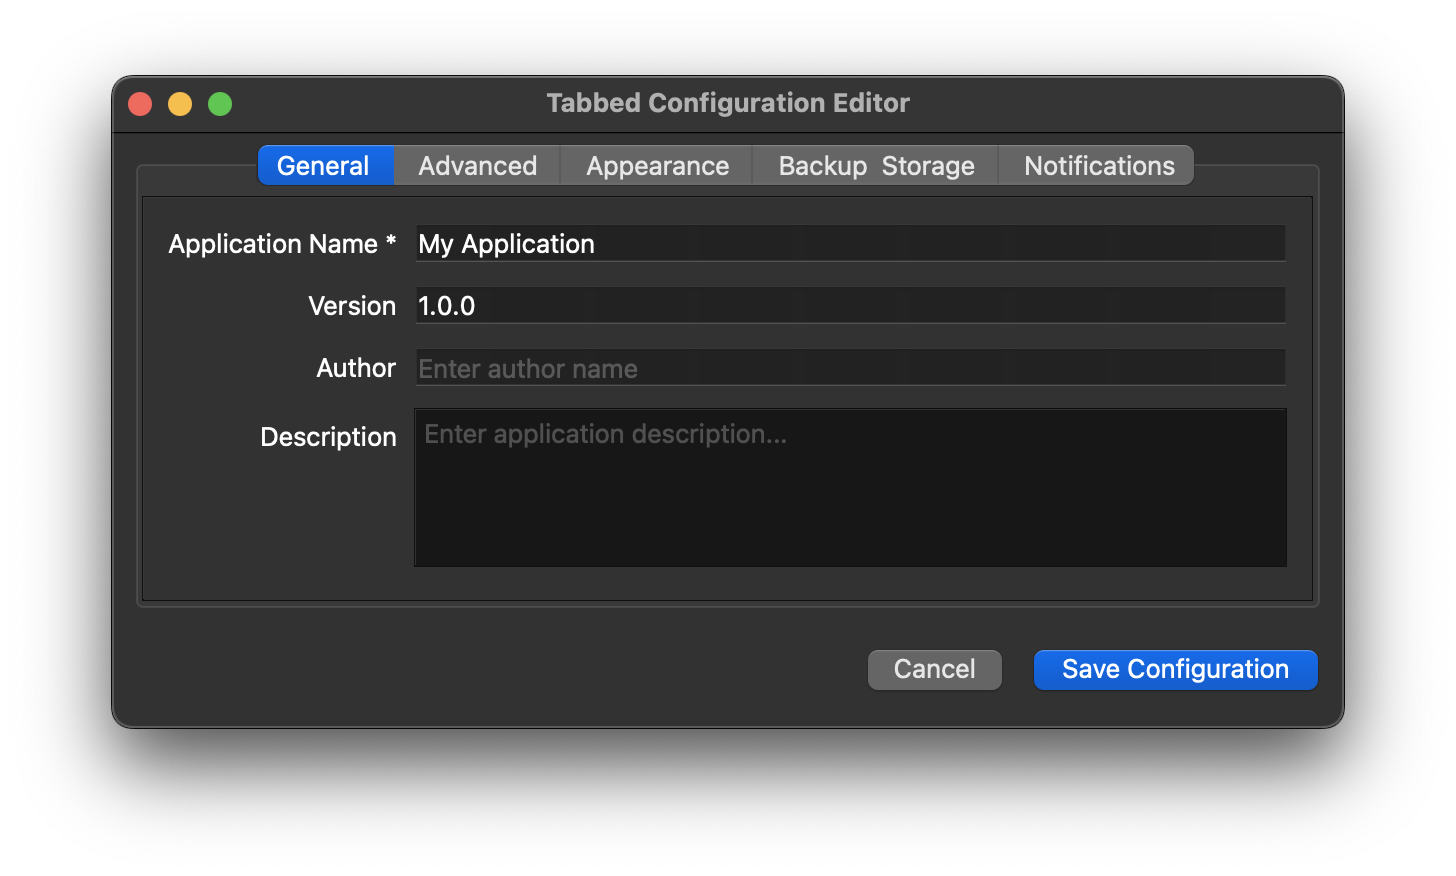
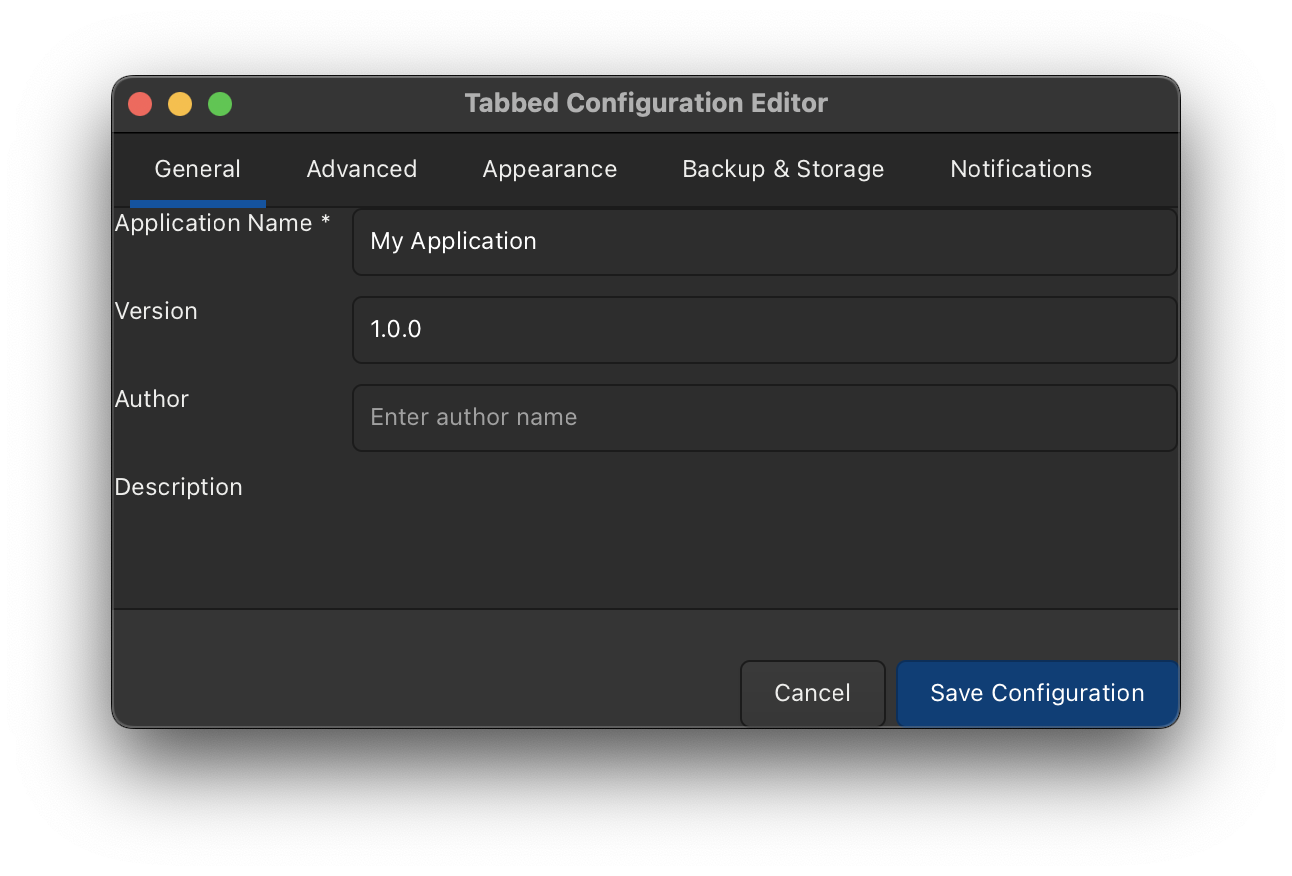
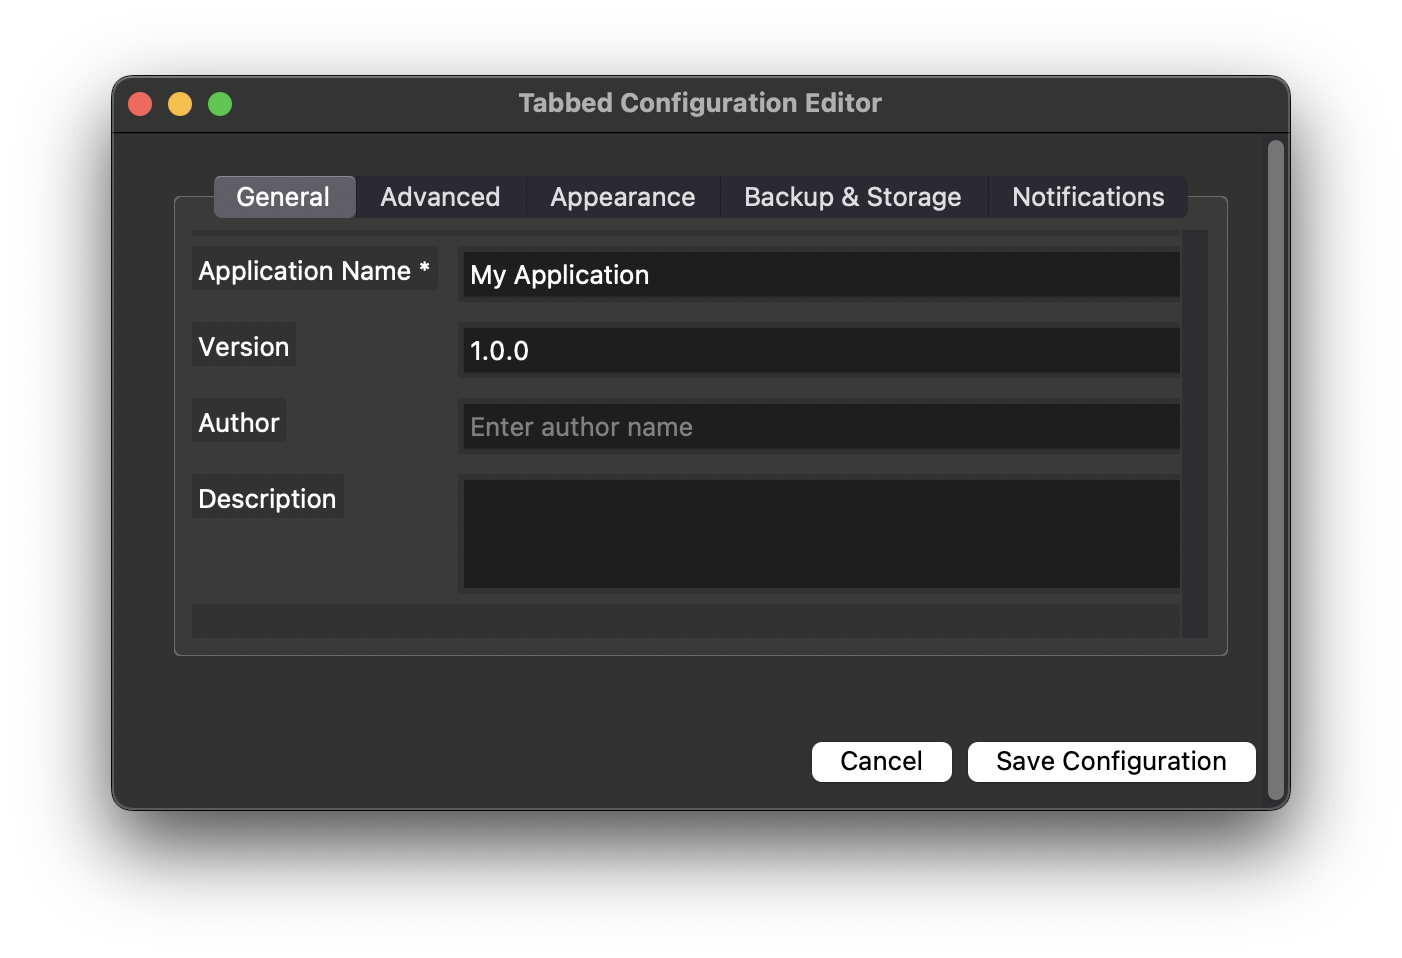
Here are screenshots of the same dialog generated by the different backends:
- 🎯 JSON-Driven: Define your entire GUI in JSON configuration files
- 🔀 Multi-Backend: Support for Qt (PySide6/PyQt6), wxPython, GTK (GTK3/GTK4), and tkinter backends
- 🎨 Multiple Layouts: Support for vertical, horizontal, grid, and form layouts
- 🧩 Rich Widget Set: Text fields, numbers, dates, checkboxes, radio buttons, file pickers, color pickers, and more
- ✅ Form Validation: Built-in validation for required fields and data types
- 🎛️ Customizable: Extensive configuration options for each widget
- 📡 Event Handling: Built-in callbacks and signals for form submission and field changes
- 🔧 Programmatic Control: Runtime manipulation of form fields and values
- 🌲 Nested Fields: Support for hierarchical data structures using dot notation (e.g., "global.app_name")
- 📑 Tabbed Interfaces: Organize fields into tabs for better user experience
- 💾 Data Persistence: Load and save form data with smart defaults and metadata support
- 🎨 Custom Buttons: Add custom buttons with callbacks and styling
QtPyGuiHelper supports multiple GUI backends for maximum flexibility and cross-platform compatibility.
Qt Backend (Default): Uses qtpy as an abstraction layer, supporting both PySide6 and PyQt6.
wxPython Backend: Alternative cross-platform GUI toolkit with native look and feel.
GTK Backend: PyGObject is a Python package which provides bindings for GObject based libraries such as GTK.
tkinter Backend: Built into Python, requires no additional dependencies, perfect for simple GUIs.
The preferred way to install all the dependencies is via conda-forge. For example, using pixi, to build an environment. Here is an example using pixi and running all the tests:
mkdir env
cd env
pixi init .

pixi add python
pixi add pytest
### for GTK backend:
pixi add pygobject
pixi add gtk3
# or pixi add gtk4
### for Qt/PyQt6 backend:
pixi add pyside6
pixi add qtpy
### for wxPython backend:
pixi add wxpython

pixi install
pixi shell
cd ..
./test.shgit clone https://github.com/jacobwilliams/qtpyguihelper.git
cd qtpyguihelper
pip install -e . # Install with tkinter Backend (No Extra Dependencies)
pip install .[pyside6] # install with PySide6 Backend
pip install .[pyqt6] # Install with Qt Backend (PyQt6)
pip install wxpython>=4.2.0 # Install with wxPython Backend
pip install -e .
pip install pygobject>=3.42.0 # Install with GTK Backend
pip install -e .
# System dependencies for GTK development (Linux)
# GTK3:
sudo apt-get install libgtk-3-dev # Ubuntu/Debian
sudo dnf install gtk3-devel # Fedora
# GTK4:
sudo apt-get install libgtk-4-dev # Ubuntu/Debian
sudo dnf install gtk4-devel # Fedora
# macOS (with Homebrew)
brew install gtk+3 gtk4 pygobject3
# Windows: Use MSYS2 or pre-built wheelsCreate a JSON file defining your GUI structure:
{
  "window": {
    "title": "My Application",
    "width": 500,
    "height": 400
  },
  "layout": "form",
  "fields": [
    {
      "name": "username",
      "type": "text",
      "label": "Username",
      "required": true,
      "placeholder": "Enter username"
    },
    {
      "name": "email",
      "type": "email",
      "label": "Email Address",
      "required": true
    },
    {
      "name": "age",
      "type": "number",
      "label": "Age",
      "min_value": 0,
      "max_value": 120
    },
    {
      "name": "subscribe",
      "type": "checkbox",
      "label": "Subscribe to newsletter"
    }
  ],
  "submit_button": true,
  "submit_label": "Submit",
  "cancel_button": true
}import sys
from qtpyguihelper import GuiBuilder
def on_submit(form_data):
print("Form submitted:", form_data)
# Method 1: Auto-detect backend (recommended)
gui = GuiBuilder(config_path="my_form.json")
gui.set_submit_callback(on_submit)
gui.show()
# Method 2: Force specific backend
from qtpyguihelper import set_backend
set_backend('wx') # or 'qt'
gui = GuiBuilder(config_path="my_form.json")
gui.set_submit_callback(on_submit)
# Method 3: Create and run with auto app management
GuiBuilder.create_and_run(config_path="my_form.json")QtPyGuiHelper supports Qt, wxPython, and tkinter backends with automatic detection and easy switching.
The library automatically detects available backends in this order:
- Check
GUI_BACKENDenvironment variable - Check
QT_APIenvironment variable (for Qt backend) - Use default backend (Qt) if available
- Fall back to any available backend
from qtpyguihelper import GuiBuilder, get_backend_info

# Check current backend
info = get_backend_info()
print(f"Using backend: {info['backend']}")
print(f"Available backends: {info['available_backends']}")

# Create GUI with auto-detection
gui = GuiBuilder(config_path="form.json")
print(f"Selected backend: {gui.backend}")# Use wxPython backend
export GUI_BACKEND=wx
python your_app.py
# Use Qt backend
export GUI_BACKEND=qt
python your_app.py
# Use tkinter backend
export GUI_BACKEND=tk
python your_app.py
# Use GTK backend
export GUI_BACKEND=gtk
python your_app.py
# For Qt backend, you can also specify the Qt binding
export QT_API=pyside6 # or pyqt6
python your_app.pyfrom qtpyguihelper import set_backend, GuiBuilder
# Force wxPython backend
set_backend('wx')
gui = GuiBuilder(config_path="form.json")
# Force Qt backend
set_backend('qt')
gui = GuiBuilder(config_path="form.json")
# Force tkinter backend
set_backend('tk')
gui = GuiBuilder(config_path="form.json")
# Force GTK backend
set_backend('gtk')
gui = GuiBuilder(config_path="form.json")from qtpyguihelper import GuiBuilder
# Force specific backend during construction
gui = GuiBuilder(config_path="form.json", backend='wx') # or 'qt', 'tk', 'gtk'- Native Qt styling and themes
- Advanced widgets and layouts
- Comprehensive signal/slot system
- Cross-platform consistency
- Rich graphics and animation support
- Native platform look and feel
- Smaller memory footprint
- Direct platform API access
- Extensive widget library
- Strong macOS integration
- No additional dependencies (built into Python)
- Lightweight and fast startup
- Cross-platform compatibility
- Simple and reliable
- Perfect for basic to moderate GUI needs
- Native Linux desktop integration
- Automatic GTK version detection (supports both GTK3 and GTK4)
- Automatic OS theme detection (respects system dark/light mode)
- Modern GTK 3.0+ / 4.0+ styling and themes
- Accessibility support
- Rich widget library
- Strong integration with GNOME desktop
- Cross-platform with native look on Linux
GTK Version Support:
- GTK4 (preferred): Automatically detected if available
- GTK3: Fallback when GTK4 is not available
- Force specific version with:
export QTPYGUIHELPER_GTK_VERSION=3.0or4.0
GTK Theme Support:
- Automatic OS theme detection: Detects and applies system dark/light mode on macOS, Linux, and Windows
- macOS: Reads AppleInterfaceStyle preference
- Linux: Uses gsettings to read GNOME/GTK theme and color-scheme preferences
- Windows: Reads registry for dark mode preference
- GTK3 Enhanced Dark Mode: Uses multiple fallback strategies for reliable dark theme application:
- Attempts to use system dark theme variants (Adwaita-dark, current-theme-dark, etc.)
- Falls back to custom CSS styling when standard theme switching doesn't work
- Provides comprehensive dark styling for all widget types
- GTK4 Native Dark Mode: Uses built-in dark theme support with
gtk-application-prefer-dark-theme - Manual override: Set
GTK_THEMEenvironment variable to override automatic detection
All core features work identically across all four backends:
- ✅ All field types (text, number, date, etc.)
- ✅ All layout types (form, grid, vertical, horizontal)
- ✅ Custom buttons with callbacks
- ✅ Data persistence and loading
- ✅ Field validation
- ✅ Nested field names
- ✅ Tabbed interfaces
- ✅ Event handling and callbacks
from qtpyguihelper import get_available_backends, is_backend_available

# Check what's available
print("Available backends:", get_available_backends())

# Check specific backend
if is_backend_available('tk'):
    print("tkinter is available")

if is_backend_available('qt'):
    print("Qt backend is available")

if is_backend_available('gtk'):
print("GTK backend is available")| Type | Description | Supported Properties |
|---|---|---|
text |
Single-line text input | placeholder, default_value |
email |
Email input field | placeholder, default_value |
password |
Password input (masked) | placeholder |
int |
Integer input (whole numbers) | min_value, max_value, default_value |
float |
Floating-point input with precision control | min_value, max_value, default_value, format_string |
number |
Numeric input (legacy - uses float behavior) | min_value, max_value, default_value |
textarea |
Multi-line text input | placeholder, default_value, height |
checkbox |
Checkbox input | default_value (boolean) |
radio |
Radio button group | options (array), default_value |
select |
Dropdown selection | options (array), default_value |
date |
Date picker | default_value (YYYY-MM-DD) |
time |
Time picker | default_value (HH:MM) |
datetime |
Date and time picker | default_value (ISO format) |
range |
Slider input | min_value, max_value, default_value |
file |
File selection button | default_value ("open"/"save") |
color |
Color picker button | default_value (hex color) |
url |
URL input field | placeholder, default_value |
int: Use for whole numbers (age, quantity, score, etc.). Creates QSpinBox widgets.float: Use for decimal numbers with precision control. Creates QDoubleSpinBox widgets.format_string: Controls decimal places (e.g., ".2f" for 2 decimals, ".1f" for 1 decimal)
number: Legacy type for backward compatibility (behaves likefloat)
.2f,.4f: Fixed-point notation with specified decimal places.2e,.3E: Scientific notation (lowercase/uppercase E).3g,.2G: General format (automatically chooses fixed-point or scientific).1%,.2%: Percentage format (multiplies by 100 and adds %),.2f: Thousands separator with fixed-point notation.0f: Whole numbers only (no decimal places)
vertical: Fields stacked verticallyhorizontal: Fields arranged horizontallygrid: Fields in a 2-column grid (label, widget)form: Qt's form layout (automatic label-widget pairing)
{
"window": {
"title": "Window Title",
"width": 800,
"height": 600,
"resizable": true,
"icon": "path/to/icon.png"
}
}{
"name": "field_name", // Unique identifier (required)
"type": "text", // Field type (required)
"label": "Field Label", // Display label (required)
"required": false, // Whether field is required
"default_value": "default", // Default value
"placeholder": "Enter text...", // Placeholder text
"tooltip": "Helpful tip", // Tooltip text
"width": 200, // Fixed width in pixels
"height": 100, // Fixed height in pixels
"min_value": 0, // Minimum value (numbers/ranges)
"max_value": 100, // Maximum value (numbers/ranges)
"options": ["A", "B", "C"] // Options for select/radio fields
}{
"layout": "form", // Layout type
"submit_button": true, // Show submit button
"submit_label": "Submit", // Submit button text
"cancel_button": true, // Show cancel button
"cancel_label": "Cancel" // Cancel button text
}QtPyGuiHelper supports adding custom buttons with callbacks to the bottom of the form. Custom buttons appear to the left of the standard submit/cancel buttons.
{
"custom_buttons": [
{
"name": "validate", // Unique button identifier
"label": "Validate Data", // Button text
"tooltip": "Validate form before submission", // Optional tooltip
"enabled": true, // Optional: button enabled state (default: true)
"style": "background-color: #007bff; color: white;", // Optional: CSS styling
"icon": "path/to/icon.png" // Optional: button icon
},
{
"name": "export",
"label": "Export JSON",
"tooltip": "Export form data as JSON file",
"style": "background-color: #28a745; color: white; padding: 8px 16px; border-radius: 4px;"
}
]
}| Property | Type | Required | Description |
|---|---|---|---|
name |
string | Yes | Unique identifier for the button (used when registering callbacks) |
label |
string | Yes | Text displayed on the button |
tooltip |
string | No | Tooltip text shown on hover |
enabled |
boolean | No | Whether the button is enabled (default: true) |
style |
string | No | CSS-style string for custom button appearance |
icon |
string | No | Path to icon file for the button |
from qtpyguihelper import GuiBuilder
def validate_data_callback(form_data):
"""Custom button callback receives current form data as parameter."""
print("Validating data:", form_data)
# Perform validation logic here
if not form_data.get('email'):
print("Email is required!")
else:
print("Validation passed!")
def export_data_callback(form_data):
"""Export form data to JSON file."""
import json
with open('exported_data.json', 'w') as f:
json.dump(form_data, f, indent=2)
print("Data exported successfully!")
# Create GUI
gui = GuiBuilder("config.json")
# Register custom button callbacks
gui.set_custom_button_callback("validate", validate_data_callback)
gui.set_custom_button_callback("export", export_data_callback)
# Standard callbacks still work
gui.set_submit_callback(lambda data: print("Form submitted:", data))
gui.set_cancel_callback(lambda: print("Form cancelled"))
# Show the GUI
gui.show()# Get list of all custom button names
button_names = gui.get_custom_button_names()
print("Available buttons:", button_names)
# Remove a custom button callback
gui.remove_custom_button_callback("validate")
# Check which callbacks are registered
print("Registered callbacks:", list(gui.custom_button_callbacks.keys()))See examples/custom_buttons.json and demo_custom_buttons.py for a complete working example with multiple custom buttons including validation, clear form, preview, and export functionality.
QtPyGuiHelper supports hierarchical data structures using dot notation in field names. This allows you to organize related data into nested JSON objects when saving or loading form data.
{
"name": "global.app_name", // Creates: {"global": {"app_name": value}}
"type": "text",
"label": "Application Name"
}{
"fields": [
{
"name": "database.host",
"type": "text",
"label": "Database Host",
"default_value": "localhost"
},
{
"name": "database.port",
"type": "number",
"label": "Database Port",
"default_value": 5432
},
{
"name": "ui.theme",
"type": "select",
"label": "Theme",
"options": ["Light", "Dark", "Auto"],
"default_value": "Auto"
}
]
}When using nested field names, the saved JSON will have a hierarchical structure:
{
"database": {
"host": "localhost",
"port": 5432
},
"ui": {
"theme": "Dark"
}
}The library automatically handles loading nested data structures. If you have existing nested JSON data, the GUI will populate fields based on their dot notation names.
from qtpyguihelper import GuiBuilder
# From JSON file
gui = GuiBuilder(config_path="form.json")
# From dictionary
config = {"window": {...}, "fields": [...]}
gui = GuiBuilder(config_dict=config)# Form submission
def on_submit(form_data):
print("Submitted:", form_data)
gui.set_submit_callback(on_submit)
# Form cancellation
def on_cancel():
print("Cancelled")
gui.set_cancel_callback(on_cancel)
# Field changes
def on_field_change(field_name, value):
print(f"{field_name} changed to {value}")
gui.fieldChanged.connect(on_field_change)# Get/set form data
form_data = gui.get_form_data()
gui.set_form_data({"username": "john", "age": 25})
# Get/set individual fields
value = gui.get_field_value("username")
gui.set_field_value("username", "jane")
# Control field visibility/state
gui.show_field("username", False) # Hide field
gui.enable_field("submit_btn", False) # Disable field
# Clear all fields
gui.clear_form()The library includes comprehensive examples in the examples/ directory:
user_registration.json- Complete user registration formsettings_form.json- Application settings with various widget typesproject_form.json- Project data entry form with grid layoutcustom_buttons.json- Demonstrates custom buttons with callbackstabbed_config.json- Complex tabbed interface configurationfloat_fields.json- Float fields with custom formattingnested_config.json- Nested field names with dot notation
Quick Demos (from root directory):
python demo.py # Interactive demo launcher
python demo.py comprehensive # Full-featured demo
python demo.py quick-qt # Simple Qt demo
python demo.py quick-wx # Simple wxPython demo
python demo.py backend # Backend comparisonComprehensive Demo (from examples directory):
# Interactive demo with all features
python examples/demo.py
# Specific demos
python examples/demo.py registration # User registration form
python examples/demo.py settings # Application settings form
python examples/demo.py project # Project data entry form
python examples/demo.py tabs # Tabbed interface demo
python examples/demo.py float # Float fields demo
python examples/demo.py custom_buttons # Custom buttons demo
python examples/demo.py wxpython # wxPython backend demo
python examples/demo.py tkinter # tkinter backend demo
python examples/demo.py gtk # GTK backend demo
python examples/demo.py compare # Backend comparison
python examples/demo.py unified # Unified interface (auto-backend)Simple Examples:
python examples/simple_example.py # Basic getting-started example
python examples/qt_backend_demo.py # Qt backend selection demoThe library provides seamless switching between Qt, wxPython, tkinter, and GTK backends. All backends support all features with identical APIs:
from qtpyguihelper import GuiBuilder, set_backend
config = {
"window": {"title": "Cross-Platform Demo", "width": 500, "height": 400},
"layout": "form",
"fields": [
{"name": "name", "type": "text", "label": "Name", "required": True},
{"name": "age", "type": "int", "label": "Age", "min_value": 0, "max_value": 120},
{"name": "height", "type": "float", "label": "Height (m)", "format_string": ".2f"},
{"name": "active", "type": "checkbox", "label": "Active"}
],
"submit_button": True,
"custom_buttons": [
{"name": "clear", "label": "Clear Form", "tooltip": "Clear all fields"}
]
}
# Test with Qt backend
set_backend('qt')
qt_gui = GuiBuilder(config_dict=config)
# Test with wxPython backend
set_backend('wx')
wx_gui = GuiBuilder(config_dict=config)
# Test with tkinter backend
set_backend('tk')
tk_gui = GuiBuilder(config_dict=config)
# Test with GTK backend
set_backend('gtk')
gtk_gui = GuiBuilder(config_dict=config)
# All GUIs work identically!Auto-Backend Selection (recommended):
# Automatically uses the best available backend
gui = GuiBuilder(config_dict=config) # No backend selection needed!def custom_validator(form_data):
if form_data['password'] != form_data['confirm_password']:
raise ValueError("Passwords don't match")
return True
gui.set_submit_callback(lambda data: custom_validator(data) and save_data(data))def on_country_change(field_name, value):
if field_name == 'country' and value == 'USA':
gui.show_field('state', True)
else:
gui.show_field('state', False)
gui.fieldChanged.connect(on_country_change)class User:
def __init__(self, **kwargs):
for key, value in kwargs.items():
setattr(self, key, value)
def on_submit(form_data):
user = User(**form_data)
user.save() # Save to database
gui.set_submit_callback(on_submit)The library supports loading and saving form data to JSON files, making it easy to create configuration editors and data entry applications.
# Load data from JSON file
gui.load_data_from_file("input_data.json")
# Load data from dictionary
data = {"field1": "value1", "field2": "value2"}
gui.load_data_from_dict(data)# Save current form data to file
gui.save_data_to_file("output.json")
# Save only non-empty fields
gui.save_data_to_file("output.json", include_empty=False)
# Save with metadata (includes config info and timestamp)
gui.save_data_with_metadata_to_file("output_with_metadata.json")Input data files contain the actual field values:
{
"project_name": "Website Redesign",
"start_date": "2025-01-15",
"priority": "High",
"budget": 75000,
"active": true
}Data files with metadata include additional information:
{
"project_name": "Website Redesign",
"start_date": "2025-01-15",
"priority": "High",
"_metadata": {
"config_source": "qtpyguihelper",
"window_title": "Data Entry Form",
"layout": "grid",
"field_count": 8,
"required_fields": ["project_name"],
"generated_at": "2025-07-04T10:30:00"
}
}- Python 3.7+
- PySide6 6.5.0+ (recommended) OR PyQt6 6.5.0+
- qtpy 2.0.0+
- wxPython 4.2.0+
- PyGObject 3.42.0+
- GTK 3.0+
- No additional requirements (built into Python)
- If all backends are available, Qt is preferred by default
- tkinter is second priority (always available with Python)
- wxPython is third priority
- GTK is fourth priority
- Use
GUI_BACKENDenvironment variable to force selection - Use
set_backend()function for programmatic control
QtPyGuiHelper includes comprehensive documentation built with Sphinx:
- Full Documentation: [Coming Soon - GitHub Pages]
- API Reference: Complete API documentation with examples
- User Guide: Installation, quick start, and tutorials
- Backend Guide: Detailed comparison and features for each backend
Install documentation dependencies:
pip install qtpyguihelper[docs]Build and view documentation:
# Quick build and open
./docs.sh build && ./docs.sh open
# Or step by step
cd docs
make html
open _build/html/index.html # macOS
# or navigate to file://path/to/docs/_build/html/index.htmlDevelopment with Live Reload:
./docs.sh serve
# Opens http://127.0.0.1:8000 with auto-reload on changes- Installation Guide: Multiple backend setup options
- Quick Start: Get up and running in minutes
- Comprehensive Examples: Real-world usage patterns
- API Reference: Auto-generated from docstrings
- Backend Comparison: Choose the right backend for your needs
- Advanced Topics: Custom widgets, validation, theming
- docs.sh: Convenient build script with multiple commands
- GitHub Actions: Automated documentation deployment
- Sphinx: Professional documentation generation
- Read the Docs Theme: Clean, responsive design


{
  "name": "price",
  "type": "float",
  "format_string": ".2f",  // 2 decimal places (99.99)
  "default_value": 29.99
}

{
  "name": "percentage",
  "type": "float",
  "format_string": ".1f",  // 1 decimal place (95.5)
  "max_value": 100.0
}

{
  "name": "precision",
  "type": "float",
  "format_string": ".4f",  // 4 decimal places (0.1234)
  "default_value": 0.0001
}

{
  "name": "scientific",
  "type": "float",
  "format_string": ".2e",  // Scientific notation (1.23e+06)
  "default_value": 1234567.89
}

{
  "name": "general",
  "type": "float",
  "format_string": ".3g",  // General format (123 or 1.23e+06)
  "default_value": 123.456
}

{
  "name": "currency",
  "type": "float",
  "format_string": ",.2f", // Thousands separator (12,345.67)
  "default_value": 12345.67
}

{
  "name": "percent_field",
  "type": "float",
  "format_string": ".1%",  // Percentage format (85.6%)
  "default_value": 0.856
}