docker help

docker command --help
docker version

docker info
docker search busybox
This command will search the online Docker registry for a Image named busybox. On my machine, the output shown is as follows
docker run -t -i busybox
The run command does something interesting and this will help you understand the Docker architecture, which we have seen earlier. The run command does the following:
The run command does something interesting and this will help you understand the Docker architecture, which we have seen earlier. The run command does the following:
- It checks if you already have a busybox image in your local repository.
- If it does not find that (which will be the case first time), it will pull the image from the Docker hub. Pulling the image is similar to downloading it and it could take a while to do that depending on your internet connection.
- Once it is pulled successfully, it is present in your local repository and hence it is then able to create a container based on this image.
- We have provided -i -t as the parameters to the run command and this means that it is interactive and attaches the tty input.It checks if you already have a busybox image in your local repository.
Note: If the image was present locally, it would have directly run the container for you.
docker images
-
REPOSITORY
-
TAG
The REPOSITORY column is obvious since it is the name of the Image itself. The TAG is important, you will find that the TAG value is mentioned as latest. But there was no indication given by us about that.
Could mention the version TAG as needed:
$ docker run -t -i busybox:1.0
$ docker run -t -i busybox:2.0
When you executed the docker ps command, you noticed that no container was running. This was because you exited out of the container. Which means that the container only exists as long as its parent process is running.
CONTAINER_ID: A Unique ID for the container that was launched.IMAGE: This was the IMAGE that you launched i.e. busyboxCOMMAND: Important stuff here. This was the default command that was executed when the container was launched. If you recollect, when the container based on busybox image was launched, it led you to the Unix Prompt i.e. the Shell was launched. And that is exactly what the program in /bin/sh does. This should give you a hint that in case you want to package your own Server in a Docker image, your default command here would typically be the command to launch the Server and put it in a listening mode. Getting it ?
I note down the CONTAINER_ID i.e. cfb007d616b9 and then give the following command:
docker start ab0e37214358docker attach ab0e37214358
This will get you back to the Prompt i.e. you are now inside the busybox container. Type exit to exit the container and then try the docker ps command. There will be no running containers.
docker search httpd
We will go with the OFFICIAL image for httpd. So let’s learn a new command i.e. docker pull
docker pull httpd
docker run -d --name MyWebServer httpd
This will launch the default Apache HTTP Server based on the httpd image and since we have launched the container in detached mode, we got back a Container ID. Your ID need to be similar to the one that I got “54c39730ab784a998c3bb4522cf6421a4a0c7d46db54afa75202e76741032216”
docker stop .....

docker ps .......

docker rm MyWebServer
You will notice that there is an entry in the PORTS column. The value for that is “tcp:80”. This means that port 80 is being exposed by the Container. This looks reasonable since Apache Web Server default port for HTTP is 80. If you are adventurous enough, you can take a look at the Dockerfile (don’t worry about what a Dockerfile is) for this project is here.
EXPOSE 80
CMD httpd-foreground
Now, let us start the httpd Container with an extra parameter i.e. -P. What this parameter does is that it “Publish all exposed ports to random ports”. So in our case, the port 80 should get mapped to a random port, which is going to be the public port.
docker run -d --name MyWebServer -P httpd
docker port MyWebServer
We can see that port 80 has got mapped to port 32769. So if we access our web site at
http://<HostIP>/<HostPort>
So on my machine it is http://192.168.59.103:32769 and it works!
So what if we wanted to map it to a port number other than 32769. You can do that via the -p (note the lowercase) parameter.
-p HostPort:ContainerPort For e.g. -p 80:80 or -p 8080:80
The first parameter is the Host port and we are now making that 80. The second port is what Apache httpd exposes i.e. 80.
The first parameter is the Host port and we are now making that 80. The second port is what Apache httpd exposes i.e. 80.
Let us check out everything again:
$ docker stop MyWebServer MyWebServer $ docker rm MyWebServer MyWebServer $ docker run -d --name MyWebServer -p 80:80 httpd 02ce77550940cb1f37361b74af8913e46d6a507d06c2579b8a8b49e389b1e75f
Now you should be able to access your web site via port 80 (default port):
# 3. Docker Hub
Recollect that the Docker toolset consists of:
1. Docker Daemon
2. Docker Client
3. Docker Hub
Docker registry. Some of this has already been covered, but it is nice to go through these commands again plus this session has a little bit more on the Docker Registry (Hub).
The Docker Architecture diagram is reproduced below again:
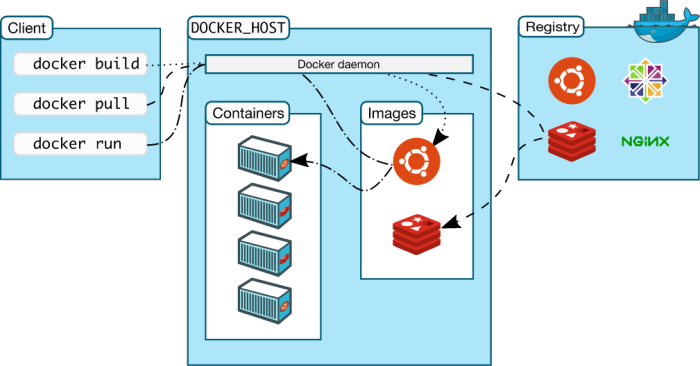
Let us focus on the Registry part in the diagram. The Registry is also called the Hub. So for the purpose of this document, the 2 terms are interchangeable.
Docker hosts public repositories called the Docker Registry (Hub) where you can find a list of public Docker images for your use. This is handy, since a lot of developers have worked hard to get the images ready for us and all we need to do is pull those images and start launching containers based on them.
The implications of this for the developer is huge. It cuts down your time drastically in downloading/setting up applications that you want to have running locally as fast as possible. For e.g. consider that you have to setup MySQL. One option available to you is to go down the traditional path and download the installer binary from the official MySQL site. Then follow the instructions to set things up and more. You know that this process is time consuming and error prone.
By now, you would have realised that a standard format for containers makes things not just easy and quick with a toolchain like Docker but you are also sure that it’s going to run not just on your machine but if you need to give that image to someone else, you are confident of it running well there too.
### Pulling an Image
docker pull java
or
docker pull java:lates
or
docker pull java:8
# 4. Building your own Docker images


“Images are Immutable and Containers are Ephemeral”
docker pull ubuntu:latest
docker run -it --name mycontainer1 --rm ubuntu:latest
This should lead you to a prompt. For e.g. on my machine


### Commiting your image

To ensure that next time we have a version of ubuntu with Git installed, we need to commit our image. What this means is that we started with a container based on the ubuntu image. Then we added some software to it i.e. git. This means that we modified the state of the container. Hence we need to save that state of the container as an image, so that can relaunch additional new containers from that image. This way they will have the git software installed too.


Launch the container based on ubuntu, this time without the — rm flag
docker run -it --name mycontainer1 ubuntu:latest
$ sudo apt-get update $ sudo apt-get install git
git --version
exit
docker ps -all
This should show you the mycontainer1 that we had launched. It is currently in exited state.
Commit the container image via the docker commit command as shown below:
docker commit [ContainerID] [Repository[:Tag]
In our case, we use the mycontainer1 as the containerid since we have given it a name. If you had not started that container with a name, you could have used the Container Id that is visible in the docker ps -all command.
The Repository name is important. Eventually (and which is what we will do) we will want to push this to the Docker Hub. So the format of the Repository name that is recommended is the following:

In our case, the repository-name can be something like ubuntu-git and you will need to substitute your <dockerhubusername> tag above with your Docker Hub user name.
If you do not give the tag, it will be marked as ‘latest’, which is fine for us. For e.g. my Docker Hub user name is rominirani and hence I will commit it in the following manner:
docker commit mycontainer1 rominirani/ubuntu-git
docker images REPOSITORY TAG IMAGE ID CREATED VIRTUAL SIZE rominirani/ubuntu-git latest 23cf273fafed About a minute ago 247.1 MB
This shows that our Repository rominirani/ubuntu-git has got created

## Launching Container from your image

We can now launch a container from our newly created Docker image i.e. yourusername/ubuntu-git via the docker run command.
docker run -it --name c1 /ubuntu-git
The above command will launch the container based on our image. It will then take you to the prompt, where you can verify that it comes with Git by giving the git — version command.

## Pushing the Image to the Docker Hub

To push the image to the Docker Hub via the following steps:

1. Get an account at Docker Hub
2. From boot2docker prompt, execute the command docker login and follow the instructions for your username and password.
3. On successful login, you should get a Login Succeeded message.
4. To a docker push as shown below:
docker push /ubuntu-git
This will take a while to upload the details. Note that Docker is smart in the sense that it already will detect if the base image i.e. ubuntu already exist and hence it will cleverly chose only those layers that need to be uploaded. A sample run of the process is shown below:
docker push rominirani/ubuntu-git
# 5. Docker Private Registry

## Pull down the Registry Image

You might have guessed by now that the registry must be available as a Docker image from the Docker Hub and it should be as simple as pulling the image down and running that. You are correct!

Assuming that you have boot2docker running, execute the standard command to pull down the registry image.
docker pull registry
### Run the local Registry

The registry Docker image is configured to start on port 5000 in the container, so we will expose the host port also as 5000.
docker run -d -p 5000:5000 --name localregistry registry
Pull down a few images and push to local Registry
docker pull busybox
docker pull alpine
If at this point, we try to pull the alpine image from our local registry, it should ideally respond with the image not found, shouldn’t it ? Yes, it will. Remember that we have already started the registry container on port 5000. The result of this operation is shown below:
docker pull localhost:5000/alpine Using default tag: latest Error response from daemon: manifest for localhost:5000/alpine:latest not found
Notice that the format for specifying the Image in a specific registry is as:
[REGISTRY_HOSTNAME:REGISTRY_PORT]/IMAGENAME
For public Docker Hub, we were not specifying the [REGISTRY_HOSTNAME:REGISTRY_PORT] option. But for our local registry we need to specify that so that the docker client will look there.

### Step 2 : Push busybox and alpine Linux Images into the local Registry

Now, we will push the two images that we downloaded (busybox and alpine) into the local registry. Remember that these are two images that you downloaded directly from the Docker Hub. We have not modified it in any way. But you could create your own modified image (as we saw earlier in this series) and and push that into the local Registry too.
docker tag alpine:latest localhost:5000/alpine:latest
If you now run a docker images command, you will see both the alpine and the localhost:5000/alpine images listed.


This is done via the standard docker push command that you saw earlier. All we have to do is use the new tagged localhost:5000/alpine image. The command is given below:
ocker push localhost:5000/alpine:latest The push refers to a repository [localhost:5000/alpine] 04a094fe844e: Pushed latest: digest: sha256:5cb04fce748f576d7b72a37850641de8bd725365519673c643ef2d14819b42c6 size: 528
In this part, we looked at running a private registry. This was a registry that did not enforce any authentication on the part of the client. While this is useful from an understanding point of view, keep in mind that you should still follow the best practices for running a secure registry. It is not just about running a secure registry but also about making decisions around storage options for your private registry repositories.

# 6. Data Volumes

If you have been following the series so far, we have launched Containers from various images and even created a basic image for our own use. To reiterate the point, Containers are Ephemeral and once a container is removed, it is gone. What about scenarios where you want the applications running inside the container to write to some files/data and then ensure that the data is still present. For e.g. let’s say that you are running an application that is generating data and it creates files or writes to a database and so on. Now, even if the container is removed and in the future you launch another container, you would like that data to still be there.

In other words, the fundamental thing that we are trying to get over here is to separate out the container lifecycle from the data. Ideally we want to keep these separate so that the data generated is not destroyed or tied to the container lifecycle and can thus be reused. This is done via Volumes, which we shall see via several examples.


As per the official documentation, there are 2 ways in which you can manage data in Docker:

* Data volumes

* Data volume containers

### Few points to keep in mind about Data Volumes

* A data volume is a specially designed directory in the container.

* It is initialized when the container is created.By default, it is not deleted when the container is stopped. It is not eeven garbage collected when there is no container referencing the volume.

* The data volumes are independently updated. Data volumes can be shared across containers too. They could be mounted in read-only mode too.

### Mounting a Data volume

Let us begin first with the most basic operation i.e. mounting a data volume in one of our containers. We will be working with the busybox image to keep things simple.

We are going to use the -v [/VolumeName] as an option to mount a volume for our container. Let us launch a container as given below
docker run -it -v /data --name container1 busybox
This will launch a container (named container1) in interactive mode and you will be at the prompt in the container.
/ # cd data /data # touch file1.txt /data # ls file1.txt /data #
Now, let us inspect the container and see what Docker did when we started this container
docker inspect container1
Now that the container is stopped i.e. exited, let us restart the container (container1) and see if our volume is still available and that file1.txt exists.
$ docker restart container1 container1 $ docker attach container1 / # ls bin data dev etc home proc root sys tmp usr var / # cd data /data # ls file1.txt /data #
1. We restarted the container (container1)
2. We attached to the running container (container1)
3. We did a ls and found that our volume /data is still there.
4. We did a cd into the /data volume and did a ls there. And our file is still present.
/data # exit $ docker rm container1 container1 $ docker volume ls DRIVER VOLUME NAME local 568258a7940182c5ac52f0637c60c1d1f81e9ec77f3e4694647b4879c2ff003c
Hopefully this explains to you how you can persist your data in volumes.
/data # exit $ docker rm container1 container1 $ docker volume ls DRIVER VOLUME NAME local 568258a7940182c5ac52f0637c60c1d1f81e9ec77f3e4694647b4879c2ff003c
### Mounting a Host Directory as a Data volume

Now that we have seen how to mount a volume in the container, the next step is to look at the same process of mounting a volume but this time we will mount an existing host folder in the Docker container. This is an interesting concept and is very useful if you are looking to do some development where you regularly modify a file in a folder outside and expect the container to take note or even sharing the volumes across different containers.

In our example, we are using Docker for Mac. Click on that and  then go to preferences and then File Sharing. You will see a screenshot similar to this:

To mount a host volume while launching a Docker container, we have to use the following format for volume -v :
-v HostFolder:ContainerVolumeName
So, let us start a busybox container as shown below:
docker run -it --name container1 -v /Users:/datavol busybox
What we have done here is that we have mapped the host folder /Users to a volume /datavol that will be mounted inside our container (container1).
Now, if we do a ls , we can see that the /datavol has been mounted. Do a cd into that folder and a ls, and you should be able to see the folder contents of C:\Users on your machine.
/ # cd datavol /datavol # ls Shared romin-irani /datavol #
1. Try adding a file directly from your laptop/machine in /Users/<username> folder and then go back to your running container and do a ls there. You should be able to see that new file there.

2. From the container shell, go to the /datavol folder and then add a file there. Then go back to your machine/laptop and do a ls. You should see the new files there.

Additional Note: Optionally if you require, you can mount a single host file too as a data volume.

Start thinking now of how you would use host folders that have been mounted as data volumes. Assume you are doing development and have the Apache Web Server or any other Web Server running in the container. You could have started the container and mounted a host director that the Web Server can use. Now on your host machine, you could make changes using your tools and those would then get reflected directly into your Docker container.

### Data volume containers

We now come to the next part i.e. creating a Data volume container. This is very useful if you want to share data between containers or you want to use the data from non-persistent containers. The process is really two step:

1. You first create a Data volume container

2. Create another container and mount the volume from the container created in Step 1.
docker run -it -v /data --name container1 busybox
/ # cd data /data # ls /data # touch file1.txt /data # touch file2.txt /data #
docker ps
Now, if we execute a command on the running container1 i.e. see the contents of our /data volume, you can see that the two files are present.
docker exec container1 ls /data file1.txt file2.txt
Great! Now, let us launch another container (container2) but it will mount the data volume from container1 as given below:
docker run -it --volumes-from container1 --name container2 busybox
Notice above that we have launched it in interactive mode and have used a new parameters — volumes-from <containername> that we have specified. This tells container2 to mount the volumes that container1 mounted.
Now, if we do a ls, we can see that the data folder is present and if we do a ls inside of that, we can see our two files: file1.txt and file2.txt
/ # ls bin dev home lib64 media opt root sbin tmp var data etc lib linuxrc mnt proc run sys usr / # cd data /data # ls file1.txt file2.txt /data #
You can launch multiple containers too , all using the same data volume from container1. For e.g.
docker run -it --volumes-from container1 --name container3 busybox docker run -it --volumes-from container1 --name container4 busybox
# 7. Linking Containers

In this part, we shall take a look at how to link Docker Containers. By linking containers, you provide a secure channel via which Docker containers can communicate to each other.

Think of a sample web application. You might have a Web Server and a Database Server. When we talk about linking Docker Containers, what we are talking about here is the following:

1. We can launch one Docker container that will be running the Database Server.

2. We will launch the second Docker container (Web Server) with a link flag to the container launched in Step 1. This way, it will be able to talk to the Database Server via the link name.

This is a generic and portable way of linking the containers together rather than via the networking port that we saw earlier in the series. Keep in mind that this chapter covers Linking Containers via the — link flag. A new tool Docker Compose is the recommended way moving forward but for this tutorial, I will cover the — link flag only and leave it to the reader to look at Docker Compose.

Let us begin first by launching the popular NoSQL Data Structure Server Redis. Like other software, Redis too has its official Docker image available in the Docker Hub.
docker pull redis
Next, let us launch a Redis container (name redis1) in detached mode as follows:
docker run -d --name redis1 redis
docker run -it --link redis1:redis --name redisclient1 busybox
Notice the — link flag. The value provided to the — link flag is sourcecontainername:containeraliasname. We have chosen the value redis1 in the sourcecontainername since that was the name that was given to our first container that we launched earlier. The containeraliasname has been selected as redis and it could be any name of your choice.


The above launch of container (redisclient1) will lead you to the shell prompt.

Now, what has this launch done for you. Let us observe first what entry has got added in the /etc/hosts file of the redisclient1 container:
/ # cat /etc/hosts 172.17.0.23 26c37c8982e9 127.0.0.1 localhost ::1 localhost ip6-localhost ip6-loopback fe00::0 ip6-localnet ff00::0 ip6-mcastprefix ff02::1 ip6-allnodes ff02::2 ip6-allrouters 172.17.0.21 redis 37f174130f75 redis1 / #
Notice an entry at the end, where the container redis1 has got associated with the redis name.
ping redis
If you print out the environment variables you will see the following (I have removed the other environment variables):
/ # set .... REDIS_ENV_REDIS_DOWNLOAD_SHA1='0e2d7707327986ae652df717059354b358b83358' REDIS_ENV_REDIS_DOWNLOAD_URL='http://download.redis.io/releases/redis-3.0.3.tar.gz' REDIS_ENV_REDIS_VERSION='3.0.3' REDIS_NAME='/redisclient1/redis' REDIS_PORT='tcp://172.17.0.21:6379' REDIS_PORT_6379_TCP='tcp://172.17.0.21:6379' REDIS_PORT_6379_TCP_ADDR='172.17.0.21' REDIS_PORT_6379_TCP_PORT='6379' REDIS_PORT_6379_TCP_PROTO='tcp' ....
You can see that various environment variables were auto-created for you to help reach out to the redis1 server from the redisclient1.
Sounds good? Now , let us get a bit more adventurous.

Exit the redis1 container and come back to the terminal.

Let us launch a container based on the redis image but this time instead of the default command that will launch the redis server, we will simply go into the shell so that all the redis client tools are ready for us. Note that the redis1 server (container) that we launched is still running.
docker run -it --link redis1:redis --name client1 redis sh
This will lead you to the prompt. Do a ping of redis i.e. our alias name and it should work fine.
ping redis
Next thing is to launch the redis client (redis-cli) and connect to our redis server (running in another container and to which we have linked) as given below:
redis-cli -h redis
You can see that we have been able to successfully able to connect to the redis server via the alias name that we specified in the — link flag while launching the container. Ofcourse if we were running the Redis server on another port (other than the standard 6379) we could have provided the -p parameter to the redis-cli command and used the value of the environment variable over here (REDIS_PORT_6379_TCP_PORT). Hope you are getting the magic!
redis:6379> PING PONG redis:6379> set myvar DOCKER OK redis:6379> get myvar "DOCKER" redis:6379>
Everything looks fine. Let us exit this container and launch another client (client2) that wants to connect to the same Redis Server that is still running in the first container that we launched and to which we added a string key / value pair.
docker run -it --link redis1:redis --name client2 redis sh
redis:6379> get myvar "DOCKER" redis:6379>
# 9. Writing a Dockerfile


A Dockerfile is a text file that has a series of instructions on how to build your image. It supports a simple set of commands that you need to use in your Dockerfile. There are several commands supported like FROM, CMD, ENTRYPOINT, VOLUME, ENV and more. We shall look at some of them.


1. You create a Dockerfile with the required instructions.
2. Then you will use the docker build command to create a Docker image based on the Dockerfile that you created in step 1.


Now, open up the vi editor and create our first Dockerfile as shown below:
FROM busybox:latest MAINTAINER Romin Irani (email@domain.com)
Since, a Docker image is nothing but a series of layers built on top of each other, we start with a base image. The FROM command sets the base image for the rest of the instructions. The MAINTAINER command tells who is the author of the generated images. This is a good practice. You could have taken any other base image in the FROM instruction too, for e.g. ubuntu:latest or ubunt:14.04, etc.


Execute the following in the /images folder as shown below
$ docker build -t myimage:latest . Sending build context to Docker daemon 2.048 kB Sending build context to Docker daemon Step 0 : FROM busybox:latest ---> 8c2e06607696 Step 1 : MAINTAINER Romin Irani (email@domain.com) ---> Running in 5d70f02a83e1 ---> 3bc3545a1f64 Removing intermediate container 5d70f02a83e1 Successfully built 3bc3545a1f64 $
What we have done here is the step 2 that we highlighted in the overall process above i.e. we have executed the docker build command. This command is used to build a Docker image. The parameters that we have passed are:

* -t is the Docker image tag. You can give a name to your image and a tag.

* The second parameter (a ‘.’) specifies the location of the Dockerfile that we created. Since we created the Dockerfile in the same folder in which we are running the docker build, we specified the current directory.
docker images
docker run -it myimage
Now, let us modify the Dockerfile with a new instruction CMD as shown below:
FROM busybox:latest MAINTAINER Romin Irani (email@domain.com) CMD ["date"]
Now, build the image and run a container based on it again. You will find that it printed out the date for you as shown below:
docker run -it myimage
The CMD instruction takes various forms and when it is used individually in the file without the ENTRYPOINT command (which we will see in a while), it takes the following format:
CMD ["executable","param1","param2"]
# 10. Docker Swarm Tutorial

Container Orchestration systems is where the next action is likely to be in the movement towards Building →Shipping → Running containers at scale. The list of software that currently provides a solution for this are Kubernetes, Docker Swarm, Apache Mesos and other.