##Semantic Versioning 🧙
This project is going to use semantic versioning for its tagging. semver.org
-
Given a version number MAJOR.MINOR.PATCH, increment the:
-
MAJOR version when you make incompatible API changes, e.g.
1.0.1 -
MINOR version when you add functionality in a backward compatible manner
-
PATCH version when you make backward compatible bug fixes
-
Additional labels for pre-release and build metadata are available as extensions to the MAJOR.MINOR.PATCH format.
The Terraform CLI installation instructions have changed due to gpg keyring changes. So the original gitpod.yml bash configuration was outdated and would require manual intervention.
- Install the Terraform CLI Referred to the latest Terraform CLI install instructions via Terraform Documentation and change the scripting for install
- This project is built against Ubuntu 22.04.3 LTS . Please consider checking your own Linux Distribution to see if it requires any changes according to your distribution needs. How to check Linux version in Linux Other article
- Example of checking OS version:
$ cat /etc/os-release

PRETTY_NAME="Ubuntu 22.04.3 LTS"
NAME="Ubuntu"
VERSION_ID="22.04"
VERSION="22.04.3 LTS (Jammy Jellyfish)"
VERSION_CODENAME=jammy
ID=ubuntu
ID_LIKE=debian
HOME_URL="https://www.ubuntu.com/"
SUPPORT_URL="https://help.ubuntu.com/"
BUG_REPORT_URL="https://bugs.launchpad.net/ubuntu/"
PRIVACY_POLICY_URL="https://www.ubuntu.com/legal/terms-and-policies/privacy-policy"
UBUNTU_CODENAME=jammy
While fixing the Terraform CLI gpg depracation issues, I noticed that the installation steps for bash were a considerable amount of more code. So, I decided to create a amended bash script to replace the Terraform CLI. This will keep the GitPod Task File ([gitpod.yml)(.gitpod.yml)]) tidy, and an easier time to debug and execute manually Terraform CLI install for better portability across other projects requiring Terraform CLI install. Bash script located here: ./bin.install_terraform_cli
A "shebang" (pronounced _shah bang) for Ubuntu (and most Unix-like operating systems) goes at the beginning of your script to specify the interpreter that should be used to run the script. e.g., #!/bin/bash
- For simple script executions. Different scripts may be written in different programming languages, and specifying the correct interpreter ensures that the script is executed with the appropriate language interpreter
- For portability. Without a shebang line, you would need to explicitly specify the interpreter each time you run the script, like python3 script.py. With a shebang, you can simply make the script executable (chmod +x script.py) and then run it directly with ./script.py.
- For consistency. Shebang lines promote consistency and clarity in script execution. Anyone who looks at the script can quickly see which interpreter it requires without needing to examine the code
When executing the bash script we can use the ./ shorthand notation to execute the bash script
information on "shebang"
- If we are using a script in .gitpod.yml, we need to point the script to a program to interpret it. Such as
source ./bin/install_terraform_cli
Linux chmod permissions control access to files and directories. They are divided into three categories: owner, group, and others. Each category can have read (r), write (w), and execute (x) permissions. 'r' allows reading, 'w' allows writing, and 'x' allows executing files or accessing directories. You can use commands like chmod to change these permissions, ensuring the security and accessibility of your files in Linux.
- In order to make our bash scripts executable we need to change the linux permissions for the fix to be executable at the user category.
chmod u+x ./bin/install_terraform_cliAlternatively,
chmod 744 ./bin/install_terraform_cliWhen using git init in an existing workspace or directory, it initializes a new Git repository if one doesn't already exist. However, if a Git repository has been previously initialized in that directory, running git init again won't re-run the initialization process. Instead, it will have no effect and won't alter the existing repository. So, it's important to be cautious and use git init only when you intend to create a new Git repository or reinitialize a directory.
- In the GitHub repository lifecycle, "before" refers to the preparation stage before creating a repository. "Init" involves initializing a new Git repository in a local directory using git init.
- Once initialized, you can use various Git commands, such as git add, git commit, and git push, to manage and collaborate on your project, which are essential for version control and collaboration on GitHub. Information on Workspace Lifecycle
Environment variables, or env vars, are a way to configure software and store important information. They're like labels with values, used to customise programs. Env Vars are handy because they allow to change software settings without editing code. They consist of a name and a value, helping programs adapt to different environments.
- We can list out all environment variables using the
envcommand - We can filter specific env vars using grep, eg.
env | grep AWS_
- In the terminal we can set using
export HELLO=world - And do unset, use
unset HELLO - Can set an env var temporarily when just running a command
HELLO='world' ./bin/print_messageWithin a bash script we can set env without writing export e.g.,
#!/usr/bin/env bash
HELLO='world'
echo $HELLO- We can print out an env var using echo e.g.
echo $HELLO
Setting environment variables at the global scope typically involves defining them in a way that they are accessible to all processes and applications running on a system. It can change based on operating systems, but for Linux/Unix(bash) we can set env vars by adding them to a system-wide configuration file like /etc/environment or by creating custom files in the /etc/profile.d/ directory
- When you open up new bash terminals in VSCode it won't be aware of env vars that've been set in another window. Environment variables set in one terminal session are typically not automatically available in other terminal sessions.
- To persist environment variables across future Bash terminals in a way that they are available every time you open a new terminal session, you should add them to your Bash profile configuration files
We can persist env vars into gitpod by storing them in GitPod parameter store/secrets storage.
gp env HELLO='world'
All future workspaces launched will set the env vars for all bash terminals opened in those workspaces.
- Can also set env vars in the
.gitpod.ymlbut this must be only used for non sensitive information for best practices
The AWS CLI is a command-line tool provided by Amazon Web Services (AWS) for interacting with AWS services and resources. It allows you to manage and automate AWS resources and operations directly from your terminal.
-
The CLI is installed for the project via the bash script
./bin/install_aws_cliGetting started Installing (AWS CLI) -
Good habit to check if AWS credentials are configured correctly by running the following CLI command:
aws sts get-caller-identity- Upon success, should be returned with a JSON payload that looks like this:
AWS_ACCESS_KEY_ID='WOWOWOWOWOWOWOWOWOWO'
AWS_SECRET_ACCESS_KEY='WOLOLOLOLOLOLOLOLOLOLOLOLOLO'
AWS_DEFAULT_REGION='us-west-2'
Will need to generate ALI CLI access keys in order to gain admin permissions inhereted from IAM User.
- Terraform sources their providers and modules from the Terraform registry which is located at registry.terraform.io
What they do:
- Providers are like connectors in Terraform. They help you interact with various cloud or infrastructure services (e.g., AWS, Azure, Google Cloud) or other systems (e.g., databases) to create, update, or manage resources.
- For example, If you want to create an AWS EC2 instance, you'd use the AWS provider to communicate with AWS services. Read up on Terraform Providers
What they are:
- Modules are reusable templates or blueprints for creating sets of related resources. They make it easier to manage and organize your infrastructure code by breaking it into smaller, reusable parts.
- You might create a module for a web server that includes an EC2 instance, security group, and load balancer configuration. You can then reuse this module for multiple web servers. It's a way to make large amount of terraform code modular, portable and repeatable. Read up on Terraform Modules
The idea behind Terraform modules is to promote code reusability, maintainability, and modularity in your infrastructure as code (IaC) projects. Modules allow you to encapsulate and package together a set of related Terraform resources, configurations, and logic into a single, reusable component
In a nutshell, providers connect Terraform to external services, while modules help you structure and reuse your infrastructure code. They're both essential for managing infrastructure as code effectively.
Can see a list of all the Terraform commands by simply typing terraform, and to check version terraform --version
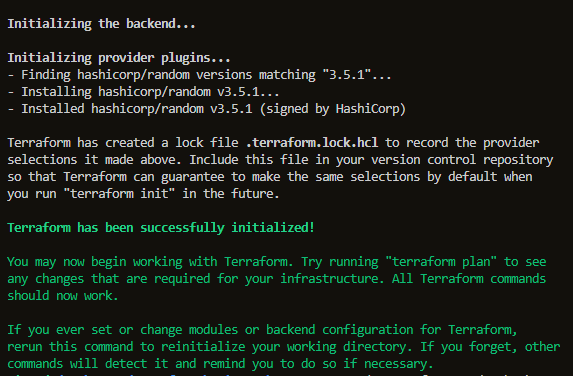
- At the start of a new Terraform project, run
terraform initinto the terminal to download the binaries for the terraform providers to be used later on in the project. - It's like preparing a toolbox before going ahead to start doing some DIY at home. It's a command to ensure that we have all the right tools (binaries) ready for the job.
- In this case "tools" are Terraform providers which are connnectors to various cloud or infrastructure services. Step by step, running terraform init will:
- [] Download Providers: Fetching the necessary TF provider binaries for the cloud services or resources to be used in the project. Providers are like translators that help TF talk to specific services like AWS etc.
- [] Creates a working directory: It sets up a _".terraform" directory in the project folder to store these downloaded binaries within along with other config files. Inside which will be stored a hash in the lock file ".terraform.lock.hcl" to make sure that once we begin defining infrastructure, Terraform knows how to communicate with services and resources.
- This will generate a changeset, just like in CloudFormation, that allows Terraform to preview changes before taking effect. It's to avoid unintended changes or whoopsies when applying configurations.
+indicates a resource to be created.~indicates a resource to be updated.-indicates a resource to be destroyed. - For example,
+ aws_instance.my_instance
~ aws_security_group.my_security_group
- aws_instance.old_instance
It's there to review the plan before applying changes to infrastructure
- This is the command to make the infrastructure changes come to life. It takes the plan created in
terraform planand carries out the state changes by deploying and managing those resources. - It turns infrastructure code into actual resources, creating servers, networks, databases and buckets.
In the terminal, after running
terraform apply, it'll ask to confirm changes.yesis to proceed, which can be expedited withterraform apply --auto-approve - Then, it'll CRUD those resources as defined in the configuration, store the state of the infrastructure in a state file (usually named _terraform.tfstate) to keep an eye on current state, and show an example output such as:
An execution plan has been generated and is shown below.
Resource actions are indicated with the following symbols:
  + create

Terraform will perform the following actions:

  # aws_instance.my_instance will be created
  + resource "aws_instance" "my_instance" {
      + ami           = "ami-0c55b159cbfafe1f0"
      + instance_type = "t2.micro"
      # ...
    }

Plan: 1 to add, 0 to change, 0 to destroy.
.terraform.lock.hcl contains the locked versioning for the providers or modules that should be used with this project
- The Terraform Lock File should be committed to your version control system (VSC) such as GitHub
.terraform.tfstate contains information about the current state of the infrastructure.
-
This file should not be committed to the VSC because it contains sensitive data, plus if it's lost or overwritten, we lose knowing the state of our infrastructure.
-
Mercifully, we have
terraform.tfstate.backupwhich is the previous state of the backup, as per theserial
- It's a command to nuke the infrastructure resources
terraform destroyIt will display a list of resources that it plans to destroy, to which we can-- auto-approveto expedite. - Terraform will initiate the process to destroy those resources,
When attempting to run terraform login, it will launch in bash a wiswig view to generate a token. However, it doesn't work as expected in GitPod VSCode inside the browser.
The workaround is to manually generate a token in Terraform cloud
https://app.terraform.io/app/settings/tokens?source=terraform-login
Or by pressing p in the wiswig bash editor, go to that same link, close and reattempt to enter the token in manually. Or create the file manually here:
touch /home/gitpod/.terraform.d/credentials.tfrc.json
open /home/gitpod/.terraform.d/credentials.tfrc.json
Provide the token and bypass the issue.
- Automated this workaround using the following bash script .bin/generate_tfrc_credentials