vouch.chat
The responsible social network.
This repository contains the source code for Vouch -- a social network that is:
- Ad free
- Member supported, and
- 100% open source
React, Firebase & Bacon
Along with the source code, the Vouch team is also developing a course with a goal of walking you through the construction and architecture of this codebase -- from npm init through to credit card payments. It's still in-progress, and currently completely free.
Running and Deploying Vouch
So you want to get Vouch running locally and then deploy your own copy? Here's how.
1. Accounts
Before starting, you'll need accounts with a couple of services:
- Firebase (with a plan that allows for communication with external APIs, like the Blaze plan)
- Stripe
Once you have these accounts, you'll need to prepare the following information:
- Your Firebase config object (which you can find in the Firebase console)
- A Firebase service account JSON file (which you can create in the Firebase console under Project Settings / Service accounts)
- A Stripe test api key, secret key, webhook secret and product id
Setting up your Stripe Product
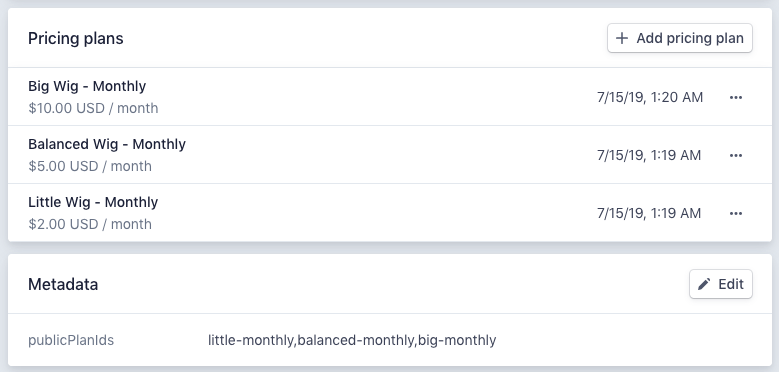
Vouch reads the available product plans directly from Stripe. It expects that all available plans will be created under the same Product object, and looks for a list of available plans under the product metadata's publicPlanIds key.
Here's what the relevant settings look like for Vouch itself:
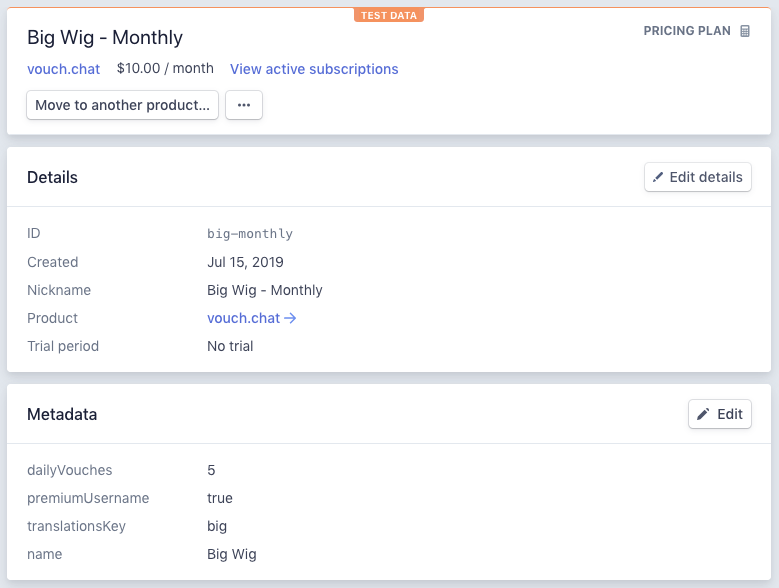
Vouch also reads plan information from each plan's metadata. Here's an example of what this configuration looked like at the time of writing:
2. Clone and install
Once you've got the config ready, start by cloning the repository and installing its dependencies. Vouch manages its dependencies with yarn, but npm may work too.
git clone git@github.com:frontarm/vouch.chat.git vouch
cd vouch
yarn install
cd functions
yarn install
cd ..
3. Local configuration files
To run the app locally, you'll need to create some configuration files.
cp .env.example .env.development.local
cp functions/.runtimeconfig.json.example functions/.runtimeconfig.json
You'll then need to fill in these files with the settings you prepared earlier:
- Add your Stripe configuration to
.runtimeconfig.json - Add your Firebase config and Stripe public key to
.env.development.local
The end result should look something like this:
// .runtimeconfig.json
{
  "stripe": {
    "product_id": "prod_lololololololo",
    "secret_key": "sk_test_lololololololololololololololololo",
    "webhook_secret": "whsec_lolololololololololololololololo"
  }
}

// .env.development.local files
REACT_APP_FIREBASE_API_KEY=lolololololololo_lololololololololololo
REACT_APP_FIREBASE_AUTH_DOMAIN=something.firebaseapp.com
REACT_APP_FIREBASE_DATABASE_URL=https://something.firebaseio.com
REACT_APP_FIREBASE_PROJECT_ID=something
REACT_APP_FIREBASE_STORAGE_BUCKET=something.appspot.com
REACT_APP_FIREBASE_MESSAGING_SENDER_ID=111111111111
REACT_APP_FIREBASE_APP_ID=1:111111111111:web:1lololololololol

REACT_APP_STRIPE_API_KEY=pk_test_lololololololololololololololololo
You'll also need to copy your firebase service account JSON file to functions/.serviceaccount.json
The configuration files are all listed in .gitignore, so that you don't accidentally push any configuration to a public repository.
4. Link a firebase app
The Firebase CLI tool looks for the current project's app ID in a file could .firebaserc -- which you'll need to create. The easiest way to do this is by running firebase use --add, selecting a project, and then naming it default when prompted:
$ firebase use --add

? Which project do you want to add? vouchchat
? What alias do you want to use for this project? (e.g. staging) default

Created alias default for vouchchat.
Now using alias default (vouchchat)
5. Start the dev server
You can test your configuration by starting the development server:
yarn startThis should open a browser window to http://localhost:3000/, which should display the landing page.
6. Configuration for deployment
Before deploying your app, you'll first need a .env.production.local file. This follows the same format as .env.development.local -- in fact, you can just copy the development settings across unless you're launching you own production app.
You'll also need to set the production config for your Firebase functions:
firebase functions:config:set stripe.product_id=... stripe.secret_key=... stripe.webhook_secret=...The reason you'll need to do this is that the information in functions/.runtimeconfig.json is only used locally; the firebase functions:config:set command is used to configure the same settings for production.
7. Deploy!
Deploying your app to the internets is simple:
yarn deployThis will build your app's distributable files and renderer package with universal-react-scripts, then deploy these to Firebase Hosting/Functions -- along with the Firebase functions that constitute the API. Once complete, the app's URL will be printed to the console.
8. Setting up Webhooks
To keep the Firebase database up to date with the latest subscription data, you'll need to set up a Stripe webhook in the stripe Developers / Webhooks panel.
The webhook URL will take the following format:
https://us-central1-<your firebase project id>.cloudfunctions.net/webhooks-stripe
The webhook will in turn call the function in functions/webhooks/stripe.js, which handles the following events:
invoice.createdcustomer.subscription.deletedcustomer.subscription.updated
License
Vouch's source code, other than the files in /src/media, are licensed under the MIT license.
Files under /src/media are not licensed for use without explicit permission. Please get in touch at hello@vouch.chat if you'd like to use the Vouch brand in your project (or if you'd like to help us improve our license).

